Earth Auger Sources

Sources of Handy Earth Augers

Earth augers are not as easy to find as you might think. Those living in the country probably will have more luck than those living in a big town. Augers are a common farm implement and a farm supply store will most likely carry them.

If you have a county soil conservation office, they may have some catalogs as well. Soil testing companies will also know people who make and sell earth augers, as these scientists need to probe soil on a daily basis.

Garden centers have earth augers you install in a regular power drill. But these augers are made for vertical mulching of trees and for planting bulbs. Unless you have a very shallow sewer line, they will not work. The primary reason being that they usually only drill 18 inches deep. I have yet to see one of these garden augers that comes with extensions.

Here are a few I found while doing a search:

  • Little Beaver, Inc.
    This company has a full range of hand operated or gasoline powered earth augers. Visit their website, especially if you are looking for hand augers with extensions.

  • Ardisam Inc.
    These guys make a 2 inch powered auger called the Earthquake Auger. It looks like it is a nifty unit.
  • Stihl Incorporated
    Stihl makes durable gas powered augers.
  • Hoffco Outdoor Power Equipment
    Hoffco had been producing equipment spanning five decades. They offer one and two man, gas-powered earth augers and earth drills.

Column B326

Stop Tree Root Growth in Sewer Lines

Installing PVC Casings to Stop Tree Root Growth

Stopping tree roots that invade a sewer line requires a little investigative work. You somehow need to find out the position of the sewer line. The older the house is, the tougher this can be. Why? Because old sewer lines were built using 3 or 4 foot lengths of clay pipe that can easily be installed in sweeping curves, not necessarily a straight line. Your best bet is to hire a company that can send a camera into a sewer line and use an electronic sensing device to determine the location and depth of the sewer line as it passes beneath the ground.

Sewer Department Records

If your indoor plumbing connects to a municipal sewer system, I always start the process by visiting the sewer department. Most have good records and they can tell you the location of your sewer tap. This distance is measured quite accurately from the center point of the nearest manhole. Most sewer taps then extend at a 90 degree angle from the main sewer towards the property line. From here it can get a little tricky. Take my sewer line for example. The developers of my subdivision decided to save money. Instead of digging separate trenches for each house, they dug one wide sewer tap trench for two adjoining lots! My sewer tap and my neighbor's are next to one another right at our shared property line. I had to install a 45 degree elbow followed by a 22.5 degree elbow immediately off the tap to be able to get to the center of my lot. Once there I had to install the same fittings to be able to head in a straight line back towards my house. See the problems? And my house is only 15 years old! But armed with sewer tap records, you can at least have an idea where the sewer line ends at the edge of your property.

Drilling

If you have any buried wiring, gas lines, water lines, sprinkler lines, etc. be sure you get these marked if possible. A sharp earth auger can damage these lines and if it is electric or gas, you might cause serious injury or death! Be sure to use the right sized auger for the job. I prefer to use one that drills a 2.5 inch diameter hole, since 1.5 inch diameter PVC pipe has a 2 inch outer diameter. You want the hole a little bigger than the pipe so that the casing slides into the hole with minimal resistance.

Location and Depth

If you can determine the exact entry point of the roots into the sewer line then you can spot a casing pipe directly over that location. If you can't find the exact spot, you may need to install a series of casings spaced at 6 foot intervals along a stretch of sewer line that is under or adjacent to the tree or trees that are causing the problem. Remember to stop the casing about 18-24 inches above the top of the sewer line. You want gravity to help you distribute the copper sulfate solution. Drill too deeply and you are simply wasting your time. Keep in mind that the sewer department records will tell you the maximum depth of the sewer tap. Use this information and the estimated depth of the sewer pipe as it leaves your house to get an idea of how deep the sewer line is as it makes its way across your yard.

Access

The top of the casing needs a simple threaded plug that screws into a female adapter. This allows you to add copper sulfate crystals and hot water at periodic intervals. If you don't want to see white dots in your yard, consider painting the plug green to make it blend in with the grass. It is also a good idea to create a little map of the casings, measuring the center point of the plug from two fixed points of your house. This triangulation method allows you to pinpoint the casing if it should sink into the soil over time. Place a copy of the map in a plastic freezer bag and attach this bag to the water line in your basement or utility room.

Repeated Treatments

The copper sulfate will need several months to work initially. You then might want to add more every 6 months.

Column B326

Avoiding Sewer Back Ups From Tree Roots

Nothing is more disgusting than 4 to 6 inches of raw sanitary sewage in a basement or crawl space. Often the cause of backup problems can be traced to tree roots that have invaded a sewer line. The tree roots are drawn to sewer lines as they constantly and randomly search for food and water resources. The roots enter very small cracks in the pipe joints and when they find the water and nutrients in sewage, they go crazy. In the process, they drive homeowners like you and me crazy as well.

Solving the Problem

There are all sorts of concoctions you can put into your plumbing system that claim to solve root problems. A few work, but many do little to solve the problem. Any product that is simply a liquid or a solution that is flushed down the toilet will often do little. Why? The roots often grow down from the top of the pipe. The chemicals may burn the tips of the roots or any portion that the solution touches as it passes by the roots. The better chemical products are those that create a foam that fills the pipe void and contacts all of the roots. But keep in mind that the tree continues to grow and makes every attempt possible to re-establish root growth in the pipe.

Stop Them Before the Pipe

I have always thought the best way to stop basement water leaks is to stop the water BEFORE it gets to the basement. I have solved hundreds of chronic basement leaks by installing simple linear french drains around the perimeter of houses. These devices capture sub-surface water and redirect it around a house instead of into the basement.

You can apply the same thinking to tree roots in sewer pipes. Why not stop the roots BEFORE they get to the pipe? To achieve this all you have to do is poison the soil above and around the sewer pipe. Even if you only are able to treat several inches of soil around a sewer pipe, this method will be highly effective. The problem is, it is nearly impossible to deliver chemicals with that degree of pinpoint accuracy, especially to a pipe that is buried under tons of soil.

Dr. Pryor's Class

I majored in geology while in college. One of my favorite subjects was soil science and hydrogeology. I learned that water moves through soils in two directions. It moves down, then it moves sideways. Dr. Pryor, you would be proud of me. I did pay attention in class!

If you combine this knowledge with a delivery system that gets you close to sewer pipes, you can effectively treat soil above and around a sewer pipe so that it becomes distasteful to tree roots.

First Hand Experience

The second house I owned had a tree root sewer infestation. With the help of a professional sewer cleaner, I was able to determine a fairly accurate distance from the house where the tree roots entered the sewer pipe. I also found out where my sewer line entered my property. When I combined these two pieces of data I was standing right beneath two maple trees in between the sidewalk and the street.

I borrowed an earth auger and drilled a hole 10 feet deep. I glued a female adapter onto the end of a 1.5 inch PVC pipe and inserted the other end into the hole. With minimal effort I was able to extend the pipe into the earth so that the threaded end of the fitting was flush with the grass. I then poured 4 pounds of copper sulfate crystals into the pipe. Five gallons of hot water was then poured down the pipe. To make a long story short, the sewer never again backed up. I had nailed the problem. The placement of the pipe was obviously perfect and I was undoubtedly lucky, but the bottom line is that the trees continued to thrive, they just got their water and nutrients from someplace other than my sewer pipe.

Multiple Pipe Casings

You may not be as lucky as I was. You may have to sink 4 or 5 pipes into the soil in a line directly above or very near where you think your sewer problem is. You must also be patient. The copper sulfate takes months to poison the soil. The roots didn't plug the pipe in just one day and you are not going to dissolve them that quickly. If you combine a professional sewer cleaner, PVC pipe casings and copper sulfate, you absolutely can solve your tree root problem. Remember, patience...

Column B326

Chlorine Bleach vs. Oxygen Bleach – Drain Cleaning

Chlorine Bleach Alternatives for Drain Cleaning

Some people are actually highly sensitive to chlorine bleach and the fumes it produces. Even if you are not, if you get a strong whiff of it in its pure form, it absolutely gets your attention. What's more, this product should not be used if your house is connected to a septic system. Why? Chlorine bleach is a fantastic sanitizer. It quickly kills bacteria. The trouble is, septic systems are filled with beneficial bacteria that break down waste. Pour chlorine bleach or products that contain chlorine bleach into a septic system and you can cause the septic system to malfunction.

Chlorine bleach can also deteriorate fabrics and immediately take color out of them. I once was wearing some nice sweat pants as I was cleaning my shower one day. It was a quick cleaning and I thought I would be OK. Well, somehow I got a splotch of chlorine bleach on the pants and bingo, the navy blue pants have a nice magenta splotch right on the left thigh.

An alternative product that works just like chlorine bleach, but not as fast, is oxygen bleach. Oxygen bleach is color and fabric safe. It is also safe for use in septic systems. In fact, it helps septic systems by adding needed oxygen within the actual tank.

SS02 Black Small imageYou can buy oxygen bleach in many places. It is sold on cable TV, I have seen it in membership stores, and I have recently seen it in a large grocery chain in my city. I also sell it.

The trouble is not all of the products are the same. Many of the ones sold on TV and in the stores have fillers in them to extend the product. My Stain Solver oxygen bleach is 100 percent pure. You need less of my product to achieve the same results you get with the also-rans.

You can get oxygen bleach by going to:

www.stainsolver.com

Or by calling: 513-407-8727.

Message from Tim:

Years ago while researching a column about cleaning decks, I discovered the wonders of Oxygen Bleach. It is perhaps the 'greenest' cleaner I know of as it uses oxygen ions to break apart stains, dirt and odor molecules. There are no harsh chemicals, and it works on just about anything that is water washable.

I decided to create my own special blend using ingredients made in the USA. In fact, the raw materials in the active ingredient are food-grade quality registered with the FDA. I call my product Stain Solver. I urge you to use it to help with your cleaning needs. You will be amazed at the results!

Column B347

Cleaning P Traps, Tailpieces and Drain Lines

Cleaning out drain lines is not my favorite job by any means. But sometimes it is a necessary task to rid a drain of clogs or to stop odors from drifting out of sinks. We have a small extra sink in our kitchen next to the refrigerator. My kids constantly pour milk and other drinks into the sink. They also drop food into it. That is not so bad but what they don't do is rinse it out. After a while the bacteria in the milk and food start to grow on the tailpiece that leads from the sink down to the trap. This produces a foul odor. Every now and then, I have to disassemble the trap and the tailpiece to clean it. It is nearly impossible to get a brush past the small holes in the sink strainer.

Doing Plumbing

Taking apart drain lines beneath a sink is perhaps the first place that many people start their DIY plumbing careers. It is relatively safe to do compared to working with water supply lines that are pressurized. If you goof up and can't get the drains back together, you can always put a bucket under the trap or the pipes. If you goof up a water line connection, you can have a Niagara Falls simulator in your house in no time flat.

Required Tools

If you want to take apart drain lines, you just need a few tools. A 12 inch or possibly a 14 inch pipe wrench is a good start. A large channel lock pliers or fancy locking type wrench found at Sears stores will do as well. If your drain lines are tubular plastic and you have a strong grip you can often loosen the nuts without any tools.

If you are working in an old home, be careful of the pipe that connects to the desanko fitting in the wall. Sometimes these pipes were directly leaded into the joint! If you disturb that pipe you can create a leak that is nearly impossible to fix without tearing into the wall.

Dicey Work With Old Pipes

Anytime you work on old plumbing, it can be a challenge. Pipes wear out and threaded joints that originally went together with ease can become welded together with deposits or rust. Anytime I decide to work on old pipes, I always figure a worst case scenario. In fact, if you are planning to live in the house for a decent period of time, it is always best to replace old piping with new so as to have trouble free plumbing for years.

No Stretching Please

When you are working with P traps and tailpieces, watch how you measure. A tailpiece normally fits into a P trap about one and one half inches. I have seen drain lines where a homeowner only had the tailpiece sticking into the P trap about one quarter inch. All someone had to do was bump the P trap and the drain line would fall apart. If you need a longer tailpiece to get deep into the trap, then get it. I always carry assorted lengths with me so I am prepared. They are inexpensive, so buy different ones when you are working on your drain lines.

Preventative Maintenance

To keep drain lines running free and clear, I periodically fill a sink to the brim with water. I then pull the plug and let the water rush down the drain. The weight of the water in the sink creates a decent amount of pressure and often completely fills the branch line from the sink to the main drain completely with water. This is good as the sides and the top surfaces of the pipe get a little cleaning. It is also a great idea to do the same thing with the main drain from time to time. Fill all of the sinks, tubs, etc. with water and then get everyone in the family to pull a drain plug at the same time. Flush the toilets at the same instant and the main drain line gets a huge slug of water going through it.

Column B347

Custom Hose Bib Photos

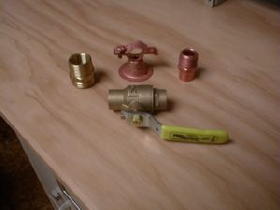
Here are the only parts you really need to build a custom hose bib. A ball valve, the special hose thread adapter and a male adapter that converts 1/2 inch copper to the special brass hose adapter.

The funny looking clamp holds the new hose bib securely to the wall. Remember, if you live where it gets cold, you MUST install a separate valve inside to cut off water to the outdoor faucet. The outdoor piping must be drained and the valve left open all winter.


These simple parts combine to create a custom hose bib.

These simple parts combine to create a custom hose bib.


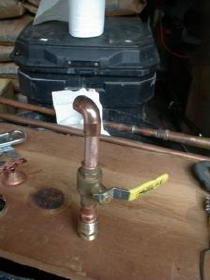
Hose bib prior to soldering.

Hose bib prior to soldering.

Here is the hose bib before I soldered it together. The valve is in the closed position. Always do this when soldering. Open it only after the valve body has cooled. I love how my valve works. I get full water flow and no valve noise.

Column 362

Avoid Water Line Problems – Installation Tips

The feeling is so satisfying - much like sneezing - you turn off the torch, cool the joint and then turn the valve on. You hear the water race through the pipe. It is looking for the tiniest place to escape. The pressure builds. Within moments the hissing rush of water stops. It is silent. BINGO! No leak! Your soldering job is a success! Yes, it is a great feeling, especially when you consider the alternative.

Minimizing Down Time / Water Outages - Plan the Job - Get the Right Stuff!

There is nothing more aggravating than working under pressure. Especially if you need to get water turned back on to flush a toilet or resupply an entire house. Trust me, I have been in these situations on jobs before. What happens if you are missing a critical fitting? What then? You run to the supply house - they just closed or don't have it. Accckkk!

This can be avoided. Take some time before the job and draw out what you are going to do. Put it on a piece of paper. From this drawing, you can determine how many and what type of fittings you need. Copper fittings are very inexpensive. Order extra ones. Why? Because there are always obstacles when you get down to it. You may need to use some extra 90 degree fittings. You may have to cut a pipe to thread it through something. So, get extra couplings and even special repair couplings. A repair coupling is used when you can not move either of the two pieces of pipe that result from a cut. Believe me, this can happen!

Install New Piping Before Old is Taken Out!

In many instances you can install vast amounts of a new piping system before the old system is taken out of service. You can run the new copper piping parallel to the old system. Every hour of labor you invest in doing this is one less hour that the system will be down. This procedure is done all the time when cities and municipalities install new water mains in your streets. It is a great idea. Heck, where do you think I got it from?

It's Late - Time to Quit - Not Finished!

What happens if you simply have to quit? Well, hopefully you restored water to the most important fixtures or fixture groups. Did you remember to buy those nice ball valves? You know, the ones that don't have washers, allow for full water flow, and last forever? Well, if you did, you can install a valve at each branch that you have not completed. Be sure to solder a one foot piece of pipe coming out of the other end of the valve. Why? Because if you don't, you will not be able to get the valve hot enough the next day to solder. The water on the other side of the valve will suck every bit of heat from your wimpy torch. A one foot piece of pipe beyond the valve is plenty of buffer. It will permit you to successfully continue the job.

By the way, don't forget to solder ball valves in the closed position! If you don't you can distort the inner plastic seat and it will not shut off. Also, after you have soldered the valve, cool it with water or a water soaked thick towel. Retained heat can also damage the inside of the valve. Old fashioned valves with rubber washers must be soldered in the open position. However, be careful of the valve seat orientation. Add too much solder and it can settle on the seat!

Column B362

Water Pressure Loss

Sometimes, there is nothing more aggravating than low water pressure. In some instances, it can even be dangerous. Low water pressure problems are so commonplace that the national plumbing codes mandated, several years back, the use of pressure balanced shower valves to minimize injury caused by low water pressure problems.

There is a misconception by many homeowners that low water pressure is something they have to live with. Nothing could be further from the truth! Many low water pressure problems are a result of installation inadequacies. The plumber(s) simply put piping in that was either too small (undersized) or reduced the size of the piping, within a structure, too quickly.

Low water pressure problems can also be attributed to scale deposits inside of piping which reduce their diameter, low pump pressure (houses with wells), leaks in underground lines serving a house, and problems with outdated water mains in municipal systems (rare). These problems can usually be identified very quickly. Municipal water works companies have trained personnel that will visit your house and answer questions regarding your water service. Often it takes very little detective work to determine if one, or several, of these possibilities is the source of your low water pressure. Almost always they will help you determine if there is an underground leak, at no charge to you.

They can also attach a pressure reading device which will tell you just what the water pressure is inside your house when all fixtures are turned off.

You can also stop by your local firehouse. Fire engines are equipped with accurate pressure gauges. When a fire engine attaches to a fire hydrant, before they start pumping water from the hydrant they know what the water pressure is in that water main.

By the way, in case you didn't realize it, the fire hydrants on your street are hooked to the same water main you drink from. The only deviation from this is in some large cities. There are individual water mains specifically for fire fighting, but these are almost always located in dense urban/business environments.

The fire departments often have very specific records and they can tell you the specific pressure of the fire hydrant closest to your house. Stop by and chat with them, you may be surprised at what they can tell you about the water mains in your area!

Robert Boyle

Robert Boyle was an English chemist born in 1627. He was a pretty smart guy. Well educated and very methodical, he started experimenting with gases. He developed Boyle's Law which has to do with the relationship between a given volume of gas and its pressure.

He determined that liquids acted somewhat differently. It didn't take too long for him to determine that water couldn't be easily compressed. In fact, it was virtually impossible.

What he found out was that when you applied pressure to water (liquids) in a closed system (no leaks), whatever pressure you applied, the same pressure was exerted everywhere by the liquid against the container it was in.

This is a very significant finding. It tells you that when all of your faucets are closed in your house, the pressure within your plumbing system should be equal everywhere. Not only that, if you happened to visit your local fire department and/or call the water works, you will know what that pressure should be. The only deviation will be the resultant pressure drop due to friction loss as the water travels from the street into your house.

Those people who operate using well water and electric pressure pumps operate under the same "laws". The only difference is pump capacity. Smaller pumps simply cannot meet the demand (flow) you might impose upon them. They may be able to produce an adequate pressure (50 - 70 pounds per square inch PSI), but when asked to deliver lots of water at this pressure, they choke. You may have to jump to a bigger pump.

This is rarely the problem with a municipal system. The typical water main in a residential street can deliver hundreds of gallons per minute and maintain pressure. To put this in perspective with respect to your own water usage, you might use seven gallons per minute if you had four people using two separate bathrooms at the same time. This situation is somewhat realistic as people get up to go to work and school.

Friction Loss

OK, so we know that the pressure in a closed system is constant because of Bob Boyle's findings. What then accounts for water pressure / volume losses?

Well, a number of things can contribute to water pressure loss. Some of the major items are relative elevation differences between your house (fixtures) and the water main, size of water piping and restrictions in a pipe. The two most likely culprits in most cases are the last two, water pipe size and restrictions. These two items have a huge impact on friction loss. Friction loss can dramatically affect water pressure. What happens is simple. When water starts to flow through a pipe, some of it rubs against the side of the pipe. Depending upon how much water is rubbing against the inside walls of the pipe in relation to how much water is in the pipe in any given length, determines how great the pressure loss will be.

The technical term for this situation is called the hydraulic radius. But who cares about that, let me show you a simple example.

Bigger is Better

Let's look at a cross section of a 1/2 inch inner diameter copper pipe. Remember that grade school math homework you didn't do??? Well, it's payback time!

The inner circumference of the 1/2 inch pipe is 1.57 inches. The area of the cross section of this same pipe is 0.19 inches.

Let's look at a 3/4 inch pipe. It's inner circumference is 2.35 inches. It's cross sectional area is 0.44 inches.

Now, these numbers may seem either confusing or insignificant. But, look a little closer. Notice that when we jumped to 3/4 inch pipe, a funny thing happened. The circumference increased by 49.6 percent. But, the cross sectional area increased by 131.5 percent!

This means that as a pipe gets bigger, there is more room to move around. Not as much of the fluid in the pipe has the opportunity to rub against the sides of the pipe.

Restrictions inside pipes can also cause friction loss. Imagine a rough scalely pipe. The water trying to get from one end to the other hits and rubs against lots of "things". It loses energy. What's more, the deposits inside the pipe reduce its inner diameter. As shown above, small inner diameter pipe causes great pressure loss because of friction loss.

So, with respect to pipe size and pressure, bigger is better!

Column B372
Soldering Copper Water Lines

Soldering Copper Water Lines

Copper doesn't rust. As such, it has become one of the preferred materials to use in residential water distribution systems. Copper, however, can corrode in certain circumstances.

Copper pipe and copper fittings are attached to one another by using solder. Solder is simply a metal, or combination of metals, that when heated bond to the copper. Think of the solder as a very permanent glue. Some metals which are used in solder are tin, antimony, silver and lead. Lead solder was used years ago because it flows at lower temperatures and is a "thicker" solder. Think of it as a maple syrup type solder. It has the capability to fill larger gaps between a pipe and a fitting in case the fit is sloppy. However, lead is poisonous! Don't use a solder that contains lead for water supply lines. It can be used safely for copper drainage lines. Look for solder that is often sold as "95-5". This is a solder that contains a mixture of tin and antimony. It is safe for water supply lines. Silver solder is often used for copper gas lines. It melts at a much higher temperature. The key to soldering is to get the surfaces which will be soldered clean. That's easy. You can use steel wool, sandpaper, plumber's cloth (a fancy sandpaper) and special wire brushes (for the inside of fittings) to accomplish this task. After they are clean, don't touch the cleaned areas! Dirt, grease, etc. from your fingers will spoil the solder job.

Now apply flux evenly to the two pieces which are to be joined together. Flux is a chemical compound, frequently zinc chloride. It removes oxidation which allows solder to bond more easily to the copper. It is often sold as a paste that has the consistency of petroleum jelly. Always stir flux with a clean stick to thoroughly mix. If allowed to get warm or hot, the zinc chloride will separate from the paste.

Apply heat to the assembled fittings and pipe. Heat with a propane or acetylene torch, being careful not to set adjacent combustible material on fire. Heat until the flux stops bubbling. Pull the torch away and touch the heated joint with the solder. It should begin to melt within two seconds. If not, heat again with the torch. If you heat the copper just right, the stored heat in the pipe and fitting will be more than enough to melt the solder. Applying heat with the torch WHILE soldering can give misleading results. The solder may melt at the edge of the joint, but not flow into the joint. Many an apprentice plumber and DIYer has found this out the hard way!

Repairs to existing copper lines are tougher. Existing lines need to be drained of all water. You simply can't solder pipes that contain water. The water absorbs too much heat and doesn't allow the pipe to get hot enough to melt the solder.

If you have to repair existing lines there is an easy way to drain the water lines. Turn the water off at your main shut off. Next, flush all toilets and open all valves everywhere as quickly as possible, starting at the top of your house. Go to the lowest faucet and open it and the water will flow to this low point suctioning much water from the lines.

If you have a persistent drip at the repair sight, use this trick as a last resort. Do all your prep work to the joints. Have everything ready to go, torch, solder, etc. Get a piece of white bread. Remove the crust. Make a ball of bread, firmly packed, slightly larger than the inner diameter of the pipe that is dripping. Insert the bread into the pipe and push it 4 to 6 inches away from the joint with a small stick. Quickly assemble the pipe, heat and solder. The bread should give you a 30 to 45 second window in which to solder.

Finally, always keep a bucket or two of water handy in the event you start a fire. I have used it on more than one occasion!

Column B372

Calculating Water Pressure Loss

Calculate Water Pressure Loss

Years ago, engineers developed tables to quickly calculate water pressure loss. They're often referred to as hydraulic friction loss tables. Studies produced constants (numbers which you use to help in the calculation) which make the math fairly easy.

What Do You Need to Know to Calculate Pressure Loss?

You need to know several things:

  • size of pipe
  • flow in gallons per minute (GPM)
  • the distance which the water flows

Do Fittings Affect the Actual Distance?

Yes, fittings increase the actual distance. If you have lots of bends and tee's, 100 feet of pipe might really be 130 feet or so.

Flow is the thing that stumps most people. Flow rates can also be found on tables. Here are some standard flow rates for residential fixtures:

  • toilet - 2.5 GPM
  • kitchen sink - 1.25 GPM (H or C - times 2 if both handles are wide open)
  • washing machine - 1.6 GPM (H or C - times 2 if H & C on at the same time)
  • shower 2.5 GPM (both hot and cold on at the same time)

What are the Constants?

Now for our constants. I have listed several to show the relationship as the gallons per minute of flow increases.

Listed are 1/2 and 3/4 inch copper pipe Type M. Type M is the standard grade of copper tubing used in residential construction.

What are the Pressure-Loss Constants for Small Pipe?

The constants listed are pressure loss per hundred feet of pipe run.


1/2 inch pipe: 1 GPM = 2
2 GPM = 7.22
3 GPM = 15.3
4 GPM = 26.0
5 GPM = 39.2
6 GPM = 55
3/4 inch pipe: 1 GPM = 0.354
2 GPM = 1.28
3 GPM = 2.71
4 GPM = 4.60
5 GPM = 6.94
6 GPM = 9.75


Notice the difference in the constants for different-sized pipe, but yet the same GPM flow! It's HUGE. See why 3/4 is better?

Now, here is how you do a pressure loss calculation.

By the way, we need one other constant and it is a number that relates to pounds per square inch. It's really pretty complicated, so I would appreciate it if you would just trust me on this one. The number we need to remember is 0.4335. Okay, if you don't trust me and want to know more about the secret constant of 0.4335, click or tap here.

Can You Do A Sample Pressure-Loss Calculation?

Yes, let's calculate what will happen to the pressure if we flush a toilet while a shower is running in a bathroom 100 feet away from where the water enters the house. We are using 1/2 inch pipe.

Toilet flow = 2.5 GPM Shower Flow = 2.5 GPM Total flow = 5 GPM

Constant from table multiplied by 0.4335 = Pressure loss in PSI
39.2 X .4335 = 16.99 PSI

If we substitute 3/4 inch pipe, here is the calculation:
6.94 X .4335 = 3.00 PSI

Quite a difference!

Column B372