Brush-on Waterproofing Compounds

Brush-on Waterproofing Compounds

I have used these products for years. Many of them do a fantastic job of damp proofing a wall or providing a unique textured surface. Some of these products claim to be waterproof, however, you need to read the language carefully!

To achieve true waterproofing, you sometimes must apply the product on the positive pressure side of the wall. This means that you need to apply it on the side of the wall where the water first enters, not where it comes out. This can be tough on a basement foundation wall or a retaining wall. It may require some digging.

Also, the application process is very important. The walls must be clean. The walls must be wet down before you apply the compounds. Also, two thinner coats often work much better than one thick coat. Applying these compounds over paint is a mistake. They will simply delaminate. They will just pull the paint from the wall, or not stick well to the paint. If your wall is painted, you must remove the paint. Consider sandblasting or pressure washing to remove paint films.

My experience with these products has been very good. They do a fantastic job of stopping water when the directions are followed, even on the negative side of a wall. Often the products come in a grey color and a pure white. The texture is sandy. If you use a stiff brush with a handle, you can create very attractive decorative swirls.

There is only one drawback with these products. They do not stretch. If there is continued movement in your wall, the crack will reopen. If you have this type of problem, you need to stabilize the wall, use the epoxies, then coat the wall.

  • ChemMasters
  • Chemrex
  • Master Builders
    Masterseal 340 FA510
  • Quikrete
    Heavy Duty Masonry Coating

Column B119

Plumbing Books & Publications

Illustrated Plumbing Books & Publications

There are many good books which explain in great detail the particulars of plumbing drain and vent systems. After reading or reviewing some of the books, try to visit a house or large project under construction before the drywall or plaster is installed. Look at the drainage and vent system.

Pick out a fixture in the basement or first floor area. Note where the vent pipe begins. Follow that vent pipe until you see it interconnect with other vent pipes or until it exits the roof. You will quickly determine that in a standard house, there is almost as much vent piping as there is drainage piping!

If you have other questions, feel free to write to me as well.


Column B036

Foundation Drain Tile & Backfilling Tips

Foundation Waterproofing - You Might Not Have It!

Did you know that there is a big difference in exterior foundation waterproofing treatments? I'll bet that you think that your new home foundation has been waterproofed. Yes, you saw that black stuff sprayed on so you are in good shape. Isn't that right? WRONG! Fewer than one in 50 houses in the Greater Cincinnati housing market have waterproofed foundations. Most are damp proofed. What do you think is happening in your city?

delta ms foundation waterproofing

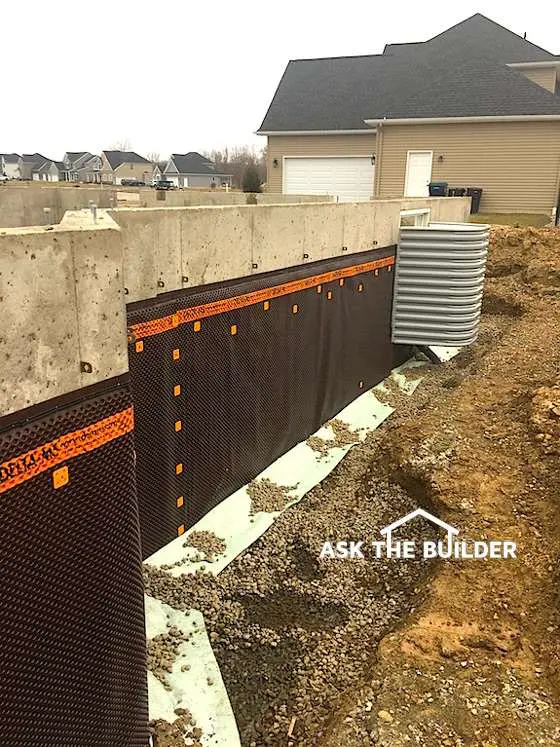
This system connects to the drain tile. It's a great waterproofing solution. I'd add more gravel and no matter what the MS Delta people say, I'd cover the gravel with a foot, or more, of straw. Copyright 2025 Tim Carter

What's the Difference?

Concrete soaks up water. If you place moist earth around an unprotected foundation, your basement will be damp. Surely, you have been in an older basement and smelled this moisture. Older homes rarely had any treatment on the concrete or stone.

Beginning in the 1950's, there was widespread use of asphalt on new foundations. This was hand-brushed or troweled onto a new foundation by laborers. The asphalt did a great job of minimizing water soaking into the foundations. However, it did not possess the ability to bridge or fill a crack that may develop in the foundation. You see, after a period of time, asphalt becomes somewhat brittle. When a foundation treated with asphalt cracks, the asphalts cracks too!

Approximately 25 years ago, Owens Corning modified standard asphalt by adding some rubberized compounds. The result was a compound that had a certain amount of flexibility. Other companies developed synthetic rubber compounds that have far greater elasticity than the modified asphalt. Even before either of these products were available, commercial builders used cardboard panels filled with bentonite for waterproofing. Bentonite is a special natural clay product that swells when wet. Water carries the clay into the crack, it swells and plugs the leak! The bottom line is that you can truly waterproof your foundation. It just takes a little homework on your part to select the right product for your particular building situation.

Drain tile - REALLY Important

If you decide to have your new foundation waterproofed, the company doing the work will most likely insist that they install or monitor the installation of your drain tile system. Very few builders that I'm aware of take the time or interest to adequately install drain tile.

foundation drain tile perforated pipe and useless filter fabric

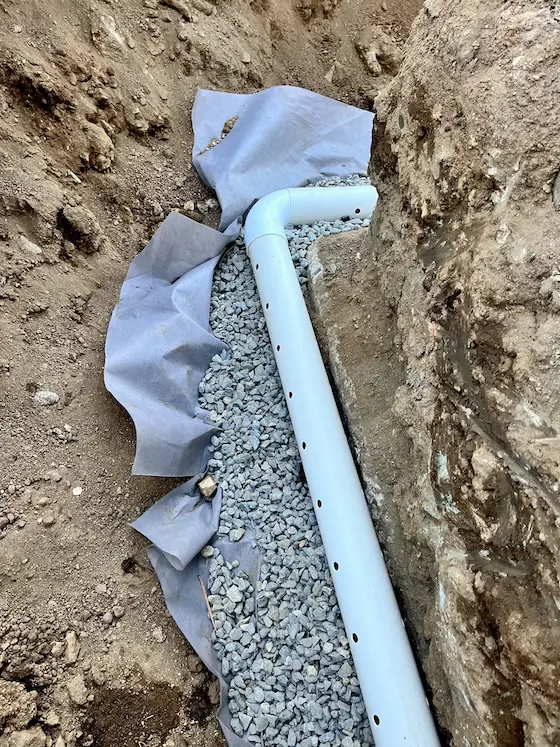
This is 4-inch-diameter perforated drainpipe. Everything about the installation, but one thing in this photo, is wrong. Copyright 2024 Tim Carter

Water naturally flows towards your foundation. This is especially true if you live on a hillside or even a slight slope (which, by the way, most of us do!). Much of the movement of water is horizontal through soil. Water occupies the void spaces between the particles of soil. The deeper you go into a soil, especially if it is clay, the less space there is for water.

To make matters worse, the soil that is used for backfill around your house is rarely compacted. When it is dumped around your house, it has huge amounts of air in it. This dirt was fluffed up and pumped full of air when it was dug from the ground. It can takes years and years for this ground to naturally compact. In some case, where overhangs protect the dirt, it may never truly compact. It can always have more air in it than soil only five or six feet away. This can spell BIG trouble for your foundation if it is not waterproofed AND if you have a bad drain tile installation.

From the above discussion, you can see why drain tile is important, I hope. The point is this: the backfill soil has the capacity (because of the large volume of air) to hold large quantities of water. You need to collect this water rapidly and get it away from your foundation. That is the job of the drain tile.

Another Quality Installation

That is a phrase I used to use to tease my coworkers after we would finish a task. It was an inside joke. However, the phrase applies to drain tile. You generally only have ONE chance to put it in. It gets buried deeply. It can clog up if not installed right. It's expensive to redo. For these and several other reasons, you need a quality installation.

I always like to install the drain tile on the side of the foundation footer. Many builders simply install it on top of the footer. Installing the drain tile on top of the footer means that your water table will be at the top of the footer. My method puts the water table about six inches below the top of the footer. You want the level of water as low as possible.

foundation drain tile illustration

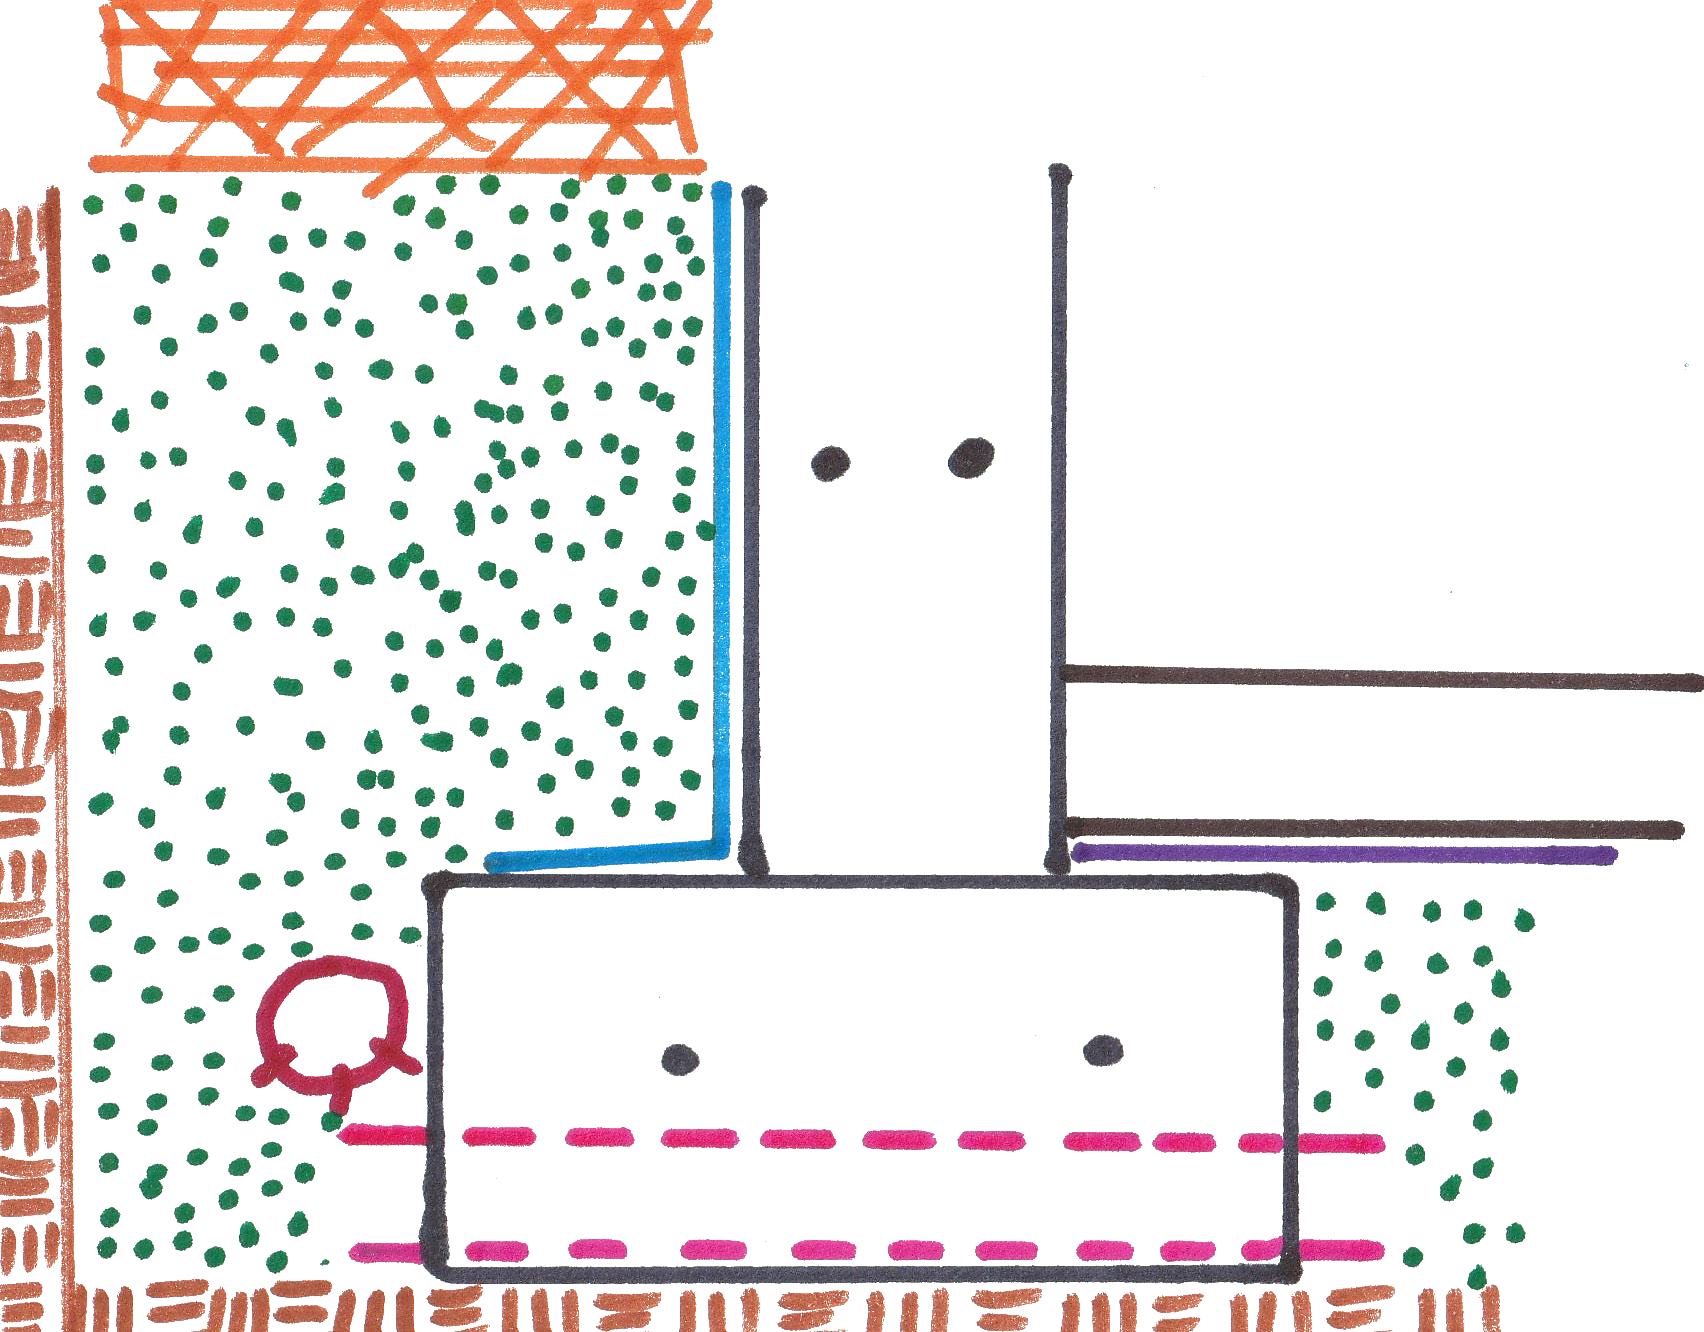
I recommend that the drain tile be installed the day after the footers are poured. I used to help strip the forms and then put a one to two inch layer of one inch gravel along side the outside of the footer. I would then install the drain tile continuously around the footer. Finally, we would cover the drain tile with one inch gravel flush with the top of the footer. This would complete phase one of the operation.

There are advantages to doing the job this way. First, the space between the side of the footer and the wall can fill with collapsed dirt and/or concrete overflow from pouring the foundation wall. This stuff is tough to dig out and remove once the basement walls are poured. Besides, it is tough to work in the narrow area left along the foundation after the walls are up and poured.

Once the foundation is waterproofed, you can continue the drain tile installation. I recommend that you install an additional two to three feet of one inch gravel cover above the footer. On top of this, install tar paper or a six inch thick layer of straw before installing any backfill dirt.

The elimination of the straw or tar paper is a huge mistake. The backfill dirt is fluffed up. When it gets wet, small silt particles will be carried into the gravel. This will clog the gravel. If your soil has enough fine particles, you may clog your drain tile! All of your work will have been for naught!

Seeking Daylight

So where does the drain tile water go? Good question! If you are lucky, it drains out somewhere on your lot. Here is what I mean. If you are building on a sloped lot, maybe you are lucky enough to have enough fall within your property line whereby the drain tile can daylight. There is no need for the pipe to have a slope. It can be laid virtually perfectly level from the footer until it daylights. The net result is that you are simply providing a resistance-free path for the water around your foundation to escape.

If you are unlucky, like me, you need to install a sump within your basement. The drain tile pipe gets to the sump either through or under your footer. I always install a six inch pipe under the footer right where I know I will install the sump. I actually install this pipe before the footer is poured. It's tough to tunnel!

An electrical pump pumps the water from the sump to either the outside of your house or into a storm water drainage system. Never allow the sump water discharge pipe to dump the water along side your foundation. This simply soaks the soil again!

Battery backup sump pumps are available to assist the regular pump in the event of primary pump failure or a storm-related electrical outage.

Backfilling Basics

Many a foundation crack is related to backfilling. Very few homeowners realize the risk of backfilling a foundation too quickly.

Don't forget that your foundation walls are simply beams or retaining walls. The walls act as a beam once the basement floor and the first floor subfloor are attached. Without these two elements, a foundation wall can tilt inwards, crack or even slide off the footer! Don't allow your builder to backfill until these floors are in place!

Also, did you know that it takes approximately 28 days (under ideal conditions!) for concrete to reach 75 percent of its design strength? I know of builders who backfill foundations within four days of being poured!! I have seen huge cracks develop from foundations that were backfilled prematurely. Don't let it happen to you!

Column B113

Exterior Foundation Waterproofing Systems

Exterior Foundation Waterproofing Systems

The following companies make exterior foundation waterproofing compounds. Some are modified asphalts (Tuff n Dry), some are rubber (Rubber Polymer Corporation), and some are bentonite clay products (American Colloid Company).

I recommend that you research as many as possible and get product literature. Then discuss the systems with your builder. See what products he/she has had the best success with. Good luck on your project!

  • Certainteed Form-a-Drain
  • Grace Construction Products
  • Mar-Flex Waterproofing
  • Mer-Kote
  • Tuff-n-Dri Waterproofing
  • Wall Firma

Column B339

Plumbing System Vent

Plumbing System Vent

Plumbing systems have been in use for thousands of years, however only in the past 100 years did they evolve as we know them today. Higher concentrations of people living in cities forced plumbers to become involved in sanitation.

Plumbers achieved a very high status in society 100 years ago, as they were responsible for public health. Because disease can spread easily and rapidly in water systems, it is important that individuals who work in these fields be regulated, knowledgeable and responsible. That is why plumbers are licensed in many states and cities.

Ultimate Guide Plumbing book cover

Want to know more about Vent Pipes and other plumbing topics. CLICK THE IMAGE to get the comprehensive guide to plumbing.

Plumbing system vents are an integral part of plumbing drainage systems. Many people do not realize the complicated nature of plumbing drainage and vent systems. A typical household drainage and vent system features two piping systems, both of which are interconnected.

One system (drainage or waste system) pipes water away from fixtures and conducts that water towards a sewage or septic system. The other piping system (vent system) supplies atmospheric air to each fixture.

CLICK HERE to get FREE & FAST BIDS from local Plumbers who can install your new fixtures.

Without vents, an interconnected plumbing drainage system will not work properly. Virtually every house in the USA has an interconnected plumbing drainage system.

Plumbing vents allow a drainage system to breathe. Sewage contains bacteria which creates obnoxious fumes. Besides supplying air to each fixture, a vent system allows those fumes to be directed to the atmosphere. The vent pipes are located on roofs, away from windows or other air intake devices, so that the fumes dissipate into the air.

Vent systems also perform another extremely important function. They allow for the equalization of pressure within the plumbing system every time water is poured into a sink or a toilet is flushed. To understand why this is important, you must realize the importance of the simple U- shaped trap beneath many of your plumbing fixtures.


U-shaped traps perform a vitally important function. These traps create a water seal. Usually, the depth of water in a trap is two to three inches. This water serves two purposes. Obnoxious gases and vermin within the drainage system cannot get past this water.

However, prior to vent systems, people discovered that if they rapidly drained water from one fixture, the water in the U-shaped trap of an adjacent fixture would be sucked away, leaving the trap dry. Fumes and bugs would soon enter the room. It didn't take long for plumbers to figure out that a vacuum was being created by the water traveling down the drainage pipes.

Plumbing drainage pipes are sized according to the size of the waste material and the quantity of water each plumbing fixture can handle. You don't want the pipe too small, as it may become easily clogged. On the other hand, you don't want a drainage pipe too large, as it may not be adequately flushed each time water drains from the fixture.

The pipes are sized so that if a sizable quantity of water is allowed to drain rapidly from the fixture, the drain pipe will completely fill with water. This is where plumbing systems without vents begin to get into trouble.

Need to fix your Vent Pipe or install a water heater? CLICK THE IMAGE to get a complete guide to all your plumbing needs.

Try to imagine the following scenario. A drainage system which is not being used has nothing but air in the pipes. The only water in the system would be that in the traps of the fixtures. Also, if you have never seen a plumbing drainage and vent system prior to the walls being drywalled or plastered, it looks very similar to a tree.

Just as the branches of a tree connect to the trunk, so to do plumbing lines. For the most part, all of the drainage lines eventually join together into one large pipe which exits your house.

OK, if you are still with me, here is the interesting part. When you allow a large quantity of water to be rapidly drained from a fixture, the drainage pipe just past the U-shaped trap fills completely with water. In some instances, as this water drains down through the system, the pipe continues to be filled with water.

The air that was in the piping system just before you pulled the drain plug is being 'pushed' ahead of the water. Because water is still draining from the fixture, the air can not be replaced at that fixture. That air must be replaced. If the system does not have vents, it begins 'looking' for air. As the water travels down the system, it begins to pass by other fixture pipes.

The surging water has created a vacuum immediately behind itself. As this vacuum passes by the other drainage pipes, the suction created by the vacuum can easily pull the water from the other fixture traps. As soon as it pulls enough water to break the water seal, air enters the piping system and relieves the vacuum. We already know why we don't want these water seals broken!

Vent systems eliminate vacuums. They do this very easily. Each of the plumbing fixtures in an approved drainage and vent system is served by a vent. This vent pipe is usually within three feet of the fixture.


The vent pipe's sole function is to supply air to the drain pipe of that fixture, in the event that a large quantity of water is discharged. Some plumbing codes allow multiple fixtures to be served by the same vent pipe. These are referred to as venting exceptions.

The installation of vent pipes is very technical. They also must be sized to permit a sufficient quantity of air to easily pass through them. They must be installed with a slope, just like drainage pipes. Water can easily condense within vent pipes.

This water must not be allowed to collect in a vent pipe. It should be able to drain readily to the drainage pipe system and then to the sewer or septic system. If a vent pipe becomes blocked with water or debris, the fixture, or fixtures, which it serves will be looking for other ways to get air when they need it. You don't want this to happen at your house.

CLICK HERE to get FREE & FAST BIDS from local Plumbers who can install your new fixtures.

Column B036

Watch this video to see how Tim SOLVED a problem in minutes!

Analyzing Foundation Cracks

Analyzing Foundation Cracks

Crack Appearance

Vertical or Diagonal Cracks in a foundation wall. Cracks start at floor and run to ceiling. Cracks are wider at the top or the bottom.

Possible Cause

Vertical movement between the two pieces of foundation. Crack is the hinge. Poor fill, soil creep, erosion, etc. are possible causes.


Crack Appearance

Horizontal Crack in a foundation wall. Commonly seen in concrete block walls. Crack is usually 4 to 5 feet off the floor.

Possible Cause

Poorly designed foundation wall. Wall is actually a retaining wall trying to hold back dirt from falling into basement. Can be fixed with beams or helical piers.


Crack Appearance

Stair stepped cracks in a block foundation or in brickwork above a foundation. Cracking often begins at a window or door corner.

Possible Cause

Foundation is either settling or heaving. Vertical displacement between two or more sections is occurring. Must be stabilized before masonry repair begins.


Crack Appearance

Hairline cracks around basement windows or in basement walls. Cracks appear not to get larger. Usually occurs weeks or months after foundation is poured.

Possible Cause

These are likely shrinkage cracks caused by water loss when foundation was curing. Usually not a structural problem unless foundation begins to move.


Crack Appearance

Interior plaster or drywall cracks above doors, windows or archways. No apparent foundation cracks.

Possible Cause

These are most likely seasonal cracks caused by lumber shrinking and swelling. Structural problems are probably not present.

Related Column: Foundation Cracks

Column B102

Literature for Foundation Problems & Helical Anchors

Literature for Foundation Problems

The two books listed are excellent resources for those who really want a good understanding of soil movement and foundation problems. Check your local library for availability.

  • Residential Foundations
    by Jim Carr
  • Has Your House Got Cracks? A Homeowner's Guide to Subsidence and Heave Damage
    by T.J. Freeman, G.S. Littlejohn, and R.M.C. Driscoll

Steel Pipe Piers and Helical Anchors

The following two companies are very familiar with solving foundation settlement problems. One uses helical anchors (A.B. Chance Co.) while the other (United Structural Systems, Inc.) uses steel pipe piers. However, at the time of this publication, United Structural Systems, inc. was only servicing the Midwestern States. If you want to compare the two systems, there is a good likelihood that a company exists near your town that does use the steel pier method. Simply check the Yellow Pages under "Foundation Repair."

Column B102

Virtues of Cast Iron Pipe

Cast Iron Pipe Has Advantages Over PVC

Noise Considerations

Do you live in an older home? Did you grow up in one? Do you ever remember hearing water rush across a ceiling or down a wall? The reason is simple: cast iron piping. Cast iron is a very dense, non-flammable material. It is so dense, that the sound waves produced by water crashing and splashing against the inside of the pipes simply can not be heard.

Plastic PVC piping is just the opposite. While it appears to be very solid, its molecular structure is very open. This allows sound to travel through it as if it were a piece of paper.

The density of cast iron also provides another advantage with respect to sound. Cast iron does not readily expand or contract in response to temperature changes. This means that when you run hot water down a sink or tub drain, you will not hear the cast iron piping popping or crackling within your walls. These types of sounds are very common with plastic PVC piping systems.

Cost Considerations

Cost is a factor in just about every job. Everybody has an upper limit to spending. However, cost shouldn't be a problem if you choose to use cast iron piping in your next project. Cost comparisons have shown that on average, the use of cast iron piping only increases costs by about $150 per bathroom. This is a one time charge, as the cast iron will outlive you and the next four owners of your house! It is also a small price to pay for a quiet plumbing system.

If you try to use plastic PVC piping and then attempt to insulate it so that it does not transmit sound, you will probably save nothing. By the time you calculate the cost to purchase and properly install sound deadening insulation around the piping, you might actually have spent more money than had you used cast iron in the first place. It's food for thought.

You can minimize the upgrade cost of switching to cast iron by mixing both cast iron and plastic piping within your new home or remodeling project. This is easy to do, it's accepted by virtually every plumbing code, and the cast iron and plastic PVC are compatible with one another using simple adapters.

You can utilize the combination of materials in this fashion. Use the less expensive plastic PVC materials for the majority of your underground drainage system. Make the switchover to cast iron just before the pipes turn up to become vertical stacks. Continue to use the cast iron for all pipes that carry liquids and solid waste.

Switch back to plastic PVC piping at each fixture vent. Use plastic PVC piping for all vent pipes, as you can't hear the air that rushes through these pipes each time water drains from a fixture.

Using the two materials in conjunction will save you money. There will be no sacrifice in quality or durability.

The Environment

Finally, cast iron is great for the environment. It's made from 100 percent recycled scrap iron and steel. At the end of its service life it can be recycled again and again. PVC, on the contrary, is not so friendly. Crude oil is used in the manufacturing process. The solvents that are used to weld the pipe and fittings together are carcinogenic and dissipate into the atmosphere. PVC piping cannot be easily recycled. It simply takes up space in landfills or pollutes the air with toxic fumes if burned. Cast iron is simply a better choice.

Sources of Information

For more information than you ever wanted to know about cast iron pipe, go to the web site of the Cast Iron Soil Pipe Institute and read their book (in PDF format) called Pipe & Fittings Handbook.

Cast Iron Pipe Manufacturers and Associations

  • American Brass & Iron Foundry
  • American Cast Iron Pipe Company
  • Charlotte Pipe & Foundry Company
  • Griffin Pipe Products Company
  • Tyler Pipe Industries
  • Cast Iron Soil Pipe Institute

Column B62

Ways to Stabilize Your House Foundation

Ways to Stabilize Your House Foundation

Years ago, when I first got into the construction business, we used to fix failed foundations by "underpinning" them. This simply involved digging a round or square hole underneath the failed portion of the foundation. After we reached solid ground, we would fill this hole with concrete. This new pier would support the foundation. This method is still used today, however, it is quite labor intensive. Much of the digging is performed by hand.

Newer methods have been developed that allow you to not only stabilize the foundation, but also lift it back up (to varying degrees.) These methods involve either driving steel pipes into the ground or installing a giant screw called a helical pier. Once these things are driven or drilled into solid ground, a large steel bracket is attached. The bracket slips under the foundation and footer. Machinery then is able to lift the bracket up the pier or the steel pipes. If you are lucky, you can bring the foundation back to its original position.

Artificial Rain

Let's talk about expandable clays. These soils can cause big problems, especially for people who live in a house on a slab or who have room additions or garages with shallow foundations (those four feet or less in the ground.)

Periods of extended, severe drought can dry a soil to deep levels. Large trees near a house can suck vast amounts of moisture from the soil. You can combat these problems if you install (during construction) a water injection system. It's easy to do.

Have you seen foundation drainage pipe? You know, the pipe with holes in it. Imagine if your builder is installing this to drain water away from your foundation. Great! But what about when your foundation needs water? Well, simply have the builder install two or three Tee fittings around your house. Extend a vertical pipe from these fittings up to the surface. In periods of dry weather, you can run a garden hose into the pipes. The soil, down by your footer, will think that everything is normal back at the surface! Nothing like smoke and mirrors!

Phantom Settlement Cracks

Sometimes people think that their house is settling when, in fact, it is not. They are victims of lumber shrinkage and swelling. The framing lumber (wall studs, floor joists and roof rafters) all absorb humidity from the air.

Here in Cincinnati, we have very humid summers. Cracks around windows and doors disappear or get very small in the summer months. Six months later, these same cracks look like the Grand Canyon. The drier winter air sucks the water from the lumber.

The wood acts like an accordion. It moves back and forth with the changes in seasons. Be sure to consider this possibility before you initiate expensive foundation repairs! You may not have a foundation problem.

Column B102

House Foundation Settlement

Foundation Settlement

Numerous homeowners have told me about instances that happened in the middle of the night. The stories are all very similar. They are awakened by a loud "crack" or "pop". Yes, part of their house cracked like a dry piece of kindling wood. However, often the part that cracked is the foundation!

Other stories speak to doors and windows that work perfectly one day and stick the next day. Sometimes the sticking is seasonal. That is, the doors and windows work fine for three to four months and then trouble begins. Magically, the doors and windows work fine four to six months later.

In all these cases, the common denominator is some form of major structural movement. The movement can be within the house (lumber swelling and shrinkage) or it can involve the entire house (settlement or some other force which is stressing the entire structure.)

All too often, however, the term 'settlement' is used to describe any movement. This can be misleading, as settlement is really just one form of movement which can affect the way the inside and outside of your house looks. Cracks can develop in your house from other forces such as landslides, heaving (frost or soil swell), soil shrinkage, erosion of soil from beneath your foundation, earthquakes, construction blasting, soil creep, etc. You see, lots of things can be happening! Sometimes, two or more at once.

Common Causes

It is not uncommon for a house to be built on fill dirt or on a hillside. Have you seen huge earth-moving machines working on a new subdivision? They scrape dirt from the high spots and deposit it on the low areas. The dirt that is used for fill is supposed to be compacted. However, it may not always be. Gravity and water entering the soil over time compacts the loose fill. If the compaction is not the same under the entire foundation, your foundation may fracture.

Hillside construction is a simple matter of high school physics. Gravity is constantly pulling the soil down the hill. I learned this in my first geology class. This soil creep, as it is called, takes place at a faster rate the closer one is to the surface of the ground. So, houses dug into a hillside basically have their backsides exposed! The part of the foundation that is shallow and is near the surface is subject to movement, while the remainder of the foundation is quite stable where it is dug deeply into the hillside. Perhaps you have seen foundation failures like this.

Hillsides also pose another problem. The soil creeping down the hillside can exert huge forces on the uphill part of the foundation. These walls can crack or tilt inward from the force of this pressure.

Water, or the movement of water in soils, can cause foundations or slabs to crack as well. For instance, imagine if a sewer line or water line that runs beneath your house develops a leak. It erodes soil from beneath your house and floor. Eventually the foundation footer, wall, and/or floor cracks in response to the absence of the support. Remember, your foundation was designed to work with adequate support beneath it. Remove this support and.......CRACK!

Certain parts of the nation have clay soils. Some of these clay soils shrink and swell (like an inexpensive sponge) in response to the amount of water they contain. This movement can be dramatic. As the soil beneath your foundation dries out, your foundation drops. In wet weather the clay swells and lifts your foundation. This is no problem if the movement is the same at every point along your foundation. In more cases than not the movement is not equal. Stress builds and your foundation cracks.

Solutions

If your foundation develops a crack or a fracture, it usually can be stabilized. If the crack is vertical or diagonal, it may require a support from beneath that cradles the footer or foundation. If your foundation develops a horizontal crack, it can be stabilized in several ways as well.

In all instances, it would be wise to consult with a licensed structural engineer who specializes in residential problems. If you try to solve the problem yourself, or merely trust the workmen, you may have a problem occur at a later time. Some of the solutions can actually transmit the stress of the problem to another portion of your foundation. These cracks may happen months later. The contractor will generally say that those are not his fault, when, in fact, they may be! Have a structural engineer develop the solution. Then hire a contractor to perform the work.

Column B102