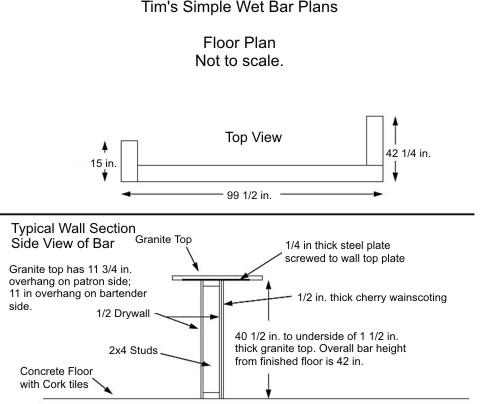
! ! ! See Author's Notes at Bottom of Column ! ! !
Geology - We Interact with the Earth
My college major was geology. I was very interested in the subject. I learned much about the movement of subsurface water in my clay mineralogy class, hydrology and geomorphology. WOW! I can't believe I remember those cryptic names.
The point is this: very few parts of the USA have well drained soils (sandy). A majority of the soils are rich in clay, especially in the Midwest, East and West. Generally, as you dig deeper in a clay soil, it becomes more dense. There is less space for air. The portion of the soil that has the most air provides the best route for water movement.
Just as water flows down your driveway, it flows downhill beneath the surface of the ground. Retaining walls, basement walls, etc. can often try to block this movement. If the wall has no cracks, the water might go around the wall. If there is a crack, the water may find it is easier to enter than to go around. You know, the path of least resistance.
A curtain drain can capture and divert this subsurface water. A previous Bulletin, #70 - Linear French Drain, goes into great detail as to how to construct these wonderful devices. They consist of a narrow trench, a four inch perforated pipe, and massive quantities of large rounded gravel.
When I built my house many years ago, the rear of my lot was extremely wet. I was 'receiving' water from uphill. I installed a curtain drain to intercept this water. It has worked every spring. My neighbor's yard is spongy, while mine is dry! They are excellent DIY'r projects.
Author's Notes:
You may wonder if my advice is worth anything. Well, read what Jim Sanders wrote to me when he was at the end of his rope:
"Hi, I just wanted to write to give you the results of my "Trench Drain". I have had a wet crawlspace for 15 years. Water would fill the crawlspace at times, so we actually had to drill weep holes at the base so that it would enter the basement and eventually, the sump pump.
I have tried everything. Several contractors said that the only thing we could do was to bring the water into the house via drainage tile and let it enter the sump pump. That would work, but because I live on a 6' elevation, there is no reason that I should have water problems. It became like clockwork...when it rained, we would rush home from the lake or wherever we were vacationing so that we could be prepared to start the backup generator, in case the power failed. We even had our alarm company put a sump alarm on our system, so they could notify us if we had a power failure. Battery backup was not an option, because sometimes we lose power for days and during any rain, our sump would run every 7 minutes...just like clockwork.
I found your site and read the article on the trench or French drain. At first, it sounded a bit like "holistic healing" to me. I failed to understand why a 2 ft. deep trench, 4 ft. away from the house would do any good. How could this simple thing correct an extreme water problem that has plagued me for years, cracked my foundation, settled my garage floor and ruined almost every vacation?
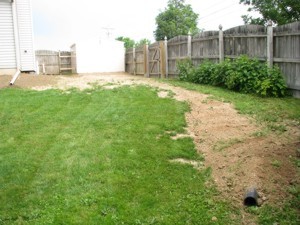
The Linear French Drain trench running from the house. PHOTO CREDIT: Jim Sanders
I decided "what the heck". I had to dig by hand using a trenching spade and a pick-ax, because the builder back-filled our property with brick and blacktop. It took quite a bit of time. Because the ground level varies so much on that side of the house, I was not able to achieve exactly 2 ft. deep. It varied from 18" to 30" in spots, but the slope was downhill. The trench is about 80 ft. long. At times, I thought about filling it all in, because I just didn’t believe that it would work.
I stoned it, put tile in, and filled it with #1 round stone. I socked the pipe just for safety measure and I also used geotextile fabric on top, so I could cover with dirt and grass. I also ordered some clay and pitched from the house to the drain.
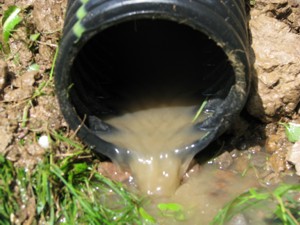
After a short rain, water is running away from the house. PHOTO CREDIT: Jim Sanders
Result? For the last month, we have had 7 or 8 torrential rains, the worst of which was last night. It rained so hard, that our lawn washed out in spots because of the high clay content. Our sump pump, that normally ran every 7 minutes during and after rain, has not turned on for 4 weeks. The silt at the bottom of the sump well is now dry and cracking. Our crawlspace has not shown a trace of water or even moisture.
Since I couldn’t see correcting the foundation cracks or the garage floor settling and tilting until I corrected the problem's source, I waited to see if the trench drain worked first.
This week, I had a company come in and perform sort of a "mud-jacking" technique on the garage floor, which worked perfectly. Also, during the past few weeks, I parged the cracks in the foundation.
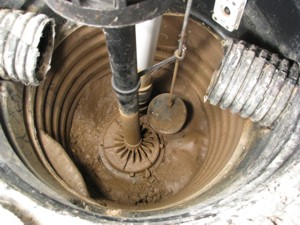
A dry sump pump. PHOTO CREDIT: Jim Sanders
I just wanted you to know how this worked. I stressed for many years over this issue and the solution was nowhere near as difficult as I thought it would be.
As a side note, I went to the end of the drain tile during a hard rain to see what was happening. Water was running out of the drain tile in about the same exact volume that it previously ran out of the weep holes in my crawlspace. This winter will be interesting, because last year, the ground next to the house was so saturated that during a thaw, my sump would run constantly. I'm guessing that the ground between the trench and the house will probably be drier now going into this winter."
- Jim Sanders, Upstate area - New York
CLICK HERE to get FREE & FAST BIDS from local drainage expert contractors.
Column B119