Faux Finish Techniques

The first time I saw a faux painting technique in action happened about six years ago. I was touring a model home that was under construction in Northern Kentucky. The builders were fans of mine and had asked me to stop by to see a hybrid home where they were using metal floor joists and wall studs. The nearly completed home was next door and two women painters were faux painting a room.

The Look of Leather

An adjacent room was already complete and the walls looked as if they had been covered with a high quality leather. The coloration, texture and 3D appearance was amazing. They were simply applying a translucent glaze over a base color and creating the look by applying a thin sheet of plastic throw-away drop cloth over the wet glaze. The plastic was crinkled and wrinkled while it was on the wall and when they quickly peeled it off, it gave this random texture and appearance. I was amazed.

Tough To Do

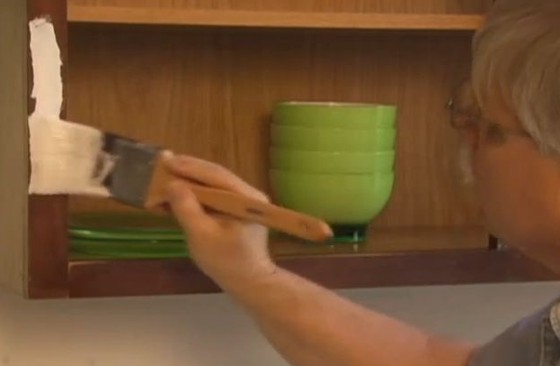
What the women painters were doing was very difficult. They were working super fast and had the technique down. You can achieve the same look yourself by using a different tool - the rag roller. I saw a very cool rag roller at the Sears Editors Conference in June, 2001. It is available at all Sears stores and is a very unique tool. It is simply a plastic tube that is covered with a fabric sock that has an opening at each end. The fabric is folded over the end of the roller cover and held in place with two inserts. You twist the rag on the tube before installing the inserts. The twisting produces the random pattern that is duplicated on the walls as the roller is moved across the wall.

Got Glaze?

Glaze is simply a paint product that is lacking in fillers or pigment extenders. Regular paint contains dust or finely ground particles that absorb the colored pigments added at the store. These solid particles produce the hiding power of paint. You don't want these particles in glaze. You want to be able to see through the glaze down to the base color of the wall. Think sunglasses.

I purchased my glaze at a Sherwin Williams paint store. You can also get it at Sears or any other paint store that carries a full line of products. If you open the glaze before color is added, it will look like diluted milk, but it will indeed dry clear. In fact, some people apply clear glaze to a wall surface to make it look like it is striped or even mottled. You can use the rag roller to apply clear glaze and it does give a wall surface a unique appearance as long as you do not completely cover all of the base color with glaze. If you do, the wall simply looks like it was painted with a semi-gloss paint.

Glaze Extenders

Latex glaze dries incredibly fast. There is no body to glaze since it is primarily a resin you are applying to the wall. This rapid dry time means you can put the room into use very quickly but it also means you can have a nightmare trying to work with it.

Full line paint stores carry additives that you can mix with paint or glaze. One of these happens to be a drying time extender. The one I used was called Floetrol® Latex Paint Conditioner. It is made by the Flood Company. It is a common paint and/or glaze extender. It is also milky in appearance but it doesn't change the color of the glaze.

The use of the extender is mandatory. It makes all the difference in the world. You never get double coverage marks if you keep up a steady pace going down a wall. The extenders are affordable and easy to add to the glaze. Only use as much as the label states!

Column B384

Kitchen Cabinets – Painting Tips

Final Gratification

This is what everyone always want to do first - paint. It is really the second to last step in the process. The application of paint is an art. Most people that I watch paint do a miserable job. Why? Because they were never really taught. They think that anyone can do it. Well, anyone can do it, but not necessarily well!

Let's do the doors and drawer fronts first. We can really make up some time with these articles first.

If you are using oil based paint, you will need two brushes: a 1.5 inch and a 2 inch wide brush. Buy the 1.5 inch one as a tapered brush. Be sure they are china bristle or a synthetic fiber brush that is suitable for oil! If you use water based paints, NO china bristle brushes! You will ruin them with the water. It swells the natural hair bristles.

Oh yes, we also need a roller pan and a small 2 or 3 inch wide fine nap roller. What? You are confused? You mean to tell me that you have never used a small roller to apply trim paint? See what I mean by everyone thinking they could paint....! Come on now, don't go away angry....
We are going to use the roller to apply the paint on any flat surface which will accept paint from the roller. The brush is used to smooth the paint after it is applied.

Painting Doors

Raised panel doors should be painted from the inside out. In other words, paint the flat center area first. Then paint the beveled areas of the raised panel. Finish the outer frame last. Detailing is everything. See where one piece of wood joins another? Those are the same places that brush strokes should end and begin. Speaking of brush strokes, do you know how to avoid them on long pieces of wood work? It is easy.

You avoid brush strokes by working from an unpainted area towards an area that was just painted. The final brush stroke is towards the painted area. Just as you finish the stroke you gently lift the brush off the surface while your arm is still moving. You will see the lift off mark for a few moments, but if you have a great self leveling paint, it will disappear! As soon as the door is painted, set it flat on a can or some other surface that is smaller than the door. This will allow you to get all edges painted. It will also reduce the risk of runs in case you put too much paint on. If you set the door on the floor, on paper, etc. the paint at the edges will stick and cause a big mess.

Drawers - A Piece of Cake

Paint the drawers in the same fashion. Set them on end to allow the paint to dry. Try not to get too much paint inside the knob or handle holes. If you do, remove the paint with toothpicks as soon as possible.

Let's talk about open time for a moment. High gloss paints require that you keep a wet edge. If you try to paint too large an area and the paint starts to set, you will have problems when you try to blend the fresh paint to the drying paint. Flat wall and ceiling paints are very forgiving. If you are used to this, you had better get ready for a BIG surprise. Paint one door or one drawer from start to finish. Don't try to get an assembly line going with that roller. Cover the roller pan or brush with aluminum foil to minimize exposure to air if you are worried about the paint drying.

Paint Indoors or in a Garage

Paint the doors and drawers in a covered area. Avoid direct sunlight and breezes. You will find it easier to keep the before mentioned 'wet edge'.

Cabinet Frames - Gravy!!

The cabinet frame is a cinch. Use the roller on the flat fronts. Use that tapered brush for all tight spots and cutting in against walls and countertops. Remember, no brush strokes!

Column B391

Kitchen Cabinets – Paint and Primer

Choose Your Weapon....

It is time to paint. What will you use? Most choose ease and convenience - water based paints. Why? Because they think it is easier to clean up when using water based paints. Well, that is not necessarily so. More on this later.

Oil based and water based paints will produce superior results. However, many experts will agree that oil based finishes will yield a glossier surface and will harden more rapidly than water based finishes. These are important characteristics if you want clean cabinetry as well as a functioning kitchen in a short period of time.

To Prime or Not to Prime....

This is a tough call. If you are painting over a clear finish like urethane or varnish, it is mandatory that you use a bonding primer. If you are painting over previously painted surfaces that will require two coats, then it is a great idea. If you are just applying a fresh coat of the same color or nearly so, then you might be able to get by with a top coat only. Be sure to clear this move with the manufacturer. Check the label of the finish paint. See what it has to say about the use of a primer. When in doubt, always read instructions. (That's a joke! Read before acting at all times!)

Remember, primers are formulated to bond well to the surface being painted. They also are made to even out the texture between bare wood and painted wood. Primer/sealers will also even out porosity in the event that bare wood has been exposed during sanding.

Column B391

Kitchen Cabinets – Painting Prep

Small Surface Area - Big Project!

Painting kitchen cabinets is a tough job. I can paint two bedrooms in the time it takes to do an average set of cabinets. To achieve really good results on cabinets, you need to break them down. This means removing all hardware (door knobs, hinges, drawer pulls, etc.). Skip this important step and your paint job will suffer!

Once the hardware is removed it is time to clean and sand. Any name brand liquid soap will do just fine. However, DON'T immerse the wood in water or subject it to excessive water, especially raised panel doors. Water can get in hidden spaces and cause swelling, warping, twisting, etc.! Use damp sponges or rags to clean. Rinse immediately and dry with a dry rag. Do not let the cabinets air dry.

Sand with medium sand paper to roughen up the surface. Coarse sandpaper can be too harsh and cause deep scratches. On wide open spaces use a sanding block or vibrating sander to maintain a level sanding surface. Sand paper in your hands is a mistake. You will sand more areas than others, trust me.

Column B391

Kitchen Cabinets – Painting

painting kitchen cabinets

Paint is a very interesting material. It reminds me of a show I used to watch on television as a child. A friendly witch would twitch her nose and presto, something would change (usually for the better)! Paint isn't as fast, but it can really transform an object, room or set of cabinets.

What's more, if you incorporate multiple colors, stenciling or specialized painting techniques, you can really accomplish some inexpensive redecorating.

Common Complaints

Painting cabinets can lead to problems. There are two primary reasons for this: surface contamination and previous gloss or slick surfaces.

Surface contamination (a fancy term for dirt, cooking grease, old food, dust, etc.) interferes with the ability of paint to hold onto the new surface. If you paint a dirty surface, the paint sticks to the dirt, not the surface below the dirt. Peeling paint is a reality. I have seen it happen many times.

Previously painted or stained kitchen cabinets almost always have a slick or glossy surface. Why? Because this makes them easier to clean. A glossy surface doesn't have those microscopic grooves that trap dirt. This is great for cleaning, but bad for paint! Paint needs lots of tiny grooves or scratches to grab onto.

Successful paint jobs are based on thorough preparation. Clean, sand, fill all holes, caulk where necessary and your paint job will really look professional.

This popular column was shared in my December 29, 2010 Newsletter.

Column B391

Painting a Toilet

Painting a Toilet - Color Photos and Tips

You can paint toilets! But I don't want you to paint the inside of the bowl! In fact, just two days ago I was at a delightful plumbing supply house in my city - Keidel Supply - and saw a new painted toilet by Kohler. It had a humming bird on the tank front and tank lid. It was gorgeous. You could feel the paint or decal or whatever as you rubbed your hand over the surface.

Oil Paint

High gloss oil paint sticks very well to glazed china surfaces. You don't have to do any preparation work other than cleaning the surface and making sure it is dry.

Painting a scene is only to be done by a person who has talent. If you want stick people on your toilet, give me a call! I have zero artistic talent with respect to scenes, forms, etc. I can do two dimensional drawings, but not proportioned 3D paintings.

Coordination

If you decide to paint your toilet or some other china object, use scenes from wallpaper or a magazine to inspire you. Yes, you can give the artist some latitude, but you want the final painted product to blend with the surroundings. Keep in mind that you can strip off the paint down the road if you grow to dislike the look. Regular paint strippers will readily remove the paint without harming the china.

Always have the artist do a quick sketch before you proceed to the final project. Be sure the proportions are right and the look is what you want.

Painting Photos

This photo should help you get a feel for what is possible when you decide to paint a toilet or any other piece of glazed china. Look at the detail on the canisters! The artist who painted them used a fine brush and a steady hand to create the random look of the ferns. The black lettering was also done free hand with black paint. The paint job is over 20 years old and looks as good as the day it was completed.

The seaside border is in the bathroom where I have a plain white toilet. My oldest daughter is going to take elements from the border and paint them on the tank face and the tank lid. She has not yet decided what she is going to do. But I can assure you it will be spectacular. Keep in mind that if you have to hire an artist, they can take the toilet tank off and keep it in their studio. They don't have to paint it in place!

Related Column:

Paint a Toilet? Sure!

Column B400

Special Gray Primer & Manufacturers

Special Gray Primers

I thought about this analogy after I wrote my column about the new special gray primers: If you are above the age of 50, you very likely are somewhat familiar with black and white photography. Think about it, many younger people have never really seen black and white photos! Color photos today are as common as just about anything routine in your life. I can remember years ago when color photos from the drug store were special. But think about black and white photos - say ones you might see in the newspaper. The objects in the photos were a variety of colors, yet in the photos they come out various shades of gray. In modern computer graphics and television production, this is called gray-scale. There is a complimentary shade of gray for each and every unique color on the color palette.

It then goes without saying that if you determine the complimentary gray color for each color, then that color of gray will act as a unique and powerful primer that will not affect the final finish color that is applied over the special gray tone. This is the basic technology or thinking behind this new system. It works and it works well. I actually viewed test panels that were painted with the gray primers and the final color. They actually looked better than test panels that had two or three coats of just the colored paint!

You may get weird looks when you walk into a paint store and talk about these primers. This is cutting edge technology in the paint industry even though the concept behind it has been around for years. It simply was not applied to the paint industry. The two places where you should be welcomed if you ask about the special gray primers are listed below:

Sears Stores

Simply go to their paint department and ask about the new Bob Vila line of paints. Look at the brochures describing this new paint system.

Sherwin Williams Paint Stores

They also offer the new gray primer system. They may only offer several shades of gray, but that's OK. The shades they offer work with every color that you will find on their paint chips.

Column B417

Painting – Proper Equipment

Equipment

Consider purchasing fiberglass extension poles if you use paint rollers. With a little practice, you won t be jumping on and off a ladder to do those ceilings and high spots on walls. They really work well. Also, when using a pole, you don't get all those little sprinkles in your eyes!

Brushes and rollers: Simply put, buy the best that you can. There is a big difference in quality. A good brush, taken care of and cleaned properly, will last for years. Not only that, the finish will look much, much better. Good rollers don't shed their nap on your walls and ceiling. Nothing is more annoying!

Cleaning brushes and rollers to maintain them is easy. Consider buying a spinner. This is a cool tool that spins a roller cover. The cover slides onto the spinner and you push and pull a handle that makes the spinner operate. Once the roller is wet, it spins out the paint like a washing machine spins clothes. With some practice you can completely clean a roller cover in less than 90 seconds. One trick is to use a curved tool to scrape out excess paint from the roller before you start to spin it.


Do your white walls need some color? Find the professional painters by using my Interior Painting & Staining Checklist or my Exterior Painting & Staining Checklist. I offer a 100% Money Back Guarantee.


You can clean brushes with a spinner too but I prefer to clean them in an empty paint can. I swish the brush back and forth rapidly in warm soapy water. Don't mash the bristles down on the bottom of the can nor hold the brush upside down in a stream of water. You can permanently damage the bristles doing this.

Column B417

Applying Primer and Wall Paint

Priming

Painting new wood? Shifting from an oil painted surface to latex or water based paints? New drywall? If so, you must use primers, sealers or a combination of the two. These paints are specially formulated. They help even out textures and equalize porosity. Without them, the best finish paint will look lousy. I spoke about these primer paints in this linked article.

Applying Wall Paint

Most rookie painters make the same mistake. They simply put on too little paint. Many paint manufacturers recommend a minimum coverage for their products. They do this because they know that when first applied, a paint looks like it is covering well. But, an hour or two later, after the water or solvent has evaporated, the coverage looks horrible. You, the homeowner, then blame the paint. Well, it's your fault, not the paint's!


Do your white walls need some color? Find the professional painters by using my Interior Painting & Staining Checklist. I offer a 100% Money Back Guarantee.


This happened to me recently at my daughter's school. I test painted a wall that was previously light blue. We were changing to a wall paint that was almost white. I primed the wall and got good coverage on the first coat. After it dried, here and there you could see the blue through the paint. I knew this would happen. The next night some volunteers painted the other walls in the room while I was helping elsewhere. I specifically showed them the wall I had primed. It was made clear to them that they must not over-roll (apply too thinly) the paint. I even showed them how thick I was applying the paint. Oh well, what a waste of time! I came back into the room one hour later and it looked as if they had poured five gallons of water into one gallon of paint. The paint was applied so thinly that we had to paint everything they did an additional time. Don't let this happen on your job!

Column B417

Painting Tips

So you want your upcoming paint job to really be first class? Well, who doesn't? Painting always seems so easy, yet when completed the results are not often the greatest.

Prep Work - - It's the Key!

By far the most unglamorous part of painting is the work you should do before you pop the top to the paint can. In the trade it's called prep work. There is so much to do to achieve that really professional look. Surely you don't think it happens by accident?

First, you need to always start with clean surfaces. Invariably it says this on a paint can, but few people go to the trouble to wash walls. Remember, paints are simply glues. They stick to things.

Filling holes and patching cracks: The paint can only do so much. In fact, many people think that paint can fill or bridge small cracks, because they see how thick the paint is. Well, I can understand where this comes from. Paint companies know that much of the vehicle - the component of paint that makes it a liquid - in the paint evaporates into the air as the paint dries. This is why they recommend applying paint three times thicker - referred to as mil thickness - than the finished dry mil thickness. More on this in a moment. Take the time to fill all holes and cracks. The best time to do this, believe it or not, is at night time. Holes and lines show up much more when sunlight is not pouring through a window or door. Try this yourself, and see if I'm not telling you the truth!


Do your white walls need some color? Find the professional painters by using my Interior Painting & Staining Checklist. I offer a 100% Money Back Guarantee.


Caulking

This is where most people miss the boat. The pros use caulk like a runner drinks water. Lots of it. Each and every crack between woodwork and wall and woodwork and woodwork must be filled for that first class appearance. I always recommend priming the areas which are to be painted first. This way, the cracks always seem to be better defined.

Caulking is an art. For interior purposes, I recommend using an acrylic caulk, matched closely in color to what you are painting. Cut the end of the tube close to the size of the cracks you are caulking. Apply the caulk, 2 feet at a time. Wipe the bead with your finger to smooth the joint and to press it into the crack. Then *now here is the important part* wipe the part you just caulked with a damp sponge. This removes excess caulk from the areas adjacent to the crack. This step is often overlooked by the novice.

Column B417