Painting Fiberglass Doors Black

DEAR TIM:

I have a question about changing the color of a fiberglass exterior door. I purchased a mahogany fiberglass door for the front of my house. My shutters are black and I want to know if I can paint the door black? What would be your advice? Thanks!

Pam

- - -

DEAR PAM:

If the door gets lots of direct sunlight, it could be a huge mistake. The black paint can absorb a tremendous amount of heat and there may be an issue with the paint bubbling. But, if the door is shaded by a nice roof or faces north, you will be just fine. Be sure you use a paint that has a blend of acrylic and urethane resins.

Column QA

Termites Turn Wood to Dust

DEAR TIM: I know nothing about termites or the damage that they cause. My husband and I have been looking for a home to buy for almost a year. We found the house about a month ago. We were told by the Realtor that there were termites but the owner had treated the house. We have already paid for the appraisal and the home inspection. We were going to close this week.

But the Realtor called my husband on Thursday and told us that the seller was not going to have another termite inspection. We would not agree to this. So the Realtor agreed to pay for the termite inspection out of his pocket. So Friday we had our final walk through and my husband and a friend went under the house and found that approximately 24 feet of the face plate, the floor joist, and something else were just dust.

We do not have the money to invest in the repair. We have already paid almost a $1,000.00 that we may lose. Is this something that the seller should fix? And if they fix it will the home be just as good as before the damage, or should we just call it a bad experience and go on looking for another home to buy? And should our home inspector have seen this damage? Misty Dunfee

DEAR MISTY: Your home inspector blew it. I would call him and ask for the name of his insurance carrier. Or did you get this information before you hired him? If he has a good policy, the insurance policy may pay for the repair and all will be well and good.


Termite infestation? Pick the best exterminator using my Termite and Carpenter Ant Checklist. I offer a 100% Money Back Guarantee.


If you don't mind I would like to take a moment and sort of say I Told You So; if you would have read a column at my website about the home buying process and who the *best* inspectors are, you might not be in this predicament.

But that aside, you may have some negotiating power. Aside from being a home builder, I am also a licensed real estate broker. If you are lucky, your state laws may be such that you now have a leverage tool. Most states have property disclosure laws.

Now that the damage has been brought to the attention of the owner, he MUST disclose it to all future potential buyers. If he doesn't and a buyer finds out after a sale that the owner knew of the defect, the owner is subject to painful legal expenses, plus the cost of repairing the property.

To get the wheels in motion with respect to making this new termite damage work in your favor, write the owner a letter as well as any listing real estate broker. Send the letters certified mail and note in the letters that a paper trail of the defect has now been created. That letter, once received, will get some attention.

So now that he knows of the defect, this means he is going to have to fix it or lower the price of the house by the cost of the repair. Any savvy real estate agent who is working on behalf of the buyer's interest knows this and should be working this angle to get the house for the lowest price possible.

But the problem is more complex. Is there even more damage than what you have discovered? If so, then this may not be a great buy and you might want to think of the $1,000 as a tuition payment to the College of Hard Knocks. It may be smarter in the long run to move on and find a house that is in better condition.

Read about more termites damaging wood in my Little Termites Cause Huge Damage.

Column QA

Wall Anchors for Shelf Systems

Many people dread installing anything on concrete or concrete block walls. The same is sometimes true for drywall. Drywall is weak and failures are common, while concrete and concrete block can be difficult to drill. There seems to be no happy medium.

Anchors & Friction Fit

Just about every concrete anchor or anchoring system you choose works by employing friction. The object you are anchoring responds to the force of gravity - it wants to fall off the wall or get to a lower state of energy. The anchor works against this force.

The strength of the resistive force has many variables. Among them are the length of the anchor, the diameter of the anchor, its shape, the strength of the material in which the anchor is embedded, etc. You can see it is fairly complicated.

The size of an anchor is very important. The larger the shaft size of an anchor, the greater the amount of surface area of metal that anchor possesses. It can be significant! Take a 1/4 inch anchor as compared to a 1/2 inch anchor. The surface area of the 1/2 inch anchor available to grab is 100 percent greater than the 1/4 inch anchor.

A Multitude of Choices

There are tons of choices when it comes to anchors. You can use the old fashion lead shields, plastic tap in anchors, split bolts (a fat tipped blunt nail), stud anchors, sleeve anchors, concrete screws, etc.

Large cities have specialty stores that sell these high performance anchors. You can find some of these at high quality hardware stores, but your best selection will be at an anchor store. I recommend that you obtain a copy of the Business to Business Yellow Pages from your local phone company. This is THE book! You will almost always find these specialty companies under the FASTENERS heading.

Anchoring Tips - Methods

The ultimate strength of the anchor you install depends as much on the anchor you choose as it does the material in which you place the anchor. The concrete, concrete block, brick, mortar, wood, drywall, etc. must be sound for the anchor to perform at its highest design level.

What's more, it is important where the anchor is placed. If you place an anchor too close to an edge, the anchor can actually split the concrete, block or brick. I know, it has happened to me! The fastener manufacturers can provide you with excellent literature which tells you how close to an edge a particular anchor can be placed.

Corrosion

How long do you want that anchor to last? What kind of weather/ environment is the anchor exposed to? These are important questions, especially if the anchor is exposed to water, salt, sea water, etc. If the anchor fails because of rust, you could have a major problem. Often anchors are available in stainless steel versions that cost just a little more, but save you immense headaches in the future.

Dust Removal in Concrete

If you plan to anchor something in concrete, be sure to remove the dust from the holes you drill. Dust in the hole can actually act as a lubricant to a degree. It can interfere with the friction fit intended by the manufacturer. You can purchase a bulb type blower that has a nozzle. Squeezing the bulb directs a blast of air into the hole. You can also use a straw, but BE CAREFUL! Dust will immediately get into your face and eyes. Wear goggles or close your eyes while blowing into the straw.

In a Pinch?

Guess what really works well? Believe it or not, two 16 penny common sinker nails driven simultaneously into a 1/4 inch hole! I have used this technique for years to attach wall plates to concrete floors. You simply put the wall in place, drill right through the wood plate with a 6 inch long 1/4 inch hammer drill bit and into the concrete. Be sure that the bit penetrates two inches into the concrete.

You pull the drill out and hammer two 16d nails side by side into the hole. The nails bite ferociously into the concrete. Often it is impossible to extract them. It is an effective, inexpensive way to attach wood to concrete. Be sure to use a 20 oz. hammer when installing the nails!

Column B145

Hardware for Shelves on Concrete and Drywall

Shelf Hanging Tips

Size Shelves for Objects

Take a few moments to determine just what will go on the shelves. The object is to build a shelf wide enough for the objects being stored. Not only that, why build shelves that waste vertical space? If the objects being stored are a consistent or close height, then let's only leave an inch or two of space above them before the next shelf, not three to five inches!

Basement Shelves on Concrete Walls

I have extensive shelves on concrete walls. All I did was attach CCA treated lumber 2x2's on the concrete wall using my two nail technique. Then I ripped a 4x8 sheet of 1/2 CDX plywood into three shelves - 15 7/8 inch x 8 feet. I then attached a 2x3 on edge to the front of each shelf as a stiffening apron. This helps to keep the shelf from sagging. Then at each end I installed a vertical 2x4 from the floor to the ceiling. I screwed through this 2x4 into the 2x3 apron. It helps to add one additional vertical standard at the middle of the system for strength. These shelves are very strong!

Drywall Shelves

I have had the best luck using metal shelf standards. Books are enormously heavy. If you try to rely on drywall itself, you are making a grave mistake. Design your shelf system to attach to the wall studs behind the drywall. The key is to install the vertical standards perfectly level. If the standards are out of level, the shelves will be also.

The metal shelf standards come in different finishes. The shelf brackets can be adjusted for different heights every inch or so. Different width brackets are available that will fit on the same standard. You can have shelves that stagger inward as they get higher on the wall.

Column B145

Cordless Hammer Drill Manufacturers

Cordless Hammer Drill Manufacturers

Now here is a nifty tool every homeowner or contractor must have. Cordless drills have been around for years. However, why not buy a cordless drill that has the capability, with a flip of a switch, to become a hammer drill? This allows you to drill concrete, brick, or concrete block with the same ease you drill wood! The outward appearance, function, style, etc. of these cordless drills looks the same as the drills that cannot hammer. Often the price is just a little more for the hammer feature.

Pay attention to overall tool weight and the volts of the drill. The higher the voltage, generally, the more power the drill will produce in harsh situations. Buy smart - don't buy a drill that is overkill. Buy a drill that will do the things you need to do, not the things you dream to do.... If you buy a drill that is too big or powerful, you will just wear out your wrist and arm. Some drills come with handy battery packs that attach to your belt. This can take a load off your arm!

  • Bosch
  • DeWalt
  • Fein Power Tools
  • Hilti
  • Hitachi
  • Makita
  • Milwaukee
  • Panasonic
  • Porter Cable
  • Prazi USA
  • Ryobi
  • Skil Power Tools

Column B145

DEWALT DC970K-2 18-Volt Compact Drill/Driver Kit
DEWALT Bare-Tool DCD950B 1/2-Inch 18-Volt XRPHammerdrill/Drill/Driver
Makita LXPH01CW 18-Volt Compact Lithium Ion Cordless 1/2-Inch Hammer Driver Drill Kit (Discontinued by Manufacturer)
PORTER-CABLE PC180CHDK-2 1/2-Inch 18-Volt NiCD Compact Hammer Drill Kit
DEWALT DCD950KX 18-Volt XRP 1/2-Inch Drill/Driver/Hammerdrill Kit
DEWALT DCD795D2 20V XR Lithium Ion Brushless Compact Hammer Drill Kit
Bosch HDS181-02 18V Compact Tough Hammer Drill Driver
Bosch DDS181-102L 18-Volt Lithium-Ion 1/2-Inch Compact Tough Drill/Driver Kit with High Capacity Battery, Charger and L-BOXX-2
Bare-Tool Milwaukee 2602-20 M18 18-Volt Cordless 1/2-Inch Hammer Drill/Driver (Tool Only, No Battery)
DEWALT DCD985B 20-Volt MAX Lithium Ion 1/2-Inch Hammer Drill/Drill Driver

The above are an affiliate links. I get a tiny commission if you purchase this item from Amazon.

Wall Anchor Types and Strengths Chart

Wall Anchor Types and Strengths

I could reproduce 20 or 30 pages of anchor sizes, types and their strengths. It would drive both of us crazy. If you have a specific application and/or know the weight of what you intend to hang, you should take that with you when you go anchor shopping. If you visit a high quality fastener shop, they will have all of the tables/values at their fingertips.

Remember that anchors have two types of strength: shear and tension. Shear strength refers to the vertical load experienced by the anchor. In other words, if loaded too much, the bolt will tear or break off flush with the wall. Tension refers to the force required to pull it from the hole. Imagine an anchor in a concrete ceiling with weights attached directly to the anchor. These values can be very different! Ask if you are confused or unsure. Also, different metals (regular steel say vs. stainless steel) have different values for the same size/type anchor! You must pay attention. All values listed below are tension values.

The first value in each line represents the size of the anchor. The second value is its length. The final value is the amount of pull out force the anchor will resist.

Common Anchor Types and Strengths Chart

Common Lag Shields
3/8 inch 1 3/4 inch long 240 lbs
3/8 inch 2 1/2" long 400 lbs
3/4 inch 3 1/2" long 800 lbs
.
Split Bolt Anchor
1/4 inch 1 1/8" embedment 400 lbs
.
Expansion Anchor
3/8 inch 2 1/2" embedment 1,290 lbs
1/2 inch 3 1/2" embedment 2,130 lbs
1 inch 6" embedment 6,000 lbs
.
Sleeve Anchor
3/8 inch 1 1/4" embedment 425
1/2 inch 1 1/2" embedment 820 lbs
3/4 inch 2" embedment 1,270 lbs
.
Nylon Drywall Screw Anchor
1/2 inch (only) 15 lbs


Column B145

Mortise & Cylindrical Locksets

door locksetLocksets are used by each of us virtually everyday. They are one of those items that we constantly take for granted. Locksets provide us with convenience, privacy and security. However, many people do not realize that there is a wide range in features, quality, durability and function with respect to locksets. I believe this is due in part to the fact that we are exposed to locksets as children. They are those shiny knobs that are on every door. What could possibly be so difficult about locksets? Plenty!

Two Basic Types

Locksets are available in two different basic configurations: mortise and cylindrical. Once installed, it is difficult, from a distance, to distinguish between the two. However, they are vastly different in function and installation.

Mortise locksets are those that require a mortise in the edge of the door for installation purposes. The guts of the lockset are contained within a thin box or case which fits into the mortise. The mortise which needs to be created is often quite deep. It is not uncommon to create a cavity, 7/8 inch wide, six inches long and four inches deep. Believe me, that is a big hole in the edge of a door! This mortise must be created with precision. It requires a special tool to do it expertly with minimal chance of damaging the door.

Mortise locksets are usually very durable and can often last the lifetime of a house. Residential uses of these locksets are usually reserved for front doors, where you often wish to install a fancy lockset.

These locksets also offer a unique feature. Virtually every mortise lockset has a built-in heavy duty deadbolt. What's more, this deadbolt can be activated in conjunction with unlocking the standard door latch. You simply have to insert your key into one slot and turn the key a little more than one full turn.

Mortise locksets are often very expensive. They usually are solid brass with highly decorative finishes. The locking mechanism is very substantial and all parts are precision milled. They are not really overpriced when you compare them to other locksets.

So what are the holes for?

Those predrilled holes you commonly see in doors are created for cylindrical locksets. These are the locksets that most of us are familiar with. These locksets derive their name from the shape of the lockset mechanism.

Cylindrical locksets come in a variety of styles. There is also a wide range of quality and durability with these locksets. You can purchase some cylindrical locksets for as little as $8 to $10. That should tell you something!

These locksets have one tremendous advantage over mortise locksets. They can be easily and quickly installed by a rookie who has a little bit of patience and hand-eye coordination. The installation does not require expensive tools, especially if you order the door predrilled for both the lockset and the latch.

Because virtually every cylindrical lockset requires the same sized hole for the lockset and the latch, predrilling is the only way to go! There is generally only one measurement you need to specify. This is called the 'backset'. Backset is defined as the distance from the edge of the door to the center of the lockset hole. The two sizes most commonly used in residential work are 2 3/8 inch and 2 3/4 inch. Most residential locksets use the 2 3/8 inch backset.

Which one is right for me?

In my building career, I installed 50 to 100 cylindrical locksets for every mortise lockset. My own home contains 20 to 30 cylindrical locksets of varying quality and style. However, I did install a beautiful and durable mortise lockset in my front door.

Many people like the appearance of the thumb latch handle which is common on many mortise locksets. This same look is available on certain cylindrical locksets.

However, remember that cylindrical locksets almost always require a separate deadbolt lock for security purposes. This lock requires that you insert your key into an additional slot to unlock the deadbolt. Also, the deadbolt requires additional predrilled holes. My advice is to shop around and see which lockset will best serve your needs. Good luck on your next project!

Column B52

Mortise & Cylindrical Lock Manufacturers

Mortise & Cylindrical Lock & Lockset Manufacturers

  • Acorn Manufacturing Company
    * manufactures both mortise & cylindrical locksets.
  • Baldwin Hardware Corp.
    * primary manufacturer of residential mortise locksets. Highly decorative styles available. Just recently offering a lifetime guarantee with respect to polished brass finish. They claim that finish will not tarnish.
  • Kwikset Corp.
    * major player in residential cylindrical locksets.
  • Master Lock Co.
    * major manufacturer of residential cylindrical locksets
  • Omnia Industries, Inc.
    * manufactures cylindrical & mortise locksets - various styles of lever handles and standard knobs.
  • Schlage Lock Co.
    * key player in cylindrical locksets
  • Weier Lock
    * major player in residential cylindrical locksets.
  • Weslock National, Inc.
    * cylindrical locksets

Column B52

Lockset Installation Tips & Required Tools

lever handle cylindrical lockset polished brass

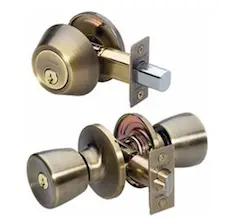
Lockset Installation - This is a standard cylindrical lockset sporting a lever handle. The dead giveaway that it's NOT a mortise lockset is the presence of the two screws on the round brass plate. You'll only see these on one side of the lockset. Photo credit: Tim Carter 2024

Lockset Installation Tips & Required Tools

Cylindrical Locksets

A cylindrical lockset is comprised of two sections. This lockset fits into a large-diameter hole you drill on the face of the door.

Cylindrical locksets are, by far, the easiest to install. This is especially true if you replace an existing lockset or install a new one in a pre-drilled new door.

How Long Does it Take to Install One?

The installation time should not exceed 30 minutes if the large hole is drilled in the door.

Required Tools

You will need the following tools to install a typical cylindrical lockset:

  • Measuring tape
  • Drill
  • 2-1/8 inch hole saw
  • 7/8 boring bit
  • 7/64 drill bit
  • /2 inch wood chisel
  • razor knife
  • Phillips screwdriver,
  • hammer

Installing a Cylindrical Lockset Without the Pre-Drilled Hole

If, by chance you are forced to install a cylindrical lockset from scratch, the first thing you need to do is drill the lockset and latch holes. To determine where the center of the holes are, use the template which is provided as part of the lockset package. There are two important considerations: the backset of the lockset and the height of the lockset off the floor. The backset is the distance from the edge of the door to the center of the lockset hole. As I mentioned earlier, this dimension is commonly 2 3/8 or 2 3/4 inches. Doors that have glass or narrow stiles almost always require 2 3/8 inch backsets. If you use a larger size, the decorative rosette might overhang the stile on a paneled type door. Flush doors do not pose this problem. Commonly, the centerline height of a cylindrical lockset is 36 inches off the floor.

The layout of the lockset hole is critical. Almost all doors have a very slight bevel. Normally you would not realize this. If you have an accurate combination square, check for this bevel. The bevel is necessary, especially on thicker doors, so that the door does not hit the jamb when closing. Without a bevel, the gap between the door and the jamb, when the door is closed, would be objectionable.

Layout the holes starting from the longest edge. Be sure to subtract the bevel distance when you layout the centerline on the other side! When drilling for the lockset hole, use a standard hole saw. Slowly begin drilling from one side. Drill about 3/8 inch into the door.

Now, start to drill from the other side. This practice ensures that you will not splinter the face of the door, had you tried to drill entirely from one direction. Drill the hole in the edge of the door for the latch, being careful to make sure the drill is level and remains square to the door while you are drilling. This is not easy to do!! Take your time. If this latch hole is not drilled properly, assembly of the lockset will be impossible. The latch will be in a bind and will stick. This hole must be right!

Once you have drilled the holes, assemble the lockset. Check for smooth operation. If you did everything right, the lockset will operate just fine.

Installing the Strike Plate on the Door Jamb

Now it's time to install the strike plate. This is really somewhat simple. The most important part is to get the strike plate positioned on the jamb so that the door latches properly. If you position the strike plate incorrectly, one of two things may happen: set too shallow, the door will rattle against the door stop; set too deep, the door latch will not be able to enter the strikeplate.

door lock strikeplate on a door jamb

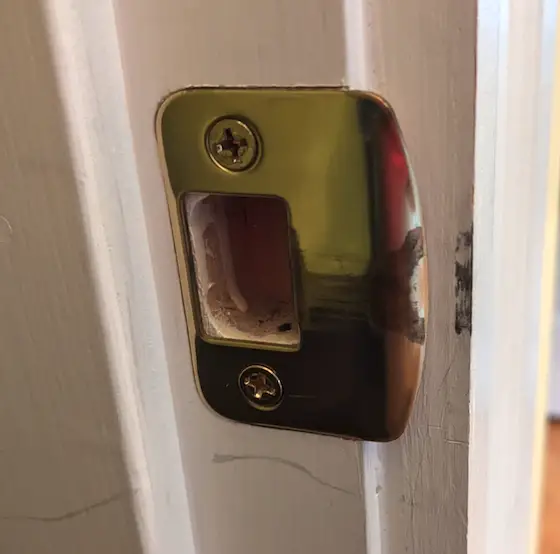
This strikeplate has seen lots of use. More care could have been taken to make the hole for the latch cleaner. Photo credit: Tim Carter Copyright 2024

The tolerance is critical. You have only 1/16th to 1/8 inch to play with. When you are confident that you have the dimension right, place the strike plate on the jamb and lightly trace around it with a sharp razor knife. Do this carefully!!! I have used this method for years to create a very tight recess for the strike plate to fit into. Chisel out the necessary wood, drill the latch hole and install the strike plate. If you have taken your time, the operation will be a success.

Mortise Locksets

If you have never installed a mortise lockset before, I recommend that you not try to do it, unless you are a very skilled individual. These locksets require patience and precision layout. There is absolutely no room for error. You also need access to a special tool - a door mortise. This special tool creates the cavity for the lockset case. It is a powerful tool, and if used improperly, will ruin a $300 to $1,000 door in a matter of seconds!

Many of the installation steps are the same as in cylindrical locksets, however there are more of them. There are usually several different holes to drill on each side of the door. The holes are at different locations and are not always the same size. A master carpenter might spend four to six hours installing a mortise lockset. How long do you think it will take you?

Deadbolt Locks

CLICK HERE to read all about installing deadbolt locks.

Column B52

Tarnish Free Brass Hardware Manufacturers

Tarnish Free Brass Hardware Manufacturers

The tarnish free brass hardware technology has been around for years. It did not get its start in the hardware industry. The machine tool industry actually pioneered tarnish free metal technology. It was first developed 25 years ago for special drill bits!

Baldwin Hardware has lead the charge in the hardware industry. Competition within the industry will force all others to adopt a tarnish-free brass hardware line, that you can be assured of! In the meantime, you can get a good variety of different tarnish free brass hardware from the following manufacturers. Don't hesitate to ask your local hardware distributor if they carry other tarnish-free brass hardware.

  • Baldwin Hardware
  • Schlage Lock
  • Weiser Lock


Column B172