Cleaning Brass Products

Cleaning Brass Products

Cleaning and polishing tarnished brass objects can be a real chore. There are numerous brass polishing/cleaning products on the market. Some of the compounds (ammonia based products - caustic!) will react and actually dissolve the brass. Other compounds (acidic compounds such as citric acid or Maleic or Tartaric) will not dissolve the brass. These compounds aggressively attack the compounds on top of the brass. The mild acids soften the compounds allowing you to easily remove them. The partially oxidized brass remains. Often you can polish this with minimal effort.

Brass restoration can be an ordeal if it is severely tarnished. In these instances you may have to use a two step process. The first step is to apply a caustic tarnish remover. Often these are brushed on and left to work. Some products require you to use a mild acid neutralizer to stop the caustic from dissolving the brass. This is vital! If you leave the brushed on solution on the brass, it can continue to eat into the metal. Always follow instructions!

Light tarnish can often be removed with simple liquids that react quickly with the oxidized brass. You will have to simply read the instructions on the can or jar to see if you feel the product will work on your brass object. Remember, the degree of tarnish determines the product you will use! Many off the shelf products work just fine.

If you have brass specialty shops in your city/town, I urge you to call or stop in. These stores always sell excellent brass cleaning and polishing compounds. Remember, the store owners deal in brass everyday. They know which products to recommend and the best methods to use for each product. Don't re-invent the wheel. Ask for advice.

  • Brasso - A liquid for lightly tarnished surfaces
  • Colonial Metal Polish - a liquid that contains very fine abrasives for tougher jobs.
  • Gillespie's - a three part kit. Works great for heavily tarnished objects. Follow directions!
  • Nev'r Dull - require work and leaves very fine brushed look due to the fine abrasives.
  • Noxon - light tarnish disappears with a soft cloth.
  • Parks - a two step process for heavy tarnish
  • Tarn-X - another liquid that attacks light tarnish
  • Red Bear - available at many fine brass shops. Works well and washes off with water.
  • Wenol - in a tube like toothpaste. It contains no abrasives and works really well on light tarnish.

Remember: Wear cotton or rubber gloves in the final stages of cleaning and polishing. The oils from your hands will leave fingerprints that will show up months later! Always wash the brass with soap and water after cleaning to remove all polishing and cleaning compounds!

Column B172
Brass Restoration Tips

Brass Restoration Tips

The first step in restoring tarnished brass is to remove any old clear coating that may inhibit you from attacking the tarnish. This can be easily accomplished with regular off the shelf paint strippers. Follow the directions on the can and you will remove the clear coating in less than an hour. Rinse the stripper off with water or whatever solvent the manufacturer recommends.

Heavy Tarnish

Brass objects that are severely tarnished will require a lot of work. Don't think you will complete this job in 15 or 20 minutes. You will undoubtedly have to use a caustic two or three step tarnish remover to cut through the tarnish.

Use judgment if you decide to use a cleaner or polish that contains fine abrasives. The same is true about using steel wool to help remove the tarnish. Abrasives and steel wool can and will cause fine scratches. The removal of the scratches can take considerable time and effort. It may be worth your time to use multiple applications of a non abrasive cleaner.

Wash and Rinse the Residue

Once you have successfully cleaned/removed the tarnish from the brass, you must neutralize and completely remove the chemical from the brass. Failure to do this will cause stains and spotting on the brass. Follow the cleaning instructions and use the recommended neutralizer or solvent.

Rubber or Cotton Gloves

The oils from your hands will stain polished brass. Once you have a piece of brass clean, you cannot handle it with bare hands. All polishing and buffing must be done with gloves of some type on your hands. Cotton work gloves will do just fine if you have completed all operations that involve moisture. If you are still using water or solvents, you might try rubber gloves.

Clear Coatings and Wax

Once the cleaned brass is perfectly polished, you need to protect it from oxygen and chemical attack. Clear lacquer or non-yellowing urethane will work. Lacquers seem to work best as they dry quickly. This will minimize dust in your finish. Spraying the finish is much more desirable than brushing. I would apply no less than 4 coats of lacquer. Follow the lacquer instructions.

Automotive wax applied to exterior brass fixtures will help maintain the finish. However, wax will prohibit further coats of lacquer. If you decide to use the wax method, you should apply a fresh coat of wax every 4 to 5 months. This can be a real maintenance nightmare.

You may choose to simply apply a fresh coat of lacquer every year instead. Normal weathering will attack the lacquer and break it down. If you applied 3 to 5 coats of lacquer from the start, your brass should never be exposed to oxygen or water-borne pollutants if you recoat it every 12 months. Simply clean and rebuff the fixture before you apply the new coat of lacquer.

Column B172

Brass Hardware and Tarnish Free Brass Hardware

The two front porch sconces at my house are magnificent light fixtures. I remember the glow on my wife Kathy's face when I installed them 10 years ago. The splendid solid brass fixtures were polished to a mirror like finish. The brass resembled solidified honey.

Direct sunlight and rain have never touched the fixtures. However, they have lost their shine. Airborne pollutants and condensation have eaten pinholes in the clear lacquer coating. The tarnish that has developed was slow at first - barely detectable. Then within a period of six months it appeared that the fixtures developed a severe skin rash. It was too late...I now have to totally restore the fixtures.

Unstable Metals

Many metals are very unstable. Think of it. You just don't go up to upper Minnesota and find steel I beams growing out of the ground. A trip to the hills of Jamaica will not uncover aluminum cans or aluminum siding sprouting from the hillsides. On the contrary - aluminum, steel, copper, zinc and other metals look much different in their natural state. The metal ions are often coupled with other elements. Iron, for example, is often coupled with oxygen. The mineral hematite is simply 2 atoms of iron and 3 atoms of oxygen - Fe2O3. The iron is very happy in this state. Heck, it probably was like that for millions of years!

When we refine metals we change all that. We throw the iron ore into a blast furnace and strip away the oxygen atoms. We produce raw steel. The steel is very unhappy and wants to get back to its original state. It will readily do this in the presence of water. The result is rust! Rust is simply stable iron - Fe2O3.

Brass is no different. Brass is simply an alloy of copper and zinc. Both copper and zinc are unstable in their refined states. Combined they are still unstable. The tarnish that develops on brass is basically "rust". Tarnish and rust are actually protective coatings. When this film forms on the surface further oxidation or "rusting" is slowed down. The tarnish or rust hides the remaining pure metal from the outside elements. That is why each time we polish steel, brass, or sterling silver, it begins to tarnish again. The tarnish wants to protect the remaining pure metal.

The Tool Industry

Nearly 25 years ago, the tool industry developed a way to coat metals with stable metals. The coating helped improve performance and extend tool life. An ultra-thin layer of gold was applied to titanium nitride drill bits.

About five years ago, the light bulb went off in someone's head. They decided to try the same thing with brass. An alloy of nickel was used. Working in a vacuum, they applied an ultra-thin layer - forty millionths of an inch thick! - to the brass. Then a hardener was applied. Zirconium was added in the presence of nitrogen. The result was a metallic protective layer on the polished brass. The most interesting thing was that the layers of the metals were so thin, you could see through them! Tarnish free brass was here. It will soon be available in just about any form. Regular brass hardware and plumbing fixtures are readily available. Just about any brass piece will probably be able to be purchased with a lifetime tarnish-free guarantee.

In fact, I'll bet that within 10 years you will be able to take old brass objects like my porch lights and have them cleaned and coated with the magic metal films. It is just a matter of time before a company offers this service. The technology is here. All you will have to do is arrange the back and forth shipment!

Regular Restoration

For now I'm stuck with restoring my brass fixtures. Outdoor brass suffers and tarnishes more readily than indoor brass. The reason is simple. Moisture accelerates the chemical reaction that results in tarnish. Couple that with the destructive forces of ultraviolet (UV) rays from sunlight and you have a real problem.

UV rays can erode and blast apart the resins that make up clear lacquer coatings on decorative brass. The naked eye can't see this happening. However, it happens the instant you hang those fixtures or brass house numbers. What's worse is that you do not know the quality of the lacquer that was used at the brass factory. Perhaps a cheap lacquer was used. Perhaps only two coats were applied. All this in an effort to save money.

If you want to minimize restoration work on your existing or new brass, then you must coat the brass with 3 to 5 coats of clear lacquer before you place it outside. Spray lacquers are easy to apply and dry rapidly. Experiment on a scrap piece of metal before spraying the real piece.

Exterior brass needs to be recoated each year to prevent tarnish. Don't let your brass get away from you like mine did!

Column B172

Keyless Deadbolt and Electronic Deadbolt Hardware

Security is a major concern for many people. Our current society is such that you need to lock up your possessions to protect them and yourself. Standard door locks offer minimal protection. Deadbolt locks help attain a higher level of protection against intruders. They can't offer complete protection as a determined burglar or thief can and will get into your home. If you don't believe me, ask a seasoned police officer!

New Options

Have you purchased or leased a new car lately? If so, you received a little gizmo that allows you to lock and unlock your car doors from a distance. Some even start your car remotely! You can now get similar features on deadbolt locks. The technology has been integrated so that the little gizmo on your key chain operates your house locks, your garage door opener and even the indoor lights of your house. The next 10 years and beyond are going to be exciting times for electronically excited people!

The remote operated dead bolt locks are very interesting. They are battery operated and have built-in audible and visual alert features that tell you if the deadbolt actually locked. There are lots of other cool features as well.

The lighted deadbolts are handy for those dark locations. I have struggled in my own garage on a moonless night to try to get the key into the lock slot. The lighted deadbolt emits a handsome glow that circles the key slot. It is a very simple yet handy feature.

Security Basics

Before you try to thwart the thieves, I suggest you call your local police department. Large police departments have special crime prevention sections and officers who specialize in door security. They will gladly tell you the things that work and those that are a waste of money. Often the police will perform a free security analysis of your home and tell you where the weak link(s) are in your security armor. Don't hesitate to call your police department! It is a great way to see your tax dollars at work! Besides, the police want to help you before a crime, not after one has happened.

Code Problems

Building codes affect deadbolt locks. Some codes prohibit or restrict the use of certain types of deadbolt locks. The locks I am talking about are those that are classified as double cylinder locks. These are the ones that require a key to operate the lock on both sides of the door. These locks are often used in doors that have glass or glass sidelights. Standard single cylinder locks have a twist knob on the inside of the door. A thief will simply break the glass, reach in and twist the knob. Double cylinder locks prevent this type of entry.

They also prevent rapid escape from the house in the event of a fire or some other problem. Simply keeping the key in the lock does little good since a thief will break the glass and turn the key! Before you consider such a lock on your door, check with the building code individuals and fire officials in your area. Ask them if there is an approved method of installing a double cylinder deadbolt lockset in your town.

Professional Installation?

If you have never done this type of job before, I would surely not start with your front door! I am not saying you can't do this job. I am saying that deadbolt lock installation is a somewhat difficult task. If you drill the holes crooked or mis-align them, you will have big problems. Accurately chiseling the mortises required for the bolt and its keeper require skill.

If you decide to tackle the installation yourself - which I think is admirable! - then you might want to practice your drilling and chiseling techniques on some scrap wood or an old door or similar sized piece of wood. Get the feel of a chisel. See how difficult it is to use a spade bit or a hole saw.

Be sure to use a very sharp pencil to make you marks. Double check all dimensions before you drill anything! Once you drill a hole, it is really hard to enlarge it or move it.

Reinforcing the Jamb

Deadbolt locks are only as strong as what they connect to. Almost every lock kit comes with a special hidden steel keeper plate that is installed in the door jamb. Be sure to use this plate and the long, heavy screws that attach this plate to the rough door jamb hidden behind the regular door jamb.

Also look for deadbolt locks that have a 1 inch long bolt. These tend to be stronger.

Visit your local library. Get a copy of the September 1998 Consumer Reports. They had an excellent article on house alarms, dead bolt locks and home security tips!

Column B244

Deadbolt and Electronic Deadbolt Manufacturers

Standard Deadbolt Manufacturers

There are no less than 45 players in the deadbolt lock business. Making a deadbolt lock is not that hard to do. To make one that is durable, long-lasting and smooth operating is a challenge. I have installed some fairly inferior deadbolt locks in my day. These were ones customers supplied to me. These low cost locks would frequently jam. The mechanical operation of the bolt was sloppy.

I have listed below some companies that I know to make higher quality deadbolts. Cost is a fantastic barometer of quality. High quality deadbolts simply cost more money!

  • Baldwin Hardware Corp.
  • Corbin Russwin Arch. Hardware
  • Kwikset
  • Master Lock
  • Schlage Lock Co.
  • Weiser Lock
  • Weslock
  • Yale Locks

Electronic and Lighted Deadbolt Locks

There are two players I have been able to find that make electronic, lighted or keyless deadbolt locks. The electronic and lighted locks still have traditional keyed operation - they just offer the radio operated locking and infrared sensing lighting feature as additional convenience features. Kwikset - 800-327-5625 - makes the electronic and lighted deadbolt locks. They are attractive mechanisms and offer excellent protection if you follow the clear and concise installation instructions. Kwikset even has a TOLL FREE hotline that is available 7 days a week if you run into difficulties while installing the deadbolts! Call the above number if you get yourself or the lock in a bind.

I discovered another company that advertises keyless locks. It is the Presto-Matic Keyless Lock Company - 800-269-4234. I tried to get information from them but no one would answer their toll free number. Perhaps you will have better luck than I did! You can bet that other companies will soon enter the electronic lock race.

Column B244

Deadbolt Installation Tips

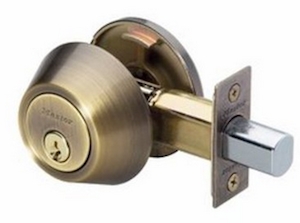
deadbolt from the outside

Here's what a deadbolt looks like outside of the door.

Deadbolt Installation Tips

The installation of a deadbolt lock requires a certain level of skill. You need to have good hand - eye coordination, the ability to measure accurately and patience. Add to this a good assortment of tools. The final fit and finish of deadbolt locks depends upon precise alignment of the 3 different holes that must be drilled in the face of the door, the edge of the door and the door jamb. Make a mistake in any of these areas and the lock will probably not work smoothly, if it works at all.

Necessary Tools

You are going to need the following items to professionally install a deadbolt lockset:

  • power drill
  • assorted drill bits / hole saws - up to 1 and 1/4 inch
  • sharp 1/2 inch wide wood chisel
  • Phillips and flathead screwdrivers
  • razor knife
  • small square
  • measuring tape
  • wood putty for mistakes

The larger sized drill bits or hole saws are necessary to make the large bore holes for the lock mechanism, the latch and the hole the latch fits into in the door jamb. The directions that come with the lock will indicate the size holes you will be drilling.

Getting Started

The instructions will generally tell you how high to place the lockset off the floor. A reader of my column in Colorado suggested in a letter to me that the standard height suggested by most companies might be too low. He indicated that the average person can kick a door at that height - which is usually around 36 inches off the floor. He suggested installing deadbolts at 54 or even 60 inches off the floor. This is above the height that a solid kick can be executed against a door. The only problem with this is that some doors do not have a lock block within the door at this height. If it is a solid wood door, you will be OK. If the door has no lock block, when you drill the large hole on the face of the door, you might encounter a hollow spot!

Pre-Drilling Marks

Once you have decided on a lock height, you drill the door first. The instructions will talk about a backset dimension. This is a critical dimension from the edge of the door to the center of the deadbolt lock hole. You MUST measure this backset dimension from the longest edge of the door bevel. What is a door bevel? Most beginners don't realize that the edge of a door where locksets are placed is beveled. The bevel is necessary so that the thick door will close snuggly against the jamb. Without a bevel the gap between the door and the jamb might be 1/4 inch or larger. The long edge of a properly beveled door is always on the hinge side of the door. The hinge side is the side of the door where you can see the hinge pins when the door is closed.

Measure the backset center mark and use a hole saw to begin drilling the hole. Watch closely as the hole saw pilot drill bit starts to pop through the other side of the door. Stop drilling, remove the drill bit from the partially drilled hole and now complete the hole from the other side. This method prevents splintering of the door finish.

It is now time to drill the latch hole. This hole must be drilled level and at a 90 degree angle to the large lockset hole. A mistake here will create binding as the dead bolt tries to exist the edge of the door. Take your time! You will need to carefully chisel the mortise area to accept the bolt plate in the edge of the door. Use the razor knife to trace the pattern - a pencil is too inaccurate.

The Door Jamb

Once the door holes are drilled, assemble the deadbolt lock in the door. Operate the mechanism and check to see if it is smooth. If not, you need to modify the holes to get them in proper alignment. Once you are satisfied with the lock's operation, you need to mark where the latch contacts the door jamb. Simply measuring doesn't always work because the floor can be out of level! I close the door and then turn the deadbolt lock so that the bolt comes out and strikes the jamb. I mark the top and bottom limits of the bolt onto the jamb with a light pencil mark. These marks allow me to get the proper height for the bolt hole in the jamb. The next challenge is to get the side to side measurement so that the bolt operates smoothly when the door is closed.

Close the door and see if the door face is flush with the door jamb. If so, then the door jamb bolt hole centerline is the same as what you used for the edge of the door. If it isn't make the necessary measurement adjustments. Drill the hole, chisel for the latch keeper and you are done!

Column B244

Vinyl Fencing Installation Tips

A Totally Different System

Have you ever installed a wood fence? I have. If a rail is a little long, no problem. Just get the saw out and cut it off. You can't do this with vinyl! Many of the fence systems are preassembled at the factory for a number of reasons. The installation tolerances are tight. Post center to center dimensions must be accurate. Expansion and contraction needs to be accounted for. In other words, this is not a job for the rookie or uninformed.

If you plan to have a vinyl fence installed, be sure your installer is familiar with the product and the fence you choose. Ask for references. Go and visit the job sites. Do it on a warm day if possible. See if the fence looks like a snake or a straight line.

Cold Climates

Anyone who lives in a cold climate knows that the ground freezes. Did you know that the frost heave can push fence posts out of the ground just like my son and daughter push those frozen Popsicles out of those plastic wrappers? Many fence installers do two things wrong: 1. They don't sink the bottom of the post below frost depth. 2. The post hole is a smaller diameter at the bottom than the top.

This is a HUGE mistake! Fence post holes need to be wider at the bottom than the top! If you do this, and fill the hole with concrete, the frost will actually help keep the post in the ground. Remember, the ground freezes from the top down. The correctly installed fence post will have to try to push the frozen ground out of its way on its way up. Fat chance.

Fence Hardware

When you make your fence investment, be sure that every part exposed to the elements is lifetime. This means that any hardware should be stainless steel. Don't settle for less. Hidden steel structural members can possibly be galvanized steel, but make sure it is of the highest quality.

DIY'r Jobs

Thinking of tackling that upcoming vinyl job? Well, if you do decide you can handle it, you had better get some written instructions and read them. I'm serious as a heart attack about how close tolerances must be. Not only that, you must constantly think about expansion and contraction. If you install the fencing in extreme weather (very hot or cold), you might be in for a surprise when the weather goes the other way!

You must leave room for the vinyl to move. It can never be pinched. Install it too tight and I guarantee you that you will be taking it apart and doing it over. I heard a story about this just last week at the end of my radio show. A homeowner installed the fence sections into the posts too tightly. The sun came out and....WAVE city!

Column B129

Vinyl Fencing Manufacturers & Warranties

Vinyl Fencing Manufacturers

  • CertainTeed (Bufftech)
    800-333-0569
  • Country Estates by Nebraska Plastics
    800-445-2887
  • Genova Products
    800-521-7488
  • Outdoor Technologies, Inc.
    800-736-5143
  • Kroy Building Products
    800-933-KROY
  • Royal Building Products
    800-387-2789
  • UltraGuard Fencing And Railing
    800-457-4342
  • Westech Fence
    800-515-2459

Column B129

Repairing Existing Fencing

Gravity and frost heaving can take its toll on fence posts. I often see fence lines that have developed a noticeable tilt. All too often an ambitious homeowner will try to push against the post to straighten it. The result is usually a cracked off fence post!

The simple way to straighten a fence line or post is to dig the dirt away from the tilted side of the post. With this dirt out of the way, you will immediately be able to straighten the post with no resistance. The dirt that was removed will immediately be used to fill the new cavity on the other side of the post.

The most common failure of older picket fences seems to be the horizontal rails that support the pickets. If you have to replace a rotted rail, it is major fence surgery. You will have to disassemble the wood pickets to replace just one rail! If you do this, replace the other rail at the same time, unless you are positive it is in excellent condition.

The rot in these rails can be slowed considerably by pretreating fence materials before they are built. This is covered in detail within the remainder of this bulletin. If you choose to use a clear or semi-transparent wood sealer for your fence, be SURE you use a synthetic wood sealant.

Column B194

Wood Picket Fence Materials and Cost Sheet

Wood Picket Fences

There are countless designs for wood picket fences. You can visit your local bookstore and jump on their in-store computer that houses Books in Print. I'll bet you come up with no less than 15 - 20 books on fences, designs, materials, etc. Just before writing this bulletin, I jumped on the Web and I came up with thousands of references to fences. Granted, some have nothing to do with wood picket fences, but I quickly found five sites that had photos of interesting designs!

Creating a material list for a picket fence is not that hard. You need to first decide upon your design and quite possibly build a one panel prototype or maybe a small scale model to see if you like the design. That is what I did.

Often you will buy certain materials in longer and wider quantities to create components. For example, I used 6 foot long fence posts. It makes sense to buy a 12 foot long post and cut it in half rather than buy 8 footers and waste 2 feet!

The same is true for the pickets. In my instance, I purchased 8 foot long pieces of 1x6 rough sawn cedar. Using my table saw and miter box saw, I was able to get six pickets per board. I had some very nice small kindling wood left over as well.

Here is a material list to construct an 8 foot long fence section at my house. Remember, each successive fence section requires exactly the same amount of material except you use one less 6 foot post. This list also leaves you with four extra pickets (you need only 38 pickets) for your next section. So, if you build a long fence like mine, you will need to keep this in mind as you could end up buying too many 1x6's or 4x4's!

Material List

You simply need the following materials:

  • One 4x4 x 12 feet CCA. This is cut in half to make two 6 foot posts
  • Two 2x4 x 8 feet CCA. These are the top and bottom fence rails
  • Seven 1x6 x 8 Rough Cedar. This will generate 42 pickets that measure 1.5 inches wide by 48 inches long

I priced out this package just before writing this column. The cost for the above materials is $58.77 plus tax here in Cincinnati. To construct a fence 48 feet long, you would spend just about $325.00 including tax. That isn't that bad, especially when you consider that you can build the fence with minimal skills!

Your neighbors will probably like you as did mine. In fact, we thought they would hate looking at their side of the fence. It turns out that they feel my wife and I are looking at the bad side!

Column B194