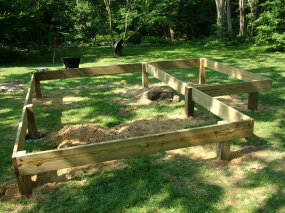
Storage Buildings IV – Materials List/Photos

The following material list will enable you to build the shed which is illustrated. The only thing missing is gravel and any concrete blocks or posts you will need to make the shed level. I would place the concrete blocks at four foot intervals on the 12 foot long walls. Put one at each corner and then go four feet in each direction. Used crushed stone beneath concrete blocks to level them. If you need to do minor adjustments, put thin pieces of steel or aluminum between the floor joists and the concrete block. Don't forget tie down anchors if you live in a high wind area!

Material List for 10 Foot Wide x 12 Foot Deep Shed

Quantity

Item

Description

Floor Framing
13
2x6x10' CCA SYP
Floor Joists
2
2x6x12' CCA SYP
Outer Band Boards
22
2x6 Single Joist Hangers
Joist Hangers
1
1 LB Box Joist Hanger Nails
Structural Galvanized Nails
4
4x8x3/4 CDX CCA Plywood
Shed Flooring
1
12x12 Foot 6 mil Poly
Vapor Barrier
1
5 LBS 16d Sinkers
Joist Nails
1
5 LBS 8d Sinkers
Floor and Roof Sheathing
Wall Framing
40
2x4x92 5/8" SPF Studs
Precut Wall Studs
6
2x4x10' SPF Studs
Wall Plates
6
2x4x12' SPF Studs
Wall Plates
2
2x6x10' SPF Headers
Garage Door Header
10
4x8x5/8 T1-11 Fir Siding
Wall Siding
3
10' Lengths Aluminum Z Flashing
Siding Flashing at Gable Ends
1
5 LBS Hot Dipped Galv. Siding Nails
Siding & Trim Nails
Roof Framing
8
2x6x12' SPF
Roof Rafters
5
2x6x8' SPF
Collar Ties
5
4x8x1/2" OSB Sheathing
Roof Sheathing
12
1/2" Ply Clips
Plywood Spacing Clips
10
H 2.5 Hurricane Clips
Rafter Tie Down Connectors
2
Square Asphalt Shingles
Roofing Material
1
Roll #15 Felt Paper
Roofing Underlayment
1
10 LBS 1 and 1/2" nails
Galvanized Roofing Nails
4
Acrylic Sheets
Skylights
Exterior Trim
8
1x4x10' Rough Sawn Cedar
Corner Trim Boards
4
1x6x12' Rough Sawn Cedar
Roof Rake Boards
2
1x8x12' Rough Sawn Cedar
Roof Gutter/Fascia Boards
4
10' Lengths Roof Drip Edge
Roof Edge at Roof Bottom
Workbench & Shelving
3
2x4x10 SPF Studs
Workbench Wall Cleats & Legs
3
1x2x10 Firring Strips
Shelf Cleats
3
4x8x3/4 CDX Plywood
Workbench & Shelving Mtl.

Note how the T-111 siding overhangs the plywood subfloor by one inch. This stops rain from getting into the shed.

Note how the ends of the rafters are flush with the outer surface of the T-111 siding. This allows you to install the 1x8 fascia without blocking.

If you use a 2x4 as your roof ridge, the diagonal measurement for the rafter is 5 feet 4 4/3 inches. This is the measurement from tip of one plumb cut to the tip of the same edge.

Column B144

Flagstone Patio on Crushed Stone

DEAR TIM: I intend to install a flagstone patio in the very near future and have been told I can place it on compacted crushed limestone that contains screenings. What are screenings and will this method work? The person giving the advice said the crushed limestone beneath the flagstones would eventually harden like concrete. What steps should I take to install the limestone in this fashion? I want to know if this will work as I don't want to have to tear everything out and start over. Tim G., Geneva, IL

DEAR TIM: Flagstone is one of the most popular patio materials I know of. The reasons are many. It is extremely durable, it looks magnificent and is naturally slip-resistant. It is also heavy so I can see why you only want to install each flagstone just one time.

Here are three piles of crushed stone. The one on the left is just larger pieces of crushed rock. The middle pile are the fines. The pile on the right is the crushed rock mixed with the fines. The larger coin on the left is a quarter and the smaller coin is a dime. PHOTO BY: Tim Carter

Here are three piles of crushed stone. The one on the left is just larger pieces of crushed rock. The middle pile are the fines. The pile on the right is the crushed rock mixed with the fines. The larger coin on the left is a quarter and the smaller coin is a dime. PHOTO BY: Tim Carter

Screenings are another name for fines. These fines that range in size from dust-sized particles to small, angular rock chips no bigger than a pencil eraser. They are a by-product of the rock-crushing process and are a very important component for the base material under your proposed patio.

If you were to use just crushed limestone with no fines, the flagstone would have a good base, but not the best. The introduction of these fines is what allows the crushed limestone to mimic poured concrete.

Without the fines there would be considerable void space between each of the larger pieces of limestone. But when you add the fines into the mix, the void spaces disappear. The fines lock each piece of crushed limestone together and make it nearly impossible for them to move. This is what happens when the sand and cement harden in concrete. It is not much different than you being in a tightly packed elevator. In that situation you can barely move your arms much less walk around inside the elevator.

The first step for installing this crushed limestone is to ensure the soil is compacted just beneath the place where the patio will be. Use a mechanical vibrating plate compactor or an old-fashioned hand tamper for this job. You can then install a geotextile fabric or traditional asphalt felt paper over the soil before the crushed limestone is installed. The fabric or felt paper stops soil particles from migrating up into the crushed limestone during wet weather.

I would plan to install no less than 6 inches of limestone for the patio base under the flagstone. But the limestone is not installed all at once. It needs to be installed in two lifts of 3 inches each. Install 3 inches of the loose limestone with the fines and spread it out evenly. Use a mechanical vibrating plate compactor to compact the limestone. A hand tamper is not the proper tool to use for this part of the job. Run the compacting machine back and forth in parallel lines across the limestone as you might cut your grass. Then do the exact same thing but at 90 degrees to the initial direction you ran the machine.

After the first lift is compacted, it is time for the final lift. This layer is very critical as it must conform to the final shape and surface of the patio. If you want your patio to be perfectly level, then this final layer of crushed limestone must be level or nearly so when it is installed and compacted. Remember, the final surface of the patio is just going to be 1 inch higher or so than this layer of crushed limestone. The flagstones are going to sit on this layer of crushed limestone. Imagine how hard it is going to be to remove compacted crushed limestone if you discover that it is too high.

The biggest concern with installing flagstone in this manner is the material used to fill the gaps between the flagstones. You can use just pure fines for this aspect of the job so long as they are more than rock dust. It is imperative to have small rock chips in the fines.

Even after the fines are compacted between the edges of the flagstones, there can be problems once the patio is finished. In periods of heavy rain, it is possible for the fines to wash out from between the flagstones. This creates an ongoing maintenance issue.

You can mortar between the flagstones with a mixture of Portland cement and sand, but I would only do this a year after the patio was installed. This will give the limestone base plenty of time to compact with a little help from Mother Nature. If you do not want to wait, you can lightly sprinkle the limestone base with water for several hours after the final layer has been installed and compacted. Then come back on the following day and run the vibrating plate compactor over the limestone base one final time. Fill any low spots that may develop.

Column 573

Storage Buildings III – Roofing/Trim/Skylights

Roof Framing

You are going to cut the rafters yourself. It is simple. Use a framing square to make a 5/12 pitch roof. See materials list for the rafter lengths. Set the rafters two feet on center starting from one end. Remember, center measurements start at the outer edge of the first rafter, not its center! Install the 1/2 inch roof plywood with the plyclips. The plyclips are used in between the rafters where the next row begins.

Roofing and Trim

Follow the directions on the inside of the shingle pack to install the roofing shingles. This roofing job should only take 3 hours. Be sure to use felt paper under the shingles.

The acrylic skylights are easy. You simply make the acrylic sheet six inches wider and longer than the opening you have made in the roof. Drill three 1/8 inch holes in one inch from each edge on each side. Slide the clear plastic up under the shingles at the top of the opening. Caulk with clear silicone under the edges and the bottom. Nail through the predrilled holes gently! Too tight and you will crack the sheet.

Install the rough swan cedar trim as shown. It is really easy to apply. Remember, if you prestain or paint on all sides, edges, and cut edges, your paint/stain job will last much longer. Take your time and think before you cut or nail. Always check for things to be plumb, level and square!

Continue to Storage Buildings IV - Materials List / Photos

Column B144

Storage Buildings II – Walls/Wall Framing

Wall Framing

The walls are constructed just like the floors. You actually build them on their side on the floor of the shed. Use the precut studs (92 5/8") because by the time you add a single bottom plate and two top plates, the wall will be 97 1/8 inches high.

You must make sure these walls are square before you attach the plywood! I don't need to tell you the diagonals. Just measure them in the field after you nail the wall together. When the diagonals are equal, the wall is square. Nail the wall plywood so it overhangs the bottom of the wall by 1 and 3/4 inch. This will prevent rainwater from entering under the wall plate. Don't worry about the missing wall sheathing at the top.

Build the two 10 foot end walls first. When you frame for the door wall, let the bottom plate run from corner to corner. We will cut it out in a few days. Trim the edges of the wall plywood even with the ends of the walls.

For the door wall, create a rough opening that measures 8 feet wide and 7 feet tall from the subfloor. This will allow the metal overhead door to fit perfectly.

When these two walls are complete, stand them up and nail them in place. Be sure the overhanging wall plywood is tight against the floor system.

Framing the other two walls will be a little tougher. These have to be framed sideways since the two end walls are in place. Remember to let the wall plywood overhang the necessary 4 inches! These walls, don't forget, are not 12 feet long. The plates actually measure 11 feet 5 inches. The first two walls make up the difference. By allowing the plywood wall material to overhang, this allows you to nail the corners together when the walls are erected. Once the walls are erected, check the top corners of the wall for square. It should be the same diagonal as the floor if you did everything right.

Continue to Part III - Storage Buildings - Roofing/Trim/Skylights

Column B144

Storage Buildings

Layout and the Square Box

My plans call for a 10 foot by 12 foot storage shed. The key to a successful project is creating a level, square flooring system. It is a breeze. Remember that all of the lumber has to be checked for square ends. The joist materials and rafters often have cuts that are slightly out of square.Wall studs are usually very accurate. Plywood is extremely accurate.

The first thing we are going to do is build the outer box. Take the two 12 foot 2x6 floor joists and cut them exactly 12 feet long. Check the thickness. They should be 1 and 1/2 inches. If so, cut two of the 2x6 floor joists nine feet nine inches. Nail the joists together so that the 12 foot boards cover the ends of the 10 footers. If you did it right you now have a box 10 foot by 12 foot.

Place the box where the shed will be. Use crushed gravel and solid concrete blocks to level the box. Place a block at each corner and every 4 feet along the 12 foot walls.

Now let's square the box so the plywood fits nicely and the roof rafters work! A line between opposing corners of the box is called a diagonal. The box will be square when both diagonals measure 15 feet 7 and 7/16ths inches. Just get it close for now.

Fill in the Joists

I have designed a shed that will handle quite a bit of weight. The floor will be stiff. I have achieved this by placing the floor joists on one foot centers. In addition, I have used metal joist hangers. These really hold the joists in place much better than nailing into the end of the joist through the band board.

Place your tape on one corner of a 12 foot board and mark the center of each joist. Install the joists and joist hangers. Do not use roofing nails for the hangers! They are not structural nails. Use approved galvanized joist hanger nails. Once the floor joists are in place, check the floor joistbox for square. It has to be right now. If you find it necessary to temporarily stake it to stop movement, do so.

Plywood and Vapor Barrier

Install the vapor barrier over the joists. Then begin to install the plywood. Be sure to stagger your seams. The cut piece from the first row will be used to start the second row, so make a nice accurate cut!

Continue to Part II - Storage Buildings - Walls/Wall Framing

Column B144

Exterior Doors Rub Carpets

DEAR TIM: We have a new home built with logs. The front door is a gorgeous fiberglass unit with sidelights. The problem is the door was installed too low and I can't even have the thinnest area rug inside my home for people to wipe their feet. Can the fiberglass door be cut off so that I can stop ruining my floors? If not, what other options do I have? Heather W., Elmira, NY

DEAR HEATHER: Many years ago I made this mistake as a rookie builder. The homeowner was so upset she couldn't see straight. The irony of the situation is that it would have taken just two extra minutes during the rough carpentry stage to eliminate the problem. You can bet I made that mistake just once. Unfortunately for you and any number of other homeowners, there is this endless conveyor belt dumping rookie builders into the marketplace each week that are making this mistake and quite a few others at the same time.

Look at the daylight under the door. There is about 3/4 inch clearance between the bottom weatherstripping and the oriental throw rug. PHOTO BY: Tim Carter

Look at the daylight under the door. There is about 3/4 inch clearance between the bottom weatherstripping and the oriental throw rug. PHOTO BY: Tim Carter

New exterior doors almost always come from the factory with the entire frame built and the door already hung within the frame. The bottom threshold is often adjustable and frequently measures about 1 and 1/4-inches high from the underside of the door frame to the top of the threshold surface which contacts the door weatherstripping.

The finish carpenter that installed your door probably set the door unit directly on top of the subfloor of your home. Unfortunately, this is a common practice in many homes. But some finish floor systems can quickly gobble up 3/4 inch of space or more. I have actually seen finished flooring that was so thick it caused the front door weatherstripping to rub on the interior flooring. As you have discovered, when this needless mistake happens, throw rugs often are pushed aside as the door swings open.

The truth of the matter is the installation height of the door is not tied to the subfloor of the house. The bottom of the door frame can be any height above the subfloor so long as the overall rough-in height of the stud walls is built to accommodate the overall height of the door frame and any spacers that are placed under the door to lift it off of the subfloor. I always placed a 3/4 inch thick piece of lumber under my door frames so the bottom of the door frame was flush with the top of my finished floors. Your builder could have done that in about 5 seconds.

Since you live in a log home, your problem can likely be solved in one day. The door needs to be carefully removed from the opening and the height of the rough opening needs to be enlarged perhaps one inch, maybe slightly more. This will be fairly easy to do since your home's exterior wall is made from wood.

If the exterior of a home is covered in brick, stone, stucco or some other hard material, the retrofitting job becomes more difficult, but not impossible. Cutting off the bottom of the door is probably not an option because your new fiberglass door is not really made to be planed or cut off as an old carpenter might do with a solid-wood door.

If you cut into the bottom of a standard fiberglass door, my guess is that you will quickly discover insulating expanding foam that is sandwiched between the fiberglass skins of the door. This foam almost always extends very close to the bottom of the door unit. Cutting off the bottom of the door is not recommended by the manufacturers.

Exterior doors come from the factory a given height and the common practice among many rough carpenters is to make the rough frame opening one inch higher than the actual height of the door frame. But they can make the opening any height. The key to success in making the exterior door work perfectly is to have detailed plans that tell the rough carpenter all of the information he needs to know to calculate the correct rough opening.

The plans need to list the actual model of the exterior door, its unit dimension which is the actual width and height of the door frame and the type and thickness of the actual finished flooring material that will be adjacent to the door. This dimension can vary significantly. For example, if plush carpeting is going in, the finished floor height could be 1 and one quarter inches higher than the subfloor. If ceramic tile is being laid on a concrete slab, the finished tile may only be 3/8 inch higher than the slab or subfloor. Each job is different and the architect or builder must provide the needed information so no one is making a guess.

Column 572

Screened Porch Plans

DEAR TIM: My husband and I live in the Denver suburbs. We just bought a new house. In the back it has a 10 x 10 ft. concrete slab as the patio. We want to build a screened patio. We don't know where to begin. We called the building department in our county. They won't come to our house to help us determine what we can and can't do regarding city codes. Do we call an architect? A contractor? If so, how do we find someone to help determine what we can do structurally and help with the design. It is a Frank Lloyd Wright style house with stone. We want to make the patio consistent with that look. We also considered a structure separate from the house but again we just don't know where to start. Any advice would be appreciated. Laura J., Denver, CO

DEAR LAURA: Most building departments will do what you asked, but you went about it the wrong way. You need to draw up a plan of the porch and submit it to them in writing. The government officials then make sure the proposed plan does not violate zoning codes and meets the minimum requirements of the building code. If you pass these two steps, you get a building permit.

Based upon this, you can see that you need plans. But it gets a little complicated. I have seen people spend thousands of dollars on plans only to discover they can't even build what was planned! In one particular case an inexperienced architect took the commission, drew the plans and submitted them only to discover the project violated the zoning code. The owner could not get a variance and the project was never built. But the architect collected his fees.

I would make a visit to the county zoning office and talk with the officials there. See if your proposed screened porch is permissible and meets all side and rear yard setbacks and every other aspect of the zoning code. If they do tell you that you may need a variance, ask what the likelihood of approval might be. If it is low, you may want to put the brakes on the project now.

If you discover the screened porch doesn't violate the zoning, now it is time to call in an architect. Be sure you find one that specializes in residential architecture and find one that can show you at least two or three screened porch plans she or he has drawn for other clients. You do not want to be a lab rat and be the first screened porch client if at all possible. It would really be fantastic if this architect could prove to you that she/ he is familiar with drawing addition plans that match existing architecture. You do not want to add a porch that will detract from your current Frank Lloyd Wright home.

Take your time looking for the right architect. It will payoff in the long run. But make sure you know for a fact the size of the finished room will suit your needs. Go put all of the furniture you plan to use on the patio. If it fits and you are comfortable, this is great. But if the spacing is too tight, the porch may have to be expanded.

Creating a porch of your dreams requires an understanding of the elements, both in construction and climate. Better Homes and Gardens Porches and Sunrooms is a wonderful book to help you decide and plan a porch or sunroom that is right for you. In this book, you will find chapters evaluating and exploring your options, creating elements of style - porches and /or sunrooms, planning, and the basics of building. There is even a chapter on building ... talking you through the process point by point, including tips for choosing and working with building professionals.

Column 729

Building With Wet Plywood and OSB

DEAR TIM: I'm having a new house built. Six weeks ago my builder put in the floor joists and the wood subfloor. Immediately after the subfloor was installed, he framed the walls. Then work stopped and he has not done anything since. The idiot builder forgot to order the roof trusses. Since the work stoppage the house has experienced six major rains. Are the wood walls, flooring and subfloor ruined? The builder said he will sand the oriented strand board (OSB) down to make it even again. I'm getting oak flooring installed over this junk wood. Will the oak flooring be fine over the OSB? Thanks Richard Sparks

DEAR RICHARD: I am at a little disadvantage since I can't see the wood. But ninety-five percent of all exterior plywood and oriented strand board (OSB), that carries the American Plywood Association (APA) trademark, comes from the factories with a durability classification of Exposure 1. This means that the glues used to bond the wood plys, or the wood strands, to each other is 100 percent waterproof.

Products carrying the Exposure 1 stamp are designed so that minimal damage will occur during normal construction activity. It is possible to build with waterproof lumber and this is often done in the Southeast to prevent termite damage. But it is not a common practice to build with treated lumber for the few times wood might get wet as a house is built.

The water will do no damage to the wood wall studs and floor joists unless they are in constant contact with the water for long periods of time. The water can ignite an explosive growth of mold on the wood surfaces, but this can be cleaned off once the house is under roof and the threat of water contact is minimized.

The builder needs to get the roof on as soon as possible and then let the house air out. Once the moisture content of the lumber is down near 12 percent, see how the subfloor feels to walk on. If it is spongy, then perhaps it will need to be replaced.

The OSB panels can feel rough and still maintain all of their structural integrity. It is a good idea to sand the OSB to get it fairly smooth before the finished flooring is installed.

Column QA

Askthebuilder mp3 Radio Show March 26 2005


Each title below is a direct link to a downloadable mp3 file. Just click the title if you want to listen. Right click if you want to download into your computer to save and play at a later date.

The Copyright to all radio segments is owned by Tim Carter. I would love to know what you think of these radio segments.  Do you like them? Do they help you? Have they saved you money and/or time?  Let me know by sending me an email: [email protected]


Tim Gets a VIP Blue Angels Ride in Florida

Cork Flooring Durability

Fine Homebuilding Magazine

Jim, Middleton, OH - Cork Flooring

Fred - How to Seal an Exposed Basement Stone Foundation

Bob, Batavia, OH - Whirpool Tub Installation

Jeff, Hamilton, OH - How to Fix a Warped Parke Floor

Elaine, Lexington, OH - Lowering Ceiling, Suspend Metal Grid System

Paula, Princeton, OH - How to Fix Squeaky Floors Before Installing New Carpet

Askthebuilder mp3 Radio Show March 12 2005


Each title below is a direct link to a downloadable mp3 file. Just click the title if you want to listen. Right click if you want to download into your computer to save and play at a later date.

The Copyright to all radio segments is owned by Tim Carter. I would love to know what you think of these radio segments.  Do you like them? Do they help you? Have they saved you money and/or time?  Let me know by sending me an email: [email protected]


New Nisbet Showroom in Cincinnati

Thelma - 105-year-old Brick House - New Siding

Tim - Leaking Septic Leach Line

Chris - Spalling Concrete

John - Reduce Road Noise in Home and Reinforcing Walls

Don - Modifying a Roof Truss

Dennis - Water Heater Dip Tube