Bridges – Planning

I was flying to an awards dinner in Washington DC early one spring (1999) and was paging through a Delta Sky Mall magazine. One of the products offered was a sleek, decorative, arched bridge for a garden. The bridge came in 5 sizes ranging from 3.5 feet long to 10 feet long. The prices ranged from $299.95 to $1,199.95 . It is a beautiful arched bridge, but the prices sort of takes your breath away! If you want to try to find it, you don't need to fly on a plane.

Modifications

If you want to build a bridge like the one in the Sky Mall magazine, you need special tools and skills. The arch bridge frame and the matching arch railings are tough to build. You can try to do a simple one, but I believe you will soon find out that trying to fit the pieces and get consistent bends is very difficult. I propose that you consider a flat or straight bridge that possibly has a fancy rail system. What do you think of that idea?

Bridge Basics

About ten years ago a next door neighbor's daughter asked me to help her with a high school physics project. The challenge was to build a bridge using toothpicks and regular glue. The total weight of the bridge could not exceed 40 grams. I tried to get fancy and copy the truss design of a real bridge that crossed the Ohio River. I made a little template for her to show her how to cut the little pieces and built a sample triangle truss. She proceeded to build a superb bridge and actually won first place in her weight class division. Her bridge ended up being the lightest weight bridge weighing in at about 12 grams.

Do you know what bridge won the overall competition? The one that held by far the most weight? It was a simple crazy flat bridge that an industrious student built by gluing toothpicks next to one another! The bridge consisted of several layers. I believe every other layer the toothpicks were oriented at a 90 degree angle just as plywood veneers are glued to one another. It was so plain and so simple you could scream! The moral of the story is that your bridge doesn't have to look good to be a top performer.

Long or High Spans

The bridge I have in mind that you are going to build is supposed to be about 10 - 15 feet long and cross a gully no more than 2 or 3 feet deep. If the bridge needs to be larger than this, or cross a creek or ditch deeper than 3 feet, you better consider getting some professional input. Bridge engineering is not that hard for simple spans, but it is critical if you don't want to get hurt. Remember, if you build a bridge that you drive a tractor over, it is going to experience concentrated loads and the vibrations of the tractor may set up a harmonic vibration that can further stress your bridge.

Water Problems

If your bridge is going to cross a creek that rises during periods of heavy rain, you need to take special precautions. Bridge designs that include posts at mid span that are in the center of the creek require study. These posts get stressed as the water rushes by them.

Keep in mind the high water mark of the creek or stream. If the horizontal bridge beams become submerged, the weight and force of the water can simply wash your bridge away. You need to make sure that flood waters don't hit the bridge beams.
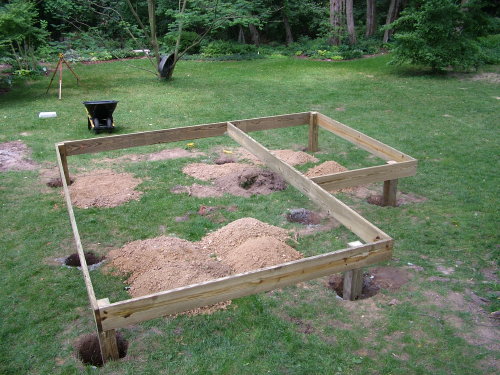
Planning

If you are getting ready to build a bridge, draw up your own simple plan. Install a simple piece of string to simulate the top surface of the deck. Perhaps string two lines to simulate each outer edge of the bridge. Use these strings to give you the overall length of the bridge and how much room is below the beams in case you have a water filled stream to contend with.

Simply take your time. I would not purchase lumber until I had my concrete grade beams in place. I would want to make sure my beams don't fall short!

Companion Articles:  Bridges in Your Backyard, Bridge Building Tips, Bridge Joist Sizing

Wire Bird Feeder System vs. Squirrels

Wire Hazards

Several people contacted me about the hazards of having thin wire suspended in the air. They said that birds could fly into the wire and get hurt or killed. So far I have not had that problem. Actually, I think the birds clearly see the wire as many of them roost on it and seem to use it as they do regular utility line wires. I have seen as many as ten to twenty small birds on the wire at once. But I agree it could possibly be a hazard.

Building the System

As I indicated, I used very small gauge wire - 1/16th inch in diameter. You can get even thinner wire if you want, but I used what I bought because all of the parts were readily available at my local corner hardware store.

I was concerned with several things as I started to build the system. I knew the line would sag both before and after I added the feeders. But I didn't now how much. I also knew I wanted the bottom of the feeders at least 4.5 to 5 feet off the ground. In addition, I didn't want the wire so low as to pose a problem as I carried ladders and long lumber around to the back of my home. Knowing all of this I decided to mount the wire about 12 feet up in the air.

Fortunately, I have a wood frame garage on one side of my patio and a large pine tree on the opposite side. The corner of the garage and the tree happen to be in perfect alignment with the far edge of the patio. I installed two 1/4 inch diameter threaded open hooks to support the wire. I made sure these penetrated solid wood for a minimum of 1.5 inches.

The Drop Wires

Since my feeders are different sizes and types I didn't want to make the final height adjustment of each drop wire until the primary cable was up in the air. But attaching drop wires 12 feet high is a problem! So I attached extra long drop wires to the wire before I installed the wire from the tree to the garage. I then was able to work on a small ladder to cut off the excess from each drop wire and make the final clamp connection for the loop that holds the small S hooks to which the feeders are attached.

Lots of Tension

The wire needs, in my opinion, two cable clamps at each threaded hook location. I show these clearly in the photos. These clamps are easy to work with and do a swell job of holding the wire so it does not slip. The combined weight of the bird feeders full of feed is surprising. I would estimate that the wire might have 40 to 50 pounds of weight on it when all feeders are open and ready for business.

Hook and cable with clamps.

Hook and cable with clamps.

Why a Wire?

Just today, while I was eating lunch and looking out the window to the feeders, I mentioned why I like the wires vs. a pole. The wires are so thin you can't see them against the backdrop of trees at the edge of my property. The feeders seem to float in mid air. There are no posts to navigate while cutting the grass or catching a Trac-Ball (one of my favorite outdoor games I play with my kids). At first, Kathy didn't like the wire but she has since grown used to it. Or so she tells me!

Bird feeders hanging from the wire.

Bird feeders hanging from the wire.


Bird Feeder Suspension System Photos

The top photo is a close up of the wire, the threaded hook and the two wire clamps. Take this photo with you to the hardware store to get the right parts. Remember that the wire is just 1/16th inch in diameter. I used two clamps to make sure the wire would not fall. I built the first loop with two clamps on the ground. I attached it on the hook in the tree and then went over to the garage corner and pulled the wire as tight as I could. I made a mark on the wire where I knew the end of the second loop needed to be. Then I went back down the ladder and built the second loop on the ground. BUT, before I built the second loop, I had to slide down the wire the five hammer-type friction clamps for the drop wires. You can just see a hint of those in the bottom photo. These clamps are small aluminum rectangles with a hole in the middle. You put two pieces of wire through them, place the clamp and wires on a smooth, flat surface and strike them with a hammer. It is amazing how well it holds. I used the same type clamp to make the loops for the S hooks that hold the feeders. The entire system took me about 30 minutes to build.

Outsmarting Squirrels?

I predicted with great accuracy the response I would get from readers about my method of solving the uninvited squirrel guests at my wife Kathy's bird feeders. I told Kathy and Ellen - the faithful employee who handles my mail order and Stain Solver business - that we would get lots of letters and calls from people who had other and/or better solutions. Let me tell you, did I ever get the letters, calls to my radio show and emails! Most people were supportive and I enjoyed many of the comments.

Squirrel Club President

Believe it or not, I even got a call from the president of a Chicago area squirrel admirers club! He chuckled at the column and politely told me it was just a matter of time before the wonderful squirrels would be feasting at those feeders once again. So far I am OK. I even got mail from two people who had identical setups but the diligent squirrels in their yards crossed the wire up side down fist over fist like you see soldiers traversing a rope! This happened just once to me to my GREAT surprise 10 days ago. It had just snowed the day before and the wire was encrusted with frozen snow. This increased the diameter of the wire and made its surface more uneven. Kathy, Ellen and I were eating lunch and one of those little devils started across the wire! I scared him away and since the snow melted I have not had any trouble. Looks like Mr. Squirrel Club President was right......!

Other Solutions

Everyone that contacted me had a story or an idea. Many people have had success with different types of grease coated pole mounted feeders. Been there, done that. Too messy and the feed sticks to the grease and turns moldy.

Still others used large diameter 3 and 4 inch Schedule 40 PVC plumbing drain pipe. The feeders are attached to the top of the pipe via a standard toilet flange fitting that fits on the pipe. Some people screwed the feeder to the toilet flange while others screwed a piece of plywood to the flange. The flange is not glued to the pipe. This allows you to remove the feeder to service/fill it.

Perhaps one of the most unique solutions was a recent one I got two days ago. A person bought one of those giant plastic water bottles that works on an office or household water cooler. He cut the bottom off the bottle. The bottle was then slid down the pole to just below the feeder. A squirrel climbs up the pole, can see through the clear bottle to the feeder but can't get through/or around the bottle to get to the feeder. Pretty ingenious!

Squirrel Proof Birdfeeders - read about them in that column.

AsktheBuilder mp3 Radio Show April 9 2005

Each title below is a direct link to a downloadable mp3 file. Just click the title if you want to listen. Right click if you want to download into your computer to save and play at a later date.

The Copyright to all radio segments is owned by Tim Carter. I would love to know what you think of these radio segments. Do you like them? Do they help you? Have they saved you money and/or time? Let me know by sending me an email: [email protected]


Show Opener

Jennifer - Structural Problems

Ralph - Mold in Earth BFRM House

Jim - Removing Black Soot from Candles

Jim - How to screw down Hardwood to Concrete

Kim - Cork or slate flooring for Basement

AsktheBuilder mp3 Radio Show Feb 26 2005

Each title below is a direct link to a downloadable mp3 file. Just click the title if you want to listen. Right click if you want to download into your computer to save and play at a later date.

The Copyright to all radio segments is owned by Tim Carter. I would love to know what you think of these radio segments.  Do you like them? Do they help you? Have they saved you money and/or time?  Let me know by sending me an email: [email protected]


Introducing Column Summaries on the Web site and Crown Quiz

Funny Home Improvement Stories

Mike, Alexandria, KY - Condensation on Bed Window

Karen, Dayton, OH - Concrete Floor Cracks and Poor Drains

Karen - Black Dust

John, Columbus, OH - Sewer Gas

Elva, Versailles, KY - Granite Countertop Stains

George - Composite Decking with Preservatives

AsktheBuilder mp3 Radio Show May 14 2005

Each title below is a direct link to a downloadable mp3 file. Just click the title if you want to listen. Right click if you want to download into your computer to save and play at a later date.

The Copyright to all radio segments is owned by Tim Carter. I would love to know what you think of these radio segments. Do you like them? Do they help you? Have they saved you money and/or time? Let me know by sending me an email: [email protected]


Annual Las Vegas Hardware Show

New York City Conference & Train Ride

Bill, Cincinnati, OH - Granite and Tile Countertops

Rick, Salt Lake City, UT - Rook Leak In Valley

David, Hamilton, OH - Fibers or Steel in Concrete

Bill, Cincinnati, OH - Precast Foundations

Bill - Sediment Water Heater

Steve - Possible Mold in Basement

AsktheBuilder mp3 Radio Show July 2 2005

Summary: Tim opens the show musing about building material delivery in the 1840s without heavy machinery, specifically in the Cincinnati area. Caller questions include leaking brick veneer, liquid vinyl sources, quality wood windows and foundation strength. Tim also updates on his garden shed and interviews about western red cedar.

Each title below is a direct link to a downloadable mp3 file. Just click the title if you want to listen. Right click if you want to download into your computer to save and play at a later date.

The Copyright to all radio segments is owned by Tim Carter. I would love to know what you think of these radio segments. Do you like them? Do they help you? Have they saved you money and/or time? Let me know by sending me an email: [email protected]


Tim Talks About Building Material Delivery in the 1840s

Tim Gives an Update on Garden Shed Project

Pam - Leaking Brick Veneer

Nancy - Liquid Vinyl Sources

Bill - Quality Wood Windows

Interview about Western Red Cedar

Roger - Foundation Strength

AsktheBuilder mp3 Radio Show June 18 2005

Summary: Today's show introduces Tim's Garden Shed project, along with some Sears tools and metal pegboard manufacturers. Caller questions on tar and chip driveways, shed vapor retarders, cutting Plexiglas and installing ceramic tile on unheated wood are answered.

Each title below is a direct link to a downloadable mp3 file. Just click the title if you want to listen. Right click if you want to download into your computer to save and play at a later date.


The Copyright to all radio segments is owned by Tim Carter. I would love to know what you think of these radio segments. Do you like them? Do they help you? Have they saved you money and/or time? Let me know by sending me an email: [email protected]


Happy Birthday Meghan!

Tim's Garden Shed Project

Sears Multiplying Racheting Screwdriver

Sears Bolt Off

Crystal - Tar and Chip Driveways

Metal Pegboard Manufacturer

Ann - Garden Shed Vapor Retarder

Junior - Cutting Plexiglas

Mark - Ceramic Tile on Wood in Unheated Cabin

AsktheBuilder mp3 Radio Show June 25 2005

Each title below is a direct link to a downloadable mp3 file. Just click the title if you want to listen. Right click if you want to download into your computer to save and play at a later date.

The Copyright to all radio segments is owned by Tim Carter. I would love to know what you think of these radio segments. Do you like them? Do they help you? Have they saved you money and/or time? Let me know by sending me an email: [email protected]


Tim gives an update on his Garden Shed project

Bill or Phil - Sewer Trench Gravel

Phil - Leaking Dishwasher Door

Ann - Pointers on Washing Aluminum Siding and Napoleon Dynamite comment

Cameron - Napoleon Dynamite Discussed and Burying Electric Cable

Garden Sheds

Are you interested in garden sheds? Or a new storage shed? My wife and the tools and machines we use to garden were overtaking our garage.

This is a very basic page and it shows you just a little bit of how I have spent the last two weeks. Soon, I will post many more photos, but from these shots you can see pretty much what I am trying to accomplish.

The outcome of this project will be a series of eBooks. There will be an overall eBook showing how to build the shed from start to finish with hundreds of photos. Then, there will be separate eBooks if you just need help with one aspect of the shed. Hopefully some of these eBooks will be completed shortly.

This is the first step in building a shed that will work. You take much of the stuff you are going to store and place it on your lawn. Then draw an outline around the equipment to get some rough dimensions. PHOTO BY: Tim Carter

This is the first step in building a shed that will work. You take much of the stuff you are going to store and place it on your lawn. Then draw an outline around the equipment to get some rough dimensions. PHOTO BY: Tim Carter


Here is the early stage photo of the outline of the shed. The floor joists are resting on notches cut into the 6 x 6 posts. The pier holes go all the way down to 30 inches below the grass. PHOTO BY: Tim Carter

Here is the early stage photo of the outline of the shed. The floor joists are resting on notches cut into the 6 x 6 posts. The pier holes go all the way down to 30 inches below the grass. PHOTO BY: Tim Carter


Here is the floor about 90 percent complete. PHOTO BY: Tim Carter

Here is the floor about 90 percent complete. PHOTO BY: Tim Carter


This photo was taken July 8, 2005. The shed was started on June 23, 2005. 99% of the work has been done by me with no help whatsoever. Add in the heat and humidity and you can see why it is taking so long. But I am having a blast. It is really a lot of fun. PHOTO BY: Tim Carter

This photo was taken July 8, 2005. The shed was started on June 23, 2005. 99% of the work has been done by me with no help whatsoever. Add in the heat and humidity and you can see why it is taking so long. But I am having a blast. It is really a lot of fun. PHOTO BY: Tim Carter


The shed has two Velux skylights and a really neat ventilating roof turbine. The other skylight is around the corner on the other side of the hip roof. The EBooks will show you exact step-by-step instructions how to install both of these things without ever getting a drop of water in your home or shed!

The shed has two Velux skylights and a really neat ventilating roof turbine. The other skylight is around the corner on the other side of the hip roof. The EBooks will show you exact step-by-step instructions how to install both of these things without ever getting a drop of water in your home or shed!


My friends and neighbors who see the shed are amazed. They call it a little house. Look at the cool six-foot wide overhead Clopay garage door that allows me to get my John Deere tractor in and out. How about those fancy cedar shakes in the gable end? Did you notice the real beadboard used for the soffits? If you live near Cincinnati, OH, you can stop by to see the shed in person if you like.

My friends and neighbors who see the shed are amazed. They call it a little house. Look at the cool six-foot wide overhead Clopay garage door that allows me to get my John Deere tractor in and out. How about those fancy cedar shakes in the gable end? Did you notice the real beadboard used for the soffits? If you live near Cincinnati, OH, you can stop by to see the shed in person if you like.


Turbine Vent

CLICK this IMAGE to get the turbine vents that I put on all my jobs. Great great quality and Made in the USA! Image credit: Lomanco