Tips on Residential Blacktop & Asphalt Paving

nice blacktop driveway

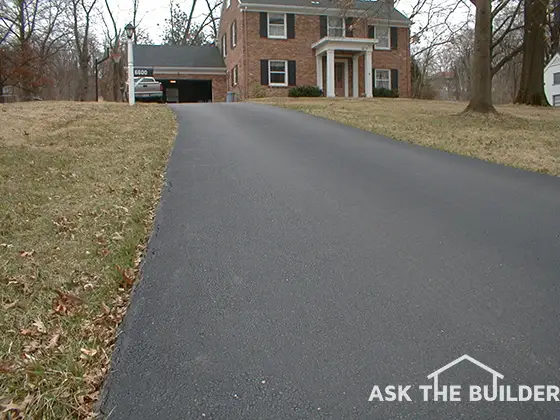
This is a blacktop driveway near my last home. it's in great shape and you know it's got a solid gravel base under it. Copyright 2017 Tim Carter

Tips on Residential Blacktop Driveway

Working with blacktop is like working with many construction materials. It takes skill, knowledge, well-maintained equipment, high quality asphalt paving and base materials and favorable working conditions. If any one of these is compromised, you will, in all likelihood, get a poor quality job. If two or more of these are compromised, there is no doubt that you will experience inferior results.

As with anything, the more you know, the better your chances of success. Here are some tips which will enable you to ask some intelligent questions as you talk to asphalt contractors:


Get the best-looking asphalt driveway around! Learn what to ask your contractor in my Asphalt/Blacktop/Tar & Chip Installation & Repair Checklist. I offer a 100% Money Back Guarantee.


Driveway Drainage Slope

Make sure that your finished pavement will slope at least 1/4 inch per foot. You must have positive drainage on top of the blacktop. Water must not be allowed to puddle on top of blacktop. If your driveway is virtually level this is not a problem. Simply have the contractor install a crown in the driveway. The middle of the driveway will be higher than the edges. That way water will run from the middle to each edge.

Sub-grade

The subgrade is the soil beneath your driveway. Different soils have widely different strength characteristics. If your soil is a plastic type clay, it can be very weak. It will deform easily when heavy concentrated loads are placed on it. Check with your local agricultural extension service to see what type of soil you have. Often they have soil maps which tell you the strength characteristics of your soil.

If building a new driveway, you must remove all top soil. Also, remove any roots or other material which can decay. Be sure to compact the soil if it was disturbed while digging. If you have utility trenches which will cross the driveway (water, gas, sewer, electric lines), make sure that your builder fills these trenches with gravel all the way to the top! Do not allow the builder to backfill these trenches with soil! The soil will eventually settle and your driveway will have a depression.

If you have soil which is poorly drained when wet, you should give serious consideration to installing drain tile beneath the base. This drain tile will help to keep water from softening the soil and spoiling the base. Consider installing a geo-tech fabric in these conditions as well. These fabrics help to keep the mud from getting mixed with gravel. If you have an area with heavy vegetation, you can sterilize the soil to inhibit plant growth. However, use these chemicals sparingly so as not to harm the environment.

Asphalt Driveway Base

The base or foundation of an asphalt driveway is the key to a crack-resistant surface. The base and the soil beneath it do all the work in supporting the loads which will be placed on the driveway. There are two types of bases. One is the standard crushed gravel base. This base is placed on high quality, strong, compacted soils. It often is a minimum of 6 inches thick. It can be up to 8 to 10 inches in thickness, depending on the strength of the soil and what type of vehicles will be on the driveway. You should always build the driveway for the heaviest vehicle which will be placed on it. For example, suppose you intend to have a fully loaded concrete truck on your driveway. Many of these trucks weigh 36 tons when fully loaded. Each wheel of the truck could have a 6 to 8 ton load on it! The footprint of each tire is less than 1 square foot! The little bit of extra money you spend on the thicker base will be worth it.

CLICK or TAP HERE to get FREE QUOTES from local companies that can install your driveway.

You can also install an asphalt base. This type of base is similar to standard blacktop except for one thing. The aggregate (rocks) in the mixture are larger than normal. This larger aggregate gives the asphalt base great strength characteristics. This type of base does not usually have to be installed as thick as a gravel base. It also is a better base to use if your soil is poorly drained or if it is a heavy clay.

Column B29

AsktheBuilder mp3 Radio Show June 11 2005

Husky Mechanic's Tool Sets

I gave away six of these Husky Mechanic's Tool Sets during the show today. Don't you wish you lived in Cincinnati, OH so you could participate? PHOTO BY: Husky Tools

Each title below is a direct link to a downloadable mp3 file. Just click the title if you want to listen. Right click if you want to download into your computer to save and play at a later date.

The Copyright to all radio segments is owned by Tim Carter. I would love to know what you think of these radio segments. Do you like them? Do they help you? Have they saved you money and/or time? Let me know by sending me an email: [email protected]


Husky Tool Set Giveaway Contest

Flooding Danger From Heavy Rain

Waterproofing a Hole in a Foundation

Lending a New Walkboard to Relatives

Toolset and Concrete Block Prevent Car Crushing Injury

Sawdust in Clean Swimming Pool and Divorce

Water Heater Sediment Causes Gurgling Noise

Saw Cuts Finger While Cutting Plywood

Patching Synthetic Stucco

Router Bit Cuts Finger to Ribbons

Mystery Call

Wiring an Outlet While the Power is Still On!

Connecting Two Water Heaters Together

Applying Fiberglass Board to a Bathroom Ceiling

AsktheBuilder mp3 Radio Show June 4 2005

Here is the board. This is the piece of equipment that makes the radio show happen. PHOTO BY: Tim Carter

Here is the board. This is the piece of equipment that makes the radio show happen. PHOTO BY: Tim Carter


Each title below is a direct link to a downloadable mp3 file. Just click the title if you want to listen. Right click if you want to download into your computer to save and play at a later date.

The Copyright to all radio segments is owned by Tim Carter. I would love to know what you think of these radio segments. Do you like them? Do they help you? Have they saved you money and/or time? Let me know by sending me an email: [email protected]


Sears Editors Conference Ft. Lauderdale, Florida

Sears Powder Coating Tool

Repairing Ceramic Wall Tile

Sears Incredi-pull Engine-Starting Gizmo

Deck Cleaning and Staining

Sheet Vinyl Over Embossed Tile Floor

Sears Air Compressor and Nail Gun Combo Kit

Bubbles on Freshly Painted Interior Wall

Making a Hot Attic Cool

Pegboard and Custom Color Pegboard

metal pegboard with tools

This is a great starter set of the metal pegboard, hooks and accessories. This is the brand I have in my home.

DEAR TIM: My garage, indoor workshop and utility room are cluttered. I have seen all sorts of expensive storage solution systems, but most are way beyond my budget. Traditional wood pegboard will work, but I would like something better and more colorful. Is there a new storage solution similar to pegboard? Amy C., Trenton, NJ

DEAR AMY: You may think I am pretty dull, but I have often wondered how many millions of square feet of quarter-inch-thick by 4 foot by 8 foot wooden pegboard have been manufactured and sold over the past 40 years. For many years, it was the only commonly available wall storage material available to consumers like you and me. But the tide has turned and the marketplace is awash in a wide variety of very cool wall storage products.

metal pegboard with tools

Photo by: Wall Control

I am in agreement with you about some of the total-solution storage products. Once you purchase all of the components, the grand total including sales tax can take your breath away. Fortunately, I stumbled across an affordable unique storage system that takes the traditional pegboard approach and enhances it in any number of ways. This great product is custom color pegboard made from metal. Not only does it have the traditional round pegboard holes, but it also sports thin vertical slots. These slots really got my attention when I saw them at an industry trade show.

One of the problems many people had in the past with wood-byproduct pegboard is the nuisance of hook / hanger removal when you pulled a tool off the wall. It was not uncommon for the hook to pop off the pegboard as you pulled the tool towards you. Certain hooks were equipped with retention devices, but over time these would fail as stress would enlarge the holes in the flimsy sawdust and glue pegboard. Once the hole in the pegboard enlarged just the slightest bit, the hook would once again pop out of the hole.

The new metal pegboard is astonishing. It is a modular system whose primary component is a 16-inch wide by 32-inch high by three-quarter-inch thick metal panel. You can place as many or as few of these panels on a wall as you desire. The metal panels come in a variety of custom colors and they have the standard one-quarter inch diameter holes should you wish to use traditional pegboard hardware.

But the metal panels have a better feature in my opinion. Each durable metal panel has 240 thin one-inch high vertical slots spaced on one-inch centers. There are 16 rows each with 15 slots in each row. Ingenious metal hardware hooks permanently lock into these slots. The special hook ends can be found at the ends of a wide variety of accessory hangers, hooks, shelves, paper towel holders, spray paint can holders, etc.

Pegboard Colors

Photo by: Wall Control

The special hooks were designed to lock into the vertical slots and it requires a special movement to remove a hook and relocate it to another slot. This movement is not natural when you are removing a tool from a hanger so the hardware always stays attached to the panels when you do remove a tool from the wall.

Wider panels that are 32-inches wide by 8-inches high are also available. These are perfect for utility rooms where you might want to hang brooms, mops or any other longer tool. The accessory hooks and hangers made for brooms and mops are wonderful as they allow for quick and easy hanging as well as removal when you need to get to work. Once again, you never have to worry about gingerly removing a tool so as to ensure the hanger stays on the wall.

Kathy, my wife, loved the system so much she asked me to install two panels above the sink that is next to the basement interior glass-block greenhouse I built for her. She now has all of the tools and supplies she needs to help her tend to all of the blooming orchids in the greenhouse. Although the metal pegboard can't take any credit for the blooms, it surely contributes to Kathy's good mood!

The custom color pegboard is available at many discount department stores as well as online. The panels come in a sleek galvanized gray metal, painted white, green, red, orange, black or gray. The variety of accessories is mind-boggling. I especially love the combination shelf / paper-towel holder.

Perhaps the best part is how easily the metal panels can be installed. There are pre-punched holes at each corner that allow you to install the panels on any wall where the studs are 16 inches on center. The panels can also be installed quickly on concrete or concrete block walls using anchors. Because they install easily, you can remove them even quicker. Believe me, you may love this system so much you take it with you when you move!

Check out my Hand Tool Storage column where Andy lost it over missing tools!

Column 571

Manufactured Stone Installation

Manufactured Stone Installation

The stone mason is working with wet mortar and buttered the piece of stone well before he pressed it in place. PHOTO CREDIT: Tim Carter

DEAR TIM: Soon I am supposed to have some manufactured stone installed on my house. But I must say I am a little concerned. A new house in my subdivision had it installed recently and after three months, 10 percent of the stones have popped off the wall. That makes me think the product is defective. Should I change to a different material? What do you think happened? Roger P., Kansas City, MO

DEAR ROGER: The popular manufactured stone materials are almost all Portland cement-based products. The best and most good-looking stones are highly sophisticated poured concrete products that are made using special molds and high-quality long-lasting permanent pigments. Even lower quality manufactured stone is still simply a mixture of sand, small stones, cement and pigments. As for defective product, I would only suspect this if the actual stones themselves were soft and crumbled easily.

If we had video tape footage of the workers installing your neighbor's stone and some past weather data, I suspect we would quickly discover what went wrong. My instincts tell me the error was 99 percent workmanship related, not product failure.

How is manufactured stone installed?

Manufactured stone is glued onto the vertical surface of a home as opposed to natural stone which is set on top of one another. Traditional stone is stacked, and gravity pushes down on each stone. Manufactured stone is typically adhered to a wall surface with a cement stucco mixture that is often very rich in Portland cement.

The process of installing manufactured stone is not too different from the way traditional cement stucco is applied to the side walls of a home. With traditional stucco, several layers of wet stucco are applied and troweled to the desired finish. The wet stucco is a mixture of sand, Portland cement and sometimes other ingredients such as lime or latex modifiers. Once dry, the stucco is as hard as rock. With manufactured stone, the hardening process happens at the factory instead of the jobsite. The mason simply uses a stucco mixture to glue the manufactured stones to the house.

What could have gone wrong with the stone installation?

In your neighbor's case, any number of things could have gone wrong. The stucco mixture the contractor was using may have been mixed wrong. It might have had too little Portland cement in it. The stucco mix could have sat around the jobsite too long after being mixed. It could have started to harden on the mortar boards. If the contractor then tried to breathe life in this spent stucco mix by retempering it with water, this would have made a very weak bonding stucco.

The wall surface onto which the stones were set could have been dusty. The actual manufactured stones could have been dusty, too hot or too dry. It often helps if the back surface of the stones is slightly damp when the stucco mix is applied. If the stones are too hot and dry, they can suction too much water from the stucco mix too quickly. If this happens, the stucco mix never achieves its design strength.

Were the manufactured stone's instructions followed?

I can tell you for a fact that if the manufactured stone is applied per the manufacturer's instructions, it should stay on the side of your house for many years. If done right, I can see no reason why it couldn't last for hundreds of years. Cement stucco that is properly mixed and applied can last for hundreds of years with ease. Keep in mind that the stucco mix used with manufactured stone is hidden for the most part from the harsh weather elements. The manufactured stone takes the brunt of the wear from the weather. If your contractor takes the time to mix the stucco correctly and apply it while it is fresh, you should have no problems whatsoever.

If you really want the manufactured stone to stick to a home like epoxy, you can add one small step to the process. Typically the stone is applied to a surface that already has a layer of rough cement stucco or it can even be a concrete block wall.

CLICK or TAP HERE to get FREE QUOTES from local companies that will install your manufactured stone so it will last for years.

Once all materials are set up and the stucco is mixed, mix a batch of Portland cement paint. This is simply Portland cement powder mixed with pure water until it is the consistency of thin gravy. Dampen the surface of the wall slightly and the back of the stone. Use a brush to apply a very thin layer of the cement paint to the wall surface where the stone will be placed and to the back of the stone. Immediately butter the back of the stone with the stucco mixture and place the stone on the wall. Hold the stone in place for 10 seconds.

The cement paint works because it forms millions of microscopic interlocking crystals between the stone, stucco and wall surface. The stucco creates its own crystals, but the cement paint just adds even more bonding power. The cement paint is simple to apply and will permanently lock the stones into position.

Column 570

Outdoor Handball Court

DEAR TIM: My husband and I are planning to construct an outdoor handball court on the grounds of our home in central New Jersey. We are having difficulty finding information on how to construct the wall for our court. We are building the one-wall style court. The dimensions of the wall are: 16 feet high and 20 feet wide. Can you provide information as to whether we should use concrete block or poured concrete? Jean and Don Pollock

DEAR JEAN: You can read my past column on Poured Concrete vs. Concrete Block Foundation Walls for the details, but the bottom line is you can use either material to build the wall. I would think that concrete block would be the better material to use as a good block layer could get the playing side of the wall in a uniform plane with great ease.

You can't say the same thing about poured concrete unless the poured wall contractor was using brand-new forms. If you look at poured walls closely, you will frequently see waves, bumps, lines where the panels touch and other imperfections. These high spots will cause the ball to bounce off the wall in an unpredictable fashion.

The first thing you need to do is check with your local zoning authorities to see if you can even build a wall this tall. Some zoning codes would never allow such a thing.

Your biggest concern is wind load on this wall. I am quite sure it will need to be an engineered wall that very well may have steel or masonry buttresses on the back side that will help prevent the wall from blowing over. Undoubtedly the wall will have horizontal and vertical steel reinforcing rods and if you do use concrete block, the cores of all of the block will need to be filled with cement-based grout or pea-gravel concrete.

The wind load during a hurricane or even a severe thunderstorm could blow over a tall wall like you plan with relative ease. You would be shocked to discover how much pressure is on large flat surfaces on a windy day.

Column N14

When to Pay for Remodeling Plans

DEAR TIM: My husband and I are remodeling our home to accommodate for our new arrival. We've been working with an architect who is not fully licensed at this time. This individual has been drawing up plans for our new project. The plans are not yet signed and sealed as he wants to send them to a licensed architect to have this done. But he wants us to pay the full amount of the plans prior to getting them signed and sealed. We're not sure if we should pay for the plans until everything is finalized. Please let me know if we should pay for them up-front or if we should wait until the plans are completely done. Julie S., Orlando, FL

DEAR JULIE: Congratulations on the expanding family! The answer is very simple if you ask me. I feel you should never pay in full for something until such time as you are completely satisfied. The fact that the unlicensed architect-to-be asked for the money before the job is complete is very troubling to me.

Why should you not pay in full?

There are all sorts of reasons you should not pay in full until the job is complete. The money in your account is the only leverage you possess. The instant you hand over all of the money for the plans, you then rely on integrity, hope and good will to get what you want. This individual may have all of these qualities and more, but I do know he does not yet possess good business sense.

I can produce countless examples in the real world where you do not pay for things in advance in-full before you get them. There are many things where you do put down a deposit and possibly make timed payments as the work progresses, but to pay in full before delivery is a recipe for disaster.

Learning the hard way!

Here is a true story that just happened to the son of a close friend. This young man wants to become a commercial pilot. He signed up for flying lessons and all the necessary ground school training to get the commercial license. The cost was staggering - somewhere above $15,000. My friend co-signed a loan for his son with a bank, took the funds and paid the flight school for the flying lessons and schooling. They did this in advance to get a slightly reduced price. A month ago, the flight school went bankrupt and the son only had 10 percent of his training complete.

The son and father still owe the money to the bank and they have virtually nothing to show for it. A similar thing could happen to you. This unlicensed architect may have made an enormous amount of mistakes in your plans. It could take many hours of redrawing to correct them. Once he has the money, he may be reluctant to make the changes in a timely manner. One thing we know for sure is that his incentive to do so will be greatly reduced. In fact, he will find that the additional work will create a large mental obstacle as he feels he is not getting any money to correct his mistakes should they exist.


How would you like to use my specifications for your new home? I will gladly share hundreds of my tips and building secrets with you and your builder. Check out my New House Specifications. 100% Satisfaction Guarantee!


At this point in time, you have enormous leverage. The plans he has been working on are of no value to anyone but you and your husband. No other homeowner would have interest in them as they are house-specific remodeling plans.

You simply tell this person that you are more than willing to write a check for 90 percent of the total due once the plans are signed and sealed by a real licensed architect. You then tell the architect-to-be that the remaining 10 percent of the money will be paid as soon as the building permit is issued. Keep in mind that the building department may request minor changes in the plans before a permit is issued. You still want to have some financial leverage in the event this happens.

Column N13

Hardware Show Tips

Once again, thanks for your patience with respect to the creation of this webpage. The response to the talks at the Hardware Show was fantastic. The Hardware Show folks told us the attendance and feedback were off the charts. That makes me and the rest of the speakers feel great about the investment of our time and resources.

After each talk, people approached me in the hallway asking for more in-depth information. They realized, as probably you did, that it is impossible to cover the topics we did in just 45 minutes. Many people asked if I would think about putting on a two-day seminar.

The answer is Yes Look for an email later this summer about a conference I will host in the fall. You can help shape the conference into a perfect one by telling me what you want covered. My guess is that many people have the same needs and desires and the outline for the conference will be attractive to all. Send your suggestions to me at:

tim @ askthebuilder.com(remove the spaces around the "@" symbol)


Now, I am going to give you a recap on the speakers, then give you handy links to get the tools we talked about and some additional sweet tips.

First, you already know me and how to get in touch with me. I offer telephone consulting and you can call me for 15 minute Q & A sessions during the week.

Here are the six other speakers:


Janet Attard -- Janet owns www.BusinessKnowHow.com . She is a small-business expert and is very sensitive to the hurdles a small business faces as they try to satisfy customers each day AND then run a second business on the Internet. She has countless tools to help you run your business. I urge you to contact her and tell her you saw her at the Hardware Show. Here is a direct email link:

[email protected]


Don Crowther -- Don was the thin energetic speaker with a mustache. His blasts of information are all pearls of wisdom and he shares lots of them at www.GreatResults.com . Don is a Pay-Per-Click expert and has a fantastic Ebook that teaches you how to buy effective ads on Google and other search engines. Click Her to learn all about this Ebook. Don also does consulting work and you can reach him directly at:

[email protected]


Ken Giddens -- Ken was the tall gifted speaker who talks very smoothly and has a story every 5 minutes. Remember the one he told about the woman who was at a Catholic wedding and wanted to know where the lady next to her bought her shoes? That was hilarious! Ken is a Search Engine expert and is getting ready to teach a class in Atlanta. HE also does tons of independent consulting for those people who really want to learn how to avoid the search engine ups and downs. Contact Ken at:

[email protected]


Dan Murray -- Dan is one of the owners of Ravenwood Marketing, Inc. Remember him? He spoke the last day and spends (and makes) a lot of money on Google AdWords. I think it is safe to say Dan knows a little
bit about how to buy ads and make them work.


Dave Taylor -- Dave is easy to spot. He had the dark beard and has written 16 books about computers and the Internet. His latest book is due out in a few months. It is a book about how to get your website noticed by Google. Dave does all sorts of Internet consulting and he will gladly answer questions. Contact him at:

www.Intuitive.com


Jeff Walker -- Jeff was easy to spot. He also was a dynamic speaker who told you all about getting a buzz going when you try to interest your website visitors about anything. He is an expert at using email newsletters to get people to become raving fans of your products. Contact Jeff at:

www.SixinSeven.com


Handy Links:

Click Here for the link to Wordtracker. This is the invaluable tool that lets you see exactly what people are typing into search engines. You can buy daily, monthly or annual passes into this awesome data base.


Click Here for Don Crowther's Ebook about buying ads in Search Engines. It is called Pay Per Click Money Machine.


Click Here for the Power Point presentation for the last day's talk about Buying Ads in Google.


Here are some other valuable tips from Janet Attard:

Web Site Usability

If you get people to your web site, you want them to USE it. How it's set up can make the difference between customers that stay, find your information and products and take the actions you want (call, buy, etc.) and customers who click away. Here are several criteria to look at before signing off on the final design.


For all sites

  • Can visitors find information and products easily?
  • Is the navigation clear and consistent throughout the site?
  • Does the back button always take them back to the preceding page?
  • Can visitors bookmark individual pages?
  • Do the pages load quickly (10 to 20 seconds) on standard modem connections?
  • Can visitors easily find out who runs the site?
  • Can visitors easily find an email address to contact if they have difficulties using the site?
  • Are the most important elements of your site visible without scrolling up and down or from side to side on screens set to 600 x 800 size?
  • Does the site look good and work from IE , FireFox, Netscape and other browsers
  • Do you have alternate text tags under graphics (to allow visitors who are blind or who have graphics turned off to find important links)?


For eCommerce sites

  • Can visitors tell immediately what you sell?
  • Can they quickly find products and product descriptions?
  • Are there links to related products (accessories to wear with a ladies suit, for instance)?
  • Can they tell what to click on to place an order?
  • Can they find your phone number from every page in case they have a question?
  • Can they find your name and address, and fax number on every page?
  • Can they find an order blank in case they need to, or prefer to mail in their order?
  • Can they find your email address?
  • Can they find price information?
  • Can they find information about the company and its management?
  • Can they find any other important information you want them to have?

Copyright 2005, Janet Attard. May not be reprinted or redistributed without permission.


Stained Glass

This gorgeous custom-made beveled and stained glass panel is not sandwiched between the insulated glass. It lays on top of the insulated glass and is permanently held in place with caulk . PHOTO CREDIT: Tim Carter

Stained Glass Panels

DEAR TIM: We're buying two new smaller windows for a room in our house and want to add a custom stained glass panel to the assembly. One contractor says we can supply the stained glass and it can be installed in between the two pieces of the window's insulated glass.

Another contractor says this is a mistake and that the lead in the stained glass would affect the insulated glass seal and cause a window failure. What's the best way to accomplish what we want?

Is there a safe way that gives us the greatest flexibility? Alison, F., Toronto, CA

DEAR ALISON: It is a shame more people don't do what you are about to do.

New Can Look Old

I have two windows and two front door sidelights that have custom stained glass panels that were installed after the units were installed. Each time a visitor comes to our house, they think the stained glass is original and is 100 years old. The truth be told, the stained glass panels are new, but built with the same skill as the craftspeople of ages past.

Free & Fast BIDS

CLICK HERE to get FREE & FAST BIDS from local stained-glass artists who can make spectacular windows for you.


The best part though is that by adding my stained glass after the windows are installed, I get all of the benefits of new high efficiency insulated Low E glass and the beauty that only custom-designed stained glass can offer. You will be able to get the same. Many window and door manufacturers offer a variety of stained glass as an upgrade option for new windows, but that doesn't appeal to me and it might not to you. I just don't want to see my windows in someone else's house if you know what I mean.

The first contractor who said the stained glass can be sandwiched between the the insulated glass may be correct. Anything is possible and if you saw how insulated glass was made, it is not hard to include the custom panel. But I can see all sorts of challenges to this method.

For example, the size of the stained glass panel would have to be extremely precise, so it matched the inner dimensions of the insulated glass. If the stained glass panel was too big, it would cause enormous problems and if it was a tad too small, the gap between the leaded glass edge and the insulated glass seal would look tacky. Then, there is the issue of thickness. If the custom glass panel were not the same thickness as the space between the pieces of insulated glass, the panel might rattle or look funny. If just one soldered seam in the custom panel is too thick, the insulated glass seal may get stressed or may not seal at all.

I feel the best method is to install the custom stained glass panel on top of the existing insulated glass on the inside of the house. This method is simple, takes minutes and gives you enormous flexibility.

CLICK HERE to get FREE & FAST BIDS from local stained-glass artists who can make spectacular windows for you.

For starters, the custom panel is made by the stained glass craftsperson after your windows are installed. The measurements are taken by the fabricator and there is little chance of a mistake. The full beauty of the stained glass panel is seen by you and is not blocked by the glare from another piece of clear glass. If you decide to move, you can quickly remove the stained glass panel and take it with you. No one would even know the window had stained glass in or on it.

The method of installing these stained glass panels is very simple. The actual stained glass panel is made one-quarter inch less in both width and height than the actual distance between the edges where the window sash ends and clear glass begins. This spacing allows the stained glass panel to have a one-eighth inch space between the leaded glass edges and the edge of the window sash.

You must clean the window glass both inside and out until you are sure the window is perfectly clean and dry. Then, clean the new stained glass panel as well. With clean hands, gently tilt the stained glass panel up against the inside of the window glass and use two small brad nails on each edge of the stained glass panel to pinch it against the window.

The small brad nails are driven at a low angle into the edges of the sash no more than one-eighth inch so they do not hit the window glass. The shaft of the nail touches the edge of the leaded glass and holds it in place, so the gap between the stained glass and the window sash is consistent all the way around all edges. If the window is painted, you use paintable acrylic caulk to fill the gap between the stained glass and window sash. If the window is stained or is vinyl, you use clear silicone caulk. Once the caulk has cured, use a needle-nose pliers to remove the brad nails.

Many people don't realize that caulk is an adhesive or glue. In fact, the chemistry of caulk is nearly identical to many common adhesives. Once the caulk is cured along the edges of the stained glass panel, neither the panel or the caulk will fall out. The stained glass panel is very secure.

If you desire to remove the stained glass panel at a later date, you simply take a razor knife and cut through the caulk. Just place the blade along side the edge of the stained glass panel. It takes just moderate effort to cut through the caulk to the window glass below. Don't press too hard as the razor could scratch the window glass. Once the stained glass panel is removed, use a regular straight-edge razor to remove the residual caulk from the window glass.

CLICK HERE to get FREE & FAST BIDS from local stained-glass artists who can make spectacular windows for you.

Column 567