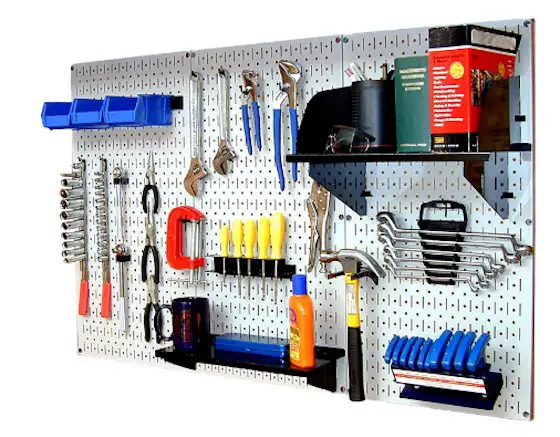
This is a great starter set of the metal pegboard, hooks and accessories. This is the brand I have in my home.
DEAR TIM: My garage, indoor workshop and utility room are cluttered. I have seen all sorts of expensive storage solution systems, but most are way beyond my budget. Traditional wood pegboard will work, but I would like something better and more colorful. Is there a new storage solution similar to pegboard? Amy C., Trenton, NJ
DEAR AMY: You may think I am pretty dull, but I have often wondered how many millions of square feet of quarter-inch-thick by 4 foot by 8 foot wooden pegboard have been manufactured and sold over the past 40 years. For many years, it was the only commonly available wall storage material available to consumers like you and me. But the tide has turned and the marketplace is awash in a wide variety of very cool wall storage products.
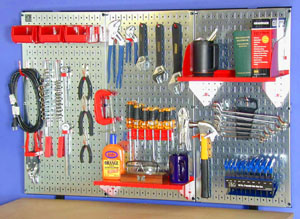
Photo by: Wall Control
I am in agreement with you about some of the total-solution storage products. Once you purchase all of the components, the grand total including sales tax can take your breath away. Fortunately, I stumbled across an affordable unique storage system that takes the traditional pegboard approach and enhances it in any number of ways. This great product is custom color pegboard made from metal. Not only does it have the traditional round pegboard holes, but it also sports thin vertical slots. These slots really got my attention when I saw them at an industry trade show.
One of the problems many people had in the past with wood-byproduct pegboard is the nuisance of hook / hanger removal when you pulled a tool off the wall. It was not uncommon for the hook to pop off the pegboard as you pulled the tool towards you. Certain hooks were equipped with retention devices, but over time these would fail as stress would enlarge the holes in the flimsy sawdust and glue pegboard. Once the hole in the pegboard enlarged just the slightest bit, the hook would once again pop out of the hole.
The new metal pegboard is astonishing. It is a modular system whose primary component is a 16-inch wide by 32-inch high by three-quarter-inch thick metal panel. You can place as many or as few of these panels on a wall as you desire. The metal panels come in a variety of custom colors and they have the standard one-quarter inch diameter holes should you wish to use traditional pegboard hardware.
But the metal panels have a better feature in my opinion. Each durable metal panel has 240 thin one-inch high vertical slots spaced on one-inch centers. There are 16 rows each with 15 slots in each row. Ingenious metal hardware hooks permanently lock into these slots. The special hook ends can be found at the ends of a wide variety of accessory hangers, hooks, shelves, paper towel holders, spray paint can holders, etc.
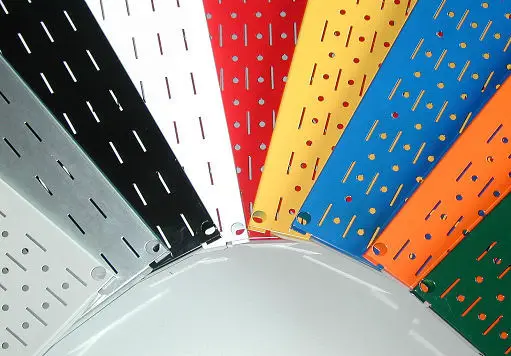
Photo by: Wall Control
The special hooks were designed to lock into the vertical slots and it requires a special movement to remove a hook and relocate it to another slot. This movement is not natural when you are removing a tool from a hanger so the hardware always stays attached to the panels when you do remove a tool from the wall.
Wider panels that are 32-inches wide by 8-inches high are also available. These are perfect for utility rooms where you might want to hang brooms, mops or any other longer tool. The accessory hooks and hangers made for brooms and mops are wonderful as they allow for quick and easy hanging as well as removal when you need to get to work. Once again, you never have to worry about gingerly removing a tool so as to ensure the hanger stays on the wall.
Kathy, my wife, loved the system so much she asked me to install two panels above the sink that is next to the basement interior glass-block greenhouse I built for her. She now has all of the tools and supplies she needs to help her tend to all of the blooming orchids in the greenhouse. Although the metal pegboard can't take any credit for the blooms, it surely contributes to Kathy's good mood!
The custom color pegboard is available at many discount department stores as well as online. The panels come in a sleek galvanized gray metal, painted white, green, red, orange, black or gray. The variety of accessories is mind-boggling. I especially love the combination shelf / paper-towel holder.
Perhaps the best part is how easily the metal panels can be installed. There are pre-punched holes at each corner that allow you to install the panels on any wall where the studs are 16 inches on center. The panels can also be installed quickly on concrete or concrete block walls using anchors. Because they install easily, you can remove them even quicker. Believe me, you may love this system so much you take it with you when you move!
Check out my Hand Tool Storage column where Andy lost it over missing tools!
Column 571