Patio Design

finished paver patio

Patio Planning -  Copyright 2017 Tim Carter

Patio Planning

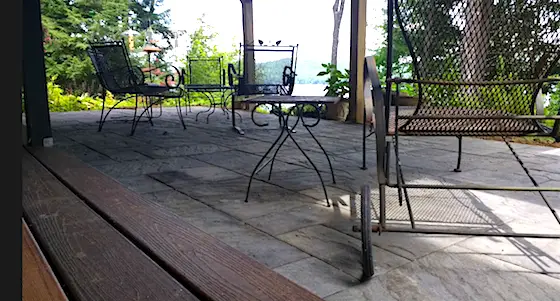
I have had the pleasure of spending time on many different patios in my lifetime. I have sat on ones that were 5 feet deep by 6 feet long and have strolled around one that was 1,200 square feet. With a little thought and creativity, a patio can be an outdoor room that is as inviting as any interior room of your home.

The first mental obstacle you need to overcome is the one-patio-is fine approach. Some of the most delightful backyard living spaces are those that have more than one patio. These peaceful platforms are interconnected with private walkways and if done properly, each separate patio can have its own identity and feel. There are two patios at my own home and the lower patio is oriented to take advantage of a completely different backyard vista.

What goes into planning a patio?

There are quite a few things you should consider when planning a patio. Two things that I consider are the primary visual assets in the backyard and the compass direction. You may be lucky and have a view of a pond, meadow or a valley. But you could also be looking directly into someone's back yard. If this is the case, the primary patio view might become the back of your own home. When this happens, you might heavily landscape the rear wall of your home and incorporate a water feature that will lull you into a state of complacency on a mild summer evening.

Sun vs Shade on the Patio

Think about where the sun rises and sets. How much natural shade will be available when you decide to relax on the patio? Will you be suffering because the patio is unshielded form intense solar rays? Can you re-orient the patio to take advantage of shade from a tree or a part of your home? You can always create shade or partial shade with shade shelters and a plethora of different plants and trees.

Once you know where you are going to place the patio, it is time to make it the right size. Undersized patios are built each day by both builders and homeowners alike. I see patios on a regular basis that only have room for a small table and perhaps two or three closely spaced chairs. If you plan to entertain, be prepared to build a patio that has a minimum of 400 if not 500 square feet.

The best way to size a patio is to buy the furniture that will be used in this outdoor room. Take delivery of the furniture and actually place it on the grass or ground as you intend to arrange it on the finished surface. Sit in the furniture and make spacing adjustments so no one person violates the personal space of another. Use spray paint to carefully mark the outline of the patio directly on the grass or ground. Be sure to allow at least 16 inches behind and on the sides of furniture that is next to the edge of the patio. Be generous with your markings. You will never regret the extra space.

CLICK or TAP HERE to get FREE quotes from local companies that can plan and install your patio.

If you want a really interesting patio and have the space to do it, try to create a few planting beds within the patio. You can purchase dwarf trees that grow only 10 or twelve feet high that provide filtered shade in daylight and interesting geometry at night when lit with an upward pointing landscape light. Abundant seasonal flowers in the planting beds add color, depth and fragrance.

Don't forget the water feature!

My favorite patio amenity is water. Ponds, fountains, even streams running next to a patio add pleasing background sound and motion that can induce a trance in the most stressed-out person. The old real estate saying "Nothing enhances the value of real estate like water." holds true in this instance as well. A water feature that is incorporated into a patio sets it apart from all those that lack this creative twist.

The material used to construct the patio can have an enormous impact on the final look. Concrete can be colorized and imprinted with patterns. Brick, flagstone, slate, tile and other materials can also be used for the patio's surface. All have different colors and textures. The really creative designers can mix and match materials to create a stunning look. Don't be afraid to experiment with different materials. Simply make sure they can withstand all that Mother Nature will throw at them before you take delivery.

Read my Sizing Decks or Patios Column for more tips on getting your patio the proper size.

Column NH031

Storage

attic truss design creating roof room

This is an attic space in a new home. Most builders would have used standard trusses and wasted all this space. (C) Copyright 2019 Tim Carter

Do you have enough storage?

I don't have any hard scientific evidence to support the following statement, but I will bet tomorrow's lunch money that it is right: Most people who walk through model homes do not think about all of the stuff they have crammed into their basements, garages and attics. New home shoppers do look at closet space to see if a house will have enough storage space for everyday use. But keep in mind that I am talking about bulk storage space in new homes.

It has been my experience that people discover on move-in day they forgot about all of the extra things they own. Some items never make it to the new home and is sold or given away, But that which is transported by the moving company often ends up covering the floor of the garage or basement because shelves or other storage solutions were not built or provided for by the home builder. All too often I have had to build shelves after the fact and sometimes there simply was not enough space to house all that needed to be stored.

How can you create extra attic storage space?

There has been an active trend for some time to build homes with fairly steep roof pitches. A vast majority of builders do this using common trusses. Trusses are wonderful building materials but the average common truss creates a waste of space above the living area. The complex pattern of framing members in each truss creates a web of wood in the attic area once all of the trusses are in place. What's more, the average common truss is not engineered to carry any more load than the ceiling below and the roof above.

Your builder can order special attic trusses that have the same outside shape as a common truss but that is where the similarity stops. Attic trusses that are installed side-by-side over a spacing of 20 or more feet create huge wide-open spaces that resemble a traditional attic. These trusses are engineered to support the extra weight of stored items or a full living space. All that has to be done is add wood flooring if you want to use the space for storage. The home designer or architect also needs to provide a convenient staircase to access this space.

Create storage over your garage

Builders often forget about the extra space that exists above the typical garage. Special storage trusses can be used over garages that provide a five or six foot tall head height in a space that might be ten feet deep and is as wide as the overall garage. Because of the limited ceiling height of storage trusses, building codes typically will never allow a space like this to be converted into a living area. But the wide open space allows you to easily walk around slightly bent over to access stored possessions.

High-quality pull-down stairs can be installed to access these garage storage areas. It is also possible to build a traditional staircase to access this storage space above your cars. If your builder supplies these trusses for you, be sure he has the drywall hangers space the screws in the drywall on one foot centers along each truss. Doing this minimizes the chance of the drywall falling on top of your cars over time. Walking around in the storage area can cause drywall to pull away from the trusses if it is installed with a minimum amount of fasteners.

garage storage shelves

Traditional shelving installed in basements or out in garages should be done before you move-in. Take an inventory of your possessions and see if you need special height shelving for larger items. It is always best to keep things off basement floors in case of minor flooding or water seepage from rainstorms. Shelving accomplishes this goal. Save waterproof plastic buckets with lids and use those as excellent floor-storage vessels.

Use turbine vents to control attic temperature

Certain possessions can be ruined by extremes of heat and cold. Think about what you might store in your attic or storage area above the garage. At the very least, be sure your builder installs several wind-powered turbine vents in the roof within these spaces. These spinning vents do a fantastic job of pulling cooler outdoor air into the attic spaces while they exhaust stifling hot air. They also exhaust humid air that might otherwise condense on objects during colder weather.

roof turbine

This turbine vent spins with just the slightest breeze. It is but one tool to use when you want superior attic ventilation. PHOTO CREDIT: Tim Carter

Valuable items stored in your basement can be placed in large plastic tubs that have snap-on lids. These products will keep water off of your items in case a plumbing pipe bursts, a drain pipe leaks or a air conditioning duct drips water. These plastic storage bins come in different heights so you should be able to maximize the storage space between shelves. My wife uses bins like these to protect her sentimental Christmas tree ornaments.

Column NH030

Dual Purpose Drain Tile

drain tile installation

The builder is doing just about everything right installing this drain tile. Photo Credit: Tim Carter

Drain Tile

I often think about how blessed I am to have worked on older homes long before I started building new homes. Frequently, I would have to excavate next to an old home if I were building a room addition or fixing its old foundation.

Often I would uncover the original drain-tile that rested against the footer just below the foundation wall. The pipe was very unique as it was 12 inch long four inch diameter orange vitrified clay pipe. The individual pieces were just butted up against one another and a piece of thick roofing felt paper was placed over the top of each of the joints.

Rest assured your builder is not going to install your drain tile in this fashion. Newer products and installation methods are available that allow builders to install foundation drainage systems that will work perfectly for many years while providing you will tremendous peace of mind.

What is the purpose of drain tile systems?

But many builders fail to realize that draintile systems can serve two purposes. First and foremost they are supposed to collect water and pipe it to another location where it can be transported away from the foundation. But some new homes have shallow foundations that are just four or five feet below the surface. These can often be found in houses with a walkout basement, those that have a crawlspace and under most attached garages.

How can drain-tiles help in times of a drought?

Draintiles installed next to the footers in these shallow foundations can be used as water injection systems in times of drought. In fact, it is not a bad idea to use draintiles systems in deeper foundations in houses with full basements for the same thing.

The heavy clay soils found under many homes in the Midwest can shrink and swell depending upon how much water they contain. In times of extended drought, some clay soils can shrink to such a degree that the foundation and footer can fall. If the movement is uniform under all of the footers at the same time, then a foundation may not sustain any damage. But this is highly unlikely.

Imagine if your builder were to extend several vertical pipes up from the drain tile system to the grade level around your home. These pipes would connect to the draintile piping with standard tee fittings. Placing a garden hose into the vertical pipe would allow you to add water to the clay soil right where it is most needed.

What is the proper components for a drain tile system?

To maximize the benefits of this water injection system the draintile system needs to be installed with care. If at all possible, try to make sure the piping rests against the footer as opposed to resting on top of the footer. I prefer to have one or two inches of coarse 1 inch or greater diameter washed rounded gravel placed between the soil and the bottom of the drain pipe. If your builder uses plastic draintile that has holes punched in it, these holes should point down not up. If placed up, smaller pieces of gravel can clog the holes. What's more, if the holes are up, it is very hard for the water to get into and out of the pipe.

CLICK or TAP HERE to get FREE quotes from local foundation drainage companies.

The draintile piping should be installed fairly level. It will still drain water just fine if level as it is simply acting as a conduit for water movement. Since water seeks its own level, the water trying to get away from the foundation will flow out of the pipe or towards a basement sump pit with little effort.

Installing the draintile nearly level is the best way when the piping will function as a water injection system. As the water flows into the level piping, it travels rapidly to all parts of the system. This ensures that the clay soils are wetted at or about the same time.

In times of drought, you are simply trying to trick the soil around your footers and foundation. Since the soil can't see the sky, it doesn't know if it is raining or not. This soil simply wants to maintain a fairly constant moisture content so that it doesn't move up or down. Your builder can give you this ability with just a little bit of extra effort and material.

Column NH029

Home Plans

SamplePlan Shed Plans Tim's

Home Plans - This is a sample blue print for the Carter Shed.

Home plans are the core documents that communicate what the home owner wants and what the builder needs to build. Without great house plans, a new home construction project can quickly become a sea of confusion, frustration and arguments. Many people think that house plans are just pretty pictures and floor plans, but believe me, they serve a far more important purpose.

Can written plans help resolve building disputes?

Can you remember the last time you were involved in a dispute over anything? Chances are you prevailed if you had some form of tangible written evidence, photograph or object that proved your statements were true. But all too often people argue about spoken words that frequently turn into broken promises, simple misunderstandings, or worse yet - deception. This misery takes place everyday in the residential building arena. Homeowners get into heated disputes with builders and remodelers about any number of issues.

Why do you need good plans?

The sad fact is a vast majority of new home construction disputes can be settled quickly and efficiently with crisp plans and specifications that are developed long before the first spade of soil is turned at the jobsite. There are many reasons why good plans and specifications never get developed. Often the customer is unwilling to pay for the time and effort to produce the documents. Another common reason is the homeowner looks at a set of blueprints and thinks they are sufficient. Without ever seeing a first-class set of prints, I can see why they might feel a deficient set will make do. After all, if they are good enough for the building department then they must be good enough for all involved.

Sample Blueprint

Discover what should be included on your blueprints and the amount of detail required. Click on the image to get a Sample Set of Blueprints from the AsktheBuilder Store. These details samples will show you want needs to be included in your blueprints.

Perhaps a few examples of dispute issues might convince you that you need top drawer plans and specifications for your new home. Imagine if you will a discussion between you and your builder about crown molding. You say you want it in all downstairs rooms. The builder agrees and draws one simple squiggly line on the plans in the cross section and adds "Crown Molding" with an arrow pointing to the line.

Months later while walking through the house as the finish work is being completed, you see a small and simplistic paint-grade crown molding that is barely noticeable up in several rooms. You grumble and wonder why the carpenter didn't install the two piece stained oak crown molding you "thought" you mentioned to the builder.

As you walk into the bathrooms upstairs you shake your head and wonder who in the world put the toilet paper holder on the opposite wall from the toilet. It is barely reachable. Fortunately the carpenter who installed it walks in and you ask about the placement of this fixture. He simply states that is where he always put them. Need I go on?

Should the plans show locations of electrical outlets, switches and the toilet paper holder?

The failure to develop good specifications and plans can also lead to cost overruns and a limited product selection for your finishes. A great set of plans includes numerous interior elevations that show you in two dimensions what a wall will look like when it is finished. These elevations can be as detailed so as to show exact locations of electrical outlets, switches and yes, toilet paper holders. New computer software allows architects and designers to show these in three dimensions as well.

Knowing what you are going to see before it happens can often prevent costly change orders. Many people are unable to visualize what something might look like looking at a simple floorplan. Elevations help solve this problem.

Why are all details needed on the blueprints?

Plans and specifications that do not include the actual selections of all fixtures, cabinets, tops etc. can cause you problems if you try to decide what you want during construction. A builder may ask you to go to the tile store 6 weeks before he needs the tile. But once there you fall in love with a special order tile that take 10 weeks to get. Who will pay for the time delay should you decide to order the special tile?

There are hundreds of scenarios that can be described. But one thing is for sure: Detailed plans with clear and precise specifications that outline each and everything you want will save you if push comes to shove. Time and again when I consult in the forensic construction expert work I perform I find that a great set of plans that were ignored by a builder or sub leads to their capitulation if the dispute is headed for a courtroom.


How would you like me to build your new home? It's probably impossible for me to fit your job into my schedule, but I will gladly share hundreds of my tricks and building secrets with you and your builder. Check out my New House Specifications.

Column NH028

Smart First Time Buyers Plan Ahead

Garage Planning - House Under Construction

Smart First Time Buyers Plan Ahead

There is a first time for everything. Perhaps one day you may find yourself buying a new home instead of a pre-owned older home. New homes have a tendency to induce buyers into a magical state of acceptance. That smell, that new-finish smell of paint, new lumber and carpet in the models can intoxicate you and seriously impair your rational thought processes. Before you even consider signing a purchase contract, you must stop and think about what your real needs are and how well this new abode will fit the bill.

What should you include in your new home needs?

The first step of this process begins where you live now. Start to make a list of all of the things you like and dislike about your current home, condominium or apartment. This should be developed over weeks and perhaps months, not at a single sitting. You may be very surprised at the small things that make a difference. For example, do you like the way morning or afternoon sun streams into a particular room? Maybe you want the sun to greet you as you eat breakfast. If so, you need to look at new homes or building lots that will allow your breakfast area to face East.

What about room sizing?

Room sizing is a huge issue in many homes. Believe it or not, some model homes are furnished with undersized furniture. The scale of the room and furniture makes it seem to you that the room is large enough when in fact it may be too small to accommodate your current furniture or furniture you plan to buy. Use your current rooms as a benchmark in this exercise. Do you need a larger bedroom? If so, in what direction must it grow? What about your living or family room? Do you need additional seating? Your current rooms talk to you everyday with respect to your usage, you just have to listen to what they are saying.

How can you get extra storage?

Storage is becoming a big issue with many people. All too often people look at new homes and forget about storage possibilities. If your new home design incorporates a steep roof pitch, you will have a great opportunity before the home is framed to include special attic trusses that allow you to create an enormous storage area in otherwise wasted space. Similar storage-type trusses can also be ordered for garages. These trusses create a five or six foot tall area that allows you to crouch down and walk on flooring installed within the trusses. Be sure you also include plenty of basement storage shelving. This is all too often overlooked.

Is your garage big enough?

Garages can be deceptive. A totally empty garage often looks enormous. But once you park your car(s), set the trash cans inside, bring in all of the lawn care equipment, bikes, etc. this vast sea of space disappears. Measure your existing garage and determine what the needed size of the new garage should be.

Are your current closets perfect?

Closets can be a sticking point after you move into your new home. Take a very hard look at your existing closet situation in each room. Are any of them perfect? If not, why? Do you have a convenient place to store dirty laundry? Are you tired of bending over to get pairs of shoes? Would you like a bank of cubbies to store sweaters and other frequently-worn clothes? Now is the time to incorporate these desired things. Closet clutter is often caused by poor internal design.

Shoe storage - cubby

Don't forget the exterior of your new home. Is a small family in your future? If so, will the yard yield enough space for both play, gardening and entertainment zones? Be sure that you size patios and decks correctly. All too often these outdoor rooms are half the size they really need to be.

Lastly, be sure to prioritize your desires and wants. Unless you have an unlimited budget, you probably can't afford each and everything you want. Try to determine the things you really need now and include these in your new home. As time passes you often can improve on the go. Buying a new home is supposed to be a happy and joyous event, but all too often it ends up in bitterness and remorse. Thinking before acting can insure a smile on your face just after move-in day!

Column NH027

Preventing Ice Dams – Two Ways To Do It

ice dam on roof

Ice Dam | Here's a photo of the ice dam at Karen's house. This is a photo of a photo. You're probably looking at the roofer's cell phone screen. Photo credit: Anonymous roofer and Karen Bloom

Prevent Ice Dams? Keep Snow Off Your Roof

Here's the truth about ice dams. They are always going to form unless they have no food or fuel. This means you have to remove the snow from your roof.

This is not practical at all. I know as I have lots of roof in New Hampshire.

Related Link

ACCKK! STOP the Ice on my Gutter Guards!

Prevent Leaks From Ice Dams? Yes, That's Easy To Stop

You can stop leaks from ice dams by installing amazing membranes under roofing materials. These membranes stick to the roof sheathing and seal around the shafts of the nails. They are miracle roofing products and I have them on my home. Here's a video of the Grace Ice and Water Shield I have on my house:

Ice dams on roofs can cause water to pour down the inside of exterior walls and gush through ceilings. In almost all instances, all you can do is try to collect the water and call your insurance agent. There's no magical valve you can run and turn off to stop the flow of water. The water continues to flow until the snow and ice melts or the outside temperatures drop enough to re-freeze the liquid water that is backing up under your roofing materials.

Grace Ice Water Shield

I covered the ENTIRE roof of my New Hampshire house with Grace Ice and Water Shield. I never have to worry about a roof leak - EVER. CLICK on the PHOTO to have Grace delivered to your home in days.

How Many Homeowners Get Ice Dam Leaks?

This unfortunate scenario happens to thousands of homeowners each winter. It happened to my next door neighbor eight years ago, just 18 months after I had installed a gorgeous new kitchen for her. The tears in her eyes were flowing as fast as the snow melt dripping through her kitchen lights as she saw her warm and cozy kitchen turn into a rain forest in the middle of winter. Her ice dam leak had nothing to do with my work as the ice dam formed up on the original house roof 12 feet above the kitchen I recreated.

CLICK or TAP HERE to get FREE BIDS from local roofers to install Grace Ice and Water Shield.

When is the Best Time to Stop Ice Dam Leaks?

The best time to stop ice dam leaks is when you're installing a new roof or building a new home.

When building a new home you have a golden opportunity to stop ice dam leaks from making you a statistic. Your builder, rough carpenter and roofer can team up to add small innocuous options to your home that are hidden from view but go a long way to stop water from entering the finished rooms of your new home.

Does Water Backup Under Overlapping Shingles?

Water does back up under shingles if it can't drain by gravity to the ground.

To stop leaks caused by ice dams, it helps to understand how the snow-melt water can leak into the same roof surface that effectively stops rain drops in even the most violent thunderstorm. Study a typical sloped residential roof surface and you will see overlapping layers of asphalt shingles, slate, tile, wood shakes or some other roofing material. So long as water moves down the roof, this overlapping system works. But if water travels backwards up under the overlapping materials, water begins to work its way inside.

Why do ice dams form?

Ice dams form on roofs when the chilled snow melt water flows down the roof surface and re-freezes as it contacts cold shingle, gutter, and flashing surfaces whose temperature is below freezing. As more water flows down the roof the ice buildup gets higher and higher. In some instances the ice dam can grow to be one foot or higher. Liquid water builds up behind the dam and that which does not re-freeze often leaks into your home.

Ice dams can form for all sorts of reasons. Where the roof passes over an exterior wall, attic insulation is often thin. Heat can escape from the house and help to melt snow pack that is up on a roof. Ice dams can even form in the center of a roof if conditions are just right.

What is the Easiest Material to Stop Ice Dam Leaks?

The easiest material to install to prevent water from entering your home is an ice dam membrane that is applied directly to the lower edge of the wood surface of the roof before the shingles or roofing material is installed. The membranes should also be installed at roof valley locations, places where the roof might change pitches and around all penetrations such as skylights, plumbing vents and other roof vents.

These special membranes often contain rubberized asphalts and an inner synthetic membrane that work to seal around all nails that penetrate this membrane as the finish roof is installed. The water from an ice dam will still back up under the roofing materials, but it can't get through the membrane and into your home.

Will a Higher Heel Height on Rafters Help Prevent Ice Dam Leaks?

Yes, increased heel height will help prevent ice dam leaks. This extra height allows for thicker insulation at the corner of the ceiling next to an exterior wall.

Your builder and rough carpenter can help as well by increasing the heel height of the roof rafters or trusses where they pass over exterior walls. A truss or rafter with a high heel allows the insulation contractor to install more insulation without blocking the important flow-through ventilation space between the soffits and attic area. This added insulation helps to stop heat transfer that melts snow. You can also add reflective radiant barrier chips on top of your insulation to stop the flow of heat through the insulation.

Will Larger Overhangs Help Prevent Leaks?

More generous roof overhangs also are a great preventative measure to fight ice dam leaks. The ice dams form out and away from the house and any water that does backup often just drips through the exterior soffit instead of the inside of your home.

Remember, you can't stop ice dams but your builder can do many things to prevent the leaks. You can stop water that accumulates behind these winter menaces from entering your home. Discuss all of your options with your builder before the foundation is poured.

CLICK or TAP HERE to get FREE BIDS from local roofers to install Grace Ice and Water Shield.

Column NH026

A Strong Asphalt Driveway

Asphalt driveway paving like this can be done in your city or town. This is a blacktop driveway near my last home. it's in great shape and you know it's got a solid gravel base under it. © Copyright 2018 Tim Carter

"If you want your new blacktop driveway to look good for many years, you need to make sure the gravel or deep-based asphalt base is one foot wider than the actual finished blacktop surface."

Asphalt Driveway Paving - Smooth and Strong

Asphalt or blacktop driveways are often the pavement one ends up with a new home. They are typically the least expensive paved surface a builder can install. Just because they cost less money by no means are they inferior.

Free & Fast Bids

CLICK HERE to get FREE & FAST BIDS from local blacktop contractors.

How long does blacktop last?

A blacktop drive that is installed with great care can last for 30, or more, years with little effort.

Related Links

Repair Asphalt Drive Cracks - DO NOT SHARE - Secret!

Tips From Pros About Patching Asphalt

Is Blacktop a Hard Surface?

Yes, blacktop is hard because it's simply a layer of rock, sand and asphalt cement binder. As the asphalt oxidizes over time, the surface gets harder.

If you've ever watched a dropped glass shatter on an older blacktop surface you would probably testify that it was as hard as a rock.

What is in Blacktop?

Blacktop, or asphalt driveway paving material, is a matrix of small rock chips, sand and asphalt cement. Many worn asphalt surfaces are anything but black. They almost always look a lighter shade of gray.

The stone chips in the mix create this color. Look closely and you will see small amounts of black in between the stone chips and sand particles. This black is the actual asphalt that cements all of the stone chips and sand together.

Is Blacktop Flexible?

But the real truth of the matter is that asphalt, even older asphalt surfaces, are flexible. Newer asphalt is far more flexible than an older surface because the asphalt still retains many of the lighter hydrocarbon oils that allow the asphalt cement to liquefy at oven temperatures where you would normally bake a cake.

Put a piece of concrete in your oven at this same temperature and you will get a hot rock, not a puddle of smoking goo on the bottom of the oven.

A good gravel base beneath the asphalt is the secret to a long-lasting driveway.

A good gravel base beneath the asphalt is the secret to a long-lasting driveway.

What Makes Blacktop Long-Lasting?

The secret to getting a long-lasting asphalt driveway at your new house that can withstand even heavy truck traffic is the hidden gravel base beneath the smooth ebony surface you and I see as a finished product.

How Thick Should the Gravel Base Be?

The standard gravel base beneath an asphalt driveway serves as the foundation for the pavement. If you install 8 or 10 inches of crushed well-compacted gravel on solid soil, the blacktop finish has a great start at a service life of 30 or more years.

If you don't believe me, come to Cincinnati and I will show you several 30 and even 40-year-old driveways that are still in good shape.

CLICK HERE to get FREE & FAST BIDS from local blacktop contractors.


Get the best-looking asphalt driveway around! Learn what to ask your contractor in my Asphalt/Blacktop/Tar & Chip Installation & Repair Checklist. I offer a 100% Money Back Guarantee.


What is an Affordable Base Material?

Many asphalt paving contractors use crushed gravel because it is the least expensive foundation material. If you want the best underlayment for the blacktop you can have your builder install a deep-base asphalt driveway. This system uses a thick layer of asphalt with larger stones as the base layer. This system is so strong it has been used to build the roadbed under railroad tracks.

What can Ruin the Gravel Base?

Wet soil and weak soil that breaks down in the presence of water can foul the gravel base beneath blacktop surfaces. When this happens, the gravel loses much of its internal strength.

Geotextile fabrics can be laid on top of the soil before gravel is placed. This fabric stops the movement of soil particles into the gravel. The textiles are durable and roll out onto the soil as you might unroll a throw rug.


Would you like to have a gorgeous driveway? How about step-by-step photos and instructions that show you how I had my own tar and chip drive installed? If so, you might want my Instant Download Tar and Chip eBook.


Should the Gravel Be Wider Than the Blacktop?

If you want your new blacktop driveway to look good for many years you need to make sure the gravel or deep-based asphalt base is one foot wider than the actual finished blacktop surface.

All too often the asphalt contractors install the finished blacktop to the edge of the gravel. When visitors drive over the edge of the drive into the grass, they crack off one or two inches of blacktop because it has no support immediately at the edge. The extra six inches of gravel hidden beneath the grass provide this much-needed support.

Should New Blacktop be Sealed?

No, do not seal new blacktop. Resist the temptation to seal your new asphalt driveway.

Lightweight oils in the asphalt need to evaporate into the air. Even under ideal curing conditions where the daytime temperatures are high and nighttime temperatures are balmy, asphalt needs a minimum of 90 days to fully cure and harden.

Remember, this is the minimum amount of time. It is best to let your asphalt driveway cure for 6 or 9 months at the very least, before you think of sealing it.

Sealing a new asphalt driveway before it's time is the kiss of death. The sealer locks in the light-weight hydrocarbon oils that give the asphalt its flexible nature. If this happens, your driveway will be permanently susceptible to imprints from bike kick stands, twisting tires and any concentrated load from a pointed object.

When is the Best Time to Seal Blacktop?

When you do seal the driveway, use a high-quality coal-tar based sealer. These typically should be applied every 3 to 5 years. The driveway should be sealed when either the original black asphalt has worn off the stones or the subsequent coat of sealer has worn off revealing the actual pieces of stone aggregate.

CLICK HERE to get FREE & FAST BIDS from local blacktop contractors.

Column NH025

Remove Clog From Bathroom Sink – Very Easy

sink stopper nut

Remove Clog from bathroom sink | The sink stopper nut is just to the right of the yellow text. You can see the sink stopper control rod angling down from the nut. The tips below are SO GOOD that I shared this column with the 31,000 subscribers who read my November 25, 2020 newsletter. Keep reading to see why!

DEAR TIM: My drain in the bathroom is stopped up. My husband took the trap off under the sink, but the drain is clogged up above that. He cannot figure out how to get the stopper out of the sink, that metal button that you can push down and pull up. Can you tell us how to do this? Christie G., Canton, GA

DEAR CHRISTIE: You're suffering as many people do. What appears to be a somewhat large pipe, the 1 and 1/4 inch diameter tailpiece leaving the bottom of the sink, is actually clogged with parts the day it is installed. The sink stopper and the control rod that allows it to move up and down are all inside this pipe before the first drop of water and any debris starts its journey to your sewer or septic tank.

How do you remove the sink stopper?

To remove the stopper and its control rod, you must remove a round nut that is on the backside of the drain tailpiece pipe. If you get on your side or your back and look under and behind your sink, you will see this round nut. It is often shiny chrome and has small knurls in the nut instead of large hexagonal edges like a nut that goes on a bolt.

CLICK or TAP HERE to get FREE BIDS from local handymen that can fix the clog CHEAPER than a plumber!

Nut Loose - Pull the Control Rod Out

Once the nut is completely loose, pull the stopper control rod out of the back of the tailpiece drain pipe. There will be a round plastic ball attached to the end of this rod.

Bathroom Sink Stopped

Put your head under your bathroom sink and this is what you’ll see. That horizontal chrome rod lifts the sink stopper up. (C) Copyright 2020 Tim Carter

Pull the Stopper Up and Out

Once the control rod is out of the tailpiece, the stopper will pull up from the sink. It will probably have all sorts of bio-organic goo, hair and crud on it, so be prepared to get disgusted. I would wear rubber gloves if you have any open cuts on your hands. This organic mess is loaded with millions of bad bacteria that can cause serious infections.

Remove the biomass from the stopper and clean it. Do the same with the end of the control rod ball and the metal tip sticking out of the end of the plastic ball. All parts need to be clean before you reassemble them.

Clean Sides of Drain Pipe

But before you put everything back together, you should clean the inner walls of the tailpiece that leads from the sink down to the P-trap piping. You can do this quickly with a 1 and 1/2 inch bottle brush and an empty bucket.

bottle brushes

These are typical bottle brushes. You want one that has a diameter of at least 1 and 1/4 inches. A 2-inch diameter one is great for shower drains. CLICK or TAP HERE or THE IMAGE TO BUY THESE NOW.

Use a Bucket to Capture Splash Water

Simply place an empty bucket under the tailpiece and turn on the water in the sink while you move the bottle brush up and down in the drain outlet hole. Be sure to push the bottle brush down as far as you can. You may have to insert the brush from below as well as the top to clean the entire length of the tailpiece.

Cleaning the inside of the tailpiece helps control odors in bathroom sinks. The biofilm buildup that grows on the pipe walls can release odors each time water is run in a sink.

Column 550

Electric Upgrades – It’s the Small Things That Count

Metal Backsplash Outlet

Electric Upgrades | You may want an electric outlet or two in very specific locations in your kitchen. Here's a typical electrical outlet cut through a metal backsplash. Copyright 2018 Tim Carter

Electric Upgrades - It's Not All About 200-Amp Service, Silly!

If you're like the average homeowner, I doubt you will do any deep thinking about electric upgrades. You'll be so busy picking out faucets and siding colors that you'll not give much thought to electrical outlets, switches, and other electrical needs as you plan your new home.

Typically many of these decisions are left to the electrician or the architect. Many electrical outlet locations are mandated by the National Electric Code, but there is usually nothing stopping you from exceeding this wonderful set of rules and guidelines.

CLICK or TAP HERE to get FREE BIDS from local electricians who can add outlets for you.

Where Are the Best Electric Upgrades?

For example, let's talk about the mundane subject of your garage. Sure there will be receptacles in the garage, but are they in the right place and worse yet, will they eventually be hidden by things stacked against the wall? Have you ever worked on a project just outside the garage door on the driveway apron? I'll bet a convenient outdoor receptacle by the garage door would have come in handy. Are you going to have a workbench in the garage? You need perhaps four receptacles in and around this area.

zircon breaker id

Here's a double-duplex outlet. Many don't put these in and it's a big mistake. You can plug four things in one place. The black device with the red LED light is covering two outlets so you know.

Where Should a Bathroom Outlet Be?

Bathrooms are a pet peeve of mine. The power outlets should be immediately adjacent to the spot where appliances will be used. I don't want the hot curler cord stretching across a sink anymore than you do. Think about what you might use in a bathroom and where it will be used. The electrician can almost always put the receptacle where you want it.

Related Link

FIRE DANGER! Beware Extension Cords - Get the RIGHT ONE

Are Christmas Outdoor Outlets Hard to Install?

Christmas outdoor outlets are easy to install. You can have several daisy-chained together so they can come on with the flick of an indoor switch. These make for great electric upgrades.

Do you decorate indoors for the holidays? If so, you want strategically located outlets on top of mantles, next to handrails, and any place where you think you might have light displays or strings of lights. If you think these things through now, you will never have to rely on an extension cord. Do you think I bend over twice a day to plug in and then unplug my Christmas tree lights? No way. I simply flip a wall switch.

Exterior holiday lighting needs multiple outlets as well. Your electrician can put any number of exterior outlets under soffits, hidden in overhangs, and other places that will allow you to minimize the amount of spaghetti extension cords that drape all over your home. Once again, these outdoor lights can be easily operated by an indoor wall switch or two.

CLICK or TAP HERE to get FREE BIDS from local electricians who can add outlets for you.

What About Smart Plugs?

Smart plugs are a great idea. These plugs can be turned on and off via the Internet so long as WiFi is operating in the house and the smart plug can connect to the WiFi. Watch this video about how to water a Christmas tree to see a clever use of a smart plug:


CLICK or TAP HERE for a wide variety of smart plugs.


End Tables and Night Stands Require Careful Measurements

End tables at couches and night stands in bedrooms are also a sore spot with me. I want my outlets centered at the exact table location so that I am not reaching behind a couch or a bed to find an outlet. I also prefer to place these outlets 16 inches above the floor so that the lamp cords can be bundled up behind the piece of furniture. When you do this, no wiring can be seen when you walk around the room.

Can I Install an Outlet in a Floor?

Yes, you can install electric outlets in floors. There are special cover plates made for them. These floor outlets are very useful for houses with open floor plans.

If you have special wiring requirements as I do for a special glass-covered coffee table that has two miniature working model trains under the glass, you may need a floor outlet located directly under a table such as this. Extending an extension cord under a carpet is a very dangerous thing to do. You want to plan now for these highly-specialized electric needs.

Tim's small office desk

Home office needs are also important.

What Are the Best Outlets for a Home Office?

The best outlets for a home office are ones for a computer, phone charger, desk lights, a printer, and a scanner.

Home office needs are also important. I prefer to have my printer and a few other machines up on shelves just above my desk. I can easily reach the printed papers and this frees up desk space. But the electrical outlets need to be high on the wall and behind or next to the machines. Once again, if you plan out where your equipment will be, the electrician can almost always accommodate you.

electric panel wiring for future

Wiring for the future. Think about what might happen in 2100 and beyond.

Circuit Panel Needs Extra Slots

Last but not least, keep in mind your actual circuit breaker panel, the actual wire that feeds each circuit and future wiring. Be sure you have six or even ten empty spots in your panel for future circuit breakers. You may discover that 20 amp circuits throughout the house makes more sense than lower capacity 15 amp circuits.

My own home has all 20 amp circuits wired with 12-gauge wiring. Be sure the electrician installs several blank conduits that allow him or a future electrician to quickly feed wire from the electrical panel up into an attic or a crawl space. You can also install blank conduits into remote walls so that getting a wire to a hard-to-reach location is a breeze.

Column NH024

Save Money Building a Home – Lots of Ways

factory built walls on new house construction

Save Money Building a Home | Save on labor and mistakes using pre-built walls made in a factory. The precision is remarkable. (C) Copyright 2020 Tim Carter

Save Money Building a Home - Many Ways

If you studied Economics in high school or college you might remember the law of supply vs. demand. We experience this law frequently in our lives and the home building industry is by no means immune from it. In fact, there are many building products that see violent price swings even though they are commodity items. Lumber and engineered lumber fall into this group.

Currently, the price of certain lumber products is at or near historic highs. The lumber industry press releases cite all sorts of reasons for the current dilemma. No matter what the reasons are, we consumers have to suck it up and either pay higher prices or decide to wait until prices might drop. For many, waiting is not an option that is on the table.

CLICK or TAP HERE to get FREE BIDS from local builders for your new home.

Can Factory-Built Floors, Walls, and Trusses Save Money?

Factory-built floors, walls, and trusses can save lots of money. The house is built faster saving on labor and it's protected from the weather faster.

Watch these three videos to see what's possible with factory-built components. This is my daughter's new home!

Can changing the height of the ceilings save a lot of money?

Changing the ceiling height in a home can save money. However, the savings may be minimal.

Within the past 24 hours, I received an email from a woman who is stuck in this quagmire. She wants to build her new 2,000 square foot ranch home but is within a fairly tight budget. The original plans called for 9 foot ceilings. These taller ceilings are a very nice touch that adds lots of character to the average home. This woman approached her builder questioning the savings that might be achieved by downsizing to a traditional 8 foot ceiling height.

The response from the builder shocked the woman. He said there would maybe be a $500 savings. She felt much differently and asked me to identify where one can really achieve savings when you downsize a home in this manner. She was hoping for a much larger credit by modifying the ceiling height. This is an interesting problem when you first think about it, but once into the calculation you discover some interesting facts.

CLICK or TAP HERE for Contractor Nightmare stories.

How are the cost savings calculated?

First, there would be savings in lumber. You can easily calculate with a high degree of accuracy the number of vertical studs in a home where the wall studs will be spaced at 16 inches on center. Simply multiply the linear feet of walls by (zero decimal point 75) 0.75 and then add one to the sum.

For example, this woman's home will probably have about 190 linear feet of exterior walls. 190 x.75 + 1 = 143. This same house might have 245 linear feet of interior walls so it would need approximately 185 studs to frame these walls. Currently the cost difference between an 8 foot vs. 9 foot long exterior 2 x 6 wall stud is only 57 cents. The cost difference between 8 foot and 9 foot long 2 x 4 studs is only 28 cents. The total cost savings in wall studs is perhaps only $135.00. That is fairly insignificant amount of money when the house may cost $180,000 overall.

There will also be insignificant savings with respect to the exterior wall sheathing that is nailed to the studs. Keep in mind that the carpenters will not offer any savings to speak of with respect to labor to build the walls. It takes just as much time to handle and nail an 8 foot piece of lumber as it does one that is 9 feet long. The same is true for the large sheets of sheathing. Perhaps they have to use but 4 more nails to secure the larger sheet to the wall studs.

new-home-cost-estimator

This is a very cool software spreadsheet that can help you calculate the cost of your new home. Divide the square footage of the home by the cost to get cost per square foot. CLICK on THE IMAGE ABOVE TO DOWNLOAD THE SOFTWARE.

This woman will save a small amount of money on wall insulation as it is usually priced per square foot. But keep in mind there is only about 190 square feet of insulation being eliminated. This same quantity is true for drywall material, exterior wall coverings, wall paint, etc. Some of these savings translate to interior walls as well, but in many instances there is little savings in labor. If you were painting a room with 8 foot high walls vs. 9 foot high walls, how much time would you really save painting - maybe 5 or 10 minutes per average size room?

How Can You Save The Most Money Building a New Home?

You can save the most money building a new home by making it smaller. Consider cutting out 20 percent, or more, of the floor area if possible.

The footprint needs to shrink. It is also very helpful to make the plan very simplistic. Offset foundation corners, high-pitched complicated roof designs, and lots of windows typically cause construction prices to soar. A simple rectangle house with a low-slope roof will almost always be at the bottom of the price scale. But unfortunately it often is also at the low end of the curb appeal scale as well.

Column NH023