Flooded Basement and Hurricane Winds

hand sprayer stone foundation

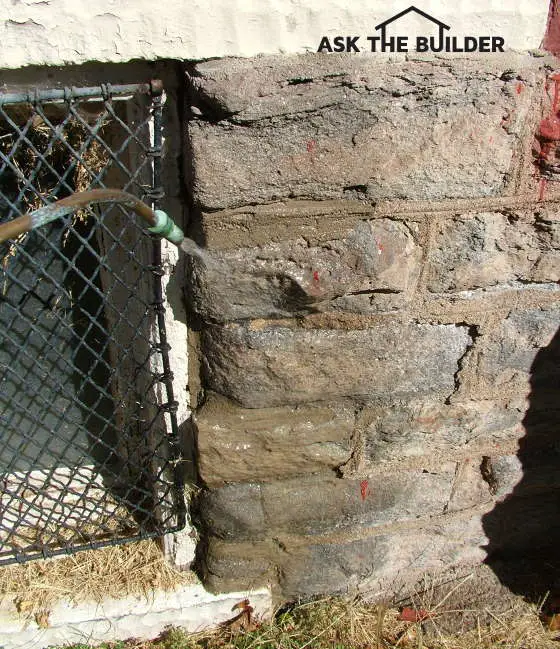
The hand-pump sprayer is doing a fine job of saturating the stone foundation. If you use the right product, it can block all sorts of gaps where water can enter. Photo Credit: Tim Carter

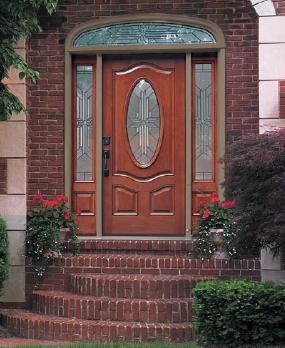
DEAR TIM: My finished basement was flooded by rains produced as hurricane Frances lumbered across North Carolina. I have a concrete block foundation that has a stone facing above grade. What is the best way to waterproof both the visible and buried parts of my foundation? What kind of drainage system in the yard can I install to help deal with the massive amounts of water that fell from the sky and then into and across the land? Paige H. Black Mountain, NC

DEAR PAIGE: I am sorry to hear about your misfortune. You are not alone in your suffering as I heard from no less than 100 homeowners and builders who have suffered water leakage into brick veneer and concrete block buildings and into basements such as yours.

What can cause basement flooding?

There are a series of factors that may be responsible for your basement flooding. It can indeed be your masonry walls, but it can also be roof gutters and downspouts that are undersized, clogged or empty on the ground next to the house. The soil around your home could have flat or even negative slope so that water pools against your foundation. To add insult to injury, your original builder may have never truly waterproofed your foundation.

Can rain create a leak in walls?

The hurricane or tropical storm winds that pounded your home are powerful. Rain that pelts against houses, with even a mild breeze during a rainstorm, can create leaks in walls that seem to be impervious to water. Each drop of rain water is like a hammer as it strikes the wall surface. It pushes the previous drop of water into the wall. Imagine thousands or even tens of thousands of drops of water combined with the actual wind pressure of a tropical storm or hurricane driving the water deeper and deeper into the walls.

What is the most common entry point for water in a masonry structure?

Perhaps the most common entry point of water into a masonry structure is through the vertical mortar joints in brick, concrete block and stone. Even though you can't see cracks where this mortar touches up against the masonry units, water, and lots of it, can and does penetrate here. If your builder did not create a system for this water to be collected and redirected to the exterior, I can see why you had the leaks.

What is a silane - siloxane repellent?

Once your walls dry out, you can seal them very effectively with a two-step process of water-based products. The first step is the application of a clear penetrating silane - siloxane water repellent that coats the entire masonry wall. Two coats must be applied and they must be applied within 30 minutes of each other. If you wait too long between coats, the first coat of the water repellent actually starts to work and stops the second coat from entering the masonry units and the mortar.

Immediately after the water repellent is applied you can then brush on a masonry joint sealer - very interesting milky product that has the consistency of canned gravy before it is heated. Once applied in a thin coat over the mortar joints and a portion of the brick, block or stone next to the mortar, it dries clear. This amazing product, when applied correctly, can bridge cracks up to 1/8th inch!

Should I divert rain water?

The water that falls onto your roof and the land around your home must be captured and diverted to the lowest spot on your lot. Often I hear about rainfall amounts of four, five or even eight inches of rain from one of these storms.

For sake of discussion, let's say 4.5 inches of rain fell at your house during the storm. If your roof area and combined yard area is say one-half acre, the rainfall dropping onto your property was 61,096 gallons of water give or take a drop or two! If your lot receives water from an uphill neighbor, then even more water was possibly charging towards your basement.

I feel it is imperative to capture all roof water with gutters and downspouts. The water from the roof should enter an underground piping system that directs this water to the lowest part of your property. Be sure your local codes allow this. Some municipalities require storm water to be piped to a special storm water system that retains it and slowly releases it over time to the natural streams and rivers in your area.

Linear French Drain Streaming Video

Do your own DIY install of a Linear French Drain with Tim Carter's time-tested methods and materials! CLICK IMAGE TO ORDER NOW!

You should also install an underground gutter system in your yard that captures any subsurface as well as surface water that is passing through and on top of the soil. You can dig a 6-inch wide trench that is 18 to 24 inches deep. Install a perforated drain tile in this trench and fill the trench to the top with washed rounded gravel.

Once the pipe passes the house and is headed towards the lowest part of the lot, make sure the pipe is level in the trench. Since most building lots have some slope to them, the pipe will eventually extend to daylight and be visible. Water will gush from this pipe during and immediately after a heavy sustained rainfall.

The next time you are a passenger in a car being driven through a moderate rain storm, open the window and let your hand get hit with some of the rain drops. You will be shocked how hard they hit your hand even while driving 30 miles per hour. The force at 70 miles per hour is almost painful.

This type of energy can easily defeat walls that have not been perfectly waterproofed. The new masonry sealing systems are effective, water-based and can last for up to ten years between applications. An even better characteristic is that they are very do-it-yourself friendly.

Column 538

The Mansion Reality TV Show

Mansion Reality TV Show

The Mansion Reality TV Show |Here's the actual mansion! This is what the back of the house looked like the night of the finale. Look to the left and you can see the red carpet!

The Mansion Reality TV Show - I Was One of the Judges!

Are you a reality television junkie? If so, then you might want to watch me on re-runs of The Mansion. I was fortunate to be cast as one of three judges responsible for critiquing the work efforts of eight young people who were contestants in this intense reality television show.

Where Was The Mansion Reality TV Show Recorded?

This very unique reality show was filmed right here in Cincinnati, OH where I live. The actual mansion was on the west side of Cincinnati at the intersection of Anderson Ferry Road and Cleves Warsaw Pike.

Mansion Reality TV Show location

The red arrow points to the Mansion! It was still standing as of April 11, 2021.

When Did the Filming Begin?

Filming for The Mansion started the last two weeks of July and the final filming happened the first week of September 2004. The first episode aired on TBS the Superstation on October 2, 2004. The final episode aired in November 2004.

If you can locate this show on your cable-TV guide or one of the streaming video services like Netflix, Hulu, or Amazon TV, you can then sit back and watch it on your flat-screen TV! Wait for the episode where outdoor gardening was the focus. Oh my!!!

What Was the Plot of the Show?

The plot of the Mansion TV show was to have eight young contestants compete against one another to see who would end up owning the mansion on the last episode. At first, they worked together on various renovation projects during the filming of the show. Then, as with all reality shows, the alliances started to form and the contestants began to claw and scratch at one another to be the winner.

How Were the Contestants Selected?

The contestants for The Mansion were picked from a nationwide search earlier in the summer.

What was the Actual Mansion House Like?

The actual house in the show was an old English Tudor home that sat on four acres of ground. It was a wonderful stately home in a nice neighborhood. The natural oak woodwork in the home was stunning. The house was slightly run down and needed quite a bit of work.

How Much Was the Mansion Worth?

This house is probably worth in the neighborhood of $750,000. That was a significant amount of money in 2004.

Did the Winner Receive Money to Pay the Taxes?

I can't tell you if the winner of the show was also given by the show producers actual cash to pay the taxes owed to the Federal Government for winning the house. I'm not an accountant, but I suspect the IRS would treat the winnings as they would money you might win at a casino or racetrack. There's no doubt the prize has tax consequences.

How Was the Winner Selected?

The winner was selected from the two finalists by the show's viewers. They had a real-time voting system in place.

What Was it Like to Be a Judge?

The experience was fun as I have never seen what it is like to be a part of a large television show. I have been on live national television before and on live large-market newscasts, but never was I surrounded by so many cameramen, sound technicians, field directors, producers, associate producers, grips, etc.! There were nearly 40 people behind the scenes to make the show happen.

What is The Reality of Reality TV?

Each episode of The Mansion is one-hour long. There are about 17 minutes of commercials so you actually only see 43 minutes of programming each week. At the minimum, there are 28 hours of tape that has to be boiled down to these 43 minutes. In some instances, there were over 100 hours of tape!

Mark and I are having some fun at the party after the taping was completed. Mark asked me for some tips to help him install baseboard at his own home.

This is Mark, the host of the show. Mark and I are having some fun at the party after the taping was completed. Mark asked me for some tips to help him install the baseboard at his own home.

How Did the Judging Work?

Let's talk about just the judgment aspect of the show. Each time the other two judges, Tom and Cassandra, and I looked at a completed project with the contestant who was foreman, we inspected and talked with that contestant for usually an hour.

In the three episodes that have aired so far, the amount of time allocated to the three judges is about 2, perhaps 3 minutes. Vast amounts of what I and the other two judges said is not making it to the airwaves. I'm not upset, but I feel you should know I was constantly pointing out errors and deficiencies in the work. Only time will tell how the tape editors and show producers portray me, and so far it ain't talkin'!

The amount of time spent taping just the judgment part of each episode stretched anywhere from 4 hours to 6.5 hours. Yes! I am talking about that part of the show from where you see the host Mark blow the airhorn to the point where he was handing out checks after we three judges decided what we were to give each episode.

What Was it Like Watching the Finale Live?

It was very cool to be part of the taping of the final episode where the winner was revealed. The friends and family of the contestants were invited as well as Tom, Cassandra and myself - the three judges. All of us were assembled in a large heated tent that had a giant flat-screen TV so we could see in real-time what was happening at each segment.

Some things never change....... Need I say more about the imbibing 3 Amigos?

Some things never change... Need I say more about the imbibing 3 Amigos? These three contestants were thick as thieves during the recording of the show.

As contestants were eliminated, they came to watch the rest of the taping in the tent with us. I must tell you it was very uncomfortable watching the show amidst the family and friends.

It was very tense as Mark was about to announce who did not make it to the next level. You could hear the gasps and groans escape from the family and friends as each of the contestants were eliminated. I could have skipped that part thank you very much.

The after-party was very fun. Those contestants who were eliminated didn't seem to mind too much. There was plenty of laughter and good times to be had by all. The liquid refreshments were flowing, and as you can see, it didn't take long for certain individuals to get comfortable!

In my October 7, 2008 Newsletter, there is a humorous article about Foundation Primer. No, it wasn't for the mansion. It was for ME!

Sample AsktheBuilder Bulletin

Bulletin 80 Concrete Patching

Copyright 1995 Tim Carter

Concrete Patching - - Manufacturers of Patching Compounds, Additives, Epoxies & Tips

Concrete, what an amazing material! I can't say enough about it. Think of it for a minute. Here is a material that you can make out of four basic ingredients (sand, gravel, cement and water). Once mixed, it can be placed with relative ease (because it is in a semi-liquid state). Then, when dry it can become hard as a rock! There aren't very many other materials I can think of that possess this capability.

Expensive Stuff

Concrete is made from basic, inexpensive raw materials. However, transportation and placement of these materials is costly and labor intensive. Because of its high cost and durability, people expect concrete to last for a long time. This is not an unreasonable expectation, as I have seen concrete 50 plus years old that is in very good shape.

But. . . sometimes things go wrong. Your concrete drive, sidewalk or patio may experience a popout (depression caused by a piece of stone that explodes for numerous reasons). Those living in cold climates may experience spalling, a condition where the top surface of the concrete peels off. A corner of a concrete step may crack and fall off due to a handrail post expanding (rust and/or freezing expansion). In any event, a patch can be employed rather than replacing an entire segment of the concrete.

Challenging Task

I have seen numerous attempts at patching concrete. The majority of them have failed miserably. There are many reasons for patch failure. I'll try to cover some of the most persistent causes.

Concrete, in its original form (when first mixed) sticks together because of the cement. When the cement is mixed with water, a chemical reaction begins that is really pretty neat. Very small crystals begin to grow. These crystals interlock with one another and lock onto the pieces of clean sand and gravel. Also, when concrete is mixed, there is usually lots of extra water around to help keep the crystals growing. And grow they do, as the crystal growth slows down but can continue for years.

However, when patching, these two conditions are not always present. The area to be patched may be dirty and bone dry! If this is the case, there is a great chance that the patch will fail.

Water, water everywhere...

Remember when I spoke above of the growing crystals? The same thing happens, to a large degree, with many concrete patching compounds. They also need water for their crystals to grow.

Many people forget that concrete can and does absorb water. You can demonstrate this easily by getting on your hands and knees. Do this and place a drop of water on a piece of concrete. Observe what happens. The water, in almost all cases, readily soaks into the concrete surface.

When you place water-based patching compounds on dry concrete, the concrete robs the water from the patching compound. No water, no crystals. No crystals, no bond. It is that simple.

Dirt also gets in the way as well. If dirt blocks the crystals from bonding to the concrete to be patched, all that happens is that the crystals bond to the dirt, not the old concrete.

Additives / Bonding Agents

To improve the chances of a patch sticking to old concrete, there are two categories of materials that you should consider. One category is additives and the other is bonding agents. They work towards the same goal, but they do it very differently.

Additives are chemicals or compounds such as rubber, vinyls, acrylics and different polymers that are sometimes added to portland cement mixtures. All they do is simply make the concrete mixture stickier. These compounds can be in a dry form premixed with a patching compound, or a wet milky liquid that you add to your patching compound. In either case, they work quite well when applied to a clean surface.

When using concrete patching compounds that contain additives, be sure to follow the instructions carefully. Some of these compounds must be applied to dry concrete surfaces, while others instruct you to wet the area to be patched. You must pay attention!

Bonding agents are glues that are applied to the old or damaged concrete surface that is going to receive the patch. These are almost always liquid compounds that you simply brush onto the clean, dust free area to be patched.

Once again, you must follow directions to the letter to achieve the best results. It is possible to use both compounds to maximize your chances of success. In other words, you can purchase a patching compound that contains additives - these are usually labeled as containing vinyl or acrylic,etc. - and use it in conjunction with a bonding agent. Always check the labeling to make sure the materials are compatible.

Epoxies

If you really want to go all out on your patching project, consider epoxies. These are no different than regular epoxy. You simply mix equal parts of a resin and a hardener together, often with a sand aggregate. You apply it and BINGO, super patch! The problem with some epoxies however, is coloration. You may not be really excited about the finished color. Some are white, beige, and very light grey. In contrast, regular Portland cement patching compounds dry to a medium grey.

The Old Stand By

Guess what? You can use just plain cement, sand and sometimes pea gravel to patch that hole. If done properly (50 percent cement - 50 percent sand and/or gravel), your patch will perform just fine.

Concrete Repair Tips

Preparation

As you might imagine, the prep work before mixing your patching material is the most important part of the job. This is really true of most building and remodeling jobs.

Most repairs on flat surfaces, such as a driveway, patio or sidewalk, consist of filling a depression or hole. The hole usually has tapered sides. These tapered edges can cause real problems for the long term durability of the patch. The patching compounds thin out at these spots and can easily peel or fail leaving an unsightly second area to patch the following month or year.

I have had the best success patching when I alter the sides of these holes. This can be done with either a chisel and a hammer or a saw equipped with a masonry blade. NOTE: Always wear eye protection and/or ear protection when doing this type of work. Small pieces of concrete, dust, metal or masonry blades can cause severe eye injury. Hearing loss is a real threat as well.

The challenge is to remove the taper from the edges of the hole. If you are successful, the finished edges will be 1/8 inch thick or so instead of tapering to a feather edge.

Mixing the Patching Materials

Always follow directions. Most compounds should achieve the consistency of cake icing or a very thick gravy (don't eat these compounds!) Only mix enough compound that you can apply in 15 to 20 minutes.

Applying the Patch

When using water based repair compounds, wet the surface to be patched, if you are not using a bonding agent. If using a bonding agent follow directions carefully.

For deep repairs, consider installing hardened nails in the depression. For extra deep repairs, drill a 1/2 inch diameter hole and pound a 1/2 inch piece of reinforcing steel into the hole. These items will help hold the patch in place. Be sure that these pieces of steel are at least 1/2 inch below the top of the patch.

Use a finishing tool (magnesium or wood float, steel trowel, etc.) to finish your patched area. Finishing is an art and takes practice. You may have to wait a few minutes until the patching compound begins to stiffen to achieve the desired results. Practice in some out of the way spot, if in doubt.

When you are satisfied with the patch, cover it with a piece of plastic. Weight the edges of the plastic so it will not blow away and so air cannot blow underneath the plastic. This is very important!! Keep the plastic in place for three to four days.

Weather Conditions

Sunny, hot , breezy weather is the worst time to do this type of work! Many people think it is the best time. These conditions cause the patching compound to dry out too fast. Remember the crystals??? Fifty five degree F weather, overcast and damp is a great time to do this work. If you insist on doing it in warm weather, do it in the early morning. Then, shade the repairs so the sun can't hit them.

Don't attempt to repair concrete in freezing weather. The patches will readily freeze and fail. Use common sense.

Manufacturers of Concrete Patching Products

There are numerous companies that manufacture concrete patching compounds. Some of these are regional and some are national brands. I have listed several national brand companies that make great products. Some also have very informative product literature. For example, the Quikrete Company has a book that may interest you. It is called Build and Repair with Concrete. The Portland Cement Association also has a huge amount of excellent literature on concrete. Go to the bookstore on their web site. Many of the publications are available for free download. At the same time, consider ordering a book called The Homeowner's Guide to Building with Concrete, Brick & Stone. This is a great book that covers building new masonry projects as well as maintenance and repair. No homeowner should be without this book!

  • Abatron, Inc.
    Abocrete - concrete repair product
    Aboweld - epoxy repair compound
    Abocoat - concrete coating product
  • Quikrete Companies
    Vinyl patching compounds, bonding adhesives, concrete acrylic fortifiers, concrete cleaners (acid free), quick setting cement & more.
  • Bonsal Sakrete Concrete
    Complete line of concrete patching compounds and repair/ maintenance products.
  • Tamms Industries Company
    Concrete repair admixtures, bonding agents, and sealers.


Concrete Homes Are Not New

Frank Lloyd Wright home

Concrete Homes | You are looking at an authentic Frank Lloyd Wright home in Amberley Village, Ohio. It is just one-half mile from my own home. Each of those windows is cast into the concrete! PHOTO BY: Tim Carter

DEAR TIM: I would really like to build a concrete home using cast-in-place forms. I am not talking one of the new insulated-concrete-form (ICF) systems that use foam blocks. I can't find anyone who has built a home using traditional foundation forms. Realtors and sales people at model homes look at me like I am from outer space. Is it not a good idea to build a simple concrete home? Why aren't more of them built here in the USA? Mark W., Bushkill, PA

DEAR MARK: Building a home with concrete is nothing new. In fact, there are all sorts of variations on the theme. As for the first home built entirely of concrete in the USA, I can't tell you when that happened but it was no doubt a long time ago. But I can tell you there is a 50-year old cast-in-place concrete home you would drool over that is just one-half mile from my own home. It is an authentic one-of-a-kind Frank Lloyd Wright home that is on the National Register of Historic Places. This drop dead gorgeous solid concrete home takes my breath away each time I see it. Even its individual windows are cast into the concrete!

What is the largest obstacle in building a cast-in-place forms concrete house?

First and foremost I think the single largest obstacle to building with concrete in the manner in which you speak - cast-in-place forms - is the overall cost. It can be expensive to build in this manner and the other subcontractors that come after the concrete people leave often have lots of extra work to do.

The cost issues of building a cast-in-place home are significant. It is somewhat labor intensive to attach interior mechanical systems of electric, plumbing and heating and cooling to solid concrete. Drywall can be directly applied to concrete that is very smooth, but not all traditional concrete forms produce smooth finished surfaces.

Are there energy issues with concrete homes?

There are also significant energy issues with respect to solid concrete or masonry structures of any type. Concrete is a conductor of heat, not an insulator. But when you combine concrete with superb insulation, you connect for a home run. This is why the ICF homes are currently gaining popularity; they have all the positives of concrete and all of the super-insulation aspects many of us who live in traditional homes would kill for.

Because of the extra-thick concrete walls, the typical doors and windows you would use almost always require extra wood and labor when they are trimmed out. The stark exterior of the cast-in-place concrete would have to be disguised with stucco or some other wall covering to ensure your home doesn't appear to be a tilt-up concrete warehouse in an industrial park. I don't dislike tilt-up concrete walls, but your neighbors might not be as tolerant as I.

Connecting traditional wood floor joists can be placed in cast-in-place concrete, but it is not as easy as nailing them to the top plate of wood-framed walls. Insulating the exterior walls of your proposed solid-concrete home can be done, but once again it almost always costs more than placing pre-sized fiberglass batts in wood framed wall cavities. The newer blown-in wall insulation products also prefer a wood or steel framing cavity so the thickness of the insulation remains uniform.

concrete homes

Frank Lloyd Wright specified that the hard paved surfaces around the home were to be red - even the driveway! PHOTO BY: Tim Carter

Don't forget that traditional cement-stucco homes are basically concrete homes. Coarse sand mixed with Portland cement makes a layer of concrete that has nearly the same compressive strength as regular concrete. Perhaps you should consider blending the wood-framing building techniques most builders and subcontractors prefer with a concrete outer skin.

It would seem to me this gives you the look you might want on the exterior as well as the superb maintenance-free outside characteristics. You never have to paint the stucco and if you desire it to be a particular color or want different colors, permanent dry pigments can be blended into the wet stucco. The finished look can be stunningly beautiful.

I also urge you to consider other concrete systems. There are all sorts of imaginative ways concrete is being used to build homes. For example, you can have a solid concrete home built using lightweight concrete blocks that contain vast amounts of air. These blocks remind me of ultra-fine volcanic pumice. These same blocks stack together easily and provide a superb surface for stucco and interior drywall.

You may be able to find a regional company that will build precast concrete walls that have integral interior wood framing that will keep the subcontractors happy. These walls are built in a factory and lifted into place with a crane. They bolt together much like you would connect a kitchen cabinet to an adjacent one. Contact one or more of the associations that promote the use of concrete. I'll bet they will help you build the house of your dreams!

Where can you get more information on concrete and residential uses?

The Portland Cement Association and the American Concrete Institute are two great sources of information dealing with concrete and residential uses of the material. When I attend the annual International Builders Show each year, I commonly visit a gorgeous home built with concrete. When you view the exterior and interior of the homes, you would never realize you were in one whose walls are made with solid concrete or a unique concrete hybrid product.

Concrete is an appealing material because it is so durable. When insulated properly, it requires very little energy to heat and cool. The dense exterior walls are, by nature, soundproof. The benefits of a concrete home are many, you just have to find a builder skilled in working with the material and choose a system that makes sound financial sense.

Column 537

Flagstone Patio Set on Sand

flagstone patio

These flagstones are set on a concrete base. The stones have not budged in 13 years and I suspect they will still look swell 50 years from now.

DEAR TIM: Last fall a contractor installed a flagstone patio for me. He carefully laid the flat stones on a bed of sand and then grouted the spaces between the stones with mortar. Well, the flagstone are separating, the mortar is cracking and the patio is a mess. The contractor wants to put a layer of cement over the sand and start over. Will this work? If I had hired you, how would you have installed my flagstone patio? April W., Denver, CO

DEAR APRIL: Years ago the same thing happened to me. I installed thin paving brick on a sand bed that looked like a piece of glass it was so smooth. But ants, moles and freezing weather turned my brick sidewalk into a humpy-bumpy sand-covered disaster. Like me way back then, you are going to have to start over.

First remove and salvage the flagstone. Carefully chip off any mortar that is on the edges. Remove the sand and discard it unless you can be sure it is free of stones and dirt. If you can salvage it, much of it can be used to reinstall the flagstone but the sand will be mixed with Portland cement.

At this point you have two alternatives to solve your problem, although I am inclined to think that one of the methods is far better than the second. This first method, in my opinion, will produce a flagstone patio that can last 50 years or more without any cracks. Once you have determined the finish height of the patio, you need to excavate soil so that you can install a 4-inch thick concrete slab, 3/4 inch thick setting bed of cement mortar and the actual flagstones. Many flagstones are commonly 3/4 inch thick so I would excavate to a depth of 5.5 to 6 inches. Compact the soil at the bottom of the excavated area.

Pour a concrete slab in the excavated area that contains one-half inch steel reinforcing bars placed on two foot centers in both directions. This grid of steel needs to be suspended so that the steel ends up in the lower third of the concrete slab, but be sure that at least one and one-half inches of concrete is under the steel at all points. This steel has tremendous tensile strength and will prevent the slab from developing large cracks that cause the concrete to separate and tilt into separate planes.

To further strengthen the slab, you can dig vertical piers that are 6 inches in diameter and extend below the frost line in your area. These piers act like the legs on a table and help give the patio added support. To prevent the patio and the piers from heaving if frost starts to penetrate into the soil, make the bottom of the piers flare to 8 inches in diameter.

flagstonse patio flowers

Curving the walkways and edges of the patio and then adding plants that flow over the stones makes for a luscious look.

When you pour the slab, it does not have to be finished smooth. The surface needs to be in the same plane, but it can be left very rough with holes and stones exposed. This rough texture will help hold the flagstones in place when they are set in wet cement mortar.

Within 24 hours of pouring the concrete slab, start to install the flagstones. Use a mixture of Portland cement and sand to permanently attach the flagstones to the concrete. Mix one part of cement to three parts sand. Coarse sand is better for this purpose as it contains pieces of rounded rock about 1/8 inch in diameter. This coarse sand makes a very strong mortar.

The mortar should be the consistency of regular bricklayer's mortar. Do not make it so dry that you have to pound the stones into place with a rubber mallet. If the mortar is just right, a small amount of pressure from your hands floats the flagstones into position. Once the flagstones have set for two days, you can fill the gaps between them with a similar mixture of medium sand and Portland cement.

A second alternative method of installing the patio is to remove the current sand and allow it to dry or become just slightly damp. Blend one part Portland cement with three parts of this sand and reinstall the sand base. Before you install the sand back into the excavated area, generously water the soil so it is very wet. Be sure you install the sand at least 3 inches thick. Level the sand and place the flagstones onto the sand and tamp them into place. Use a garden hose and a nozzle to finely mist the flagstones so that some water flows between the stones into the sand. Do this for perhaps 10 minutes.

Wait at least one week before walking onto the patio to fill the gaps between the stones with the Portland cement and sand mortar mix. This wait period will ensure the sand and cement base has time to harden. The sand base will be immune to attack from ants and moles, but it will not be sufficiently strong to withstand serious frost heaving and/or other soil movement.

The second method of mixing Portland cement with sand works, but it is not as good as the poured concrete base. Thirty years ago, I built my mother-in-law's patio using the sand and cement base method. The patio is in good shape today, but many of the brick are somewhat humpy and bumpy. She likes the look as it reminds her of weathered brick walks she has seen in Williamsburg, VA.

But her patio is different. There is no mortar between the brick. The brick are very uniform and stack closely against one another. There is a strong possibility that the cement mortar joints between individual flagstone that are laid on top of a sand / cement base may start to fall apart if the base starts to crack and shift.

There is very little extra work to install the concrete base. The only extra step is mixing the cement mortar that adheres the flagstone to the concrete slab. This is not as hard as it seems and can be done one wheelbarrow at a time.

Column 536

Installing Ceramic Tile

inlay tile flooring

The large tiles on this floor were set on smooth concrete. The smaller inlay tile make for a splendid contrast. ©2017 Tim Carter

Ceramic Tile Installation

DEAR TIM: I have successfully installed ceramic tile in different homes I have owned, but always have worked with tiles that are 12 inches square or smaller. In the first level of my new home I want to install 900 square feet of 18 or even 20 inch square tiles on the concrete slab.

Everyone tells me this is a task for professionals. Is it that hard to work with these giant floor tiles? What can I do to prevent cracks in my tiles? Shelley H., Colorado Springs, CO

DEAR SHELLEY: I think the best analogy I can offer to compare 8 or 12 inch ceramic tiles to the jumbo ones that measure 18 or 20 inches square would be to compare running a race with athletic shoes and then doing the same race fitted with snow shoes.

With snow shoes on you will finish the race, but not without a tremendous amount of difficulty and it will take you much longer to cross the finish line.

The bane of ceramic tile installations in general is rooted in a characteristic all ceramic and natural stone flooring materials share. All of these products exhibit great strength when you squeeze them, but have low strength when you bend or stretch them.

Simply put, if a given tile has a solid base under it that will not flex and you place a heavy object such as a pool table on the tile floor, the tiles will not crack. But if that same tile has a hollow space between it and the subfloor or the subfloor flexes, the tile can easily bend and crack.

CLICK HERE to get FREE & FAST BIDS from local ceramic tile contractors.

The issue of tiles cracking grows exponentially as the size of the tile gets bigger. Small ceramic tiles that are one inch square can be very forgiving but large 18 or 20 inch square tiles demand perfect installation conditions if you want your new floor to be crack-free for the service life of the floor.

Perhaps the most important step is to ensure the surface you are installing the tiles on is in the same plane. Some tile installation guides refer to this as the flatness of the floor. The floor doesn't need to be level as it needs to be perfectly smooth.

Small humps or depressions in the floor can create sinister hollow voids under tiles as you lay them. It is imperative you take the extra effort to eliminate the humps by filling in all depressions with a floor leveling compound.

The best tool to use to discover and eliminate high spots and depressions in floors is a precision aluminum or magnesium straight edge. These tools can be rented and when placed on a concrete or wood floor they immediately expose any imperfections in the floor.

If you employ a flashlight and lay it on the floor and position the light beam so it shines parallel to the floor and aim it towards the straightedge, you will quickly discover even the slightest low spots in the floor.

Full Tile Tool List

Here's a list of tools that I've used for years to successfully install thousands of square feet of ceramic tile.

  • tape measure
  • pencil
  • tile cutter
  • nippers
  • a 1/4 by 1/4 inch v-notched trowel
  • a hammer
  • some 6d finish nails
  • 8 lineal feet of straight 1/4 inch wood lattice strip
  • putty knife
  • 3-inch wide-bladed scraper
  • grout sponge
  • rubber grout float
  • several buckets
  • accurate 4 foot level

Click the image below to BUY all, or some, of the tools in the above list.

ceramic tile tools list

CLICK THIS IMAGE NOW TO ORDER ALL THE TOOLS YOU NEED TO DO CERAMIC TILE.

Once you have filled in all of the low spots with a cement-based floor leveling compound and the floor is smooth as a silk scarf, it is time to install the floor tile. It is extremely important you use the correct notched trowel to spread the cement-based thinset adhesive.

I suggest you use a one-half inch V-notched trowel. This trowel applies a generous amount of thinset for these large tiles.


If you're getting ready to install ceramic tile or have someone install it for you, my Ceramic Tile Installation Checklist is a must. Avoid making costly mistakes with the help of this document. I offer a 100% Money Back Guarantee.


colored tile inlay ceramic tile

Look what you can do with different colored tile as well as different sized tile. Think outside of the box. You do not have to use the same color and sized tile in one area. Mix it up!

The secret trick is to also skim the bottom of each tile with the thinset adhesive before you lay it on the floor. Use the flat side of the trowel to apply the thinset to the tiles and then to scrape off the excess.

This extra step fills in any hollow areas under the tile with thinset. It also assures you that each tile has nearly 100 percent contact with the floor beneath it.

I feel another surprise in store for you is cutting the large tiles. Many standard wet diamond saws may allow you to cut the tiles, but you may not be able to use the saw's sliding table aspect to help you maintain a straight cut.

All cuts may have to be free hand. If you do not have access to a wet diamond saw, you may have to use a traditional glass cutter unless you can find a large tile cutting tool made for the jumbo tile. The store where you purchase the tile may rent one to you.

Getting a floor perfectly flat or in the same plane also provides other visual benefits. Many ceramic tiles have a satin or even high-gloss glazed surface.

These shiny surfaces readily reflect light. If different tiles are tilted one way or another, your eye readily sees this as light hits the floor at a low angle. This often happens when sunlight streams into a room either early or late in the day.

But if the floor is flat and the thinset is applied evenly, all of the tile surfaces will reflect light the same direction. The glossy surface will telegraph the flatness of the floor beneath it.

It is vitally important to install reinforcing steel in any concrete slab that will be covered with ceramic tile. The steel helps prevent cracks in the concrete and holds the slab together in the event a small hairline crack does develop. Special crack isolation fabrics installed between the concrete slabs and the tile also help prevent future cracks in the tile.

CLICK HERE to get FREE & FAST BIDS from local ceramic tile contractors.

Column 535

Fiberglass Doors

fiberglass door

This is a fancy fiberglass door. There are thousands of possible combinations of wood grain, color, glass options, etc. I guarantee you will find one that will look perfect for your home.

DEAR TIM: I need to replace the outside doors of my home because they are in poor condition. I am very confused as to the type of wood I should use. I love the insulating qualities of solid wood. Different contractors have suggested oak, mahogany, teak and walnut. What type of door would you install if you were bidding the job? Why would you make that particular recommendation? Mary M., Knoxville, TN

DEAR MARY: This is an interesting proposition. Would you consider my proposal if I sold you a door that was a better insulator than solid wood? Would you consider my offer if I could give you exterior doors that would not rot, warp, crack, split or twist as a solid wood door might over time? Would you be interested if these particular doors looked more like wood than wood itself, ones that have realistic grain that matches real wood? Would you be interested if I told you that there was an infinite amount of stain colors and a virtually unlimited amount of door styles and stained and beveled glass options? I thought so.

Are fiberglass exterior doors a good alternative to a wood door?

Before you make up your mind to use solid wood, you should give a serious look at the highest-quality fiberglass exterior doors. These products, in my opinion, are in the top 25 best all-time home building products. They deserve an honored place in the Hall of Fame of truly innovative and superb home building products.

I do not offer this praise lightly. Many products strive to constantly imitate wood. I have seen cheap interior doors that have a bogus wood-grained pattern stamped into them. Who hasn't seen metal doors that have had wood grain embossed in them? Vinyl, aluminum and other sidings for years have had fake wood grain patterns to try to fool consumers. The latest are composite decking materials that are trying their best to imitate real wood. But all have fallen woefully short in my opinion. They are wood impostors.

Can a fiberglass door imitate real wood?

But the highest quality fiberglass doors successfully imitate real wood. I recently saw an new exterior fiberglass door that was so realistic, it even copied the ultra-fine mitered joint line where two pieces of wood trim cut at 45 degree angles met to make a 90 degree angle. You could actually feel the micro cuts of the wood grain in the fiberglass. It reminded me of some of the new movies where computer simulated scenes are almost impossible to tell apart from a real one.

Add to this the deep, rich custom-formulated stains and clear coat finishing kits and you have a recipe for some of the most beautiful exterior doors I have ever seen. My biggest regret is that these doors were not available when I was building. My customers would have killed to have doors such as these.

The good news is you and they can. Fiberglass exterior doors are not only perfect for new homes, but they are excellent choices for remodeling jobs such as yours. A contractor can easily find a high-quality fiberglass door that will enhance the look of your home much more than you could ever imagine.

CLICK or TAP HERE to get FREE quotes from local companies that can install your new fiberglass door.

What architectural styles are available for fiberglass doors?

These doors are available in a multitude of styles to match any architectural style. I don't care if you have a Queen Anne Victorian home like mine or a southwest adobe mission style home. There is a perfect fiberglass door with or without gorgeous stained or beveled glass.

I can assure you that the next home I build will have fiberglass doors. I love the look and I love the fact they are so low maintenance. If you come to visit me in the future you will undoubtedly touch the door's surface and wonder: Is it real or fiberglass?

Do all fiberglass doors have the same quality?

Beware, not all fiberglass doors are the same! Only the high-quality fiberglass doors get my praise. There are some low-quality fiberglass doors that just do not offer all of the things I like about the better ones.

Wood doors are superb and all of my current exterior doors are wood. But I have had problems with my wood doors developing cracks and bowing. And this happened even though I followed all of the steps to seal the tops and bottoms of the doors when they were installed. The door leading out of our kitchen must be securely dead bolted in the winter to stop drafts because it is badly bowed and does not meet up against the weatherstripping.

Fiberglass doors are stable. They will not warp, bow or twist. They are foam filled and are excellent insulators. You can apply fancy hardware to them just as you would a wood door. Fiberglass doors can be painted if you so choose. I prefer the rich custom formulated strains myself. I urge you to go look at some high-quality fiberglass doors now. But be careful, they can be intoxicating.

Column 533