Electronic Tools For Home Use

DEAR TIM: Every time I visit my local home improvement center, I seem to see another new exciting electronic tool. Just what tools are you aware of? Are these tools safe in the hands of a homeowner, or should they only be used by professionals? Also, are the manufacturers' claims of accuracy, dependability, etc. factual? What is your personal experience with some of these tools? E. R.

DEAR E. R.: I share your excitement with respect to electronic tools. The industry has experienced fantastic growth during the past few years. Not only have sales gone through the roof, but new products seem to be introduced to the marketplace on a monthly basis. I only wish that some of these tools had been available years ago. There is no doubt that all of these tools would have saved me vast sums of time and money on my building and remodeling jobs!

Currently, I am aware of a wide variety of electronic tools. Electronic building calculators, electronic levels, ultrasonic measurement devices, laser levels, and ultrasonic sensing devices are currently on the market. I have been told that a new ultra wide band radar tool capable of "seeing" through concrete is ready to be released as well.

electronic calculator

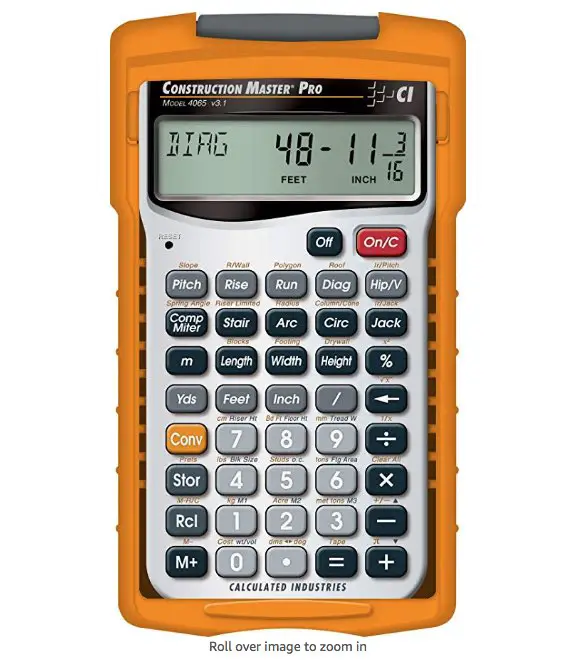
This is the type of calculator you should own if you're going to build a new home. It allows you to CHECK to make sure things are SQUARE!!!

The electronic calculators are very interesting. They have many unique features such as the ability to add and subtract fractions, conversion to any dimensional format, including metric, automatic solutions for roof framing, instant solutions for circle area and circumference, and much more. If you like to work with electricity, you can even purchase a specific calculator which solves many common electrical problems.

The new electronic levels, I think, are very exciting. These items operate on a nine-volt battery for up to 500 hours. They are extremely accurate. Some models even let you control the degree of accuracy. Several of these levels allow you to choose the mode in which to work. The display will indicate a simulated bubble, degrees, percent either slope, or pitch. Some levels feature a hold button which can freeze a reading on the display, in case the level is in a hard to read location. You can also purchase an electronic water level which can be used by one person. This level allows you to create level marks around corners and across rooms by simply listening for a tone.

The ultrasonic measurement devices are fantastic tools if you hate fiddling with a steel or wood tape measure. What's more, several of these can measure, using a narrow ultrasonic beam, up to 60 feet with 99.5% accuracy. Some models are equipped with an aiming light which allows you to aim the device directly at what you are measuring. These devices are also calculators which can measure instantly the area and volume of a room. Virtually every device offers format conversion.

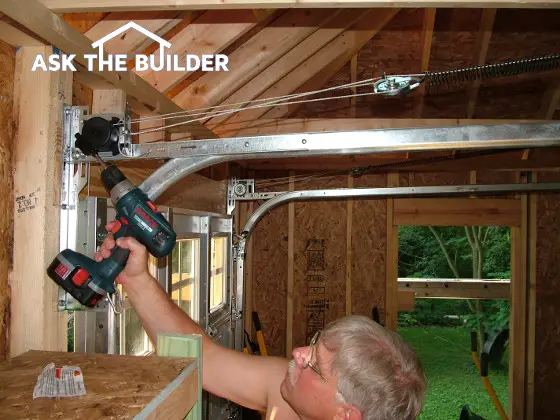
The laser levels I have seen are wonderful. In the old days, it required two persons to operate an optical level or builder's transit. Laser levels require only one person. You simply set the level up, turn it on, and watch for the rotating red beam of light. The light beam strikes whatever surface you are working on, or if out in the open, it strikes a reflective target pole which you adjust up or down. These levels are very handy.

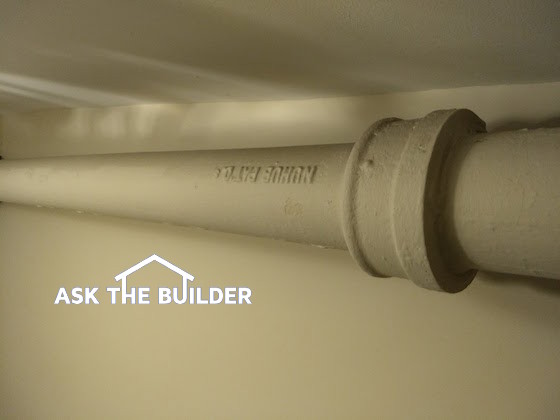
Soon to be released is a new radar tool. This tool will enable you to see right through concrete or walls. The results will be displayed on a screen. You will be able to clearly see pipes, wires, studs, etc. The current sensing devices are useful for finding studs, however, this new device represents a giant step forward.

I personally feel that you or any homeowner can operate these tools and obtain professional results. I have used many of the tools and have never been disappointed. These tools will serve you well for many years, however, you must handle them with care. The accuracy of the tools depends upon their often sensitive, electronic components.

Asphalt Shingles and High Winds

DEAR TIM: Within the past few weeks, I had a new asphalt shingle roof installed on my house. Several days after the roof was installed, a fierce winter storm blew 30 percent of the shingles off my house. The manufacturer has indicated that the shingles were improperly installed. My roofer disagrees and says that the self sealing compound didn't work properly. I'm in the middle. What do you think? Also, the manufacturer noted that felt paper was not installed under the shingles. Was this a mistake? J. M.

DEAR J.M.: Based upon the photographs you sent to me, I feel that the manufacturer is telling you the truth. There are numerous problems with the workmanship on your roof. There is a chance that the self sealing compound is defective, however, this can easily be tested.

Asphalt shingles are far and away the most common roofing material used by American homeowners. They are well engineered and, when properly applied, will provide many years of leak-free performance. Unfortunately, your shingles were not applied properly.

The self sealing compound that your roofer is speaking of is a thermoplastic asphalt compound. It is a common ingredient of virtually every asphalt roofing shingle currently manufactured. This compound was introduced, at first as an option, during the mid-1960s. Its purpose is to bond each shingle to the one immediately below it. When the bonding process is completed, the shingles are less likely to develop wind-related leaks and failures.

This self sealing compound is activated by heat from the sun. In your case, a majority of your shingles didn't stand a chance. The greatest amount of wind-related failure on your roof occurred on the exposure which faces north. That portion of the roof, in your geographic location, doesn't even receive direct sunlight until April. The installation of asphalt shingles, in colder climates, during the winter months is not always prudent. If you wish to test the integrity of your self sealing compound, simulate the heat of the sun with an electric hair dryer. Do this inside with some of the pieces of the shingles that are scattered about your yard. Don't climb on the roof this time of year!

Your photographs also indicated two major problems. Many of the nails that were used to install the shingles were driven in the wrong location in each shingle. In many cases, they were installed through or above the self sealing asphalt strip. This practice is clearly wrong. Because your roofer was installing a shingle which exposes 5 inches of the shingle to the weather, the nails should have been installed 5 5/8 inches up from the bottom edge of each shingle. A minimum of four nails should be used for each shingle. If you live in an area subjected to high winds, a minimum of six nails should be used.

The starter course of shingles was also improperly installed. Your roofer simply rotated a full shingle and applied this under the first course of shingles. This is unacceptable. The starter course, or strip, is made by trimming the bottom 5 inches from a standard shingle. This places the ever-important self sealing compound at the bottom of the roof. This prevents wind from lifting the first course of shingles.

Felt paper is a must. Roofers that fail to use it under asphalt shingles are making a big mistake. Without felt paper, your shingles lose their fire rating. Shingles, in and of themselves, are not fire rated. They are a component of a system, of which felt is an important part. Felt also helps to prevent leaks from wind driven rains that may, somehow, penetrate the shingles. Imperfections in the wood decking also can be a problem in the absence of felt underlayment. These imperfections will more readily telegraph through today's thinner fiberglass shingles. Finally, many manufacturers will not warrant their shingles unless felt is used over a bare wood deck. It's that simple.


Garage Door Spring Adjustments

garage door springs

PHOTO BY: Kathy Carter

DEAR TIM: My husband and I recently purchased a house that is approximately 15 years old. It has an overhead garage door which is approximately 16 feet wide. I can open it, however, it takes quite a bit of effort. My husband says he can adjust the door so that I can open it with less effort. I would like to have an automatic opener installed. Can my husband make simple adjustments which will permit me to open the door? Do you think we can install an automatic opener successfully? L. M.

DEAR L.M.: Unless your husband works full time for a garage door service company, don't let him adjust the springs on the garage door. Garage door springs can be extremely dangerous. You must treat them like loaded weapons. Many a homeowner has been seriously injured by garage door springs and the cables which are attached to them. Garage door springs should only be adjusted by knowledgeable, professional individuals.

Garage doors are large, heavy mechanical objects. When you stop and think about it, they frequently are the biggest moving thing in your home. Your door, for example, probably weighs between 300 - 375 pounds. Give that some thought the next time you walk beneath it.

Garage door springs are designed to do virtually all of the work necessary to lift your garage door. They simply need a little help from you to get the job started. When garage doors are in the closed position, the springs are stretched very tightly and in their most dangerous state. The cables that are attached to the springs are under tremendous tension. Never loosen any hardware which is attached to a cable or spring.

In your case, I believe that your springs are either worn out or out of adjustment. Think how much force those springs must exert to lift your 300 + pound garage door. Think how many times in 15 years they have lifted that garage door. You would be tired too!

Very few homeowners are aware that garage doors require periodic maintenance. The hinges, rollers, springs, pulleys, cables, etc. are subject to wear and tear every time the garage door is operated. Rollers have been known to break when a door is opening. The result of a failure such as this can be catastrophic. Garage doors have been known to fall on top of a car, a person, or the garage floor. Regular routine inspections can prevent accidents such as these.

If you are mechanically inclined and have the proper tools, you can successfully install an automatic garage door opener. However, you must have the door springs adjusted prior to installing the opener. If the door springs are not adjusted properly, the life expectancy of the opener can be significantly reduced. Remember, the springs are supposed to open the door, not the opener.

When installing the opener, be sure to follow the manufacturer's instructions to the letter. Mount the push-button wall control at least 5 feet above the floor. Small children love to push these buttons and often play games with moving garage doors. Should the built in safety features fail, tragedy is a real possibility. Also, try to disguise or hide the remote transmitters as well. Don't tempt children with these playtoys.

Finally, after installation of the opener, test the door to make sure the door automatically reverses. Virtually every new opener is equipped with infrared detectors mounted low to the floor. These detectors sense if someone or something walks beneath the door as it is closing. The openers also are equipped with sensing devices that tell the opener if it is striking an object before it is fully closed. These sensors, when adjusted properly, will also reverse the door and send it back to the open position.


The Contractor Selection Interview

DEAR TIM: I am really frustrated. Before awarding the contract to build my new home, I went to great efforts to hire a knowledgeable builder. However, after moving in to the house many problems have begun to surface. In many instances, the materials were not installed according to manufacturer's recommendations. I know that many other homeowners have suffered this fate. Is there a solution? B. R.

DEAR B. R.: I am sorry to hear about your misfortune. You are correct. There are thousands of homeowners who have been victimized by unknowledgeable and non-professional contractors. In many instances when problems arise, these individuals try to cast the blame on product or material failure. There is a solution, however, the problem will not be solved overnight.

The construction industry is a very unique field. It is one of a few professions where no formal education is required. On a very routine basis, individuals purchase trucks, tools, and business cards and become builders, remodelers, or sub-contractors overnight.

As a builder, I encountered numerous builders, remodelers, and sub-contractors who rarely, if ever, had read technical journal information regarding their trade. Vast numbers of these individuals had learned their trade by either observing other craftspeople, listening to verbal instructions, or learning from their past mistakes. In other instances, individuals relied upon information given to them by supply house employees. These methods of learning are not always acceptable, as the instructions are not always based upon facts.


How would you like me to build your new home? It's probably impossible for me to fit your job into my schedule, but I will gladly share hundreds of my tricks and building secrets with you and your builder. Check out my New House Specifications.


The building and remodeling industry is very aware of the problem.National and local associations are attempting to broaden the educational opportunities for their members about all aspects of the profession. Educational seminars are becoming a regular attraction at national and regional conventions. These associations are making significant progress, however, they can only educate those individuals who want to learn. Vocational education is also beginning to make a comeback. These programs often allow individuals to blend both textbook and on the job training.

Numerous manufacturing associations exist which also have enormous resources with respect to written information about the proper installation of their product. Much of this information is available at no charge to a builder or homeowner. Often these associations have training videos as well.

The past decade has also seen enormous growth in the amount of high quality books, magazines, periodicals, etc., that have very in-depth educational articles concerning every aspect of residential construction. Individuals who work in construction who regularly read these materials can easily keep abreast of the most up-to-date construction techniques and technologies.

When you decide to hire a contractor in the future might I suggest a few things. Ask the individual if he or she has any professional designations. Ask if they are a member of an association. Call the association's local chapter and see if the individual attends meetings on a regular basis. Ask the individual if he or she attended the most recent national or regional convention.

Finally, consider asking the individual what magazines / periodicals he or she receives on a regular basis. See if it's possible for this individual to bring the most recent issues for you to browse through. Judge for yourself the depth of the editorial content of these items. Education is an ongoing process. It requires continuous reading on the part of a professional. Make sure you hire a professional who reads on a regular basis.

Author's Notes - March 26, 2004

Yesterday, I had the good fortune to be deposed as an expert witness in a civil lawsuit. I do this type of work on a routine basis. In this particular matter, the attorney who represents the homeowner (plaintiff), hired me. The attorneys who represent the defendants wanted to ask me questions so they can gauge the strength of their case.

There were three attorneys who were asking me questions. One represented the builder, one the bricklayer and the third the painter. The lead attorney who represented the builder, during the course of his questioning, produced a copy of the above column you just read. It, of course, did not contain these comments I am now writing.

Just prior to presenting the column as an exhibit in the deposition, the builder's attorney was asking me all sorts of questions about many of the above points. He was trying to see if I met the criteria for being a good or great builder.

The point of the above column is simple. A great builder does not necessarily do all of the things above. He or she may only do half of them. There may be a rare individual who is an excellent builder who has never been to one convention nor read any technical journals. Maybe this person possesses mystic powers that keep him up to date with what is going on.

I have attended many conventions. As I was driving home from the deposition, I remembered clearly attending numerous seminars at a Remodeling Magazine convention. I subscribe to Fine Homebuilding and the Journal of Light Construction. Technical journals and bulletins from numerous associations grace my bookshelves. I am a member of NARI. Much of the data you read in my columns comes from one-on-one conversations I have with the top scientists in the field or with product managers who actually see a new product go from the drafting board to the store shelf.

But even still, this particular attorney was trying to discredit me by making me say I don't do everything I wrote above. He missed the point entirely. Hopefully you won't.

Many of you are probably thinking the same thing I thought as I drove home. Wouldn't you love to ask him how many law conventions he attends, how many different trade publications he reads cover to cover on a regular basis each month, how many different associations he belongs to, etc.?

But that is just a fantasy - neither you nor I will ever get to ask him those questions. My hunch is if we did get to ask him, he would probably ignore us. TC

Cast Iron Plumbing Pipe – It’s Quiet!

Cast Iron Pipe

Here's a typical cast iron drain pipe. It's suspended from the ceiling in a stairwell in one of the oldest buildings in Southwest Harbor, Maine. You can see how the lettering is cast into the pipe. Copyright 2018 Tim Carter

DEAR TIM: I recently was visiting with some friends. While sitting in their family room, I heard water rush down the wall next to me. It was very objectionable. Evidently, someone had just finished using the toilet facilities in an upstairs bathroom. I don't have that problem in my older home and I'm afraid it might develop over time. What caused the noise? Is the problem avoidable? W. D.

DEAR W. D.: Based upon your description, your friends' plumbing drainage system is constructed of either PVC or ABS plastic piping. This piping material was introduced in the early 1970's. These products were sold on the basis that they were cheaper and easier to install than cast iron and galvanized piping. However, plastic piping materials have two major drawbacks: they are very noisy and they expand and contract readily.

You do not have the problem in your home because your drainage piping is constructed of cast iron. Cast iron plumbing pipes are very durable and quiet. Cast iron piping installed 372 years ago in France is still in service. The same is true for cast iron installed in the White House during the 1800's. Rest assured that the noise problem will not develop in your present home.

Cast iron piping manufactured today is very different from the cast iron piping made at the turn of the century. Cast iron pipe, years ago, used to be static, or sand cast. This method allowed for wide variances in pipe wall thickness. Also, the sand casting methods often produced tiny pinhole leaks. The old pipes were connected by inserting the spigot end of one pipe into the hub end of another pipe. This joint was then partially packed with oakum (hemp impregnated with tar). Molten lead was then poured into the joints to complete the seal. The process was very labor intensive.

New cast iron pipe is cast using a centrifugal spinning process. This process assures consistent pipe wall thicknesses. Many manufacturers water test their pipe to check for leaks. Cast iron fittings are still static cast, however, modern casting methods assure high quality pieces. The cast iron pipes and fittings of today are joined with rubber and stainless steel clamps. Believe it or not, cast iron piping can be installed faster than plastic piping.

Cast iron plumbing is very quiet. This results from its dense molecular structure and the use of rubber between sections of pipe and fittings. The rubber gaskets and seals isolate the pipes and fittings and help to absorb sound vibrations. The sounds you heard at your friends' house were created by the vibrations of the water bouncing against the sides of the lightweight plastic piping. Plastic piping can also create popping noises when hot water passes through it. The plastic pipes expand and often rub against the wood framing members inside of walls. Cast iron piping will rarely, if ever, cause this problem.

Should you decide to build or remodel, cast iron piping is also very affordable. In fact, it only costs on average, $150 per bathroom to upgrade to cast iron pipe. You can minimize this extra cost by using both cast iron and plastic piping in your home. Use cast iron for all of the drainage pipes that handle water wastes and use plastic piping for all of the fixture vent pipes.

Cast iron is also environmentally friendly. It is made from 100 percent recycled scrap iron and steel. Should your home be demolished in the future, you can recycle cast iron. Plastic piping, on the other hand, can not make these claims. The solvents which are used to weld the pipes together are highly toxic. They produce fumes which dissipate into the atmosphere. In order to avoid becoming sick while using these solvents, adequate ventilation becomes a necessity. Plastic piping is not easily recycled. Often it ends up devouring space in our dwindling landfills.

Rustproof Wood Siding Nails

DEAR TIM: We are getting ready to install some plain beveled wood siding on a room addition project. As you can see from the photos (not shown in this column), we live next to the ocean. We are afraid of stains. What kind of nails do you recommend that we should use? Are galvanized nails sufficient? Also, do you have any suggestions with respect to nailing the wood siding? N. B.

DEAR N. B.: Does that room addition happen to have a spare bedroom for a traveling columnist? Seriously, I do love the ocean and the ocean environment loves to corrode metal. As such, you should only use one type of siding nail, that being a type 316 stainless steel siding nail. High quality galvanized nails will work in just about every location except for yours.

Galvanized siding nails are available in many different types and grades of quality. There are four types of galvanized nails: mechanical plated, hot-galvanizing, electroplated, and hot dipped. All of these types have a zinc coating which is applied to a standard steel nail. However, the thickness of the zinc coating and manner in which it is bonded to steel varies significantly.

Mechanically plated galvanized nails receive a thin coating of zinc dust which is applied to cold steel nails. Sometimes an extra thin layer of chromate is added to these nails. Hot-galvanized nails are not to be confused with hot dipped galvanized nails. The hot-galvanized nails receive a zinc coating by tumbling steel nails in a drum with small zinc chips. The drum is heated and rotated and the zinc chips melt. However, the coating results are often uneven. The bond between the steel nail and the zinc is not as good as it could be.

Electroplated galvanized nails often are very shiny. The thin zinc coating is applied to the steel in an electrolytic solution. The coating of zinc is very thin. This method is often used for nails that are used in pneumatic nail guns. These nails often begin to rust in short order when exposed to any type of weather.

The best galvanized nails are those that are hot dipped. Steel nails are bathed in molten zinc. The temperature of the molten zinc is so hot that the zinc actually forms an alloy with the outer layer of the steel. The best process involves the nails being dipped a second time. This adds a thick layer of zinc to the nail. If you must use galvanized nails for any outside purpose, only use double hot dipped galvanized nails.

The ultimate exterior nail is stainless steel. These nails are commonly available in two grades: type 304 or type 316. The type 304 stainless steel nails contain 18 percent chromium and 8 percent nickel. These nails will never corrode in most environments. However, ocean spray and mist can contain chlorides which will corrode 304 stainless steel. Type 316 stainless steel contains molybdenum which makes it resistant to attack by ocean water spray or mist.

Nailing your beveled siding is very critical if you want the best results. A large majority of this type of wood siding is often incorrectly nailed. Wood siding will expand and contract in response to changes in moisture content. Because of your ocean location, your siding will be on the move. This movement is greatest across the grain of the wood. The siding must be allowed to move freely with changes in moisture.

To permit this movement, only one nail should penetrate each piece of siding at each wall stud location. These nails must pass through the siding just above the hidden top edge of the piece below. Should you nail into the piece below, you will effectively pin it. Cracks or bulges may appear at a later date. Finally, make sure that the siding nails are long enough to pass through the siding, the exterior sheathing, and into the wall studs a minimum of one and one-half inches.

This column was featured in the May 6, 2014 AsktheBuilder Newsletter.


Ceramic Tile Failure

DEAR TIM: While cleaning the tile above my bathtub yesterday, several tiles in the bottom row appeared loose. After investigating further, they actually fell off the wall. Behind them was what appeared to be drywall or plasterboard with a green paper. What puzzles me is that none of the grout was cracked or missing. After talking to some of my neighbors, I come to find out that this problem is widespread in my subdivision. What can I do to get my ceramic tile to adhere as in my parent's 65 year old house? F. R.

DEAR F. R.: You are not the first person to suffer this fate. Nor will you be the last. The root of your problem, as you have probably already determined is water. Water simply got behind the tile and was absorbed by the paper covering the drywall. After a period of time, the gypsum core softened. This caused the bond between the paper and the gypsum to fail. You can clearly see in your photographs that pieces of the green paper are still attached to the back of the tile.

Your parent's house has what is often referred to as a mud and metal lath system. This was a very popular method used to attach ceramic tile to vertical wall surfaces. This system involved nailing metal lath identical to that used by plasterers to the wall studs. The tile setter would first apply a thin coat of cement mortar to stiffen the wire. On the second day, he would return to apply a second coat of cement mortar. This coat was approximately three-quarters of an inch thick. After this layer of mud had set up, a thin cement paste was then used to set the individual pieces of ceramic tile. Water that gets behind this tile will not dissolve the cement paste or mortar. The bond between the tile and mortar bed is very permanent.

The problem with this system, however, is that it is extremely labor intensive. While there are tile setters who can still install tile in this manner, very few people can afford the cost. This is where your green paper drywall and some other products enter the picture.


If you're putting ceramic tile in your home, check out my Ceramic Tile Installation Checklist to learn exactly what you should know about the process. Avoid making costly mistakes with the help of this document. I offer a 100% Money Back Guarantee.


The green paper drywall is a product manufactured by gypsum manufacturers. It is marketed as a moisture resistant drywall. The gypsum core is treated with special chemicals that make it moisture resistant. The green paper simply tells installers that it is different from ordinary drywall. Note that there is a big difference between moisture resistant and waterproof.

There are two other types of products that are available as well. One of them has a gypsum core that has been treated with silicone. This gypsum core is then surrounded by an inorganic glass mat. The mat, on one side is then surfaced with a co-polymer coating which is both water and vapor retardant.

The other product is referred to as cementitious board. These products use the same cement mortar as described above. However, it is sandwiched between thin layers of fiberglass mat.

All three of these products can be installed in a fraction of the time of the old fashioned method. The key to successful tile adhesion lies in installing them properly. These products must not be allowed to come into contact with the top ledge of the bathtub. Water sitting on the top ledge of the tub may come in contact with these products. This water can be easily absorbed by some of the products such as your green drywall. This water can cause numerous problems such as the one you experienced.

The Tile Council of North America recommends that you should leave a gap between the bottom edge of these products and the tub. This gap should then be caulked with an elastomeric caulk such as mildew resistant silicone. If you should use green drywall, be sure not to cut off or trim the factory paper-bound edge. After the tile installation is complete, the gap between the tile and the tub should also be caulked. Do not install grout in this horizontal gap!


Restore the "clean" to your grout. Just go to STAIN-SOLVER to see the beautiful, quick results.


Grout can also be very misleading. Many people think that grout is water retardant. In fact, it is the opposite. Untreated grout can and does absorb water. Always treat your finished grout job with grout sealers.

Acrylic and Fiberglass Tubs And Showers

DEAR TIM: My husband and I are planning a bathroom remodel. We can't agree on which type of tub / shower stall to install. My husband says there is no substitute for cast iron. Because of the wide variety of shapes and sizes, the fiberglass and acrylic products appeal to me. My husband says these units won't stand the test of time and scratch easily. I mentioned that cast iron products can chip. Without your help, we may be headed for divorce court! A. G.

DEAR A. G.: I hope both of you have good attorneys. I think you might need them as both of you have raised some valid points. I'm very confident that there is a product or two available that will satisfy both of your desires.

Your husband's comments concerning cast iron are very accurate. Cast iron plumbing fixtures are extremely durable. Cast iron will not flex. The thick enamel coating is actually fused to the cast iron in high temperature ovens where the temperatures exceed 1,700 F. Through this process, the enamel achieves a hardness very near that of ordinary glass. However, enamel can be scratched and it does chip. If you don't believe me, come and look at my kitchen sink.

As you have already discovered, there are many manufacturers, styles, and materials used in fiberglass type tub and shower stall units. While the finish on these units is not as hard as enameled cast iron, they can easily retain their glossy appearance with a little care and maintenance. The simple rule is to use the same care and cleaning products that you might use when you wash your new car.

There are three primary types of "plastic" tub and shower units: gel-coated fiberglass, acrylic reinforced with fiberglass, and acrylic backed with a structural composite. Side by side, these products look very similar, however there are important differences.

The gel-coat products, when constructed with high quality ingredients, can be very hard and durable. The manufacturing process is critical, as the liquid gel-coat must be applied evenly on the molds at the correct temperature. Gel-coated products if damaged or scratched can be repaired with great success. Repairs performed correctly are permanent and virtually invisible.

Acrylic units are usually constructed using large sheets of solid colored acrylic plastic. These sheets are heated so that they soften. The softened sheets are then stretched over a mold to achieve the desired shape of the shower or tub unit. This stretching process, however, sometimes causes the acrylic to be very thin as it stretches around corners. Those units with the highest percent of acrylic tend to offer higher performance levels. Repairs to these units are not always successful.

Should you and you husband eventually agree on using a "plastic" unit, be sure to carefully follow the installation instructions. Many homeowners in the past were dissatisfied with the fact that the floors of these units flexed like oil cans. Some of the acrylic units backed with composites have addressed this problem. The other units often need to be set in wet plaster or mortar to provide a solid base. Be sure that you or your contractor carefully follows the installation instructions.

The care of either cast iron units or the alternatives is important. Never use cleansers that contain abrasives, as these can scratch both cast iron and plastic fixtures. If you simply make a practice of cleaning the tub or shower area every two weeks, you will avoid the heavy soap buildup that often necessitates heavy scrubbing. Virtually every manufacturer has a recommended cleaner that they strongly suggest you use. Follow these instructions and you will have a beautiful tub and shower area for many years.

Finally, if you do select one of the "plastic" units, you can keep it looking new with a little known trick. Once a month, take just fifteen minutes and apply a high quality spray automotive wax to the wall surfaces only. Never apply wax to the floor of the unit. Buff this wax out and it will be as shiny as new!

Bleeding Redwood And Cedar Siding Stains

DEAR TIM: I have an unusual problem. My house is covered with redwood beveled siding coated with a light solid colored stain. A few weeks ago dark brown streaks began to stain the siding. These stains appear to originate from behind the siding. I am also beginning to notice blue-black stains at each nailing location. Do you have a clue as to what is happening? What can be done to prevent this staining? I. L.

DEAR I. L.: I'm afraid I have some bad news for you. You appear to be the victim of a phenomena called extractive bleeding. It can happen with just about any wood siding, but it is especially noticeable with redwood and cedar sidings.

Redwood and cedar are forest products which contain naturally occurring chemical extractives. Woods such as redwood and cedar derive their durability and weather resistant characteristics from these chemicals. However, these chemicals can dissolve quite easily in water.

In your situation, water from several possible sources got behind the siding. This water could have been water vapor that condensed on the back of the siding after it traveled through the walls of your house. It could also have resulted from a leak in your roof. There are other possibilities as well.

The water then possibly traveled down the back of the siding and dissolved some of the extractive chemicals. When the water finally broke through a seam in the siding it ran down the siding, evaporated, and left the brown chemicals behind. This same thing can happen if water enters redwood from the surface. Water soaks into the wood, dissolves the chemicals and then is drawn back to the surface by wind action or sunlight. In any event, the result is the same.

The stains at each nail head are being caused by a chemical reaction between the extractive chemicals and the iron in the nails. Had the nails been hot dipped galvanized or stainless steel, you would not have had this problem. It may be in your best interest to replace the nails to prevent further staining. However, you can try to countersink the nails, swab the holes with a high quality water repellant, and when dry, fill the holes with an exterior wood filler.

The stains caused by the extractive chemicals and the nails can often be successfully removed. Mix one cup of trisodium phosphate, one cup of bleach and one gallon of water and wash the siding with this solution. Follow this with a solution of four ounces of oxalic acid crystals dissolved in one gallon of warm water. Be sure to use a plastic bucket to mix this solution. Wash the wood with this solution and let dry. When the solution dries, rinse with fresh water. Be careful! Oxalic acid is poisonous and can burn your skin and eyes. Wear rubber gloves and use goggles. Keep away from plants as well.

There is a way to virtually eliminate extractive bleeding stains. The trick is to seal completely each piece of exterior wood before it is installed. Just make sure the wood is completely dry before beginning the sealing process. In fact, the California Redwood Association recommends that this practice be followed with any exterior finishing system.

Should you decide to paint redwood in lieu of staining, this sealing process or back-priming is absolutely essential. The reason this sealing process is necessary is quite simple. By sealing the entire piece of wood, it becomes virtually impossible for water to enter the wood and dissolve the extractive chemicals. In the case of painted wood siding, the sealing process also prevents blistering of the paint. Blisters can only form if water has soaked into the wood. Be sure to seal the cut ends of each piece of wood as well. The carpenters may charge a little extra for this service, but it is well worth it. Remember, the end grain of a piece of wood is where water can most easily enter.


House Excavation Boo – Boo

DEAR TIM: Enclosed is a set of my new home blueprints and some photographs. As you can see, I was supposed to have a ranch style home built with a walk out basement. Well, I do have a ranch house with a walk out basement, but the house is sitting two and one-half feet out of the ground. Now I need steps or steeply sloping sidewalks to get into and out of the house. The developer sold me the lot assuring me that it was a walk out lot. What went wrong? Why wasn't this mistake caught early in the job? What can be done? P. E.

DEAR P.E.: I've seen mistakes made before concerning foundation depths, however never have I seen a mistake as severe as yours. In fact, more often than not, house foundations are installed too deeply in the ground. Your house looks as if it has floated out of the ground.

Because I was not privy to your conversations with the lot salesperson, your architect and your builder, I am at a slight disadvantage. It is possible that all three individuals are partially responsible. However, the largest portion of the blame should be directed towards your architect and builder.

Walk out basements require a minimum change in topography in order to work. This calculation is really quite easy to do. Your plans clearly show that the height of your foundation was to be 7 feet 10 inches above the top of the footer. If you notice on the cross section portion of your blueprints, the architect has indicated that your basement floor is four inches thick and it rests upon the footer. Also note on the cross section where the soil at the highest part of your lot contacts the foundation. Using the scale on the drawings, it appears that only six inches of foundation was supposed to be visible above the ground at this point.

If you do the mathematics, you will see that you need a 7 foot change in elevation between where you walk out of the basement and the highest point of the lot where it comes into contact with the foundation. In your instance it appears that you only had a 5 foot change in elevation.

I noticed that your blueprints did not show a simple topographic map of the existing grade and proposed grade changes necessitated by construction activities. This, I feel, is the root of your problem. Quite possibly your architect failed to take a transit to your lot in order to determine just how much the lot sloped. Without this critical grade information, I don't see how it is possible to draw accurate plans.

Your builder also needs to answer some questions. Often, builders need to determine whether or not construction activities will create excess dirt. Sometimes this dirt can be distributed on the lot and sometimes it needs to be trucked away. This determination can usually only be accomplished by using a transit to determine the change of grade on the lot. Had your builder performed this exercise, the mistake might have been caught in the bidding phase.

Finally, prior to excavating, the house is accurately staked out by surveyors. The corners of the foundation can be easily determined. The excavator and the builder working together should have noticed the problem immediately. Even after digging the hole, the problem would have been evident, as the hole for the foundation would have only been approximately 5 - 6 feet deep. The fact that the foundation was subsequently poured indicates to me a lack of adequate job supervision. Had your builder been following the plans, he could have contacted the architect prior to pouring the foundation. At this point, you could have filled in the hole and sold the lot to someone who didn't want a walk out basement.

There is no easy solution to your problem. In order to achieve the look that is indicated on the plans, you need hundreds of cubic yards of extra dirt brought to your lot. Several retaining walls need to be constructed as well. None of this was indicated on the plans. This problem is a result of negligence or compounded mathematical errors on the part of the architect and builder. The extra cost to correct the problems should not be your responsibility.