DEAR TIM:I am in the planning stages of an upcoming building project that requires stone work. After obtaining quotations for this work, I am over budget. A friend suggested that I look into the artificial stone products. After visiting a local supplier of these products I was amazed. The samples looked like real stone. What can you tell me about these products? Are they affordable? Would you install it on one of your projects? N. I.
DEAR N. I.: Have you had your vision checked lately? Just kidding! I couldn't agree more with you. Artificial stone products are extremely realistic. In fact, I was a geology major in college and many of these products look exactly like the rocks that I used to study and crack with my rock hammer. I am very impressed with these materials.
Many artificial stone products are both lightweight and durable. These two qualities are achieved by manufacturing the stones in a controlled environment. Just about every artificial stone is made by mixing small, lightweight pieces of aggregate, Portland cement, and different iron oxide pigments. This mixture is poured into hundreds of different flexible molds which vibrate. This vibratory motion is the key to producing realistic textures and color variations in each individual stone. Because these stones are very similar to concrete and are manufactured under controlled conditions, they will probably outlast both you and I combined.
The fact that these products are lightweight gives them a unique advantage over natural stone products. Artificial stone products do not require foundations beneath them for support. They are attached to buildings in a manner very similar to applying stucco. If your house is wood framed, a wire lath is applied directly to the wood studs or over the exterior wall sheathing after a weather resistant barrier has been applied. This barrier can be either standard asphalt felt paper or one of the many waterproof air infiltration barriers. Once the metal lath has been securely fastened to the wall framing members, the installer simply applies a one-half to three-quarters inch thick layer of mortar onto the lath. The stones are set directly into this fresh mortar. Many manufactures recommend using specific colored mortars depending upon the color of the stone being used.
If your structure is masonry to begin with, you simply apply the coat of mortar directly onto the concrete block, brick, or poured concrete. It is a fairly simple procedure.
Anyway, there is no limit as to where these products can be used. You can use them for any exterior wall surface, free standing exterior perimeter or garden walls, coverings for exterior metal or masonry chimneys, interior fireplace fronts, columns, wainscoting, etc. You can even do the interior of your office if you desire to simulate a room in a castle. Some manufactures even make artificial cobblestones for driveways and walkways. Artificial brick is available as well.
Some people in the past have expressed concerns about the color fastness of artificial stone products. For the record, many people don't realize that natural stone will both fade and discolor as a result of oxidation and exposure to weather. The artificial stone products are manufactured in such a way that the color is integral throughout each piece. Some manufacturers have developed an additional process which imparts shade variations directly from the face of the molds. This makes the stone products virtually indistinguishable from their natural stone counterparts.
Artificial stone products should also help you with your budget problem. Frequently the cost of a complete installation is 50 - 60 percent that of a similar natural stone installation. The current retail cost of many of the artificial stone products is about $4 per square foot. Labor, mortar, and other costs may add an additional $4 - 8 per square foot depending upon your locality. (Prices shown are from the time the article was written in 1995.)
I wouldn't hesitate to use the artificial stone products on one of my projects. In fact, I wish that I would have used it to face the foundation of my existing house. I built a country Victorian house 9-years-ago and the exposed parts of my foundation would have looked magnificent had I used one of these products. Oh well, I'll do it right on my next house!
Do your own DIY install of a Linear French Drain with Tim Carter's time-tested methods and materials! CLICK IMAGE TO ORDER NOW!
Linear French Drains - They Work Well - Read the Testimonials
The Testimonials are in Author's Notes below!
DEAR TIM:We've lived in our home for twenty-two years. Our basement has always been dry. However, this winter water began to enter our basement along our front wall. There are no cracks in the foundation wall and the water company indicates that our water line is not leaking. What has happened? Is there a way to either stop or control the water? By the way, what do you think of the new raised bed landscaping in the photos? C.H.
DEAR C. H.: Your landscaping looks great, for now. I suggest you go out and enjoy it before your landscaper comes back out and temporarily removes it. The landscaping activity is the root of your problem. Several things may have happened.
Does Raised Landscaping Cause Wet Basements?
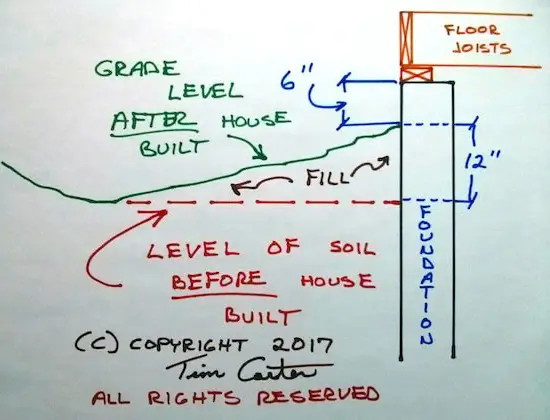
Yes, raised landscaping beds cause wet basements because the water flows towards the house instead of away from it. Water is supposed to drain away from a house. The soil around a foundation should slope down 6 inches in the first 10 feet of horizontal distance away from the foundation. Look at the green line below in my illustration.
The photos you sent me clearly indicate a problem which your landscaper created. The extra soil which was brought to your home to create the raised beds has created a negative slope situation on the front of your home. Prior to the landscaping, the ground sloped away from the front of your home. Now the ground slopes back towards your house. This condition is often referred to as a negative slope or pitch.
Remember, the holes in the perforated pipe point down. If they point up, they get clogged by pieces of gravel.
What Causes Most Basement or Crawlspace Drainage Problems?
Negative slope and roof water dumping next to a foundation cause a majority of basement or crawlspace drainage problems. It can also cause problems for houses built on slabs. Houses built on hillsides often are victims of negative slopes, as the ground uphill from the house directs surface and groundwater directly at the structure.
Can Broken Buried Drain Lines Cause Wet Basements?
Yes, a cracked or leaking buried drain line can cause water to leak into the soil next to a basement wall.
Two other things could have happened as well. The landscaper could have accidentally broken an underground downspout line while digging. Every time it rains water could be saturating the soil against your foundation. Landscapers sometimes till the soil before they plant. This tilling activity fluffs the soil which makes it soak up water more readily.
How Do You Correct Negative Soil Slope?
In those areas where the landscaper has created a negative slope, remove whatever dirt is necessary to create a positive slope away from your house. If your foundation is high enough out of the ground, you can actually add dirt to create the same effect. However, always try to leave a minimum of 6 inches of foundation exposed. Study the illustration above.
Will a Linear French Drain Stop Basement Leaks?
A linear french drain in the soil will stop basement leaks. My college degree is in geology with a focus on groundwater. I've solved thousands of wet basement problems just like yours with a simple 30-minute phone call.
What is a Linear French Drain?
A linear french drain is a hidden piping and drainage system that captures subsurface water before it enters your house. It works just like a gutter on a roof. Water flowing down a roof falls into a gutter and this water is then diverted into a pipe. The pipe is extended away from your house so the rainwater can flow naturally down to the ocean the way it did before your home got in the way.
Do Linear French Drains Really Work?
Yes, they work exceptionally well. I installed this system on my own property with great success. Water moves sideways through the soil. It moves through the air spaces in the topsoil. Most subsoils are dense clay and the water flowing through the soil moves across the top of the subsoil.
A linear french drain takes advantage of this dynamic. The moving water encounters the gravel in the trench and flows down to the perforated pipe instead of continuing its journey through the soil until such time as it bubbles into a small creek near your home.
Can You Call Me on the Phone to Help Me?
Yes, I can call you on the phone to help you solve your wet basement problem. I've done hundreds of calls with homeowners like you and solved each problem. The calls always are 30 minutes or a little less. I record the call and send you the MP3 file so you don't have to take notes during the call. You send me photos of your yard or a short video, and then I draw a picture for you showing how to install the linear french drain. Read Jim's testimonial below to see how I helped him.
Most recent customers to order a phone consult: Manu, Alexandria, VA | Patti, Ft. Worth, TX | Warren, Hamilton, OH | Sandra, Bend, OR | Brandon, Rapid City, SD | Alice, Plant City, FL | Loreli, Worcester, MA
My neighbor's property sits higher than mine. In the spring, the soil is so saturated that an underground river of water flows through the soil towards my house.
I controlled the water by digging a 6-inch-wide trench 24 inches deep along the entire length of the problem area. I installed 1 or 2 inches of washed 1-inch gravel in the bottom of the trench. Then I installed a 4-inch perforated drain pipe in the trench. I prefer to use a white plastic pipe that has two or three rows of holes drilled in the pipe at 8-inch centers. Be sure to install the pipe with the holes pointing DOWN. If they point up, small pieces of gravel can close off the holes and water can't get into the pipe.
How High Should the Gravel be in the Linear French Drain?
I prefer to fill the trench to the top with gravel. If you don't like the look of the gravel in your yard, then stop about 1.5 inches from the top and put in a piece of sod.
Should I Line the Trench with Filter Fabric?
Never use filter fabric in a linear french drain. Any silt flowing through the soil, and this rarely happens by the way, can clog the filter fabric and water then can't enter the linear french drain.
Filter fabric products are designed to stop the movement of the silt. If the fabric gets clogged with silt, then water can't find its way into the trench or the pipe.
Because my lot slopes front to back, I constructed the trench so that it sloped at a shallower angle than my lot. The drainpipe actually comes out of the ground at the rear of my property. All of the water which used to come towards my house hits this linear French drain. Because water usually takes the path of least resistance, it drops through the gravel and then takes a white water ride through the pipe to the rear of my yard. Most yards have enough slope to make this system work very effectively.
Author's Notes:
October 1999
Do you wonder if linear French drains really work? Read an e-mail I received from Pat Jones in Vienna, Virginia:
A year ago last spring, I called your radio show from my home in Vienna, VA. I described my problem with water in my basement. It was very predictable, every time it rained 2" or more in 24 hours I would get water in my basement. Anyway, you advised me that a French drain would solve my problem.
So I rented the ditch witch and got a bunch of friends, following your on-line tips we installed the drain. Your tip about the plywood to have the dirt flow onto was a great labor saver. We did have a lot of trouble with rocks and tree roots stalling the machine but in the end it was a job well done.
Of course, our work and your advice caused the drought in the Washington, DC area. We waited almost a year and a half before we got to really test the French drain. However when hurricane Floyd came through and gave us 4" in less than a day and the basement was high and dry I figured it was worth the drought. Now the neighbors are asking my advice, and I point them to your web page.
When we talked you said to let you know how it worked out. It worked out great!!
Thank you very much,
Patrick Jones
November 2003
Some wonder if you need to add a straw layer on top of the gravel. It's not necessary if you fill the entire trench with gravel to within one inch of the top. The reason is simple: Silt does not pass sideways through the topsoil. The silt that turns stormwater runoff brown is eroded soil particles that are running in overland flow.
Silt particles get trapped and filtered in the upper layers of topsoil. The vast amount of water captured by a linear French drain is water traveling sideways through the soil. It's generally clear and free of silt. To prove this point, spring water and water taken from underground wells is almost always crystal clear. The silt was left behind at the surface as the water was entering the ground.
You may wonder if my advice is worth anything. Well, read the long summary of what Jim Sanders wrote to me when he was at the end of his rope. My advice in the above column saved him:
"Hi, I just wanted to write to give you the results of my "Trench Drain".
I've had a wet crawlspace for 15 years. Water would fill the crawlspace at times, so we actually had to drill weep holes at the base so that it would enter the basement and eventually, the sump pump.
I have tried everything. Several contractors said that the only thing we could do was to bring the water into the house via drainage tile and let it enter the sump pump. That would work, but because I live on a 6' elevation, there is no reason that I should have water problems. It became like clockwork...when it rained, we would rush home from the lake or wherever we were vacationing so that we could be prepared to start the backup generator, in case the power failed. We even had our alarm company put a sump alarm on our system, so they could notify us if we had a power failure. Battery backup was not an option, because sometimes we lose power for days, and during any rain, our sump would run every 7 minutes...just like clockwork.
I found your site and read your above article on the trench or French drain. At first, it sounded a bit like "holistic healing" to me. I failed to understand why a 2 ft. deep trench, 4 ft. away from the house would do any good. How could this simple thing correct an extreme water problem that has plagued me for years, cracked my foundation, settled my garage floor, and ruined almost every vacation?
The Linear French Drain trench running from the house. PHOTO CREDIT: Jim Sanders
I decided "what the heck". I had to dig by hand using a trenching spade and a pick-ax because the builder back-filled our property with brick and blacktop. It took quite a bit of time. Because the ground level varies so much on that side of the house, I was not able to achieve exactly 2 ft. deep. It varied from 18" to 30" in spots, but the slope was downhill. The trench is about 80 ft. long. At times, I thought about filling it all in, because I just didn’t believe that it would work.
I stoned it, put tile in, and filled it with #1 round stone. I socked the pipe just for safety measure, and I also used geo-textile fabric on top, so I could cover with dirt and grass. I also ordered some clay and pitched from the house to the drain. (Tim Carter Note: Do NOT put a sock on the pipe and DO NOT USE a geotextile fabric as Jim did!)
After a short rain, water is running away from the house. PHOTO CREDIT: Jim Sanders
Result? For the last month, we have had seven or eight torrential rains, the worst of which was last night. It rained so hard, that our lawn washed out in spots because of the high clay content. Our sump pump, which normally ran every 7 minutes during and after rain, has not turned on for 4 weeks. The silt at the bottom of the sump well is now dry and cracking. Our crawlspace has not shown a trace of water or even moisture.
Since I couldn’t see correcting the foundation cracks or the garage floor settling and tilting until I corrected the problem's source, I waited to see if the trench drain worked first.
This week, I had a company come in and perform sort of a "mud-jacking" technique on the garage floor, which worked perfectly. Also, during the past few weeks, I parged the cracks in the foundation.
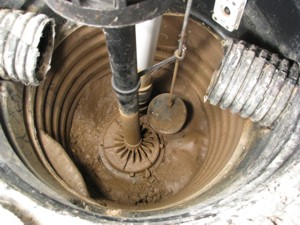
A dry sump pump. PHOTO CREDIT: Jim Sanders
I just wanted you to know how this worked. I stressed for many years over this issue and the solution was nowhere near as difficult as I thought it would be.
As a side note, I went to the end of the drain tile during a hard rain to see what was happening. Water was running out of the drain tile in about the same exact volume that it previously ran out of the weep holes in my crawlspace. This winter will be interesting, because last year, the ground next to the house was so saturated that during a thaw, my sump would run constantly. I'm guessing that the ground between the trench and the house will probably be drier now going into this winter."
DEAR TIM:My hubby and I just got back from the brickyard and I don't mean the one in Indianapolis. Anyway, there were many different types, colors, and styles of brick. I was astonished at the price spread between some of the different types. Aren't all bricks basically the same? Is there a vast difference in quality between bricks? Is there anything I can do to modify the appearance of the brick as it is installed? T.E.
DEAR T. E.: Brick is a fascinating building material. It also happens to be one of the oldest manufactured building materials. Brick is manufactured primarily of clay, which happens to be one of the most abundant materials found in most soils. My guess is that a group of individuals had a particularly intense bonfire one night. The next morning, they were astonished to see that the ground below the fire had become very hard indeed.
Manufacturing processes today are more refined than those methods used 5,000 years ago. Bricks can be manufactured from either clay or shale. Shale is simply a soft rock which started out as clay. Not all bricks are the same for the simple reason that not all clays or shales are the same. These two materials often have a high content of silica and alumina, two of the most abundant elements on earth. In addition, clays and shales contain metallic elements such as iron, magnesium, and potassium in varying amounts. These elements help add strength to the clays as they are heated to form bricks.
There are 4 primary factors that affect the cost of brick: raw material cost, energy, labor, and freight. Certain clays or shales may be easy to mine. The raw materials may be close to the brick plant. The cost of fuel for the firing kilns may differ in different parts of the country. Some bricks can be made and packaged entirely by machines. Other bricks use manual labor to blend and grade the bricks. Because bricks are heavy, the cost to ship them any distance can add significantly to their final cost.
Bricks can vary significantly in quality for several reasons. First, the clay or shale used to make the brick must possess certain qualities. Top quality bricks are made using clay or shale which has excellent plasticity and fusibility. Hang in there, I'll explain these terms.
A clay or shale is considered to have excellent plasticity if, after mixing with a small amount of water, it can be shaped or molded into a certain shape. It must be able to maintain this shape during the drying process.
Fusibility relates to a bricks durability. After bricks are formed and dried, they begin to enter a kiln. A kiln is nothing more than a giant oven. The temperatures in brick kilns can reach as high as 2400 degrees F. As the clay and shale particles are heated they begin to soften and fuse together. The more particles that fuse together, the harder and more durable the brick.
You can modify the appearance of your brick job very easily by paying attention to the mortar which is used between the bricks. Most people fail to realize that the mortar joints on a typical brick job make up approximately 15 to 17 percent of the surface area of a wall. Two things can be done to enhance the beauty of mortar: color and texture.
Many mortar manufacturers offer different colored mortars, not unlike colored grout for ceramic tile. The use of colored mortar can actually enhance the appearance of a colored brick. There are nine different textures or shapes that you can use when finishing the mortar joints. Some of these can make a brick job look old fashioned while others may make it look contemporary. Using a little creativity with mortar can make your brick home the most attractive in the subdivision.
DEAR TIM:My brother lives in a condominium complex. His unit is virtually soundproof. Rarely can you hear any exterior noise or sounds from other units. My current home is not soundproof. Can I do anything to lower sound transmission in my home? What could have been done during construction to make my house more soundproof? N.L.
DEAR N. L.: Excuse me, did you say something? I couldn't hear you. Just kidding! Soundproofing is an often misunderstood and neglected aspect of residential construction. I'm glad you asked the question. Perhaps it's best to start by understanding sound.
How is Noise or Sound Created?
Sound is created when something vibrates. Think about hitting a tuning fork against a hard surface. How about a rock-and-roll drummer hitting a cymbal or any of the drums?
These vibrations create sound waves that travel through the air. The sound waves then can either bounce off objects and/or cause them to begin vibrating.
What is Sympathetic Sound?
This additional vibration then creates sound waves on the other side of the object. This is how our ears work. Sound waves produced by a vibrating object travel through the air into our inner ear. These waves cause our eardrum to vibrate. Our brains then compute whether the vibrations are noise (unwanted sound) or pleasurable sounds such as conversation or music. I fully realize that some conversation and music can be noise depending on who's vocal cords are vibrating.
One way to minimize sympathetic sound is to make sure a wall assembly is not balanced. This is one reason a soundproof radio studio has window glass panes that are not parallel.
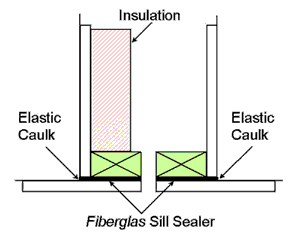
You can also add a 5/8-inch thick layer of drywall to one side of a wall that already has 1/2-inch drywall on both sides. If new construction, consider putting 1/2-inch drywall on one side of a wall and 5/8-inch on the other side to prevent sympathetic resonant vibration.
Dense or Thick Things Need More Energy
When sound is produced it has a certain amount of energy. The amount of energy is in direct proportion to the volume of the sound. So the louder a sound the greater its ability to vibrate objects such as walls, floors, and ceilings. If an object is lightweight or has a small density, it doesn't take much energy to get it to vibrate. Heavy, dense items require much greater amounts of energy to get them to vibrate. This is why older homes are more soundproof than newer homes. They tend to have thicker walls, ceilings, and floors.
What About Blocking Air?
Unfortunately, since your home is already built, the only sound that you can control is that sound which is still airborne. You need to block all pathways of air that are leaking air into the room.
Think of the room as an aquarium and begin plugging these leaks. For example, caulk all cracks in the room, especially where walls contact floors. Caulk holes inside of electrical boxes and around the edges of these boxes where they contact the drywall, plaster, or paneling. Install tight weatherstripping around doors and windows.
Soundproofing New Construction
If you are getting ready to build, you have many opportunities to soundproof. Remember, we need to stop airborne sound waves and those sound waves which travel by vibration through the structure.
Airborne sound waves can be stopped by using wall and floor materials that tend to absorb sound rather than reflect it. You can also have your builder caulk underneath all wall plates so that sound can't travel under a wall. Make sure that electrical outlet boxes from two back to back rooms are not in the same stud cavity. Install fiberglass sound batts in walls to block airborne sound waves that get into a wall cavity. Consider using insulated ductwork for your heating and cooling system.
Isolated Things That Vibrate
Vibrations caused by things in the house must be isolated. Do not allow plumbing pipes to touch framing members. Isolate them with pieces of rubber or caulk where they pass through floor joists and wall plates. Isolate any vibrating thing (furnaces, washing machines, dryers, fans, etc.) from direct contact with framing members. Without isolation, the vibrations will eventually create airborne sound waves which you will then hear.
Separate Wall Studs
Construct critical wall assemblies using two rows of studs which do not touch one another. The wall finish material for each room is applied on a separate row of studs. This stops the vibrations from one room from vibrating the drywall on the other side. If you can't afford two rows of studs, consider applying a metal resilient furring strip horizontally across the studs on each side of the wall. Then attach the drywall (two layers, if possible) to these strips. Apply 6 mil plastic to the studs before you apply the furring strips to the studs. This helps to isolate vibrations between the two objects.
Remember, stop the vibrations and you will stop the noise.
DEAR TIM: I'm thinking of adding a skylight to my kitchen area. I would really like to tackle the project myself even though my skills are limited. Many skylight manufacturers talk about flaring the shaft so that more light gets into the room. I only have three days to complete the project. My wife has started a neighborhood betting pool. The smart money says I can't finish the job in time. Can you share any tips or suggest an alternative method to get sunlight into my kitchen? G.Y.
DEAR G. Y.: I can help you, but first, what are the current odds? I might want some of that action. You better get plenty of rest, because if you choose to install a skylight, you are going to be busy!
I am installing blocking in between the ceiling joists.
I have installed hundreds of skylights. Some installations are more difficult than others, especially the flashing details between the skylight and the roofing materials. If you don't pick a skylight that has a pre-engineered flashing system, you might spend three days up on the roof. Pre-engineered flashing systems make quick work up on the roof.
Flaring skylight shafts is a very good idea. If you happen to own a flashlight that has an adjustable beam you already know why. Flaring the shaft of a skylight tunnel allows more light to enter the room. However, flaring a skylight tunnel also adds slightly more time and material to the installation.
Flaring the skylight shaft may not even be an option in your case if your roof is constructed of pre-engineered roof trusses. Trusses should not be cut. Only a structural engineer can make this determination.
If you are determined to try this project, here is what you will need to do. By the end of the first day, you must have the skylight properly installed. This means that if you had to cut any roof rafters, you have properly strengthened adjacent rafters to carry the additional load that used to be supported by the cut rafter(s). It also means that all flashing work is complete on the roof.
By lunch time of the second day you had better have the skylight shaft framing complete. Take a short break for lunch and get busy installing your insulation on the side walls of the shaft. When finished, apply your drywall. Just before going to bed make sure you have taped the drywall and put a first coat of fast setting joint compound on all the nails, screws, and cornerbead.
This particular product required face screws through the plastic outer dome to secure it to the roof.
On the third day, use fast setting joint compound for your second and final coats. If all goes well, you can sand the compound after lunch and complete your painting by supper time. Before you decide to jump into the project, only on two occasions have I been able to meet such a deadline.
As an alternative, why not consider installing one or more of the new tubular skylights. These are nifty devices that actually pipe sunlight directly into just about any space you choose. What's more, if everything goes right, you can have one of these completely installed in about 4 hours.
These devices are comprised of a flush or domed diffuser which is cut into your ceiling, a highly polished steel or aluminum pipe, and a clear acrylic dome on the roof which lets the light into the pipe. If your kitchen roof faces south, you will be pleasantly surprised as to how much light one of these sun tubes will let into your kitchen.
There are three distinct advantages that these tubes have over conventional skylights: no framing, plastering, or painting is necessary. The use of the highly polished pipe or tube eliminates all of this work. You simply need to cut a hole in your ceiling for the diffuser, install the flashing on the roof, insert the pipe and the dome and BINGO you're done. Just think, if you play your cards right you'll have 2 plus days to golf!
DEAR TIM:I went shopping for vinyl windows this weekend and was quickly overwhelmed. While they all appear basically the same, there seem to be differences. For example, why are some windows certified and others not? Does it make a difference how the windows and frames are connected? Finally, all the windows appear to be white, but when samples are held side by side, some are a blue-white color. What I thought was going to be an easy purchase has turned into a nightmare. Wake me up! D.E.
DEAR D. E.: You are awake, but you have crossed over into the vinyl window dimension. The only experience I can compare it with is a trip through a house of mirrors at a county fair. You must proceed cautiously and slowly through this difficult maze.
Let's start with your certification concern. The American National Standards Institute, Inc.(ANSI) and the American Architectural Manufacturers Association(AAMA) joined together to produce voluntary specifications for vinyl window construction. These specifications are very technical and deal with issues concerning durability and safety.
The certification program is very tough. Windows must be constructed using certified components, such as high quality vinyl, glass, and weatherstripping. Windows are tested randomly and periodically for a manufacturer to maintain certification status. Make sure the windows you purchase are constructed using the most recent guidelines, ANSI/AAMA 101-93. A sticker on the window frame should contain language indicating that the windows are approved.
Construction of vinyl windows is very important. There are two basic methods: mechanical connections and fully welded construction. Both types of construction can pass the rigid testing as outlined by the ANSI/ AAMA specifications. Mechanically connected windows are assembled by using screws, brackets, and caulk at the corners of the windows and frames. Connections can loosen or fail during the trip from the factory to your home. Fully welded construction takes advantage of the chemistry of vinyl. After the sections of the frame and window are cut, the mitered corners are heated. Once assembled and cooled, the two pieces of vinyl actually become one.
Heat (from direct sunlight), however, can cause big problems with some vinyl windows. Very close to 160 degrees F, most vinyls begin to loose some of their rigidity. Stress can cause frames to sag and distort. If you live in the South or Southwest, windows that face west can take a beating in the late afternoon. It is absolutely essential that you purchase high quality vinyl if you feel your windows will be exposed to this type of sunlight.
Quality windows are often constructed using frames which have many separate chambers. The cooler chambers which are away from direct sunlight help to hold the heated portions of the vinyl in shape. Steel inserts can also be used in larger windows. However, be sure the steel is encased in an inner chamber that is then welded shut. If not, your vinyl windows may actually start to rust!
The large number of chambers also provides another benefit. When mitered for assembly, the cut edge of a frame exposes the edges of the chambers. These are the parts which are heated and welded together. The more edges you have, the stronger the weld will be. In fact, manufacturers can tell you the square inch area of welded vinyl at each corner. Purchase a window with the highest square inch area.
The color differences you noticed are real. Some vinyls used in windows will change color when exposed to sunlight. Almost all vinyls will eventually begin to yellow. However, some will yellow much quicker than others. Some, not all, manufacturers tint their vinyl blue to delay this process. There are high quality blue vinyl windows, however. If you want these for your house, be sure to look for the ANSI/AAMA label.
Quality vinyl windows contain high amounts of titanium dioxide. Windows which have high amounts of this pigmenting chemical are almost always pure white. High quality vinyl also contains an organic form of the metal tin which also helps to stop the yellowing process. If the people in the window showroom act surprised about these things, keep shopping!
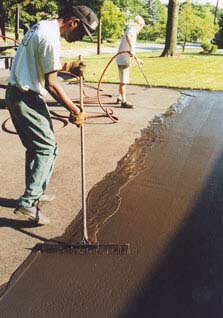
DEAR TIM:I'm a do-it-yourselfer and would like your opinion. My blacktop driveway is 3 years old and has never been sealed. It still appears black in color. My boyfriend tells me that I can wait another few years before sealing it. I have also heard that gasoline and oil can hurt blacktop. Is this true? If so, can you recommend a treatment to prevent this damage? How often should I seal my driveway? C.O.
DEAR C. O.: Hurry! Get to the local building supply store as fast as you can. You have already waited too long! Your driveway should have been sealed at some point within its first year depending upon your geographic location.
Blacktop or asphalt paving is a very interesting surfacing material. The asphalt industry actually markets the material as a flexible pavement. This claim arises from the fact that the asphalt cement, the material that holds together the small pieces of stone and sand in the blacktop, can remain pliable for a long period of time. This quality helps the asphalt or blacktop to resist cracks if installed properly.
However, asphalt which is exposed to air and sunlight will begin to loose this flexibility. The asphalt actually begins to oxidize. Ultraviolet light (UV) from the sun also helps to breakdown the asphalt cement. This is where problems begin to happen. If the asphalt oxidizes, it becomes brittle.The bond between it and the sand and stone particles(aggregate) begins to fail. The result of this process is cracking and loosening of individuals pieces of aggregate. If you live in a climate that experiences cold weather, this process is accelerated by water which enters these cracks and then freezes.
Blacktop sealers block air and sunlight from attacking the asphalt cement. There are several different types of sealers. The traditional sealers contain the same asphalt that is used in the original blacktop. The asphalt in these sealers is often mixed with water and a soapy compound called an emulsifier. This sealer tends to have the shortest lifespan and offers little or no protection from the UV rays from the sun.
Another type of sealer contains refined coal tar. These sealers offer excellent resistance to gasoline and oil. Gasoline and motor oil can actually dissolve the asphalt cement in blacktop. The coal tar sealers also contain small clay particles and an emulsifier which enables you to apply it easily. Some refined coal tar sealers are polymer modified. These added chemicals often provide, extra UV protection, richer color, and longer life.
Would you like to have a gorgeous driveway? How about step-by-step photos and instructions that show you how I had my own tar and chip drive installed? If so, you might want my Instant Download Tar and Chip eBook.
The most expensive sealers are those that are entirely man made. They usually contain high amounts of acrylic polymers. These are the sealers you often see on tennis courts. They are available in black for driveways. These sealers offer the best overall protection and frequently can last twice as long as a conventional sealer.
You have probably seen these sealers available with sand. Sand is a beneficial ingredient. It helps to seal the pores in the blacktop, improves foot and car traction, and helps the sealer to last longer on your driveway.
One of the biggest mistakes I see homeowners make is sealing their driveways too often. It is best to wait until the previous coat of sealer has worn off before applying a new coat of sealer.This will happen at different rates on different driveways because of traffic volume and exposure to weather and sunlight.
The test for wear is really quite simple. The aggregate used in the blacktop is often some other color than black. Here in the Midwest, the small stone chips are primarily limestone, which is gray in color. When you see your blacktop beginning to gray, as my daughter constantly tells me when looking at my hair, it is time to reseal your driveway. By the way, do not use blacktop sealer as a hair colorant, it can burn your scalp.
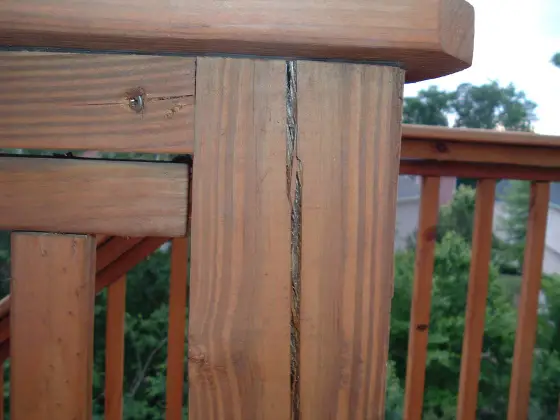
Look at the giant crack in this 4x4. The post was probably fine when installed, but the loss of moisture created tension within the lumber and caused the wood to split apart. PHOTO CREDIT: Suzanne Wieczorek
DEAR TIM:What do you know about treated lumber? I purchased treated lumber for a deck many years ago. At that time, the lumber companies said it would last a lifetime. Now they are saying that the lumber should be treated and sealed on a regular basis, even brand new lumber. Is this true? If so, why? What is the best way to clean and seal my treated lumber? R. A.
DEAR R. A.: I am by no means an expert on treated lumber, however there are several things that I can tell you which may shock and surprise you. Number one, your treated lumber must be sealed. The lifetime warranty that many of the treated lumbers carry covers rotting and insect infestation. The warranty does not cover appearance characteristics.
Wood is one of the most fascinating building materials that I have ever had the pleasure of working with. You can do just about anything with it. But, as with all things, you must take the good with the bad. The only bad quality that wood possesses, in my opinion, is that it is not dimensionally stable. The size of a piece of wood changes, often dramatically, in response to the amount of water which it contains at any given time.
Treated lumber, by its very nature, has massive quantities of moisture in it when it leaves the treatment plant. Untreated boards are stacked inside a giant vacuum chamber. The air in the chamber (and from inside the cells of the wood) is sucked out. The chamber is flooded with water which contains chemical preservatives. The chamber is then pressurized. The chemicals, because of this process, penetrate deeply into the wood. Often pieces of wood are so saturated with these preservatives, that it squirts out when driving a nail.
Wood deck surfaces need to be cleaned and sealed to keep them in good condition. The cleaner I recommend is oxygen bleach.
Wind and sun action begin a slow, destructive process that results in cracks, twisting, warping, cupping, and discoloration of any type of lumber. The top layer of wood fibers exposed to the sun's ultraviolet light can be rapidly destroyed. These effects can be minimized by blocking sunlight and slowing the evaporation of the water from the wood. That is why you must seal treated lumber. Some treated lumbers are available with factory applied sealants. Those that are not must be sealed immediately.
Cleaning and sealing treated lumber must be done on a periodic basis. There are many different cleaners and sealers that you can choose to use. Some are good and some not so good.
First, let's talk about cleaners and brighteners. Some cleaners and brighteners contain chlorine bleach. Chlorine bleach is not a great thing to use on treated lumber or any lumber for that matter. It can leave your deck looking quite white and unnatural.
Bleach can also harm surrounding vegetation. Consider using a cleaner that contains oxygen bleach. Oxygen bleach is very effective at removing dirt, mildew , and algae. It also does a great job of removing the sun damaged wood fibers. When using a cleaner, always brush it with a stiff scrub brush to get the best results. The brushing action removes the top layer of damaged wood fibers.
Treated lumber sealants can be very confusing. I'll bet that you have seen water repellents, sealers, preservatives, and clear finishes on store shelves. They are not all the same by any stretch of the imagination. To begin with, try to avoid using "all purpose" products. Stick with products that are designed specifically for treated lumber or exterior wood.
When selecting a sealer, try to choose one that is a penetrating water repellent. Look for ones that are formulated using synthetic oils and resins. Look for products that have three things in particular: mildewcides, algaecides, and ultraviolet (UV) blockers. Products that contain these three things (or any combination) are much better than a simple wood sealer or water repellent. Don't underestimate the importance of the UV blocker.
Remember, treated lumber needs to be sealed immediately after installation. If you wait any length of time, all kinds of problems will begin to occur. Quality products are available which can be applied directly to your new treated lumber. Don't hesitate to apply them!
Message from Tim:
Years ago while researching a column about cleaning decks, I discovered the wonders of Oxygen Bleach. It is perhaps the 'greenest' cleaner I know of as it uses oxygen ions to break apart stains, dirt and odor molecules. There are no harsh chemicals, and it works on just about anything that is water washable.
I decided to create my own special blend using ingredients made in the USA. In fact, the raw materials in the active ingredient are food-grade quality registered with the FDA. I call my product Stain Solver. I urge you to use it to help clean your cedar shakes. You will be amazed at the results!
DEAR TIM: It's time for a new exterior front door at my house. I love the look of our existing 70 year old wood door, but it never seems to fit right. It's either too tight or too loose. After looking around, I am astonished at the variety of different materials that are now being used to construct doors. Is there any one you prefer? Is there anything I should watch out for? T. I.
DEAR T. I.: I couldn't agree with you more. Exterior door systems have seen tremendous technological breakthroughs in the past 5-10 years. The most appealing doors to me are those that combine several different materials to make a realistic, if not actual, wood door.
Based upon your photo, your existing front door appears to be a 6 panel solid fir door. Solid wood doors can behave in an unruly fashion if not sealed completely. The humidity in the air can make solid wood doors warp and bow, causing them to fit poorly in the frames. My guess is that the top and bottom edges of your door have been neglected. They should have been varnished each time the door was refinished.
There are four primary categories of new exterior doors: steel, fiberglass, composites, and real wood. Believe it or not, the first three categories contain doors, which may be of interest to you.
Steel doors make up a majority exterior door sales in today's market. Steel is dimensionally stable. Humidity will not cause a steel door to warp or twist. You can purchase steel doors that have synthetic wood grained embossed finishes that accept stains. When finished, it is hard to tell these doors from the real thing. Just about every steel exterior door is filled with some type of foam. This foam allows the doors to achieve R-values almost five times that of an ordinary wood door.
Fiberglass entry doors are gaining in popularity. They are very similar to steel doors, however, they tend to be much more resilient. Steel doors can be dented somewhat easily. Many fiberglass doors are also stainable and have rich, realistic wood graining. When finished properly, it is almost impossible to distinguish that the door is not really wood. Fiberglass doors are also insulated with foam and have high R-values.
Some of the most fascinating doors are the composite doors. These doors often take two different materials and blend them together. For instance, one manufacturer uses a composite fiber-reinforced core that is twice as strong as wood. This core will not rot, warp, or twist when subjected to high levels of humidity. This core is then completely surrounded with real wood. The door is actually wood, but yet its not. It offers the beauty of wood, but not the problems.
Last, but not least, are real wood doors. Not all wood doors made today are like their ancestors. Many of the wood doors are made by laminating different, more stable pieces of lumber into a core. This core is then covered with a thin veneer of just about any species of wood you care to have.
Other solid wood doors are manufactured using a cut and turn method. Different parts of the door start out by using one solid piece of lumber. However, this piece of lumber is often sliced lengthwise into one or more pieces. After being cut, every other piece is rotated 180 degrees and then all the pieces are glued together. This makes the re-solidified' piece of wood much more resistant to warping and bowing.
When shopping for a new door, pay strict attention to finishing instructions. Many of these new doors require specific stains and finishes to achieve good results. Follow directions to the letter. Also, be sure to look for doors that offer adjustable thresholds. These devices allow you to adjust the threshold up or down seasonally, in the event the bottom door sweep fails to contact the threshold for some reason.
DEAR TIM:I just purchased a home that has a cedar shake roof. My concern is maintenance. The previous owner of the house says I don't have to do anything. My intuition tells me he is wrong. Is there anything I should be doing to maximize the life of the roof? Also, I am very concerned about the possible fire hazard of a cedar roof. Is there a danger? Are cedar shakes really that great when compared to other roofing products? V. E.
DEAR V. E.: Cedar shake roofs have many positive qualities. When installed properly, they are extremely wind resistant. Believe it or not, they actually have twice the insulating value of standard asphalt shingles. Hail does not easily damage cedar shakes. When treated with certain chemicals, cedar shakes can be made permanently fire resistant.
Cedar shake roofs, no doubt, have a certain amount of prestige as a roofing material. That explains why many of the other roofing product companies manufacture materials that simulate real cedar shakes. The texture, color, and appearance of a cedar shake roof is undeniably appealing. However, this beauty comes with a price tag. Cedar shake roofs do require a certain amount of maintenance to maximize their useful life. The enemies of cedar shakes, as you might expect, are water and sunlight.
Many people know that cedar contains high amounts of naturally occurring chemicals which help preserve the wood. These chemicals are called extractives. They dissolve easily in water. Need I say more. In certain conditions, rainfall can leach these chemicals from the cedar shakes in less than 10 years.
Ultraviolet light (UV) from the sun actually causes the surface cells of the cedar to break down. This microscopic refuse is washed away with each rainfall. UV rays also cause very tiny cracks to develop which allows water to drive deeper into the shakes. This simply accelerates the process of dissolving the extractive chemicals.
The key to maintaining a cedar shake roof is to keep it dry. Yes, I realize that sounds funny. What I mean is that after a rainfall, a cedar roof needs to dry out as rapidly as possible. The shakes must be free of moss, fungus, debris (twigs, pine needles, leaves, etc.), or any other thing that can trap and hold moisture. Overhanging tree branches must be sufficiently high so as to provide good air circulation above the roof.
Chemical preservatives are available which can be applied to cedar shakes. These preservatives when applied to clean, dry cedar shakes can dramatically add years of life to a cedar roof. Most of these chemicals can be applied with a hand held sprayer. Professionals who treat cedar roofs for a living have pressurized machines that allow them to do large roof areas in a short amount of time.
If you decide to clean and treat your roof yourself, you need to exercise extreme caution. You need to protect yourself from the dangers of falling. You need to protect your roof from the dangers of cleaning. Cedar shake roofs that are damp, covered with moss, or any object can be extremely slippery. I once stepped on some moss on a low pitched cedar roof and ended up at the gutter before I realized what had happened. Serious and fatal injuries are a very realistic threat.
The use of mechanical power washing equipment used in untrained hands can seriously damage your shakes. Cedar is a soft wood. Cedar that is covered with damp moss is even softer. A power washer that has too much pressure or is too close to the shakes can erode the wood. Simply use some common sense when cleaning.
A great cleaner for cedar shake roofs or decks is oxygen bleach. This non-toxic cleaner is a powder you mix with water. It will not harm the cedar roofing nor anything else it contacts. You must saturate the shakes for about 10 minutes with the solution making sure it does not evaporate. Lightly scrub the shingles with a push broom and rinse with a garden hose. The shakes will look brand new!
Message from Tim:
Years ago while researching a column about cleaning decks, I discovered the wonders of Oxygen Bleach. It is perhaps the 'greenest' cleaner I know of as it uses oxygen ions to break apart stains, dirt and odor molecules. There are no harsh chemicals, and it works on just about anything that is water washable.
I decided to create my own special blend using ingredients made in the USA. In fact, the raw materials in the active ingredient are food-grade quality registered with the FDA. I call my product Stain Solver. I urge you to use it to help maintain your cedar shakes. You will be amazed at the results!
Expert Advice For Your Home
Subscribe to the FREE Ask the Builder newsletter to receive professional advice for your home. Complete the form below and each week you'll get:
DIY Tips
Tool Reviews
Project Guides
Product Discounts, Giveaways & more.
Unsubscribe at any time. We respect your email privacy.