Water Pressure Drop Problems

DEAR TIM: Every time two or more plumbing fixtures are used in my brand new house the water pressure is horrible. The water flow is reduced to a trickle. When just one fixture is used the water flow is fine. It is very annoying. The plumber who installed the 1/2 inch diameter piping says this is normal. Is there anything that can be done to correct the problem? T. H.

DEAR T. H.: Ah hah! Another victim of slow flow! Did your plumber mumble something about "... normal for undersized pipes"? Don't despair, there is a good chance I can help you with your problem. Thousands of people like you suffer unnecessarily.

It all started a little over 300 years ago with a guy named Robert Boyle. He figured out that when all the faucets are turned off in your house, the pressure is the same just about everywhere in your water piping system. But, when you turn just one faucet on and let water start to flow, crazy things start to happen.

First, when the water leaves the big water main pipe in the street, it has a certain amount of energy. As it starts to go through the pipe under your lawn, it rubs against the edges of the pipe and looses energy. This loss of energy results in a pressure drop. Then, when the water starts going around bends and turns in the pipe, it looses even more energy. Deposits on the inner walls of older pipes, also, can add to this energy loss.

The rate at which water looses energy or pressure depends upon the size of the pipe the water is flowing through. It can be dramatic. Let's say your water pressure is 60 pounds per square inch (PSI) as it enters your house. It's 7 a.m. and 4 people are using two bathrooms. If the water has to travel through just 80 or so feet of 1/2 inch pipe to get to the bathrooms, the pressure, as it leaves any of the bath fixtures, is now only about 28 PSI.

Guess what the pressure would have been had your plumber substituted 3/4 inch pipe for the 1/2 inch pipe? 54 PSI!!! Guess how much extra money it would have cost your (you!) plumber to put this larger pipe up to those two bathrooms? It could have been done for less than $70. You can partially relieve this problem by replacing as much visible 1/2 inch pipe as possible. Do this for both your hot and cold water lines. Replace it with 3/4 inch pipe. In an average sized house, this replacement project can be done by purchasing about $150 worth of pipe and fittings.

If you are getting ready to build a new home, insist on using 1 inch pipe from the street to your house. Assuming your house is 100 feet from the water main, you will only loose 2 PSI by the time the water enters your house. The cost to upgrade to this pipe is often less than $100.

Water pressure problems are easily avoidable. Simply tell your plumber to use 3/4 inch pipe as the main feeder pipe. Only use 1/2 inch pipe to branch off this main pipe as you head to each fixture. Do this, and you will always be singing in the shower.


High Efficiency Air Filters

DEAR TIM: My air conditioning system didn't work when I turned it on for the first time this season. After spending $60 on a service call, I found out that a huge block of ice had formed inside my furnace. The service woman said my coil was dirty. That doesn't make sense. Seems to me, the air would be much cooler if it was blowing over a block of ice. What happened? Can it be prevented in the future? I'm hot about this problem! R. A.

DEAR R. A.: Cool down, take a break! Once that ice melted and the coil was cleaned, I'll bet you were in good shape. However, you possibly caused the problem by not changing your furnace's air filter on a regular basis.

There is a coil inside your furnace through which air blows. This coil has lots of thin fins. Attached to these fins is a small continuous tube which contains refrigerant. This refrigerant begins to boil inside the tube as the warm or hot air from your house passes over the coil. Prior to boiling, the refrigerant was very cold and as the heat from the air is transferred to the refrigerant the air temperature drops.

When you turn your air conditioner on, the main blower in your furnace begins to recirculate the air through your house. The moist, humid air passes over the cold fins of the coil. The water in the air condenses on the fins just like on a cold glass of iced tea on your patio table. Everything works fine if enough warm moist air can pass over the fins fast enough. If not, the temperature of the fins can drop below 32 degrees F. Ice starts to form on the fins and soon your coil is a solid block of ice.

In your case, the air passageways between the fins became blocked by dirt. This dirt slowed down the air trying to get through the coil. A clogged air filter in your furnace can also slow down the air passing through the coil.

You can prevent this problem by considering the use of higher efficiency air filters. Standard inexpensive spun glass filters are almost always less than 20 percent efficient. Some of them may only be 6-8 percent efficient. These filters are designed to protect your heating and air conditioning equipment, not cleanse the air.

You can purchase air filters that will not only protect your equipment, but also do a remarkable job of cleaning your interior air. These filters can trap very small particles of dust, pollen, mold, and other irritants. Some of these filters work much like the air and oil filters in your car. They are made using pleated filter paper. Other filters are made with fine synthetic polyester fibers. Higher efficiency air filters can sometimes be coated with chemicals that can kill tiny microbes such as bacteria and mold.

There are several advantages to using these higher efficiency air filters. Not only will your heating and cooling equipment perform better, your operating costs may well be lower. The air you breathe will be cleaner, as will your furniture and drapes. That $60 service call could have bought 10 filters that may have lasted through five cooling seasons!

Patching Concrete

DEAR TIM: I have tried to patch several areas of my concrete steps, driveway, and sidewalk with little success. Usually, after one year or so, the patch material either crumbles, or completely detaches from the concrete. The weather is always excellent when I patch: sunny, breezy, and hot. Help! What can I do to make the patches stick to the concrete? S.H.

DEAR S. H.: The first thing you need to do is reorganize your schedule. Sunny, breezy, hot days are great for the beach. They are not so great for patching concrete. Sweater weather (50 - 60 degrees F) is a good time for patching concrete.

Your patching attempts failed for any number of reasons. Many of the reasons involve water. High temperatures, sunlight, and wind can rapidly remove water from concrete patching compounds. What's more, the concrete you were trying to patch was probably very dry. In all likelihood, it absorbed water from the patching compound much like a sponge.

This is concrete made to look like brick. Believe it or not, this would be an easy surface to patch. The pattern of the brick is much easier to mimic than a perfectly smooth regular concrete slab.

This is concrete made to look like brick. Believe it or not, this would be an easy surface to patch. The pattern of the brick is much easier to mimic than a perfectly smooth regular concrete slab.

The water, you added to the dry patching compound, is needed for two reasons. It makes the mix workable. It also is a chemical ingredient. A certain amount of water must be retained within the patching compound for it to become strong. When mixing, water must be added to the dry patching compound with respect. Add too much water and the mix will be weak. Add too little water and the mix might not bond well to the old concrete.

There are numerous things you can do to increase your chances of success. Some of them involve work practices. Others involve your choice of patching materials. Let's start with the different types of patching materials.

Consider purchasing patching materials that contain polymer additives or blended cements. Patching materials that contain these things often stick much better to older concrete. If you see the words "acrylic", "vinyl", or "gypsum cement" on the label, chances are you are in good shape. You can also use liquid additives. Some of these additives are mixed with the patching compound, while others are applied to the surface to be patched. 100 percent epoxy patching compounds are also available.

It is important to prepare the area to be patched. Take some time and remove all loose material and dust. Consider chiseling or saw cutting the edges of the area to be patched. If the edges of the patch are just 1/8 inch deep, the thinner patching compounds often have a better chance to stick to your old concrete. Be sure to wear safety goggles to protect your eyes if you choose to do this.

If using a patching compound that requires water, dampen the area to be patched with a little water. This added water will prevent the dry concrete from stealing water from the patching compound. Try to perform your work on cool, overcast days. If you must work in hot weather, after you are satisfied with the finished texture of your patch, cover it with a piece of plastic and shade the patch from the sun. The plastic and shade will slow down the evaporation of water from the patching compound. Keep the plastic on the patch for a minimum of 3 - 4 days, if possible.

Washable Flat Wall Paints

washable wall paint

Washable Flat Wall Paints

DEAR TIM: I really like flat wall paint. I also like to wash my walls on a regular basis. That's my problem. In the past, flat paints have been tough, if not impossible, for me to clean. I know glossy paints clean well. Why can't you clean ordinary flat wall paint? My husband has suggested professional help for my compulsive behavior. What do you think? E.R.

DEAR E. R.: Good news! Technology advancements in the paint industry have produced new, washable, flat wall paints. A trip to the paint store is all the therapy you will require.

Thousands of people, including myself, have had problems cleaning flat wall paint. Many older flat paints would readily stain. Worse yet, if you were successful in removing a stain, the area you cleaned often had a glossy appearance. Sometimes the paint would end up on your sponge or wash rag. Many of those problems are gone forever.

To make flat wall paints washable, the paint companies had to overcome some hurdles. If you look at conventional flat wall paint under a microscope, it would look something like the Rocky Mountains. The rough texture does an excellent job of scattering light rays. This gives the paint its flat sheen. However, the valleys between the mountains provide great places for dirt to hide.

Paints have three primary ingredients: pigments (color), resins (adhesion), and vehicle (water or paint thinner). Pigments give paint its color. Resins coat the pigments and are the glue that allows paint to stick to things. Vehicle is there just for the ride. Without it, you couldn't apply the paint. Once paint is applied, the vehicle evaporates into the air.


Have you picked out the paint color but don't have the time to paint? Find the professional painters by using my Interior Painting & Staining Checklist. I offer a 100% Money Back Guarantee.


Resins are the most expensive component of most paints. Some washable flat wall paints use vinyl resins. Some use acrylic resins. Others use a blend of vinyl and acrylic. Acrylic resin is often twice as expensive than vinyl. Acrylic resin is so durable, that it is the resin of choice in most exterior paints. Resins are also shiny. That's a problem.

The shape of pigment particles is critical in flat washable wall paints. The shape of older pigment particles resembled balls or rocks. Newer pigment particles are sometimes shaped like snow flakes. They are more two dimensional than three dimensional.

The challenge in creating a washable flat wall paint is to use these newer pigments and coat them with enough high quality resin to make them washable. If too much resin is added, the valleys between the pigment particles will fill up. If this happens, you end up with a smooth, shiny surface.

Shopping for a quality washable flat paint is not too difficult. In years past, the resin content of a paint was often printed on the paint can label. This is no longer done by most paint companies. As such, use price as a guideline. The most expensive paints often contain the highest quality resins. This is the ingredient that gives you washability. Furthermore, a paint company that includes lots of high quality resin in their paint simply has to pass that cost on to you.

Related Column: Super Washable Wall Paint

Black Algae Stains On Asphalt Shingles

Black Algae Stains On Asphalt Shingles

The shingles on the left are made with granules that contain copper. The copper leaches out each time it rains and creates a toxic environment for the roof algae. Photo by: 3M Corporation

DEAR TIM: I've got a problem. Three years ago, I had a new fiberglass asphalt shingle roof installed. It was the same color as my old roof, a light tan. Within the past 6 months, several areas of the roof have developed a dark, mildew-like stain. It is spreading. The climate hasn't changed and there are no trees that shade my roof. What in the devil is going on? Can I easily remove the staining? Can it be prevented? Ginny U., Ft. Pierce, FL

DEAR GINNY: They're heeeeeere! You, my friend, have been invaded by Gloeocapsa magma, a very hardy algae. These dudes have probably been up on your new roof since day one. The streaks and discoloration you are now seeing is an accumulation of their dead, dark colored cells. While this algae can grow just about anywhere in the continental USA, it really likes humid environments. The algae was deposited on your roof by wind and/or wildlife.

This algae most probably invaded your last roof as well. But, it starved to death. The new fiberglass shingles you just installed are actually quite different from your old shingles. Your new shingles contain lots of ground up limestone. It is used as a filler to increase the weight of the shingles.

Guess what? Gloeocapsa magma loves to eat limestone. Older shingles used an asphalt saturated felt paper made from scrap cotton rags and wood chips. New synthetic textiles eliminated the cotton rag market, so roofing companies switched to fiberglass. They solved one problem but created another.

This algae can be prevented from growing on roofs. All you need to do is introduce copper or zinc into the picture. Gloeocapsa magma hates copper or zinc. These metals are a very effective poison. Because your roof is still quite new, you are going to have to install some copper strips as high as possible on your roof. Rain will wash small amounts of copper down your roof which will poison the algae.

Consider installing long, seven inch wide strips of copper underneath the last full course of shingles at the top of your roof. You should be able to slide the copper up under the shingles approximately five inches or so. This will leave approximately two inches exposed to the weather.

If you are getting ready to install new shingles, you need not do this. Many fiberglass shingles are available with colored granules that contain copper. There are enough granules present on each shingle to kill the algae. The copper is slowly released over time. Many of these shingles are guaranteed to kill the algae for the life of the shingle.

To remove the existing stains, you need to use a safe cleaning solution. Believe it or not, there are several treated wood deck cleaners that will do the job without hurting you, the roof, your gutters, and any vegetation below.

Look for deck cleaners that contain bleach. Do not use cleaners that contain chlorine bleach. Oxygen bleach is a non-toxic powder that mixes with water. Do not use a pressure washer. Apply the oxygen bleach solution to a cool roof surface on an overcast day. Do not let the solution dry. If windy or sunny, be sure to continue to apply a light spray of the oxygen bleach solution.

After it has soaked for 30 minutes, brush the solution with a stiff broom or brush. Always aim the rinsing hose down the roof, not up under the shingles. Be sure to wear a safety harness while working on the roof, as wet shingles are very slippery. BE CAREFUL!

Carpet Comparison Made Easy!

Types of carpet

Carpet Comparison Made Easy!

DEAR TIM: My husband and I just returned from trying to buy wall to wall carpeting. What a nightmare! Can you help us? It is so confusing trying to compare different carpets, fibers, stain resistance, warranties, and padding. Also, I would like a really a soft floor, so should I have a really thick pad installed? L.M.

DEAR L. M.: I couldn't agree more with you concerning the difficulty of trying to select carpeting. Until recently, even highly experienced professional carpet buyers had difficulty really analyzing different carpets. The carpet industry is changing. Some manufacturers are disclosing the facts about each piece of carpet they make.

Testing standards have been developed by the Carpet and Rug Institute and independent testing labs that evaluate the type of fiber used in a carpet, the carpet's face weight (ounces of fiber per square yard), carpet fiber density, and the amount of twist each fiber has per lineal inch.


Carpet samples are then subjected to an actual walk test where it receives 20,000 foot steps by real humans. After this test, the carpet is compared to an original piece and a durability rating is assigned.

Most residential carpet is made from one (or a blend) of four fibers: nylon, polyester, olefin, and wool. All of these fibers can make a great carpet. Face weight is a common sense measurement, as more fibers are almost always better. Fiber density is a measurement of how closely packed carpet fibers are to one another. Carpets with high density tend to look better longer and will help give you that soft feeling you are looking for.

Carpet fiber twist is very important, primarily with cut pile types of carpet. Fibers that have more twists per lineal inch tend to make more durable carpeting. The 20,000 walk test is simple. Put the carpet on the ground and have people walk on it. It's a great way to see how a carpet will actually perform in real life.

Prior to this type of comparison, homeowners had to depend upon warranties, the feel of the carpet, and other things that are tough to measure. The new system, which is grabbing hold in the industry, should help to relieve your anxiety.

Stain resistance is sometimes misunderstood by homeowners. Carpet fibers are treated with clear chemicals that simply coat the individual fibers. This coating, however, can be compromised by many household solvents, cleaners, plant foods, etc. You must be very careful about what you spill on your carpet and how you clean up spills. Don't be an amateur chemist!

Finally, carpet padding is critical to carpet performance. Too much or too little can cause premature failure of many carpets. Many carpet manufacturers publish strict minimum and maximum padding thickness for their carpet. The best pads, believe it or not, are those that are thin and firm. Thick pads allow carpet to flex too much. Avoid padding thicker than 7/16 of an inch and you should be fine.

Copper Water Pipe Corrosion – Aggressive Water

DEAR TIM: I'm getting ready to build a new home. I am deeply concerned about my drinking water lines. I have heard from some friends in different parts of the country that copper water lines can corrode from aggressive water. Is this possible? What is aggressive water? My parents had copper water lines that never were a problem. Is there an alternative pipe I can use? A.N.

DEAR A. N.: Aggressive water is drinking water that can cause corrosion. It is a real and growing problem in many parts of the country. Leaks are developing in new homes that are less than 2 years old in some cases. These leaks can cause high water bills and structural damage. Homeowners or municipal water systems that obtain their water from wells are susceptible. Rarely, does surface water (that obtained from rivers, lakes, etc.) become aggressive.

The causes and mechanisms that are responsible for the corrosion are not always the same. Water that is slightly acidic is sometimes to blame. High levels of dissolved minerals and carbon dioxide also can cause problems. High levels of chloride or sulfate can be serious.

copper pipe corrosion

Poor workmanship can lead to corrosion. Plumbers who use excessive amounts of flux when soldering and/or leave excess flux on copper pipe and fittings are to blame as well. Flux is an acid that is brushed on copper pipes and fittings that allows solder to bond more easily to copper. Municipal waters works usually have chemists who regularly test the quality of the water being drawn from wells, rivers, lakes, and aquifers. These chemists are responsible for maintaining water quality. Not only do these individuals treat water to make it safe to drink, they sometimes alter the water chemistry to make it less aggressive. Some municipal water works add corrosion inhibitors to the water.

Believe it or not, these chemists try to adjust the acidity and hardness of the water so that it actually coats the inside of your pipes with a thin scale of calcium carbonate. This scale can protect copper pipes from corrosion by insulating' the copper from the aggressive water. This may be the reason why the pipes in your parents house are not suffering from corrosion. New copper is very susceptible to corrosion, as the protective scale has yet to form.

Water chemistry can change. Those parts of the country that are experiencing growth may find out that their municipal water works are either drilling new wells, or sinking existing wells deeper. In either case, aggressive water may be mixed or injected into a previously non-corrosive water system.

For this reason, you may wish to consider plumbing piping which is not affected by aggressive water. CPVC plastic piping is a good choice. This piping has been used by the plumbing industry for over 40 years. It is regularly tested by the National Sanitation Foundation to make sure that it can deliver water which meets all U.S. EPA standards. However, CPVC piping should be used carefully in outdoor underground installations. There have been instances where solvents in polluted ground have actually migrated into the piping. Choose your piping materials carefully.

Read in my September 10, 2009 Newsletter about Jenee's question about PEX vs Copper tubing.


Author's Notes:

July 6, 2001

I just received an email from Gold Pipe and Fittings and they have information that says solvents in polluted ground areas do not migrate into the piping. Stay tuned to the website to get the facts.

Termite Elimination

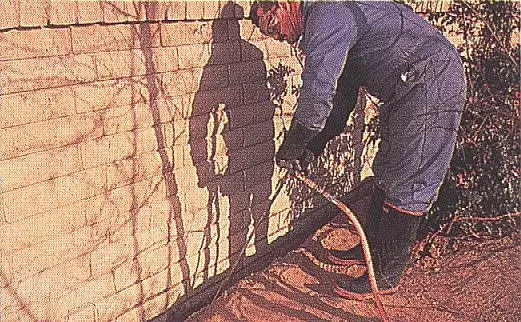
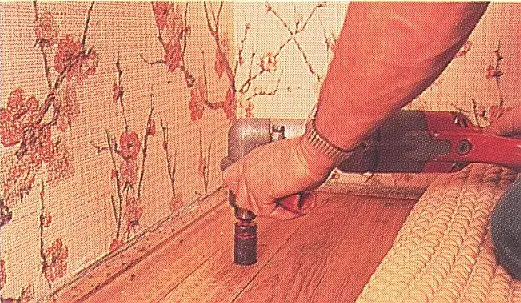
termite elminationtermite elmination
DEAR TIM: This past spring my neighbor's house was invaded with termites. I am concerned that my house might be next. Even though my neighbor's house was treated with chemicals, is it possible for the termites to come over to my house? Also, being very environmental, I am concerned about the chemicals that are injected into the ground to kill termites. Is there another way? T.E.

DEAR T. E.: You bet it's possible! In fact, there is a strong possibility that your house may be already infested. Being quite the social insect, they are constantly expanding and attempting to start new colonies. The termites that your neighbor saw may actually have originated from your house.

Remodeling contractors love termites, as they do over $1 billion worth of damage a year to structures in the United States. They like to live in warm, moist soil near wood food sources, such as fallen trees, wood piles, and houses. In the forest, termites help make top soil by munching on dead trees. In houses, they simply add to our shrinking landfills by creating construction debris.

There are over 40 species of termites found in the USA. The termites live in colonies that have highly developed social systems dominated by a king and a queen. Special termites care for the queen who can live for up to 50 years and lay thousands of eggs each year. Other residents of the colony include worker termites, soldiers, and reproductives.

The worker termites are the ones that eat wood. They supply food for the entire colony. The king, queen, soldiers, and reproductives all stick around the nest doing their jobs. The worker termites are the ones that leave the nest to pick up the carry out meals from your home.

The worker termites work 24 hours a day, seven days a week. It is possible for them to travel through a crack in concrete or steel as small as 1/64th of an inch in their constant search for new food sources. Once a worker termite gets his fill from your floor joist or wall stud, he heads back to the nest where he shares the food and gets a drink. Termites are quite thirsty, as they must revisit the soil or nest every 24 hours or so.

Chemicals used in the past, and still in use today, simply provide a barrier around your house. They do nothing to actually wipe out the entire colony. In fact, some of these chemicals can actually harm other wildlife. A new system has been developed which has the capability of killing the entire colony. Small plastic monitoring stations are inserted into the soil around your house.


Termite infestation? Pick the best exterminator using my Termite and Carpenter Ant Checklist. I offer a 100% Money Back Guarantee.


A professional checks these periodically for termites. Once detected, a growth regulator, which is toxic to termites, is installed into the monitoring stations. The worker termites eat the tasty toxic food and share its location with the other workers. Soon, many workers die. This is a major problem for the termites who hang out back in the colony, as they depend upon the workers to bring them food. This system can wipe out a colony completely within six months.


Author's Notes:

September - 1999

I recently received a letter from the public relations firm that represents the Bayer Corporation. One of the head scientists at this company was kind enough to review all of my past information on termites and offered some suggestions in order to keep my content as accurate as possible.

This individual, Dr. Byron Reid, said that up until his company developed a new product called Premise, my statements about liquid chemicals not killing termite colonies was accurate. The Bayer Corporation folks maintain that their product will kill foraging worker termites immediately but does not harm pets or humans. I would ask about this system when you speak with professional exterminators. Remember, a barrier chemical treatment system is only as good as the person who is injecting the chemicals into the ground. TC

Stair Railing Assembly


Farmcrest stars lower flight wide

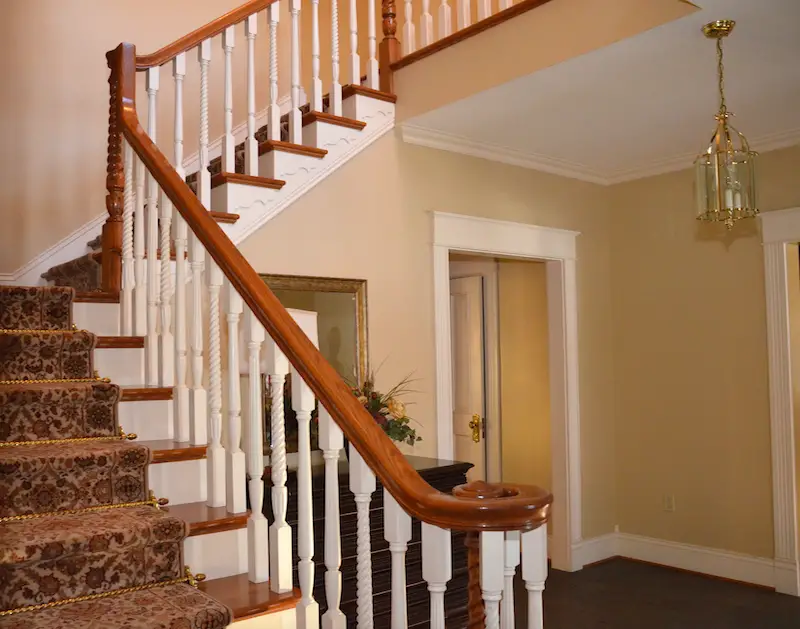
I installed this handrail system in my Cincinnati Queen Anne Victorian home. Look closely and you'll see three different styles of balusters under the stained-oak handrail. It required intense concentration and special skills to install all you see in this photo. Do NOT underestimate the painstaking work you see here. Copyright 2023 Tim Carter

Stair Railing Assembly

DEAR TIM: I'm in the midst of renovating my first old house and need help with the stair railing. The staircase leading to the second floor has an oak handrail with spindles and a curlicue thing on top of the post at the bottom of the stairs. The handrail and large, decorative posts are loose. Do I just renail all the spindles to tighten it back up? Is there something else I should / can do? Or, is it best just to start over with a new handrail system? M.I.

DEAR M. I.: Did you slip on some sawdust and bump your head? Do the words volute (your curlicue thing), newel, gooseneck, or turnout sound familiar? I didn't think so.

We're about to go on an anxiety-filled journey. You're about to enter a dimension of space and time filled with infinitely small measurements and angles and finish carpentry that only a select few can navigate successfully.

Your next stop.

The twilight zone of carpentry.

Staircase handrail systems are, in my opinion, the most difficult aspect of finish carpentry. A typical installation may take an experienced carpenter, with a helper, 4 - 5 days to install!

Probably less than 1 percent of the finish carpenters in the trade can correctly install handrails and balusters.

Your handrail was installed by a carpenter who is in the 99 percent group. Handrails and balusters installed correctly simply won't come loose unless large children use them as indoor playground equipment or a piano-moving company bashes into a railing or newel post while you're not looking.

Handrail systems derive their strength and stability from the larger, often decorative, newel posts that are found at the bottoms, tops, and landings of staircases. If the newel posts are not securely fastened, the entire handrail system will shake. The thin balusters that extend from the handrail down to each stair tread offer little strength. Their purpose is to form the barrier so you and your children do not fall off the stairs. Toenailing your spindles will do little to help the loose handrail or posts.

Newel Posts - The Foundation

Newel posts at the top, bottom, and balconies of a staircase often have long, thick dowel pins at the bottom of each post. These dowels fit into precisely drilled holes of the same size. Drill the hole too big, even by 1/16th inch and your newel post may wiggle. Newel posts installed at landings incorporate long, heavy lag bolts which are attached to hidden rough framing members. Often these posts are notched into the stair tread nosings for additional stability.

Farmcrest Staircase landing newel post

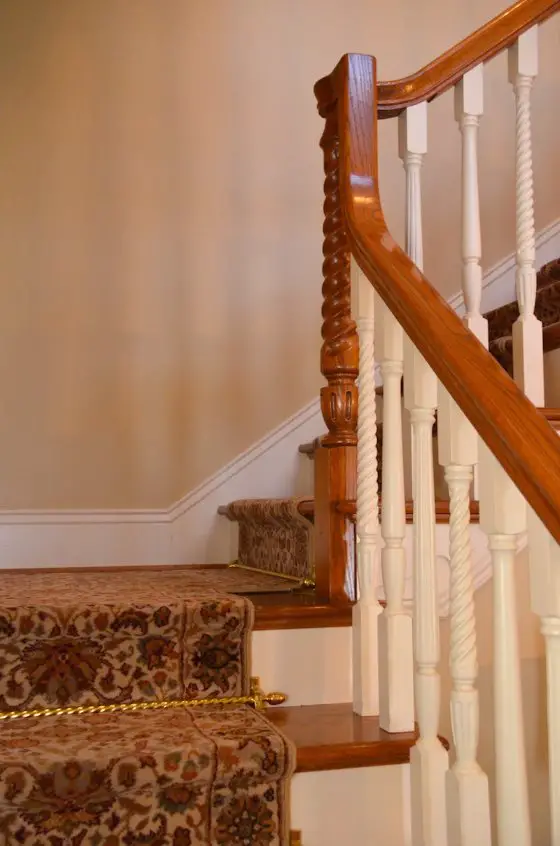
This is a close-up shot of the landing newel post. It had to be notched so it was centered on the two lines of the intersecting balusters. Copyright 2023 Tim Carter

To fix your loose handrail system, you must attack the problem from below. It will not be easy. Newel posts at the bottom and top of the stairs will be the hardest to tighten. Simply put, you now face the task of inserting a 16-inch long one-half-inch diameter lag bolt up into each post from below! This lag bolt must pass through solid blocking attached to your floor joists directly into the center of the dowel pin. The lag bolt should penetrate up into the newel post at least 8 inches.

Thinking of starting over? If so, there are several companies that, build, precut, assemble then knock down the entire handrail system for just about any project. These same companies preassemble the staircases. You, or your builder, simply provide them with a few basic measurements. The manufacturers claim that an average staircase and handrail system can be assembled in 4 hours. This sounds like something that may be of interest to you.

Avoid Over Budget Plans

DEAR TIM: My husband and I engaged the services of an architect for our project. At the beginning of the process we told him how much money we had to spend on the project. The bids for the job are all coming in about 40 percent over our budget. What went wrong? What can be done, if anything, to salvage the project? Can this agony be avoided? C.R.

DEAR C. R.: I am sorry to hear of your misfortune. On more than one occasion, I had to deliver cost estimates to homeowners that exceeded their budgets. I know the anger and frustration you are feeling. The sad thing is, in almost all cases, it can be avoided. In my opinion, you may have a legitimate beef with your architect.

Frequently, problems such as yours happen in the earliest stages of planning. Homeowners communicate their project wish list to the architect. Often, dramatic preliminary drawings of the project are produced. You can become entranced and intoxicated by these sketches. The emotional attachment to the project intensifies. It is difficult, if not impossible, to turn back at this point. Architects who permit this to happen are guilty of a major infraction: failure to maintain an assured, clear distance.

Your cost overruns are severe. There is little you can do to maintain the integrity of the project. Cost cutting measures that maintain project integrity usually only produce savings in the 5 - 7 percent range. To achieve further cost savings, major product substitutions have to be initiated and/ or the size of the project has to be reduced. These are painful procedures.

Architects can avoid problems like this. However, it requires some work on their part. Fortunately, with computer advancements it is not that hard to do. A simple system of tracking job costs, detailed cost breakdowns, project size and style, and difficulty rating is all that is needed.

An architect can quickly calculate the square foot area of recent projects. They know what these jobs cost. From this, they can calculate finished square foot costs. Because they drew the plans, they can assign a difficulty factor.

Imagine what could have happened in your case. Immediately after hearing what you and your husband wanted, the architect could have stopped the conversation. He could have taken your budget number and divided it by the current cost per square foot for similar projects. Within a matter of minutes, he could have told you the maximum square footage of your planned project. Given this number, you and the architect could quickly determine if the size would fit your needs.

This exercise can often take place in as little as 1 hour. You need a disciplined architect who is armed with accurate and up to date square foot cost figures. Ask for the availability of this data when choosing your architect. If you get a puzzled look, continue to interview prospective candidates.


How would you like me to build your new home? It's probably impossible for me to fit your job into my schedule, but I will gladly share hundreds of my tricks and building secrets with you and your builder. Check out my New House Specifications.