Piering Foundations – Lifting and Pushing

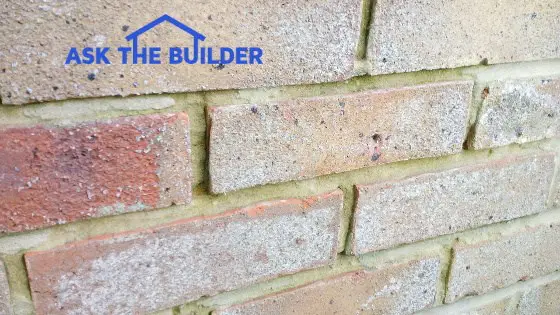
DEAR TIM: My old house has started to develop cracks in the foundation and brickwork. The cracks in the brickwork look like steps. Are these settlement cracks? Why would it take so many years for these to suddenly appear? The clay soil in my area seems very stable. Is there a way to stabilize the foundation to stop further damage? R. T.

DEAR R.T.: Your photos clearly indicate that a portion of your foundation has dropped. The reasons for failure are numerous. For example, the ground beneath the foundation could be eroding, the soil could have softened, fill dirt could have finally compressed, or a portion of your foundation could have actually heaved. In your case, however, I believe that your clay soil is to blame.

I consulted the county soil map which I received from your county agricultural agent. The map clearly shows that the clay soil beneath your house has significant shrink / swell capabilities. Certain clay soils respond dramatically to changes in moisture content. For example, have you ever seen huge cracks in a dried mud puddle? That shrinkage not only occurs sideways, but up and down as well.

The cause for this moisture loss may be two fold. I believe that your region suffered from a severe drought during the past two years. In addition, I noticed a large oak tree near the failed portion of your foundation. This tree most probably sucked water from deep within the soil to compensate for the drought. If you would have created some artificial rain with a sprinkler, you possibly could have prevented the cracks.

You may be able to lift the failed portion of your house with some water. You can start to water the ground outside of your house around the failed portion of the foundation. Water the soil as frequently as you can. You may begin to see a change within several weeks or months.

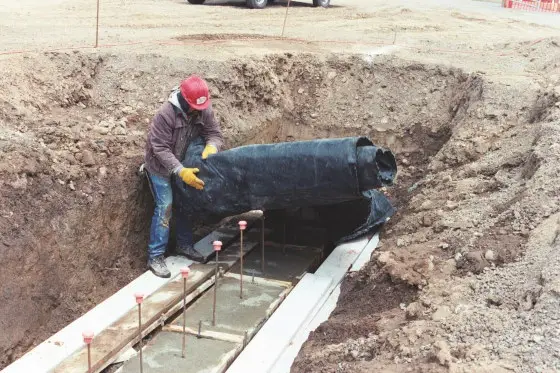
Foundations that suffer from other forms of settlement can be repaired using several methods: underpinning, steel pipe piers with support brackets, or helical piers. Underpinning a foundation usually involves digging beneath a failed portion of foundation until firm soil is reached. Concrete is poured into this excavation to resupport the foundation.

The steel pipe piers employ friction to support foundations. Small (3 - 4 inch) diameter pipes are driven deep into the soil. They encounter increasing resistance as they penetrate the ground. Once in place a bracket is attached that cradles your foundation. Often this cradle is ratcheted up the pipes to lift your foundation to its original position. Helical piers work in almost an identical fashion. They are basically giant screws that are twisted into the soil until they hit firm soil. Once in place a bracket is attached to the pier. This bracket can be used to lift and resupport the failed foundation.

If you decide to use one of these methods, consider consulting a licensed structural engineer. Using piers under one portion of your foundation may cause cracking at other areas in your foundation. The engineer will develop a plan that should stabilize your sagging foundation.

Indoor Humidity – How Much Is Needed

condensation on mirror

Indoor Humidity | This is normal condensation on a mirror. Water vapor in the air has transformed into liquid water on the COOLER mirror surface. The same fog is FORMING on your walls and you DON'T SEE IT because of the paint on the walls. Too much humidity in a house can lead to serious mold and mildew issues.

Indoor Humidity - You Need Just Enough

DEAR TIM: My house seems to require more humidity in the winter than my neighbor's house. Both houses are the same age, size, style, and use identical heating and humidification equipment. I constantly get zotted by static electricity at my house but not at my neighbor's house. Our humidistats and thermostats are set identically. Both have been calibrated and are functioning properly, but my heating bills are higher. The weatherperson on TV reports relative humidity readings in excess of 70 percent daily. What is going on? I. S.

DEAR I. S.: So, those fingertips are a little tender? Well, I may be able to help you and save you some money at the same time. There are several things that may be happening in your situation. More than one thing could be wrong. Let's start with the easy things.

Should I Check My Humidifier?

Let's check your humidifier first. Make sure that the water supply to the humidifier is turned on and that water actually flows into your humidifier. Some humidifiers have a small plastic flow restrictor at the end of the water tube as it enters the humidifier. This restrictor has a very tiny hole through which the water flows. If obstructed, this could be the source of your problem. I have had trouble in the past with this restriction on my own humidifier.

Can You Explain Attic Insulation and Humidity to Me?

Yes, I can explain attic insulation and humidity in this LIVE stream video broadcast I did. Watch it:

Do Humidifiers Get Clogged?

The water transfer pads or media inside the humidifier may be clogged with mineral deposits. If this is the case, cleaning or replacing them should solve the problem. Often these pads can be reused by allowing them to soak in warm vinegar. The acidic vinegar dissolves the mineral deposits. You may need to let it soak overnight and repeat the process to remove heavy mineral buildup.

Can Dry Outside Air Lower Indoor Humidity?

If your humidifier is working properly and you still have lower indoor relative humidity than your neighbor, it is a sign of a more serious problem. Your higher heating bills may be the clue. I feel that your humid air is leaking out of your house and being replaced by drier, outside air.

Can Cold Air Hold More Water Vapor Than Warm Air?

Don't be fooled by the weather reports. As the temperature of the outside air drops, it can hold much less moisture. The relative humidity of cold outside air may well be 70 - 80 percent. Bring this air inside, heat it to 72 degrees, and the relative humidity of that same air drops to 2 percent!

Are Air Leaks Serious?

Houses often have hidden air leaks. You can discover more about air leaks in homes here. Seal any and all areas where you feel cold air entering your house. If you feel cold air entering, it is a sure sign that humid, warm air is escaping. If you can inspect your attic, look for places where pipes and wires penetrate the attic from below. Quite possibly these penetrations are not sealed. Look for these same penetrations in your basement ceiling. Often, electricians and plumbers create open chimneys within exterior and interior walls when they install their wires and pipes.

What is the Best Indoor Humidity Setting?

Once you locate the leaks, adjust your humidifier to a minimal setting of about 45-50% humidity. Remember, humidity is a moving target as it depends on what temperature the air is inside your home. Most normal household activities (bathing, breathing, cooking, etc.) produce adequate indoor humidity. Don't overdo it!

Can Tim Carter Call Me to Help?

Yes, Tim can call you. CLICK or TAP HERE to set up a fast phone call.

Cold Weather Concrete Installation

thermal blanket concrete cold weather

This worker is using a waterproof insulating blanket to cover a freshly poured footer. The heat produced by the chemical reaction of hydration within the concrete will be retained within the concrete by using the blanket.

DEAR TIM: Last winter I had a new concrete driveway and sidewalk installed. Months later the finish began to scale off and spall. The concrete finisher is blaming the concrete supplier. The concrete supplier says the mix was fine. I'm stuck in the middle. What do you think happened? Could my problem have been prevented? Was it a mistake to pour concrete in cold weather? E. G.

DEAR E. G.: If I was a betting man, I'd place my money on the concrete supplier's statement. In all probability, your spalling concrete is a workmanship issue. You need to recreate the events and weather conditions at the time of the pour and ask your concrete finisher some hard questions. Your local branch of the National Weather Service can provide you with excellent weather data for this time period.

First of all, let's define cold weather with respect to concrete. As stated in ACI 306 (American Concrete Institute Code), the definition of cold-weather is “a period when for more than 3 successive days, the average daily air temperature drops below 5°C (40°F) and stays below 10°C (50°F) for more than one-half of any 24 hour period.” Cold weather can have a detrimental affect on concrete for several reasons.

Concrete is an interesting material. It transforms magically from a liquid to a solid material chemically. The speed of the reaction depends upon the temperature of the concrete. When it's hot outside, the reaction proceeds quickly. When it is cold, the reaction slows down. Herein lies the problem. The concrete needs to harden as rapidly as possible to resist pressures caused by water which may freeze within the concrete.


Want perfect concrete work? Find a pro by using my Concrete Work (Sidewalks, Driveways, Patios & Steps) Checklist. I offer a 100% Money Back Guarantee.


In your case several things may have happened. The concrete may not have attained a minimum strength (500 PSI) soon enough to resist the effects of freezing temperatures. Was your concrete protected with insulated blankets after it was poured? If not, it may have cooled too rapidly, slowing the chemical reaction.

Poor finishing techniques may have doomed your slabs. Freshly poured concrete often bleeds. The water in the mix floats to the top, as it is the lightest ingredient. Floating or troweling this water into the concrete weakens the top layer. Troweling the concrete too early can seal this bleed water just below the surface as well. If your slab was then exposed to freezing temperatures several days later, this water could have frozen and fractured the top layer.

Concrete can be successfully poured in cold weather. Several precautions need to be taken. Never pour concrete on frozen ground, snow or ice. Be sure to order air-entrained concrete. Request a heated mix or order 100 lbs of extra cement for each cubic yard of concrete. This extra cement helps develop early strength. Be sure the concrete is ordered with a low slump (drier mix). This minimizes bleed water. After the final finish is completed, cover the concrete with plastic and insulated blankets. The plastic will cure the concrete. Finally after 7 - 10 days, remove the plastic and allow the concrete to air dry before exposing it to freezing temperatures.

Slate Flooring, It’s Great!

slate flooring
DEAR TIM: It's time for new flooring in our entrance hall. I'm considering slate. Do you think slate would make a good floor? Does it stain easily? Are there any special care requirements? Finally, do you feel that this project can be tackled successfully by serious do-it-yourselfers? A. C.

DEAR A.C.: Is this a trick question? I thought everyone knew that slate makes an exceptional flooring material. In fact, my wife selected a magnificent rectangular random ashlar slate flooring for our entrance hall. We receive compliments about it on a regular basis.

Slate is an extremely durable natural stone product. This durability is a byproduct of its origin. Most rocks have a medium or coarse texture. You can see crystals, fossils, or sand grains. Slate is very smooth, somewhat like plastic laminate. Very small silt and clay particles bonded together under high temperature and pressure give slate this monolithic texture. This ultra fine texture makes it tough for liquids (stains) to penetrate slate.

Three unique characteristics set slate apart from other flooring materials: color, texture and available shapes and sizes. Minerals and impurities in the silt and clays create a wide range of colors in natural slate. You can choose from a dark charcoal black, rust red, greens, grays, maroons, and mottled mixtures of these colors.

The most popular texture for flooring is the natural cleft. This surface is moderately rough giving the slate fantastic slip resistance and a unique one-of-a-kind appearance. Slate can be sanded or honed as well. These two finishes are smoother giving the slate a soft sheen look.

I particularly like the different shapes and sizes that are available. You can purchase slate in several thicknesses, one quarter inch being quite popular. This thickness is similar to many ceramic floor tiles. My entrance hall floor is made up of six different size rectangular pieces which interlock into a random looking pattern. You can also purchase square tiles or random irregular pieces that need to be hand trimmed. Large slabs are available for fireplace surrounds, hearths or stair treads.

Slate is very stain resistant. However, some foods can cause stains. You can purchase penetrating sealers that give slate a beautiful 'wet' look but that do not cause a glossy built up finish. Many people make the mistake of applying heavy waxes or floor finishes that rob the slate of its natural beauty and slip resistance.

I feel that slate can be installed by serious do-it-yourselfers. It is installed in a similar fashion as any ceramic flooring material. However, cutting slate must be done with a standard hacksaw or a wet diamond blade saw. You can't score and crack slate like ceramic tile. Also, grouting slate can be very tedious. The natural cleft face can trap the grout. Often professionals coat the slate with special sealers to make grouting an easier task. Take your time, follow directions, and you will have a gorgeous floor.

Column 105

Computer-Aided Blueprints

DEAR TIM: My wife and I are in disagreement concerning plans and blueprints for an upcoming remodeling project. I feel that simple sketches and a strong written contract will be just fine. She wants a full set of blueprints. Can we streamline the planning process? Can we develop our own plans? C. O.

DEAR C.O.: I think you both have made a strong case. In my opinion, you and your wife need to combine your ideas if you desire a successful project. You need a full set of blueprints and a strong written contract. Blueprints or plans reduce your wishes and contractor's promises to a singular graphic document. There is no more effective means of communication than high quality plans.

Many homeowners underestimate the value of the planning process. It is here that project success or failure is determined. If your project is not thoroughly thought out, all sorts of problems may occur during construction. For example, a kitchen cabinet layout may prove to be awkward, room sizes may be too small, building code requirements may be overlooked.

Projects with poor plans almost always come in over budget. Change orders seem to pop up everyday. Developing a full set of blueprints usually exposes these problems. I couldn't agree more concerning a strong written contract. Your contract needs to include all of the language required by your local state or municipality. For example, my city requires specific language in a contract regarding down payment monies and a customer's right to cancel the contract within 3 days after signing. Be sure to include language in your contract that indicates that all work should be performed in accordance with your finished, dated plans. I have coached many homeowners in the early stages of planning.

Often, I suggest that you look through magazines. Cut out pictures that depict design ideas, colors, styles, etc. of what interests you. Paste these pictures on a piece of notebook paper. Make a few quick notes on the pages to remind you of what you like about the photos. Install these pages in a simple 3 ring binder. Use this tool to communicate your thoughts to your builder, architect, or designer.

Five years ago, I would have said that you could probably not develop your own plans. However, the personal computer has changed my thoughts. Many computers that you purchase today will support design software that allows you to create plans, drawings, and sometimes three dimensional views of your project. I have a simple design program that allows me to draw a floorplan, doors, windows, interior walls, fixtures, etc. on my own computer. Many professional builders, architects, and designers have powerful design programs that allow them to create, modify, and view your plan on a large monitor. You can actually walk through your house before it is built. These computer programs are usually too expensive for a homeowner. However, you can purchase affordable design programs that will allow you to experiment on your own.

Use these to develop your own preliminary plans and ideas. Once you feel you have a workable design, have the professional fine tune it.


How would you like me to build your new home? It's probably impossible for me to fit your job into my schedule, but I will gladly share hundreds of my tricks and building secrets with you and your builder. Check out my New House Specifications.


Brick Veneer Leakage

brick veneer leakage

Brick Veneer Leakage | See those vertical mortar joints? Water pours through them in wind-driven rainstorms. A magic sealer can solve the problem. Look BELOW for the one I'd use. (C) Copyright 2020 Tim Carter

Brick Veneer Leakage - The Source: Vertical Head Mortar Joints

DEAR TIM: I'm preparing to have a new home built. I am considering brick veneer. However, I have heard stories about leaks in new brick homes. Is there any truth to these stories? Does it have anything to do with the inexpensive black plastic flashing I see used by many builders? Can you do something to prevent these leaks? N. T.

DEAR N.T.: The horror stories you are hearing are true. Thousands of new homeowners are plagued by leaks in their brick veneer homes. Autopsies performed on these walls usually indicate major deficiencies with the wall flashings. Not only is the material inferior, but also the manner of installation. The flashing material you are talking about is virtually useless.

Related Link:

Brick Leaks - Amazing Clear Sealer Solution Here

Do All Brick Walls Leak?

Brick walls, especially brick veneer (common in residential construction) can and will leak. Water can easily enter a brick wall if the design, construction, materials, and/or maintenance is substandard.

Where Does the Water Leak Through?

Water commonly enters a brick wall between the mortar and the actual brick. When brick mortar is mixed with sand and water, tiny crystals begin to grow. These crystals interlock with the brick. The greater the amount of crystals, the more water-resistant your brick wall will be. If the wet mortar dries too quickly, few crystals will grow. Hot weather conditions, brick which is too dry, or windy weather can cause this to happen.

What is the Best Leak-Proof Mortar?

Modern, premixed mortars can also contribute to water penetration. Some do not have the properties of older mortars. Years ago, brick masons mixed their own mortars on the job site. They used different combinations of Portland cement and lime. Go back to the late 1800s and masons only used hydrated lime and sand for brick mortar. This is the best mortar of all. Lime is a unique ingredient. It reacts over long periods of time with water and carbon dioxide. This process actually can heal tiny cracks through which water tries to enter brickwork.

What Else is Needed to Stop Leaks?

Flashings are required to prevent water from becoming a problem in your new home. These membranes, when properly installed, divert water from the inside of brick walls back to the outside. There are numerous materials that can be used, the more common being plastics, vinyls, copper, and combination flashing. You can also apply a clear solvent-based sealer to help stop leaks after the house is built.

silane siloxane repellant

This is a magnificent silane - siloxane water repellent that soaks into the mortar and brick. CLICK on THIS IMAGE NOW TO ORDER IT.

CLICK or TAP HERE to get FREE QUOTES from local painters that can apply the above sealer.

What is the Best Brick Flashing?

This copper that can be bent with ease and soldered is the best flashing to use with brick. Employ flat-locked seams where two pieces of copper lap over one another. CLICK or TAP HERE to purchase this amazing copper flashing.

flat lock seam

Here are two pieces of copper that are interlocked to make a flat seam. The next step is to hammer them flat and solder them with a fine-tipped butane torch. Copyright 2020 Tim Carter

Where are Flashings Installed?

Flashings must be installed at the base of all walls, beneath window and door sills, and lintels. The flashings must be used in conjunction with weepholes that allow the collected water to exit the brick. Recent studies have shown that vinyl and thin plastic become brittle and fail in as few as 5 to 10 years. Often these same materials are not properly sealed at overlapping joints or at outside and inside corners. Water can pour through these seams and enter your house in as little as 1 month after construction! The combination flashings often made using thin copper or polyethylene and modified asphalts seem to offer a high degree of protection.

Can Mortar Cause Problems?

Mortar must not be allowed to fall behind the wall as it is being built. This can clog the well-placed weep holes. Newer weep hole protection products like Mortar Net WallDefender™ prevent this trouble should you employ a sloppy bricklayer. Consider using them as well.

Construction Photography – Benefits

DEAR TIM: I'm about to have some reroofing work performed. I would like to be able to see the condition of my roof boards after the old roofing is removed. However, I am afraid to climb ladders. Do you think it is unreasonable for me to ask the roofers to take pictures of the work they are doing? Do you have any other suggestions concerning construction photography? D. I.

DEAR D.I.: I think your photography idea is fantastic. I have hundreds of photographs that I shot on many of my past jobs. Often these photos saved me money by proving that I performed certain tasks. In your case, they can lessen your anxiety concerning the sound condition of your wood roof deck.

The only problem I see in your case is timing. Often roofers feel the need for speed. They have anxiety about raindrops. You may need to use an instant photography camera. This will allow them to uncover a portion of the roof and immediately photograph it. By the time they climb down the ladder, you will be able to view the photo.

Why not ask them to photograph their work in progress as well. For example, suggest they photograph all flashing details as the roof is being installed. Take close up before and after photographs of chimney flashings. The 'after' photos will tell you how well the flashings were installed. You will be able to see the soldered corners and the fresh mortar in the brickwork.

On full scale new construction or remodeling jobs, photography is a must. These projects allow you to make use of conventional, instant, and video camera photography methods. If you decide to pursue such a project, carry your camera(s) with you each time you visit the job site. Take photos of all walls, floors, window and door installations, and other work in progress.

Consider taking photographs standing at the same spot on a daily or weekly basis. When viewed in sequence it will appear that your house or room addition bloomed like a flower. Use a video camera to capture high energy activity such as the foundation being excavated by heavy equipment. Concrete trucks that spin their drums while pouring the foundation also make for great action shots you may wish to capture.

Photographing all aspects of the job may help provide clues for future problems. For example, what happens if the drywall installers cover a wall plug? Your photos of the walls just prior to drywalling will tell you the exact location of the covered plug. I always took numerous shots of utility and downspout trenches before the dirt was backfilled. By taking numerous photos from different angles, you can locate quite accurately underground pipes at a future date.

Construction photographs, especially those with the date and time imprinted on them, may prove useful in the event of a work slowdown. You can document daily progress, or the lack thereof, with photographs. O.K. say cheese everybody!


High-Quality Vapor Retarders

vapor barrier

This is the special vapor barrier that meets the ASTM standard.

DEAR TIM: My room addition is built over a crawl space. The air in our family room always smells musty. The foundation vents are open. The uncovered dirt in the crawl space seems very dry. We have no roof leaks or moisture in the exterior walls. What is causing the smell? O. R.

DEAR O. R.: Do you know the location of all of your teenager's socks? No, seriously, the musty smell in your family room can be traced directly to the uncovered dirt in your crawl space. The dry upper layer of dirt is creating an illusion.

Massive amounts of water are constantly being pulled to the surface beneath your crawl space. This process occurs 24 hours a day, 7 days a week. Just below the surface of the dirt, this water turns into water vapor. Water vapor is attracted to warm air. The air in your family room is almost always warmer than the air in your crawl space. The floor insulation and wood flooring do little or nothing to stop the water vapor in its constant pursuit of heat.

The only effective way to stop this water vapor migration is to properly install a high performance vapor barrier. Many builders, remodelers, and homeowners commonly mistake low density polyethylene plastic ( 4 or 6 mil poly) as being a high performance product. This material is often used in crawl spaces, beneath concrete slabs, or as a vapor barrier on exterior walls.

Often this product is manufactured using reprocessed plastic resins, scrap polyethylene, and fillers. The quality is sometimes inconsistent. Certain alkaline chemicals in soils can actually degrade the material. Small pin holes can exist in brand new material.

A better choice might be to use a high density cross laminated polyethylene vapor barrier. These products often are formulated from high quality virgin polyethylene. They are extremely resistant to punctures and tears. The high quality vinyl resists alkaline soils as well. They also do a much better job of stopping water vapor.

Installation of crawl space vapor barriers is not an easy task. All seams must overlap a minimum of 12 inches and be sealed with a special pressure sensitive tape. The vapor barrier must lap up onto the side walls of the crawl space. Here it should be caulked and attached tightly to the side foundation walls. Use three quarter inch furring strips and masonry nails for this job.

All objects (pipes, columns, masonry piers, etc.) that are sprouting from the soil beneath your crawl space require special attention. The vapor barrier must be carefully cut around these objects and sealed with pressure sensitive tape.

Prior to installing the vapor barrier, be sure the soil is smooth and free from all sharp objects. As you work on top of the material installing it, these sharp objects may tear or puncture the vapor barrier. These punctures or tears will allow water vapor to escape into the crawl space.


Author's Notes:

I received this email from Michael P, Cincinnati, OH. Here's how he helped with his crawl space problem.

"I live in Turpin Hills and wanted to thank you for your advice for sealing a crawl space. This is our third winter in our home and the basement is always much colder than previous basements from other homes. I did as you suggested and put heavy duty, thick plastic on the gravel and put doors on the opening of the crawl space. It's been a few weeks and I can see water droplets forming under the plastic. I may put a second layer of plastic for good measure. The basement is warmer and so is the room above the crawl space. I don't smell the mustiness either. Thanks again for the tip."


Smoke Free Masonry Chimneys

wood-burning fireplace

This is my own wood-burning fireplace. The firebox is built to exact standards including the hidden smoke chamber directly behind the wood mantle.

DEAR TIM: My husband and I just moved into a new home with a masonry fireplace. We started a fire and smoke rolled into the room. We checked the chimney for blockages and found none. The damper was wide open as well. What could be the problem? Our fireplace is three feet wide. Is that too small? Can you see anything else in my photos? E.G.

DEAR E. G.: Tell me, did your home construction contract include a strong warranty? You're going to need it. Your photos clearly show several major problems with your fireplace design and construction that are contributing to your smoking problem.

The combustion of wood in a fireplace is very complex. The exhausting of smoke and toxic gases from the fireplace is controlled by three major factors: air pressure, temperature difference between inside and outside air, and the fuel combustion process. Improper design and/or sizing of the firebox, smoke chamber, and your chimney can cause an imbalance which will lead to a smoking fireplace.

Believe it or not, the actual fireplace opening (width and height) controls the size and shape of the firebox, the flue, and the height of the chimney. The width of the fireplace opening controls all other dimensions. This dimension is a function of the size of the room in which the fireplace sits. It is all very complicated. Fortunately, years of trial and error have produced very successful designs and size proportions for smoke free masonry fireplaces.

Several problems are obvious in your photographs. The height of your fireplace opening is too tall in relationship to the 36 inch width of the opening. Furthermore, your firebox appears to be too shallow. This puts the fire too close to the fireplace opening and your room.

Your three foot wide fireplace opening should only be 29 inches tall. The firebox depth should be 16 inches. This depth does not include the thickness of the decorative brick which faces your fireplace. The distance from the floor of the fireplace to the bottom of the damper should be 37 inches. The smoke chamber, the area between the damper and the first flue liner, needs to be a minimum of 27 inches high.

Speaking of flue liners, I think the mason installed one that is too large. In your case, it should have inside dimensions of very nearly 10 inches by 14 inches. Smoke has to push the heavy, cold air up and out of the chimney. An oversize flue liner can make this a difficult process. What's more, my tables indicate that the minimum height for your chimney should be 21.5 feet. That measurement is taken from the top of the last flue liner to the floor of the fireplace.

As much as I hate to say it, I'm afraid that your entire fireplace and chimney need to be reconstructed. The two week process will be long forgotten after the smoke clears.

Interior Doors Changeover Project

DEAR TIM: My house was constructed in the early 1960's. The interior is quite plain looking. All of the interior doors are smooth hollow core painted slabs. I was thinking of installing new decorative paneled pre hung doors. However, I hesitate to do this because the frames and door trim are in excellent condition. My doors fit perfectly in each frame. Is there an easy way to simply change out each door? How would you do it? S. T.

DEAR S. T.: Talk about an excellent indoor project for a serious do-it-yourselfer, this is it! The simple process of changing out interior doors can make a dramatic difference on the inside appearance of your home. Many of my past clients were delighted with the look and feel of their new doors.

During the past five years, interior door manufacturers have expanded the styles and options of interior doors. Numerous styles are available that allow you to match virtually any architectural style or time period. Many of the doors can be purchased as solid or hollow core units. Some home center stores have specialized door machines that will actually machine a new door of any style to match your existing doors. If you can locate such a machine, you can change all of your doors in less than a day!

If not, you will need a router, drill, hole saw, spade bit, wood chisel, and various screwdrivers in order to tackle this project. The hard work has already been done by the carpenter or mill that hung your original doors. You simply need to create hinge mortises (recessed slots) and door knob holes in precise locations on the new door. To accomplish this, you are going to use the old door as a template.

Using a pencil, write lightly on each new door its intended location. Now, go through the house and do the same thing on the existing doors. While you are at each existing door, write in bold letters the word TOP on each side of the door. Don't guess where doors go or came from, you will get confused!

Remove an existing door from its frame. Strip the door of its hinges, doorknob, and latch. Stand this door on edge with the old hinge locations pointing up. Slide the new replacement door next to the old door being careful that the top of both doors are pointing in the same direction and flush with one another! Using a square and a sharp pencil, transfer the old hinge locations onto the edge of the new door. Use the hinge to create the shape of the mortise. Adjust the router depth and get to work.

After the hinges are complete, recreate the door knob holes using the same transfer process. However, if you intend to purchase new decorative door knobs let me share a secret. Consider purchasing knobs that have a two and three-quarter inch back set. This is three-eighths of an inch larger than most standard knobs. Your knuckles are less likely to rub against the door frame with this measurement.