How to Paint Aluminum Siding

UPDATE:  New information regarding painting aluminum has been added to this column. Be sure to check the Author's Notes following the article.

DEAR TIM: My husband and I just purchased a 25 year old house covered with aluminum siding. The siding is in excellent shape. It's factory painted finish has faded. In some areas the paint is completely worn down to the aluminum. Can aluminum siding be successfully repainted? I read a book that says to use a latex primer? Is this good advice? What else should I do to insure a professional job? P. A.

DEAR P. A.: The first thing I would do is throw away that book. It may contain some other questionable advice. Many latex primers are not suitable for use with weathered aluminum siding.

Sunshine, rain, and pollution erode all paints. The paint film develops tiny cracks and pinholes. These permit water and air to penetrate the actual siding. Aluminum isn't harmed by water, but air does cause problems. The air oxidizes the aluminum.

Just about every latex paint, including primer, contains ammonia. When ammonia comes into contact with oxidized aluminum it creates a gas. This gas can cause small bubbles to form beneath the paint film. This creates poor adhesion which in turn leads to premature paint failure.

A better alternative is to prime the weathered aluminum siding with a thinned down oil based metal priming paint. Leading manufacturers recommend using one pint of paint thinner to one gallon of high quality oil based primer. This primer creates a barrier between the oxidized aluminum and the finish paint. However, before you even think of mixing up and applying this primer, you need to prepare the surface for paint. If you read the labels on most paints, they will instruct you to apply the product to a clean, dry surface. How do you get yourself clean? Soap, I thought so!

Using any high quality powdered soap product, a heavy sponge, and a scrub brush, wash and rinse down your aluminum siding. You will notice that some of the old paint will wash off in this process. Don't be alarmed. Rinse the siding until no additional paint pigment can be detected in the rinse water. Avoid the use of a power washer for this job. Power washers, when used by a rookie, can direct water behind the aluminum siding. This may cause a leak into your home.

Allow the siding to dry for several days. Apply the thinned metal primer. Consider having the primer tinted to one half strength the color of your finish paint. Your finish coat should consist of a 100 percent acrylic latex exterior house paint. Buy the most expensive paint you can find. It usually contains the highest volume of acrylic paint resin. A higher volume of resin translates into a longer lasting paint job.

You should apply the finish coat of paint within 48 hours of applying the primer. Absolutely do not paint in direct sunlight or on windy days. These conditions reduce the dwell time of the paint. The finish paint needs to dry slowly to achieve the best mechanical and chemical bond. Cool, overcast days are the best for painting aluminum siding.

Author's Notes: The following updated information was received from the Paint Quality Institute.  Debbie Zimmer addresses ammonia in latex paints and the resulting bubbling.

"Hi Tim,

Thanks so much for your questions and comments.  Regarding ammonia in latex paints, it is so low today that the off gassing (resulting in bubbling) is really not a factor.
 
Here are a few detailed points to consider:
 
1. Bare Aluminum: forms a strong oxide layer which is easy to stick to and is relatively inert to ammonia. Some folks confuse ammonia with acid. Yes --- acid will generate some hydrogen gas but there should not be a reaction with ammonia.
 
2. All Aluminum Siding is coated. This again generally results in a surface that is easy to stick to but for all intents and purposes, relatively inert to waterbased paints. Even under poor conditions, incidental exposure to Aluminum should not be a problem because of above (1).
 
Also, on occasion, we do speak about oxygen bleach but typically use the more common (common to homeowners) "bleach" term. Perhaps we should use oxygen bleach more often. We don't use brand names (in any of our materials), such as Clorox.
 
Tim, I'm really glad you asked the questions --- it helps us make our educational information stronger.
 
If you are ever in the Philadelphia, PA area, I would love to take you on a tour of our PQI facilities --- we have over 30,000 paint panels on exposure (a few dating back to the 1950's) and 1000's with the most recent and forward looking technologies. In addition, our "farm" contains over 200 different surfaces and substrates (painted/not painted) on exposure as well.
 
Thanks again,"
Debbie Zimmer
PQI Director of Communications and Alliances
Dow Coating Materials, North America
The Dow Chemical Company

Updated: 08/23/2010

Concrete Repairs 101

DEAR TIM: A two foot long by approximately 4 inch thick chunk of concrete detached from one of my outdoor steps. The remainder of the steps are in good condition. Is it possible to restore the broken step? What can I do to insure that the patch will not separate? What are your suggestions as to mixing concrete? Do you feel I can tackle this project? My boyfriend is betting that I will fail miserably. E. R.

DEAR E. R.: Do you have some scrap wood? How about a concrete block or two? Can you rent or borrow a hammer drill? Is there a masonry supply house near your home? Great! Tell your boyfriend, we will take the bet. I'll split the winnings with you!

Repairing a broken concrete step or a cracked corner of a driveway or sidewalk is not a problem. The trick to a successful patch job depends on pinning the new concrete patch to the old concrete.

You need to get the following things: one bag of Portland cement, three 4 inch long pieces and one 20 inch long piece of one half inch steel rebar, a bucket of coarse sand, and a bucket of clean gravel. Pick up the hammer drill from the tool rental shop with a 6 inch long, 1/2 inch bit.

Begin your repair by removing all loose concrete from the broken step area. Use a one half inch cold chisel with a hammer to remove partially loose stones. Wear safety glasses! Drill three holes approximately 2 inches deep into the old step area. These holes should be spaced equally in the area to be patched. Drive the 4 inch long pins into these holes. Take a broom or old paint brush and sweep away all the dust.

Using your scrap lumber, cut and size a board which will act as your vertical form. This form will be held in place with the concrete blocks. You may need to put shims between the board and the concrete block to achieve the correct angle.

Take some pure Portland cement and put it in a bucket. Add water and stir until you achieve the consistency of a thick bodied paint. Slightly dampen the area to be patched with some water. Apply the cement paint to the old concrete and the pins. Mix 3 measures of gravel, 2 of sand, and 1 and a half of Portland cement to make your concrete. Add enough water so the mixture will pour from your mixing basin. Don't add too much water, as it will weaken the concrete.

Pour the concrete into the form. Insert the 20 inch piece of steel into the middle of the fresh concrete. Using a scrap piece of wood, strike off any excess concrete using a back and forth motion as you scrape. At this time take a bricklaying trowel and slide it up and down between the vertical form board and the concrete. This will minimize the presence of stones on the face of the patch.

Within two - three hours, the concrete should begin to stiffen. Gently remove the vertical form. Rub the face of the concrete with a small block of wood to achieve a sandy finish. Do the same with the top of the step. When you are satisfied with the texture, replace the form carefully. Cover the patch with plastic. Don't remove the form or plastic for three days. Also, be sure to get our money!

Ceramic Tiles on Wood Subfloors

DEAR TIM: I am thinking of installing a ceramic tile floor in my kitchen. The floor consists of 2 x 10 southern yellow pine floor joists 16 inches on center. The subfloor is 3/4 inch plywood. Is this floor strong enough to prevent cracks in the ceramic tile. If not, what do I need to do before installing the tile? Can I install the tile directly on the plywood? N.G.

DEAR N.G.: The single layer of plywood is insufficient. You will need to add additional underlayment prior to installing the ceramic tile. However, you need to check something else before you proceed. The floor joist span may be too great.

Ceramic tile is a very rigid material. Most ceramic tiles have very little tensile strength. In other words, if you try to bend or stretch a tile it will crack. Some wood floor systems, when designed to minimum standards, have too much bounce. This bounce will crack the tiles.

Floor joists are basically wood I beams. For a given floor joist, as you increase the distance between supports, the joist will deflect a greater amount. Floor joists beneath ceramic tile floors must not deflect more than 1/360 of their span. Assuming your joists are #1 grade and the span is no greater than 16 feet 9 inches, you can proceed.


If you're putting ceramic tile in your home, check out my Ceramic Tile Installation Checklist to learn exactly what you should know about the process. Avoid making costly mistakes with the help of this document. I offer a 100% Money Back Guarantee.


You have two choices of underlayment: 3/8 inch exterior grade plywood or 1/2 inch cementitious board. Both will perform exceptionally as long as you install them carefully. Your existing subfloor should be securely attached to the floor joists. Drywall screws work well. Use ones that have coarse threads.

If you choose to use exterior plywood, the spacing of the sheets is critical. The 3/8 inch plywood edges must be offset from the existing plywood edges at least 2 inches in each direction. You must also be sure to maintain a 1/8 inch spacing around each sheet of plywood.The plywood expands with changes in humidity. If spaced too tightly the plywood will buckle and crack the tile. Attach the plywood with nails or screws that will penetrate the floor joists at least 3/4 inch. Be sure to screw the edges.

Cementitious board makes a great underlayment, however, it requires some additional labor. It is necessary to install the cementitious board in a layer of fresh thinset or dry set mortar. This material acts as a filler for any low spots in the plywood. Without this layer of thinset, the board may flex under foot traffic causing the ceramic tile to crack. The cementitious board is attached to the existing plywood and floor joists with galvanized nails and screws.

If you choose exterior plywood as your underlayment, you must use either an organic adhesive or an epoxy mortar as your bonding agent between the tile and the wood. A latex modified Portland cement mortar will create a long lasting adhesive should you decide to use the cementitious board underlayment. Remember, without a stiff floor your ceramic tile job is doomed to failure.


Restore the "clean" to your grout. Just go to STAIN-SOLVER to see the beautiful, quick results.


Author's Notes:

April, 2002

Tile installed over wood floor systems MUST have a minimum of 1-1/4 inches of solid material beneath it. This means you can have a 3/4 inch wood subfloor covered by 1/2 inch plywood, cement board, or approved gypsum fiber underlayment.

If you want an even stiffer floor, be sure the wood floor system is designed to a 1/480 deflection maximum standard in lieu of the 1/360 standard mentioned above.

A/C – Furnace Replacement – Payback Periods

DEAR TIM: It is time to replace my 12 year old outdoor air conditioning (A/C) unit. I intend to purchase the highest efficiency unit available. My indoor furnace still has a useful life of approximately 10 years. Does it make economic sense to tear out the good furnace for a new super efficient furnace? Is there anything else to consider in this decision? R. E.

DEAR R.E.: Yikes! You are about to cross over into the most complicated dimension of home construction and maintenance. Heating and cooling equipment and its proper installation is by far the most technical aspect of residential construction. One mistake here and you will be miserable for quite some time. To answer your question, we need to calculate the remaining life cycle cost of your existing furnace. We need your last year's utility bills.

Pick a bill from the spring and the fall of last year when you know your furnace and A/C were not in use. Add these two together, divide by two, and then multiply the result by 14. This total is considered your "base" utility load. I define base load as the sum total of all electric and gas you might use other than that which goes into your furnace or air conditioner. Take all of last year's utility bills and add them together. Subtract the "base" load. The remainder is the annual cost to heat your home. Now, let's project what it is going to cost to heat your home for the next 10 years. Assuming a 2 percent per year increase in fuel costs, multiply your annual heating cost by 11.07. This should give you an accurate cost to heat your home for the next 10 years. We also need to assume that you will not need any major repairs during the next 10 years.

Let's look at the new system. For sake of discussion, assume you will be getting a furnace that is 95 percent efficient. Based upon the age of your existing furnace, I will assume that it is approximately 75 percent efficient. In this case, you should experience a dollar savings of approximately 21 percent per year in fuel savings (95 - 75 =20 20/95=21).

Will this savings over the next 10 years pay for the added cost of the new furnace? What kind of interest income can you get if you invest the money you might spend for the new furnace? Will the annual interest income offset a major portion of the higher annual fuel cost you are now experiencing? All of these things and more need to be considered.

It gets worse. There is a possibility that the new A/C unit will not operate at its rated efficiency if you don't modify your existing indoor equipment. Published efficiency ratings of outdoor cooling equipment can only be achieved when they are installed with specific types of indoor equipment.

If you mix and match equipment, ask the contractor for verification that the new A/C unit will, in fact, operate at the published efficiency. Discuss whether or not indoor modifications are necessary. Investigate warranties as well. See which warranty offers the best protection. Study who backs the warranty. Some companies have a third party involved in long term warranty claims. Read the fine print!

Straight Talk about Levels

DEAR TIM: My carpenter's level doesn't seem to be working right. The bubbles in the vials don't seem to read the same when you rotate the level. Is there an easy way to test mine? If I buy a new one what should I look for? What kind do you use? G. U.

DEAR G. U.: Your level may be perfectly fine. Do you remember dropping it recently? One of the endcaps may have shifted. You may have created an undetected high spot at one end of the level. Also check to see if the edges of the level are smooth. A piece of dried mud, glue, caulk, etc. may be creating your error.

If you can't find the problem, you can make a copy of an ancient Egyptian level. They made accurate levels by creating a simple A frame using a perfectly straight, horizontal brace or bottom member. A plumb bob was suspended from the apex of the A frame to the bottom brace. The clever builders then marked a point just below the bob while the horizontal brace was parallel with a small stationary body of water. From then on whenever they set this contraption on a surface and the plumb bob lined up with the mark, the surface was level!

However, before you go to that trouble let's do a quick test of your existing level. We need two 1 inch long flat head wood screws, a hammer, and a screwdriver. Find a nearly horizontal rigid piece of wood. This might be a beam, a foundation sill plate, etc. Hammer the screws into the wood about one half inch. I would like the distance between the screws to be 2 inches less than the length of your level.

Place the level on the screws. Adjust one screw until the bubble in the vial is perfectly centered. Rotate the level 180 degrees keeping the same bottom edge on the screws. If the bubble remains centered in the vial, this edge and its vial are OK. If the bubble shifts, the level is off by one half the difference of the bubble's shift. Flip the level over and check the other edge in the same fashion. You can do the exact same procedure using a vertical surface to check the plumb vials.

If your level happens to be a high quality one, the test will be easy. High quality levels have extremely well made and calibrated bubble vials. The edges of the bubble will just kiss the lines on the vial. You will not have to wonder when the bubble is centered. Lesser quality vials often require you to guess. These are the ones where the bubble is smaller or larger than the distance between the two lines. If you decide to purchase a new level, pay attention to the bubble vial's sensitivity. A good level has high sensitivity. Its bubble will move more quickly as the angle of the level is changed.

I happen to own wooden levels. Mahogany levels are usually very stable and have excellent weight distribution characteristics. I look for levels that have glass windows protecting the vials. Glass is more scratch resistant than plastic.

If you want a really nifty level, why not consider an electronic one? Some of these levels combine traditional bubble vials and electronic wizardry to take the guesswork out of making something level or plumb. The electronic window tells you degrees of angle, slope in percent, and even inches per foot. With these tools any DIY'r can easily run with the big dog carpenters!

Stanley 42-324 24-Inch I-Beam 180 Level  
Stanley 43-511 Magnetic Shock Resistant Torpedo Level  
Stanley 42-480 48-Inch Professional I-Beam Level  
Stanley FatMax 43-524 24-Inch Non-Magnetic Level  
Darice 91095-01 Mini Level Picture Hanging  
Empire EM51.48 Heavy Duty Magnetic Aluminum Level, 48-Inch  
Empire em81.9 True Blue 9-Inch Heavy-duty Magnetic Aluminum Torpedo Level  
Stanley 42-294 8-Inch Torpedo Level  
Stabila 37816 48-Inch and 16-Inch Aluminum Box Beam Level Set  
Stanley FatMax 43-572 72-Inch Non-Magnetic Level  


The above is an affiliate link. I get a tiny commission if you purchase this item from Amazon.

Tar and Chip Driveway

tar and chip driveway

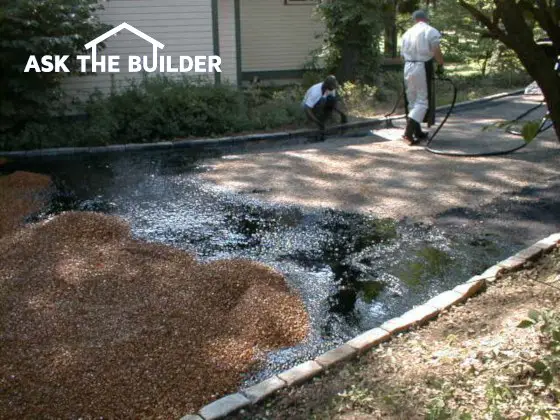
Tar and Chip Driveway |  A tar and chip driveway is being installed. The tar is about 375 degrees and very very sticky. Copyright 2019 Tim Carter

"A tar and chip driveway is durable, colorful, and inexpensive. Can you imagine having a green, red, or gold driveway?"

Tim Carter - Founder | AsktheBuilder.com

This column was so popular, even years after it was published, that Tim shared it with his 31,000 readers in the February 20, 2019 AsktheBuilder Newsletter.

Tar and Chip Driveway - Colors are Possible!

DEAR TIM: It's time for a new driveway at my house. I really like the look of a gravel road but don't want the dust. Blacktop is simply too plain. I have seen roads constructed using asphalt and small gravel. Can this be done on a residential driveway? Is it practical? What about the cost? L. A.

CLICK or TAP HERE for a FULL TRANSCRIPT of the above video

DEAR L.A.: You bet they are possible. That's the exact type of driveway I have. Locally they are called tar and chip. Some other installers refer to them as seal chip or shoot and chip. No matter what you call them they are a dynamic, beautiful surface. I happened to use two distinctive brown gravels, one from the Meramec River in Missouri and one from an Indiana location. Quite possibly this stone or a similar one is available in your city.

Related Links

Tar and Chip Installation and Upkeep Tips

Tar and Chip Ebook - Your Guide for the Perfect Driveway

Is Tar and Chip Like Blacktop?

A tar and chip driveway is very similar to standard blacktop in composition. Both types of driveway use asphalt cement as the ingredient which creates adhesion to the aggregate. Blacktop is mixed at a central plant. The asphalt cement completely coats the large, small, and fine pieces of aggregate.

Tar and chip surfaces combine either a special cutback liquid asphalt cement or an emulsified asphalt cement and small similar sized pieces of clean, angular, washed gravel. These ingredients are mixed together at your house.

FREE & FAST Tar & Chip BIDS

CLICK HERE to get FREE & FAST BIDS from local tar and chip contractors.

Is Tar and Chip Used on Major Roads?

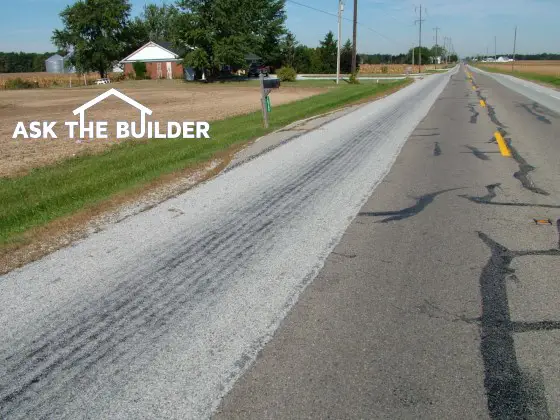
Tar and chip surfaces are still used in many parts of the USA. This method of paving was standard fare on virtually every highway in the USA prior to 1935. Central mixed blacktop technology was just beginning at this time. Tar and chip surfaces are a wonderful alternative that is, unfortunately, being left by the side of the road.

tar and chip road

Here is brand new tar and chip resurfacing on a state route in Ohio. Tar and chip are perfect for light to medium-traffic roads. Copyright 2019 Tim Carter

How is Tar and Chip Installed?

The contractor applies the hot, liquid asphalt to a standard gravel base or your existing driveway if it is in good shape. They usually spread one-half gallon of asphalt per square yard.

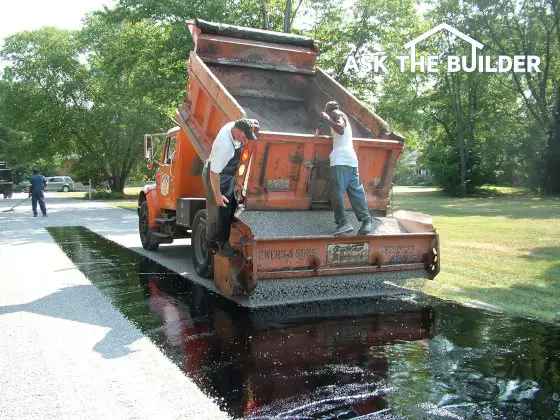
The small cubic shaped pieces of gravel are then immediately embedded in the liquid asphalt. Often they are applied at a rate of 40 - 50 pounds per square yard. The stones are then rolled and compacted into the asphalt. It is not uncommon for two layers to be installed. That is what I did.

tar and chip road

Here are chips being broadcast into the fresh tar. It requires very simple equipment to build a tar and chip road. Copyright 2019 Tim Carter


Get the best-looking Tar and Chip Driveway around! Use my Asphalt/Blacktop/Tar & Chip Installation & Repair Checklist and learn what to ask your contractor. I offer a 100% Money Back Guarantee.

The completed surface differs as well. The tar and chip surface is almost always rougher. This makes for excellent traction. Not only that, the surface is not black. The color of your driveway is the color of the gravel you choose. If you wish to have a unique country look, you can cover the driveway with a thin (1/2 inch) layer of the colored gravel. This works great on level drives. I don't recommend loose stones on sloped driveways.

What is the Best Weather to Install?

These driveways can only be installed in favorable weather conditions. Hot, dry weather is ideal. If the weather is cool, the asphalt cement may cool and set up to rapidly. The gravel may not achieve a high level of adhesion. Rain can wash away an emulsified asphalt before it cures.

Do Cracks Fill Themselves?

These driveways have a unique feature. They can heal themselves if a small crack develops. In hot weather, the asphalt cement can flow into the crack. The loose stones work in conjunction to disguise this imperfection. As long as the right asphalt cement and the correct chip size is selected, the asphalt does not get on your shoes. We have never had a problem in my house.

Tar and Chip Driveway Cost

These surfaces are inexpensive. Often they cost less than half that of standard blacktop. Unlike blacktop, they never have to be sealed. The service life of a single coat job is often 8 - 10 years.


Would you like to have a gorgeous driveway? How about step-by-step photos and instructions that show you how I had my own tar and chip drive installed? If so, you might want my Instant Download Tar and Chip eBook.


Author's Notes:

June, 2000

Who Does This Work?

Tar and chip pavement surfaces are nothing new. In fact, there is a strong possibility that you have driven across hundreds of these roads. Many counties use this surface on secondary and rural roads. It is a cost efficient method of repaving and sealing an asphalt roadway.

Businesses and manufacturing plants often pave large parking areas with this material as well.

There is a good chance that a large paving contractor in your city or town does this work. If you are really fortunate, you may find a smaller company that does it as well.

If you have trouble locating a contractor in your town, there is one sure fire way to determine if this paving system is done in your area. If there are blacktop or asphalt driveways in your area, there is an asphalt plant. This is where blacktop is made. This is the same place where the tar and chip people must purchase the tar or asphalt cement. Find out where the plant is and call and speak to the general manager. Ask if he can put you in touch with the contractors who purchase the tar.

Build Stackable or Segmental Retaining Walls

retaining wall

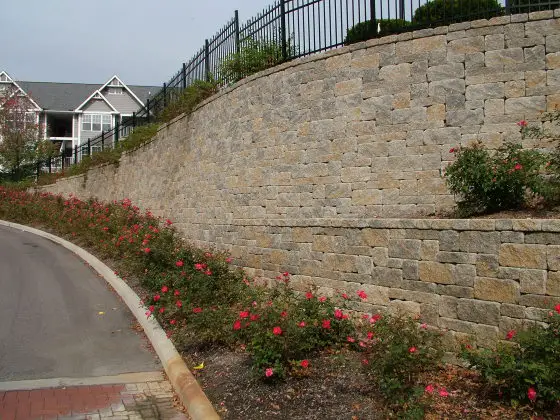
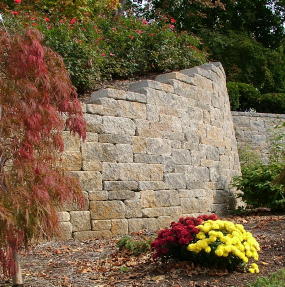
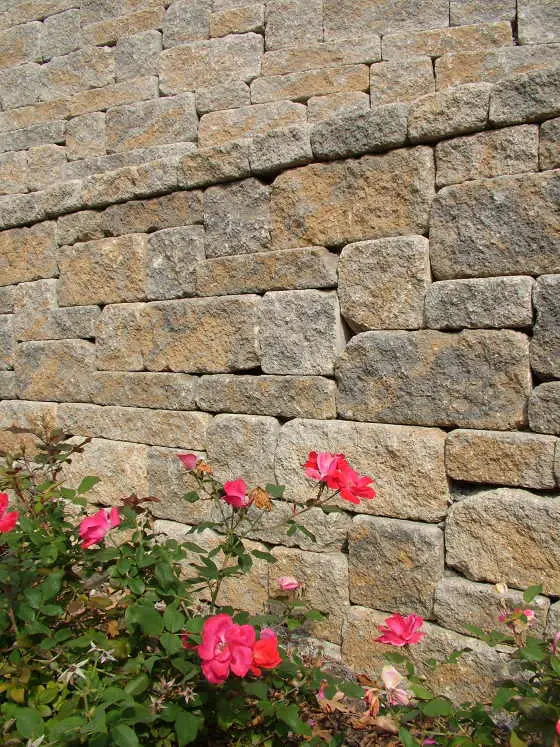
If you stand back from this mortarless retaining wall, it actually appears like rough cut stone. The manufacturer uses different pigments in the concrete mix and different sized stones to create the illusion.

DEAR TIM: I am trying to create a level play area for my children. My rear yard slopes away from my house. Building a 4 foot high retaining wall will correct my problem. I have seen new masonry walls that you simply stack one piece on another. Are these suitable? Can a single mom like me realistically do the job? What do you suggest? T. O.

DEAR T.O.: Your project is ideal for the new segmental retaining walls. A 4 foot wall height is a no-brainer. These new wall systems, which employ mortarless concrete technology, can actually exceed 25 feet in height! If you don't own some sturdy work boots and gloves, get out to the store this week. You are going to need them.

Segmental retaining walls have been used in this country for over 20 years. The technology is really quite old, just the materials are new. The Great Wall of China employs some of the same methods that are being used in many of the walls you see being built today.

There are many advantages to using a wall system like this. Time consuming and costly concrete footers are rarely required. A simple gravel base is often the substitute. The wall has built in flexibility. The individual masonry units are manufactured under ideal conditions. Each high-strength concrete block is uniformly shaped.

The design possibilities are virtually endless. Serpentine walls are a breeze. Many of the wall systems offer a simulated split-faced rock appearance. Some are available in different colors. Using different colored block you can easily create a design or a color stripe. There are accessory pieces that allow you to build steps, pillars, masonry light posts, and more.


Need to build a retaining wall? Build a sturdy, durable wall with my Retaining Walls Checklist. I offer a 100% Money Back Guarantee.


The wall you need to construct is a simple gravity wall. It relies solely on its own weight to resist the sliding and overturning forces exerted by the fill behind the wall. Wall heights in excess of 4 to 5 feet tall often must be engineered. The segmental wall systems will work, however you often must incorporate a special geogrid fabric into the wall and the compacted backfill soil behind the wall. Segmental retaining walls that support roadways or parking areas also require engineering attention.

You can make both gentle and tight curves with mortarless segmental retaining wall systems.

You can make both gentle and tight curves with mortarless segmental retaining wall systems.

Water must be allowed to drain freely behind and away from the walls. A perforated drain pipe along with gravel behind the wall helps improve drainage. Some of the wall systems actually use a light hollow block which is filled with free draining gravel. The gravel fill allows you to easily add weight to the gravity wall system. These particular blocks may be of interest to you should you wish to minimize visits to your chiropractor.

retaining wall

This is a closeup shot of the mortarless system. Excuse the pun, it rocks!

Each wall system comes with easy-to-follow instructions. Be sure to always start at the lowest end of the wall and work up slope. If your wall will abut an immovable object, such as a basement wall, try to start there as well. This will minimize cutting. Don't hesitate to ask for advice from the supplier. Ask if they have a three wheeled fork lift which will allow them to deliver the blocks and gravel to your rear yard. This will save you tons of labor and time, literally!


Column 128

Vinyl Fence

DEAR TIM: I've had it with my wood fence. Painting it is a huge investment of time. Besides, the paint only seems to last three years or so. I have seen vinyl fencing. Do you feel that vinyl fencing is suitable? Not too long ago, I saw one that didn't hold up very well. Is there a way to identify quality vinyl fencing? R. Y.

DEAR R.Y.: That poor quality vinyl fence you saw could have been one of the first ones made. Then again, it may have been made six months ago. There is a wide range of quality in some of the vinyl fence products. Some are fantastic, some are so - so.

The vinyl fence industry got it's start in the early 1980's from PVC pipe manufacturers. The early fence products didn't fare well in the sunlight. The pipe manufacturers forgot that their pipe is usually buried in the ground or in walls. Destructive ultraviolet (UV) light caused pipe grade PVC fencing to break down readily.

However, several manufacturers responded to these early failures. They developed new technology that now allows them to manufacture vinyl in two layers that are chemically bonded to one another. The process is called coextrusion. This process produces a thin top layer that contains ingredients, such as titanium dioxide, which slows the breakdown of the vinyl. The thicker bottom layer contains ingredients which enable the vinyl to remain pliable and crack resistant for many years.

The amount of titanium dioxide in the top layer is critical. The higher the amount the better. This ingredient actually absorbs and reflects the energy of the UV rays. Vinyl with lower amounts of titanium dioxide simply succumb to the UV rays at a faster rate.

Vinyl fencing products are available in a wide range of styles. The industry first targeted the agricultural market. Virtually every manufacturer has a post and rail fence. The more progressive companies developed a wide range of other styles for the residential market. These styles include picket, privacy, wrought iron look, and cross buck. Several manufacturers offer different colors and extremely realistic wood grained texture. Within six months, a variegated multicolored fence will be available. The look is virtually indistinguishable from real wood.

Vinyl fencing is pricey. Often it can cost up to twice as much as a similar wood fence. However, there is absolutely no maintenance once it is installed. Maintenance costs for wood fencing can cost as much as $0.70 per foot per year. When you figure you have to paint your fence every 2 - 3 years, a wood fence system can actually cost far more than a vinyl system in a short amount of time.

Installation of vinyl fencing is critical. It requires tighter tolerances and accurate placement of posts. Many of the fencing sections come preassembled so the posts must be spaced equally. Warranties are also a good way to identify a quality fencing product. Take your time to compare one with another. Some warranties are not only lifetime, but they are also transferable as well. Vinyl fences with strong warranties are a good bet.


Cement Stucco – Synthetic Stucco / EIFS

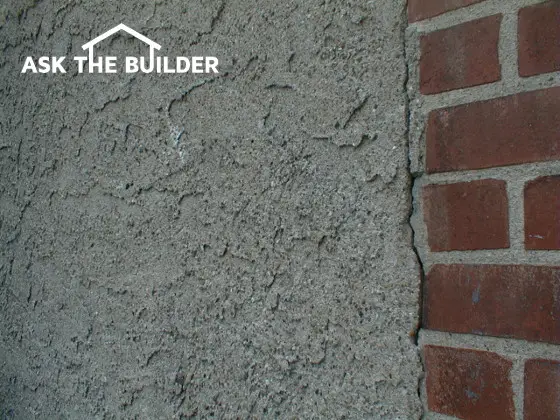
cement stucco finishDEAR TIM: I am considering using stucco for an upcoming building project. The time tested cement stucco seems to hold up fine. However, I have recently seen a newer synthetic stucco product used in residential construction. Are there any potential problems with either stucco method? What are the pros and cons to each system? T. R.

DEAR T. R.: The newer synthetic stucco you are referring to is EIFS (Exterior Insulation and Finish). It has been is use in the USA for approximately 25 years. The cement stucco system, on the other hand, is thousands of years old. It is definitely no spring chicken!

The system is durable. The reason lies in the fact that you are basically covering your house with a layer of rock. The cement stucco consists of sand, a small quantity of lime, Portland cement, and water. It is simply a fine grained concrete that is attached to your house using a waterproof barrier paper, galvanized wire mesh, and metal flashings. Flashings are handy devices that channel water to the exterior of a wall.

Cement stucco has numerous advantages. It can achieve compressive strengths in excess of 3,000 pounds per square inch. Ladders, baseballs, and rocks will rarely dent it. If you have a talented plasterer, you have unlimited surface texture possibilities. Furthermore, if you use time tested installation methods, you can create a weather tight barrier to wind driven rain, snow, and ice. Uncoated cement stucco allows water vapor to freely pass through it.

As for its disadvantages, cement stucco is a rigid material. If the wood framing beneath it shrinks or if the house foundation moves, the cement stucco will very likely crack. If you choose to use it on a new home, frame your house using wood sheathing, get it under roof, and let the lumber dry for 45 - 60 days before proceeding with the stucco installation. Quality control of the material is determined at the jobsite. The people who mix the ingredients and install it on the wall control the destiny of your stucco finish.

EIFS is a synthetic material. It is virtually impervious to water and water vapor. One coat and two coat systems are available. The outer surface layer usually contains long lasting acrylic polymers that are solid colored and extremely flexible. A wide variety of colors and textures are available. EIFS systems are almost always applied over an unbroken layer of expanded polystyrene insulation board. Lower fuel bills are a certainty when used in conjunction with standard fiberglass batt wall insulation.

In some ways EIFS is too good. It has been determined that EIFS stucco can actually act as a barrier. Manufacturers and installers of many of the EIFS systems have abandoned the waterproof barrier paper and flashing practices practiced for years by the cement stucco masons. Water gets behind many EIFS systems and can't get out. Numerous houses across the USA are suffering from serious structural wood rot. Certain EIFS systems severly inhibit the evaporation of trapped water.

An EIFS system is available that makes use of a special water management system. This concept acknowledges that water will get behind synthetic stucco. The water management system collects the water and diverts it back to the exterior of the home before it can cause rot damage. The system incorporates a special barrier paper, old fashioned metal flashings, cement board in place of foam board and a combination of a Portland cement basecoat topped with a textured polymer stucco material.

If you choose to use cement stucco and want it colored, use a masonry penetrating stain. Avoid film forming paints that may peel at a later date. If you choose to use EIFS, be sure that a waterproof barrier paper is used between the system and the wood structure. Check to make sure that flashings are used as well. The flashings must be in place at the bottom of the stucco, around windows and doors and any other place where the synthetic stucco abuts something that is not stucco. The flashings will direct water from behind the EIFS back to the exterior of the wall. Remember, EIFS systems can trap moisture. You must install an EIFS stucco finish so that it can easily liberate water that will get behind the attractive finish.

Read about Chris' dilemma in my November 22, 2009 AsktheBuilder Newsletter.

Author's Notes:

February 2002

A recent Virginia Circuit Court judge has just ruled that Dryvit's Outsulation is defective. He concludes "even if the Outsulation were perfectly applied according to Dryvit's specifications, instructions, and details, the patented Outsulation 'system' consisting of the method of application and the component parts, is intrinsically defective and thus, is not merchantable." This information was provided to me by the webmaster of another website called eifsfacts.org.

April 1997

Since I authored this column, there has been a major storm brewing concerning EIFS. One major producer of EIFS materials, USG Corporation, stopped marketing "barrier" EIFS in April of 1996. Instead, they developed a "Water-Managed Exterior Finish System". Other EIFS companies have modified their products and installation techniques to deal with water infiltration problems, drainage, and wood rot.

Maryland Casualty Insurance is not insuring EIFS houses. There is a possibility that other major insurance companies will take notice and either limit coverage or cancel policies on existing EIFS houses.

"Barrier" EIFS systems have been outlawed in North Carolina and Georgia.

Class action lawsuits have been filed in state and Federal courts against EIFS manufacturers. These are currently in litigation. On July 2, 1997 a Tacoma, Washington jury found that a major EIFS manufacturer was not guilty in a case filed by two homeowners. The jury felt the homeowners deserved compensation but not from the EIFS manufacturer. They commented that the manufacturer had provided a good quality product and adequate installation instructions for the EIFS system materials. This case may have an impact on the class action suits.

If you have an EIFS house I suggest that you check for moisture related problems. If you are thinking of purchasing a house coated with an EIFS system, I suggest that you proceed with extreme caution. You may be purchasing a house that has latent defects. Hire a professional home inspector who can prove to you that he/she has experience in dealing with EIFS inspections. Also consider contacting your local building department. Ask these officials if there have been reports of EIFS problems in your county/city/town.

If you are beginning to construct a home that will include EIFS, I suggest you get the full set of installation instructions from the manufacturer. You then must make daily inspections to insure that every aspect of the installation is being performed according to the manufacturer's guidelines.

Dishwashers and Electronics

DEAR TIM: A new dishwasher is in my future. While out shopping, I noticed a big difference in price. Also, it appears that computers have now invaded these appliances. How can sophisticated electronics help clean dishes? Are there quiet dishwashers? Is it possible for the average housewife to install a dishwasher? A. D.

DEAR A. D.: Yes, the microchip has infiltrated dishwashers. The microprocessors are connected to sensing devices. The electronic devices attempt to minimize the amount of energy and water that is used to clean your dishes. At this point in time, not all manufacturers are charting the same course. Some manufacturers feel the computerized machines may not do the job.

The electronic devices in the machines are very sophisticated. Some contain an electric eye which looks at how much dirt is in the circulating water lines. The dishwasher extends the cleaning cycle until it thinks the dishes are clean. Other machines have sensors that can detect the amount of dishwashing soap. If it thinks you goofed by not adding a sufficient amount, it raises the temperature of the wash water. Other sensors detect the washer arm rotation. If it is blocked by a fallen glass or plate, it adjusts the washer arm rotation.

Some models spy on your household habits. They memorize how many times you open and close the dishwasher door before running the machine. If hours pass, then it knows there is a good chance dried food will be present when it is time to go to work. The machine automatically increases the wash time and water temperature.

Some of these machines are pricey. They can approach $800 in cost. Energy savings may not pay for the difference in price from an non-electronic model. You must do the mathematics yourself to determine what the payback will be. Remember, price can often be a gauge of overall quality. If a machine contains inferior parts and less of them, it can often sell for less.

Noise is a major concern with most consumers who purchase dishwashers. Most manufacturers are going to great lengths to reduce unwanted noise. They do this by reducing vibrations. This can be achieved by increasing the sound deadening insulation in the door and around the tub. Precision electric motors and pumps are used that produce fewer vibrations. The extensive use of rubber mounting grommets can help. They isolate a vibrating pump or motor from the main body of the dishwasher.

Do you know how to turn off the circuit breaker that powers your dishwasher? Great! Get your adjustable opened end wrench, several screwdrivers, and some pipe dope. Take 30 minutes and carefully read the installation manual.

Turn off the electric power that feeds the dishwasher. Now, turn off the water line that supplies the machine. Remove the lower front panel to access all of the necessary, electric, water, and drain connections. Once you have disconnected these items, open the door to the dishwasher. You should see two screws that attach the dishwasher to the countertop. Remove these and the dishwasher should slide out. Now, install the new dishwasher and do everything I just said but only backwards. Be sure to check with your local plumbing department first. Some states have highly restrictive plumbing codes that will not allow homeowner installations.