Screened Porches – Beating Bug Bites

DEAR TIM: The bugs are driving me crazy in my back yard. It is time for a screened enclosure. Is it possible to build an economical screened enclosure using readily available materials? What are your feelings concerning aluminum enclosures as opposed to wood? Do you think this is a project for an accomplished DIY'er? Do you have any tricks of the trade you will share? R.C.

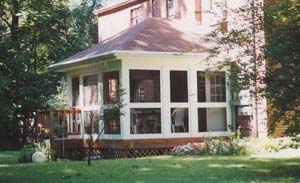
DEAR R.C.: Every screened porch that I have built has relieved the bug agony you are now experiencing. This is a project, I believe, that can be successfully tackled by a serious DIY'er. You will need to have well thought out plans, proper zoning clearance, a building permit, and approximately 160 man/woman hours of time.

Screened porches

Think before you do anything. How many people will enjoy breezy mornings and evenings within this enclosure? Are you going to have a table and chairs? Use your existing living room or dining room as a possible template for sizing this new structure. To be on the safe side, set existing furniture out in your yard where the structure will be. Create a square or rectangular shape, measure, and start to draw!

After you have obtained permission from your governmental officials, it is time to build. Wooden screened porches often allow you to match the architectural details of older homes. This feature comes, however, with a price tag - sustained, periodic maintenance. Aluminum screened enclosures offer rapid erection capabilities, low maintenance, and numerous design possibilities. Aluminum structures, however, usually require professional installation services.

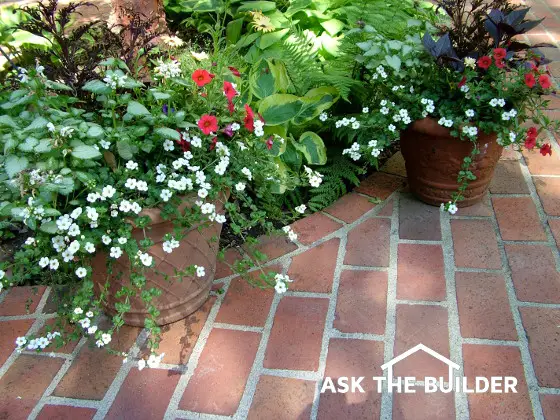
Building a screened enclosure is possible on a tight budget. There are several tricks you can use to accomplish this goal. Consider building the porch on top of a ground hugging wood deck instead of a concrete slab. Utilize ready made full panel screen doors for your walls. These doors can be installed side by side in between the support posts of the structure.

Use construction grade redwood for your support posts. This grade of lumber will give you many years of service if you prime and paint each post, including the top and bottom, before installation.

Construct a simple gable or hip roof for your porch. The rafters and roof sheathing will be visible from the inside of the porch. However, if you paint the underside of the roof a medium gray, it will look very acceptable. The angles created when building a hip roof will make for interesting conversation when your friends are sipping iced tea. Accept the challenge and try to construct this roof system.

There are several things you can do to minimize maintenance and maximize comfort. Prime and paint (stain) all wood BEFORE it is assembled. If you build the porch and then paint, numerous wood surfaces will be bare. Rain water will eventually locate this wood and cause paint failure and eventually rot. Be sure to plan ahead for the installation of electric outlets, overhead lights, and a paddle fan. Install these electric devices in accordance with the National Electric Code. Screened porches can become wet creating an increased shock hazard.

Creating a porch of your dreams requires an understanding of the elements, both in construction and climate. Better Homes and Gardens Porches and Sunrooms is a wonderful book to help you decide and plan a porch or sunroom that is right for you. In this book you will find chapter by chapter, evaluating and exploring you options, creating elements of style - porches and /or sunrooms, planning, and the basics of building. There is even a chapter on building taking you through the process point by point, including tips for choosing and working with building professionals.

House Wrap Will Save Money

house wrapped

DEAR TIM: I would like to keep my energy costs to a minimum in my new home. Do you think it is worthwhile to have my builder install a whole house wrap air barrier product? Do they work? Are there other advantages in using them? Can you share some installation tricks? L. O.

DEAR L. O.: I have used the house wrap products on all of my jobs. They are an extremely important feature that is often left out of many new homes. They will save you money on your heating and cooling costs. In addition, these whole house wrap products will protect the structure of the house in the event of water infiltration.

The idea of wrapping houses is not new. Many of the older homes that I rehabilitated early in my construction career had been wrapped with tar paper. The tar paper functioned primarily as a water barrier on wood frame houses. It probably helped to limit the amount of air that infiltrated as well. For some reason the use of tar paper was abandoned by many builders after World War II.

The modern house wraps are actually air retarders. Air infiltration can be a huge drain on utility costs. Air leaks into and out of houses in between gaps that are usually found where exterior walls sit on foundations and wooden subfloors. Air can also leak where sheets of plywood or wall sheathing abut one another. An average house has between 70 and 200 square inches of air leaks.

The air infiltration products do not block the flow of air entirely. To do so would be a big mistake. Water vapor from the inside of your house needs to be able to find its way to the exterior air. If the vapor were to become trapped, it could easily begin to cause moisture related rot problems. These building products resemble some modern fabrics - they repel liquid water but allow liquid vapor to pass freely.

All houses that are framed with lumber need protection. Brick veneer is not water proof. Wood, vinyl, and aluminum siding can develop leaks. Construction details around doors and windows are sometimes sub-standard. The whole house wrap products, when installed properly, create a very effective waterproof skin. Water that gets behind the exterior finish material of your house flows down the wrap and exits just below the top of your foundation or slab.

Installation of the whole house products requires attention to detail. These products need to be installed just like the old tar paper - start from the bottom and let subsequent pieces overlap the lower ones. All seams must be sealed with a special adhesive tape sold by the manufacturer. The wrap needs to be in place before doors and windows are installed. In fact, it should be installed prior to the placement of the second top wall plate that sits immediately below the roof rafters. By sandwiching the wrap between the double top wall plate, you virtually eliminate the entry of any soffit down drafts behind the house wrap. Be sure the house wrap extends over the top of the foundation at least 1 inch.

Some house wrap products can hide the location of wall studs. If you use such a product, be sure to align the outer wall stud markings on the house wrap with the studs. If this is too much trouble, consider using a translucent house wrap. In either case, the bricklayers and siding installers will thank you.

Brick Patios – Build One

clay paving brick patio next to plants

Clay Paving Brick | This patio was built with traditional clay brick pavers. You can get step-by-step installation instructions to create the EXACT SAME look you see in the photo here They could have been set in sand, but laying them in mortar creates a traditional look and feel. PHOTO CREDIT: Tim Carter Copyright 2022

Clay Brick Patio - Forget About Using Concrete Brick

DEAR TIM: My husband and I are going to build a patio. We want an authentic brick patio. Is there a special brick we should use? What method of installation do you feel is the most permanent? Can you offer any brick laying tips? S. E.

DEAR S. E.: Now here is a subject close to home for me. If you can make it to my house this weekend, you can help me finish my lower brick patio. I've installed thousands of brick in patios, sidewalks and stairways around my current home and my previous residence. They make superb, decorative patio surfaces.

What is Clay Paving Brick?

Clay paving brick is a special brick made from fired clay. It needs to be sufficiently hard to resist years of foot and often motorized traffic. In addition, the brick must have a high skid or slip resistance. Look for a brick that has a rough or wire-cut surface. If you live in a climate that experiences cold weather, be sure to ask if the brick is graded for severe weather (SW). Do not purchase the brick without this guarantee.

What are the Brick Sizes?

Paving brick usually is available in two sizes. Both types are solid with no inner voids. Normally they are 4 inches wide and 8 inches long. I prefer to use the one that is only 1 and 1/2 inches thick. If you expect heavy vehicle traffic you may wish to use a paving brick that is 2 and 3/8 inches thick.

What is the Best Way to Install Clay Paving Brick?

The best way to install clay paving brick is to follow my step-by-step download PDF instructions. These include secret formulas for the best mortar, detailed instructions, illustrations, videos, links to the best tools, and many many tips.

You have several options with respect to installing the brick. You can use a flexible, semi-rigid, or a rigid base system. The flexible base consists of a bed of crushed gravel and sand. A semi-rigid base incorporates a layer of asphalt beneath the paving brick. I happen to prefer the rigid method. This involves mortaring the paving brick to a steel reinforced concrete slab.

PC1450 PDF cover page

This is the cover to my download step-by-step instructions. They're the BEST INSTRUCTIONS on the Internet. Of that there's no doubt. Look and see for yourself.

You begin this project by determining where the top surface of the patio will be. Excavate the ground to a depth of 8 inches. Install the necessary wooden or steel forms to create the shape of the patio. Use 1/2 inch plywood to make gentle or tight curves. The top of the forms should be 2 inches below the anticipated finish surface of the patio (assuming you are using the 1 1/2 inch thick brick).

Once the forms are set, you can install 2 inches of washed pea gravel. While not absolutely necessary, this gravel helps promote drainage beneath the concrete. Now it is time to place the 1/2-inch steel reinforcing bars. Create a gridwork by placing these every two feet in both directions. Place the steel on small pieces of brick so that the steel ends up at least 1.5 inches off the soil and preferably in the middle of the 4-inch-thick slab. Pour the concrete base using a mix with a minimum compressive strength of 4,000 pounds per square inch. Strike the surface of the concrete with a board to remove any high spots.

After the concrete hardens, it's time to lay brick. Begin by installing all of the edge brick first. The brick should be laid in a 1/2 inch thick bed of Portland cement mortar (3 parts sand to 1 part cement). Do not use standard bricklayer's mortar mix! Let the edge brick dry for 1 - 2 days. Stretch a string between the edge brick and begin filling in the center of the patio laying a course at a time. The space between each brick is filled after all the brick are laid. I use a grout bag that resembles a cake icing bag. Mix 1 part fine sand to 1 part cement for this purpose. Let the mixture flow from the bag until it overfills each joint. The mixture will get stiff within 15 - 20 minutes. Scrape off the excess and get ready to party!

I Need More Detailed Instructions - Where Can I Get Them?

Once again, I urge you to download my 13-page step-by-step instructions showing the two methods to install clay paving brick. They come with a satisfaction GUARANTEE.

satisfaction gif


DIY Plumbing

DEAR TIM: Do you know how to solder copper water pipes? I plan to install some new copper tubing which will replace old galvanized steel water lines. How do you successfully solder copper water lines? I'm afraid of burning my house down while using the torch. What can I do to minimize fire risks? A.M.

DEAR A.M.: Soldering copper pipe intimidates many homeowners. With a little knowledge and practice, you will get leak free joints just about every time. Not only that, if you follow some simple steps, we can keep the mileage low on your local fire department pumper trucks.

For you to solder copper tubing successfully, you will need the following tools and supplies: a tubing cutter, round wire fitting brushes, plumbers sand cloth, flux, flux brush, an acetylene or propane torch, lead free solder, and a few 5 gallon buckets. All of these items can be found at your local plumbing supply house.

Tubing cutters are simple tools that cleanly cut copper tubing to specific lengths. Use the plumber's sand cloth to clean each end of the pipe. You need to shine only about 1 inch at each end. The fitting brushes are rotated inside of the copper fittings to remove oxidation.

solder copper
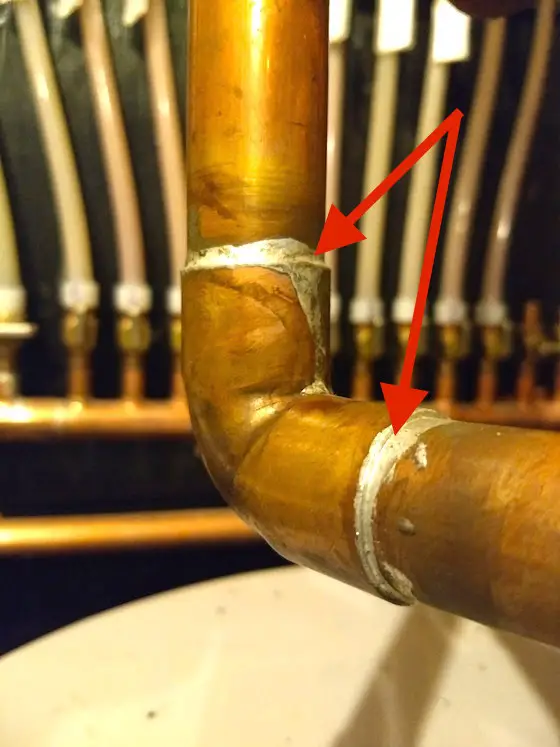
Open the flux container. You will see a gelatin like substance that usually contains zinc chloride, ammonium chloride, and paraffin. Stir the flux well to mix it, especially if it has been sitting in a hot area. Use a small flux brush to apply a coating to the areas of both the pipe and fitting you have cleaned. Don't get the flux in your eyes or mouth!

The pipes and fittings must be dry for soldering to take place. If water or steam is in the pipes, you can't get the copper hot enough to melt and draw the liquid solder into the fitting. You can temporarily stop the flow of water if you roll up some bread and stick it in the pipe where water is flowing. The bread will eventually dissolve and not cause a problem within the water lines.

Once you have joined the pipe to the fitting, it is time to solder. Light the torch using a match or a flint striker. You should see a flame within a flame if your torch is adjusted correctly. The tip of the inner flame produces the hottest temperatures. Apply the torch to the pipe/fitting area so that the tip of the inner flame just touches the copper. The flux will immediately begin to boil.

Within about 10 - 20 seconds, the boiling flux will disappear. At this time, touch the solder to the intersection point of the pipe and fitting. Within 1 second, the solder should begin to melt. Immediately remove the torch. If the pipe and fitting are sufficiently hot, the solder will continue to melt and be drawn completely into the fitting. The pipe will usually retain enough heat to melt the solder for 10 to 15 seconds. However, you usually need to only apply solder for 3 - 5 seconds.

Using a propane or acetylene torch around wood framed houses is a recipe for disaster. Wood chips, paper insulation backing, etc. can ignite easily. Prior to starting this project fill your 5 gallon buckets with water. Better yet, purchase a portable fire extinguisher that is made to extinguish wood and paper fires.

You can also buy at the plumbing supply house non combustible flameproof fire shields. You can place these between the copper and any combustible product as you solder. If you can't locate this product, a piece of sheet metal will do a fine job to absorb and deflect the torch's heat. Always look behind or past what you are soldering. Be sure you do not melt an electrical wire or telephone wire. You may need to dial 911!


Rust Prevention with Paint

rust preventative paint

Here's a great newer paint that's got the primer built in. This saves you TIME AND MONEY. It comes in many colors. While you're buying this paint at Amazon, be SURE TO GET all the other tools you need in the following list.

DEAR TIM: My painted steel patio furniture is beginning to rust. The rust that is beginning to form is light in some areas. However there are some places, near welds, that are heavily corroded. What is the best way to paint this? Can I use any high quality exterior paint to protect the steel? What about primers? B. E.

DEAR B. E.: Guess what? You are about to fork over part of the 2 billion dollars that is spent each year in the USA on protective coatings that inhibit corrosion. Don't worry, you will probably spend less than $25 to give that patio furniture a strong defense against air and water that are causing your rust problems.

Many people don't realize that the steel used in car parts, porch railings, patio furniture, etc. is very unstable. Processed iron or steel is constantly trying to change back to its original state, that of iron ore. You see, iron ore is simply wet, oxidized (rusty) iron. If you were to pick up a piece of iron ore at a mining site, you would have a clump of rust in your hands.

For you to slow this natural rusting process, you need to coat the processed steel with special paints that contain rust inhibitive pigments. These ingredients chemically alter the conditions at the surface of the metal. They make it very hard for the steel to rust. Paints that contain zinc or zinc chromate do a fantastic job of protecting steel from the corrosive effects of air and water.

Red lead also is a super rust inhibiting ingredient. However, lead poses a significant health risk. It is tough to find paints that contain lead. You may be able to find a commercial or industrial paint store that still carries a paint with lead, but be careful where and how you use it. It can poison you and/or your children.

The key to successfully repainting your patio furniture lies in surface preparation, the correct primer, and a high quality top coat. Inadequate surface preparation (cleaning, sanding, etc.) Is responsible for nearly 80 percent of all premature paint coating failures. If you spend several more hours preparing your furniture before painting, you may get several more years of protection. Sounds like a bargain to me.

Believe it or not, you do not have to remove every speck of rust to obtain superior results. Paints are simply complex colored glues. You need to remove any loose rust, oils, dirt, grease, dust, etc. that would normally come off with a thorough washing, scraping, or wire brushing. If the paint can stick well to the substrate, even slightly rusty steel, you will be OK.

Oil based or alkyd primers that contain high quantities of rust inhibitive pigments tend to work the best when priming rusty steel. They have a much better tendency to wet the surface and flow into microscopic cavities in the steel. This is how the paint sticks to the metal. In addition, these special primers are formulated not to breathe. Water vapor can't pass through to get to the steel.

As soon as the primer is dry, you need to paint the furniture with your finish coat of paint. There are both water based and oil based paints that will work well for this purpose. Be sure to use paints that are compatible. Most manufacturers will tell you which primer to use for a particular finish coat or vice versa. Don't try to do amateur chemistry and mix and match for yourself!


Decks

DEAR TIM: Within the next few weeks, I plan to build a deck. I am looking for another wood option other than chemically treated pine. I have considered redwood, however, the cost seems extravagant. Also, I worry about the environmental aspects of cutting giant redwood trees. What advice or alternatives can you offer? How about a few deck construction tips? L. E.

DEAR L.E.: You nailed my choice. Redwood is an excellent deck construction material. Western red cedar would be a good choice as well. However, don't discount the use of chemically treated pine as an integral part of your deck. I'll explain in just a moment.

First, let me shed some light on the environmental aspects of redwood. If you have traveled to the national parks and forests in California you most likely saw the Sierra redwoods. These are the giant sequoias that are national treasures. The redwood that is used almost exclusively for construction lumber is the coast redwood. The coast redwood is grown commercially in managed forests. They are two entirely different species. Don't confuse the two.

EB015 Cleaning & Sealing Deck eBoo CoverIt just so happens that the coast redwood is the fastest growing softwood tree in the USA. They reproduce so readily that early homesteaders abandoned land that they tried to convert to farmland. The trees simply grew back too fast! I trust that the leaders in the lumber industry are doing the best they can to properly manage this excellent renewable resource.

Your cost concerns must be based on a past experience. You probably purchased a piece of clear all heart redwood. This is the most expensive part of the log. There are many grades of redwood that are very economical and will do well for your deck. My grade choice would be construction heart. It is an all heartwood grade that contains tight knots. Heartwood is the wood that contains the highest amount of extractive chemicals. These are the things that make redwood and cedar naturally resistant to rot and insect attack.


Building a deck? Make the best decisions with my helpful and thorough Deck Installation & Repair Checklist. I offer a 100% Money Back Guarantee.


Let's talk about chemically treated pine. This species of lumber should not be discounted. I would use it for all of the structural aspects of your deck. In other words, use it for your support posts, ledger boards, beams, and joists. Use the redwood for your decking, benches, and railing systems. If you are concerned about appearance, you should possibly consider using clear all heart redwood for the handrails.

For your benefit, I did a quick cost analysis. I created a material list for a standard 10 foot by 12 foot deck that sits 3 feet off the ground. The first price was based using chemically treated pine for the entire deck. The second price used construction heart redwood for the decking and rail system. Guess what? It only cost $165.00 more to use redwood on top of the chemically treated pine joist system! I feel that is a bargain for the compliments you will receive from your friends and neighbors.

Consider using stainless steel nails or double dipped hot galvanized nails for construction purposes. Any other nails will cause stains in your redwood. Also, prefinish all of the redwood on all surfaces and cut edges before it is installed! This is very important. You will vastly increase the service life of the redwood if you do this. After construction is complete you can put a final coat of finish on the visible redwood.


Wood deck surfaces need to be cleaned and sealed to keep them in good condition. The cleaner I recommend is oxygen bleach.


Message from Tim:

Years ago while researching a column about cleaning decks, I discovered the wonders of Oxygen Bleach. It is perhaps the 'greenest' cleaner I know of as it uses oxygen ions to break apart stains, dirt and odor molecules. There are no harsh chemicals, and it works on just about anything that is water washable.

I decided to create my own special blend using ingredients made in the USA. In fact, the raw materials in the active ingredient are food-grade quality registered with the FDA. I call my product Stain Solver. I urge you to use it to help clean your deck. You will be amazed at the results!

Author's Notes:

June, 1996

Coastal Redwoods are the tallest trees in the world. They are indeed a natural wonder. These trees are a 'cash crop' for commercial companies. Privately managed tree farms are a reality. Forestry companies currently have the right to plant and harvest timber. However, it takes hundreds of years (see below) for coastal redwood trees to reach maturity. As such, it will take intelligent and resourceful planning to make sure that we preserve this wonderful natural resource.

We owe it to future generations of our country and the world to make sure that we do not eliminate this species from the face of the planet. People who are interested must work together to solve the needs of those who want to use redwood as a building material and those who wish to preserve and protect this magnificent living wonder. Please do your part to become more informed and help in any way possible.

August, 2000

I received a clarifying e-mail from Mr. Dan Opalach, Ph.D. who works for the Simpson Timber Company in Arcata, CA. He was kind enough to politely point out an error in the above Author's Notes. He stated in his e-mail, "... I would like to tell you, however, that redwood trees reach maturity much, much sooner than "hundreds of years" as you mentioned in your column.

Fifty-year-old redwood trees are often 125 feet tall and can be milled to produce 750 board feet of lumber -- enough decking lumber to cover three 10x12 decks!"

Dan, many thanks for this correction! TC

Air Conditioning Return Air Problems

HVAC Return Air

Return Air Problems | The red arrow points to a large wall-mounted HVAC return-air vent. The furnace or air handler is probably on the other side of the wall behind that door. Copyright 2018 Tim Carter

Return Air Problem - Air Conditioning Blues

DEAR TIM: We just had central air conditioning installed in our two story house. The air conditioner seems to work fine, however the second floor rooms are warmer than the first floor rooms. It gets very hot upstairs in the late afternoon. What might be the problem? The contractor says this happens all the time. What, if anything, can be done to correct the problem? Where do we start? F. R.

DEAR F.R.: So, it happens all the time ... Maybe on his jobs it does, but not on mine. Your central air conditioner may have been installed by a contractor who doesn't realize that hot air rises and cool air falls.Successfully installed central air conditioning can easily cool two story houses.

How Do You Check Ductwork?

Before we do anything else, let's make sure that the cold air from the air conditioner can get to each room. Check to make sure that the supply duct register in each room is fully open. Do not allow furniture to cover or block these air outlets. Check the ductwork piping in the basement or furnace room for damper controls on the individual supply pipes that go to each room. These controls are little levers that attach to a metal disk inside each pipe. They enable the contractor to balance or adjust the amount of air going to each room. Be sure these are fully open on the pipes leading to the second floor rooms.

For you to properly cool interior spaces, you must replace the hot air in each room with a sufficient amount of cool air. The amount of air required depends upon the size of the room, how many windows it might have, the number of exterior facing walls, the amount of ceiling and wall insulation, etc. The cool air enters each room through supply ducts. These can be located in the floor on outside walls beneath or very close to windows. In some instances, the ducts may be located in the ceiling.

CLICK or TAP HERE to get FREE BIDS from Local HVAC Contractors

How Do You Replace Hot Air?

Because hot air rises, it needs to be "vacuumed" off the ceilings in the second floor of your house. My heating contractor always accomplished this task by installing a return air ducting system which funneled the hot air from the rooms back to the furnace/air conditioner air handler.

Where Do You Install Return Air Ducts?

Return ducts should be located in each room very near the ceiling on an interior wall. This return air opening pulls hot air from the top of the room. The heavier cold air which is flowing from the supply duct is pulled across the room and up towards the return duct. On its way to the return duct, the conditioned air cools you and the rest of the objects in the room. These same principles must be used to cool single story houses as well.

What If Your House Does Not Have Return Air Ducts?

If your house does not have this return air ducting on the second floor, it frequently can be added. The challenge is to install adequately sized ductwork from the second floor hallway to the basement or furnace room. The hot air from the second floor rooms can be collected in the hallway and sent back to the air conditioner. Rectangular holes can be cut into the wall space just above each bedroom door. Each side of the hole can be covered with a standard return air grill. These holes allow the hot air from each bedroom to easily enter the hallway.

Once this hot air has a pathway into the central hallway, an experienced heating and air conditioning contractor can convert one or two stud wall cavities into the initial return air duct. At the floor level, this stud cavity is then connected to a traditional metal duct that is connected back to the return air ducting system. Sometimes this duct can be hidden in the corner of a first floor room or fitted into a first-floor closet.

damper control

The lever you see on the side of the round metal duct is a damper control. It is connected to a round metal disk inside the duct pipe. If I rotated the lever so that it was straight up and down, the disk would block 90 percent of the air flow in the duct.

Without this second floor return air system, the heavy cool air being discharged from the supply ducts in each room can't do its job. It often floats along in a layer near the floor. It eventually cascades down the stairwell to the first floor. This is one reason why your first floor is so much cooler than the second floor.

Author's Notes

December - 1998

I just received an email from Edna R. who lives in Oregon. Edna read this column and had an interesting story to share about another cause of poor circulation. I'll let Edna tell it in her own words.

"......We visited at a 3-year-old rental home several years ago. The hosts were living in the kitchen and family room because the bedrooms at the far end from the furnace were too cold and the living room half way to the bedrooms was not warm enough to sit around in.

When I suggested they check out the furnace filter, they weren't even sure where it was. Apparently the previous renters didn't know either! The lint and dust were jammed into the allotted space and came rolling out in packed balls when the filter was removed.

Many people raised with electric heaters and fireplaces are often unaware there are filters on their forced air furnaces. They need to be told OFTEN to check filters and where they are in the heating system. Thanks for listening to me."

Column 143

Sheds

DEAR TIM: My husband and I have outgrown our garage. We went shopping for a freestanding wood storage building. The outside appearance of the buildings looked nice, however they all seemed very flimsy. I feel I can use standard materials and build a better building myself. Do you think the average homeowner can tackle this project? What size shed do you recommend? S.V.

DEAR S. V.: I see you have the same problem that I do - too much stuff! Outdoor sheds prevent car damage, and reduce clutter. Sheds make a great place to do projects that might otherwise create a mess or fumes in your home. I have built many of these sheds for my past clients. A detail-oriented homeowner and a helper using four days worth of vacation time can build a substantial shed. Building your shed as a DIY project will save lots of money.

A 10-foot wide by 12-foot deep shed is a very popular size. This size permits you to include a fantastic 10-foot long, 30-inch deep work bench inside on the back wall. A series of shelves above the workbench will provide vast amounts of storage space for boxes, paint cans, garden chemicals, etc. This design allows for ample floor space for lawn mowers, wheel barrows, snow blowers, and yard tools.

Many of these sheds have no foundation. They simply rest on solid concrete blocks, which are spaced at 2-foot intervals. Crushed gravel can be used to level the blocks if your lot is relatively flat. If your lot is sloped, you may have to use posts which project from the floor system to the concrete blocks.

People who live in a cold climate, should place the concrete blocks or posts on concrete piers. These small piers are placed below the level which frost penetrates the soil. Without this protection, the soil can freeze and heave. This can cause your building to twist. Doors and windows may not operate properly until the spring thaw.

If you live in an area subjected to high winds or storms, it is important to include special hold-down anchors at each corner of the shed. These anchors bolt to the shed walls, and then connect to pieces of steel or blocks of concrete buried next to the building. The anchors are easy to install. Without this protection, it is possible for your building to be blown over or across your yard during severe storms.

I recommend that you install a simple metal overhead garage door to give you excellent access to the building. A standard door is 8 feet wide and 7 foot tall. They provide excellent security and often can be installed by a professional for $350 or less.


Be sure to use chemically-treated lumber for your floor joists and plywood flooring. Without this protection, the floor system of your shed would begin to rot in a very short period of time. I also recommend that you stretch a sheet of cross laminated polyethylene sheeting over the floor joists before nailing the plywood in place. This will block water vapor from the soil which can cause your tools to rust.

Natural light can be introduced into the shed by using pieces of clear acrylic. These can be placed over openings cut in the roof. Simply overlap the acrylic 2 inches on each edge and the bottom. Slide the top of the acrylic up under the shingles at the top of the opening. Apply clear silicone caulk under the edges of the acrylic to stop wind blown rain. If you can afford real skylights, install these instead of the plastic panels.

It is also a good idea to install a turbine roof vent. This device will exhaust hot air from the shed, and help keep the shed comfortable during periods of hot weather.

Wall Anchors for Concrete, Block & Drywall

expanding plastic anchor

This is my FAVORITE plastic anchor for drywall. It prevents damage from condensation should you use a metal expanding anchor! CLICK THE IMAGE to have these delivered to your home. You'll SAVE money buying them online.

DEAR TIM: We just purchased a home and need to build shelves, hang pictures, etc. on an assortment of walls. We have solid concrete, concrete block and drywall walls. Which type of wall anchors work best for each wall? What is the best way to drill into concrete and concrete block? T. I.

DEAR T. I.: It sounds to me like you are going to be busy. Fortunately the wall anchors you need are abundant. A well stocked hardware store should have exactly what you need.

The key to success lies in selecting a strong enough anchor for each particular job. Different sizes and types of anchors support different loads. In order to select the correct anchor, you must anticipate the load which is going to be placed on the anchor. This is not as difficult as it seems.

For example, I calculated that a cubic foot of one of my favorite magazines weighs nearly 60 pounds. If I were to build a set of shelves that was 6 feet wide by 7 feet tall and 1 foot deep, it could possibly be packed with 2,520 pounds of magazines! (CALCULATION: 6 x 7 x 1 x 60lbs = 2,520 pounds) If a total of 10 anchors will be used to secure the shelves to the wall, each anchor needs to have a minimum strength of 252 pounds. High quality anchor manufacturers publish anchor capacities. This information should be readily available at the hardware store.

If you are building these shelves on a solid concrete wall, I would suggest that you use a one piece expansion anchor. I have used thousands of these nifty devices. These anchors have bolt threads at one end and an expansion cone surrounded by metal wedges at the other end. It is driven with a hammer into a specific diameter hole which matches the anchor's outer diameter. Once driven into the hole, you begin to tighten a nut on the threaded end. As the nut turns, the expansion cone drives the wedges tightly into the sides of the hole.

The expansion anchors can hold enormous weight. A typical three eighths inch expansion anchor which is embedded only 2.5 inches in a sound concrete wall can resist 1,200 pounds of pull!

If you need to hang a bracket or something else on a hollow concrete block wall, you should consider using a metal sleeve anchor. This anchor consists of a threaded shaft which is surrounded by a full length expanding sleeve. The shaft has an expansion cone which forces the outer sleeve to mushroom out as a nut at the other end of the shaft is tightened. Once again, you must match the hole that you drill to the size of the anchor. These anchors often have similar strengths as the expansion anchors.

If you hang a picture on drywall, it better be light. Often the drywall is the limiting factor with regards to anchor pullout or failure. 1/2 inch drywall can usually only withstand a pullout force of 15 pounds per anchor. This same drywall can only support a 40 pound load per anchor. Drywall anchors are like giant coarse threaded screws with a hole in the center. You simply screw the anchor into the drywall at the desired location. Then you install a small screw into the center of the anchor.

Drilling holes in concrete or concrete block is a breeze. You should consider purchasing a battery powered hammer drill. These drills spin a carbide tipped bit that chips away at the concrete thousands of time per minute. They can often drill a 4 inch deep by one quarter inch diameter hole in solid concrete in less than 30 seconds. Many of them can accept standard bits to drill in wood and drywall. When drilling in these materials you simply switch off the hammer control.


Concrete Overlays

DEAR TIM: My concrete driveway and sidewalk surfaces are crumbling. The concrete just below the surface appears to be in very good shape. Can a thin concrete overlay be installed over the sound concrete? What needs to be done? Do you think I should hire a professional to do this work? E. R.

Concrete Overlay podcast

CLICK this image and listen to the first call on the podcast. I talk to Vic about how he can use a concrete overlay to save THOUSANDS of $$$. Copyright 2018 Tim Carter

DEAR E. R.: This is your day! Thin concrete overlays are possible. Many of the concrete bridges in our interstate highway system are being restored using this proven technology. What's more, if you have some friends, relatives, and neighbors with strong backs and weak minds, it will be a breeze.

Your best results will be achieved with a fully bonded overlay. This method involves placing a 1 to 2 inch thick layer of concrete which physically and chemically bonds to your existing concrete. Thinner layers ranging from 1/2 to 1 inch can be installed. They require extra attention during and after installation. Thin overlays tend to shrink more readily because of rapid moisture loss while drying. This can cause cracking and future delamination.

The amount of cement used in the concrete mixture and the size of the stones (aggregate) is critical to your success. You need to make sure that each cubic yard of concrete you mix has a minimum of 600 pounds of cement. The maximum diameter of any stone in your mixture should not exceed 1/3 the thickness of the overlay. This means that if you intend to pour a 1 inch overlay, no single stone should be larger than 5/16ths of an inch!


Want perfect concrete work? Find a pro by using my Concrete Work (Sidewalks, Driveways, Patios & Steps) Checklist. I offer a 100% Money Back Guarantee.


The concrete mixture itself contains a combination of stones, coarse builder's sand, cement, and water. If your overlay is very thin, say 1/2 inch, the stones will most likely be eliminated from your mixture.

Before mixing the first batch of material, you need to do several things. Chip away the existing loose material in several places to insure that the concrete below is, in fact, solid. Remove any grease and oil stains with soap and water and/or solvents. Completely rinse the surfaces to remove grease, dirt, dust, etc. Keeping the area to be repaired wet for 12 hours prior to applying the concrete will vastly improve your chances of success. This is especially true if you intend to do a thin overlay of 1 inch or less.

To fully bond the thin overlay to the old concrete, you need to apply a very thin layer of cement paint. Mix 1 part of cement to 1 part of fine sand. Add just enough water to make a rich, creamy mixture that resembles a high quality latex paint. Have one of your strong backed helpers apply this mixture in a 1/16th inch film just ahead of the concrete mixture. Be sure that there is no standing water in any of the repaired areas. This will dilute the bonding agent! It is vitally important that this paint does not dry before it is covered with the thin overlay.

Once the concrete has been installed, it is finished just like ordinary concrete. You can apply a broom finish or a coarse wood trowel finish for great traction. Apply a liquid curing compound immediately as you finish each section. In addition, cover the overlay with plastic to eliminate any water loss. Avoid doing this work on hot, sunny, or breezy days. Cool, overcast weather is the best for new concrete or concrete repair work!

CLICK HERE to read about the phone call with Gary and Linda. They hired a concrete contractor to install a new concrete drive two years ago. Unfortunately the sub-contractor - yes, the contractor hired someone else to do the job - did a very poor job and the surface of the concrete is spalling off.