Air Conditioning Return Air Problems

HVAC Return Air

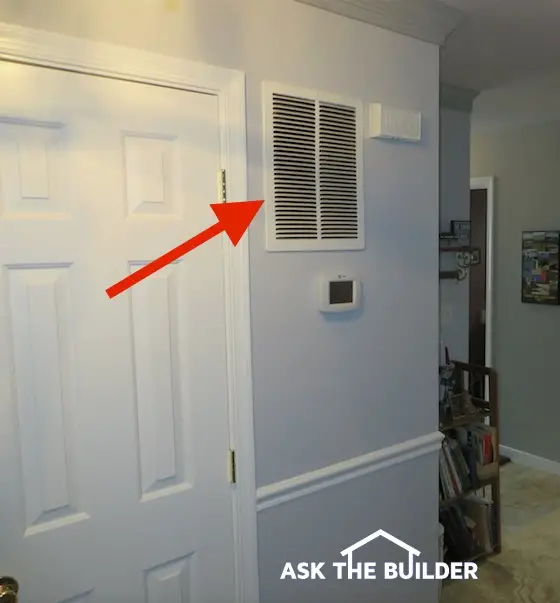
Return Air Problems | The red arrow points to a large wall-mounted HVAC return-air vent. The furnace or air handler is probably on the other side of the wall behind that door. Copyright 2018 Tim Carter

Return Air Problem - Air Conditioning Blues

DEAR TIM: We just had central air conditioning installed in our two story house. The air conditioner seems to work fine, however the second floor rooms are warmer than the first floor rooms. It gets very hot upstairs in the late afternoon. What might be the problem? The contractor says this happens all the time. What, if anything, can be done to correct the problem? Where do we start? F. R.

DEAR F.R.: So, it happens all the time ... Maybe on his jobs it does, but not on mine. Your central air conditioner may have been installed by a contractor who doesn't realize that hot air rises and cool air falls.Successfully installed central air conditioning can easily cool two story houses.

How Do You Check Ductwork?

Before we do anything else, let's make sure that the cold air from the air conditioner can get to each room. Check to make sure that the supply duct register in each room is fully open. Do not allow furniture to cover or block these air outlets. Check the ductwork piping in the basement or furnace room for damper controls on the individual supply pipes that go to each room. These controls are little levers that attach to a metal disk inside each pipe. They enable the contractor to balance or adjust the amount of air going to each room. Be sure these are fully open on the pipes leading to the second floor rooms.

For you to properly cool interior spaces, you must replace the hot air in each room with a sufficient amount of cool air. The amount of air required depends upon the size of the room, how many windows it might have, the number of exterior facing walls, the amount of ceiling and wall insulation, etc. The cool air enters each room through supply ducts. These can be located in the floor on outside walls beneath or very close to windows. In some instances, the ducts may be located in the ceiling.

CLICK or TAP HERE to get FREE BIDS from Local HVAC Contractors

How Do You Replace Hot Air?

Because hot air rises, it needs to be "vacuumed" off the ceilings in the second floor of your house. My heating contractor always accomplished this task by installing a return air ducting system which funneled the hot air from the rooms back to the furnace/air conditioner air handler.

Where Do You Install Return Air Ducts?

Return ducts should be located in each room very near the ceiling on an interior wall. This return air opening pulls hot air from the top of the room. The heavier cold air which is flowing from the supply duct is pulled across the room and up towards the return duct. On its way to the return duct, the conditioned air cools you and the rest of the objects in the room. These same principles must be used to cool single story houses as well.

What If Your House Does Not Have Return Air Ducts?

If your house does not have this return air ducting on the second floor, it frequently can be added. The challenge is to install adequately sized ductwork from the second floor hallway to the basement or furnace room. The hot air from the second floor rooms can be collected in the hallway and sent back to the air conditioner. Rectangular holes can be cut into the wall space just above each bedroom door. Each side of the hole can be covered with a standard return air grill. These holes allow the hot air from each bedroom to easily enter the hallway.

Once this hot air has a pathway into the central hallway, an experienced heating and air conditioning contractor can convert one or two stud wall cavities into the initial return air duct. At the floor level, this stud cavity is then connected to a traditional metal duct that is connected back to the return air ducting system. Sometimes this duct can be hidden in the corner of a first floor room or fitted into a first-floor closet.

damper control

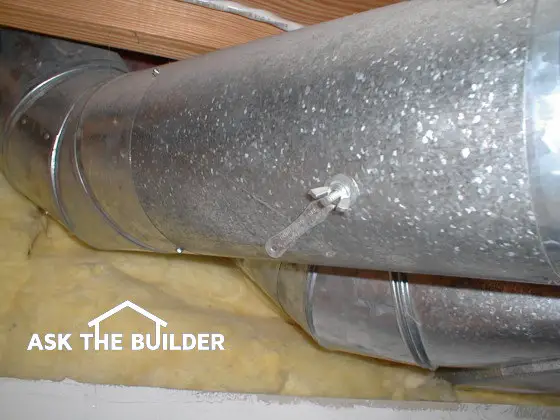
The lever you see on the side of the round metal duct is a damper control. It is connected to a round metal disk inside the duct pipe. If I rotated the lever so that it was straight up and down, the disk would block 90 percent of the air flow in the duct.

Without this second floor return air system, the heavy cool air being discharged from the supply ducts in each room can't do its job. It often floats along in a layer near the floor. It eventually cascades down the stairwell to the first floor. This is one reason why your first floor is so much cooler than the second floor.

Author's Notes

December - 1998

I just received an email from Edna R. who lives in Oregon. Edna read this column and had an interesting story to share about another cause of poor circulation. I'll let Edna tell it in her own words.

"......We visited at a 3-year-old rental home several years ago. The hosts were living in the kitchen and family room because the bedrooms at the far end from the furnace were too cold and the living room half way to the bedrooms was not warm enough to sit around in.

When I suggested they check out the furnace filter, they weren't even sure where it was. Apparently the previous renters didn't know either! The lint and dust were jammed into the allotted space and came rolling out in packed balls when the filter was removed.

Many people raised with electric heaters and fireplaces are often unaware there are filters on their forced air furnaces. They need to be told OFTEN to check filters and where they are in the heating system. Thanks for listening to me."

Column 143

Sheds

DEAR TIM: My husband and I have outgrown our garage. We went shopping for a freestanding wood storage building. The outside appearance of the buildings looked nice, however they all seemed very flimsy. I feel I can use standard materials and build a better building myself. Do you think the average homeowner can tackle this project? What size shed do you recommend? S.V.

DEAR S. V.: I see you have the same problem that I do - too much stuff! Outdoor sheds prevent car damage, and reduce clutter. Sheds make a great place to do projects that might otherwise create a mess or fumes in your home. I have built many of these sheds for my past clients. A detail-oriented homeowner and a helper using four days worth of vacation time can build a substantial shed. Building your shed as a DIY project will save lots of money.

A 10-foot wide by 12-foot deep shed is a very popular size. This size permits you to include a fantastic 10-foot long, 30-inch deep work bench inside on the back wall. A series of shelves above the workbench will provide vast amounts of storage space for boxes, paint cans, garden chemicals, etc. This design allows for ample floor space for lawn mowers, wheel barrows, snow blowers, and yard tools.

Many of these sheds have no foundation. They simply rest on solid concrete blocks, which are spaced at 2-foot intervals. Crushed gravel can be used to level the blocks if your lot is relatively flat. If your lot is sloped, you may have to use posts which project from the floor system to the concrete blocks.

People who live in a cold climate, should place the concrete blocks or posts on concrete piers. These small piers are placed below the level which frost penetrates the soil. Without this protection, the soil can freeze and heave. This can cause your building to twist. Doors and windows may not operate properly until the spring thaw.

If you live in an area subjected to high winds or storms, it is important to include special hold-down anchors at each corner of the shed. These anchors bolt to the shed walls, and then connect to pieces of steel or blocks of concrete buried next to the building. The anchors are easy to install. Without this protection, it is possible for your building to be blown over or across your yard during severe storms.

I recommend that you install a simple metal overhead garage door to give you excellent access to the building. A standard door is 8 feet wide and 7 foot tall. They provide excellent security and often can be installed by a professional for $350 or less.


Be sure to use chemically-treated lumber for your floor joists and plywood flooring. Without this protection, the floor system of your shed would begin to rot in a very short period of time. I also recommend that you stretch a sheet of cross laminated polyethylene sheeting over the floor joists before nailing the plywood in place. This will block water vapor from the soil which can cause your tools to rust.

Natural light can be introduced into the shed by using pieces of clear acrylic. These can be placed over openings cut in the roof. Simply overlap the acrylic 2 inches on each edge and the bottom. Slide the top of the acrylic up under the shingles at the top of the opening. Apply clear silicone caulk under the edges of the acrylic to stop wind blown rain. If you can afford real skylights, install these instead of the plastic panels.

It is also a good idea to install a turbine roof vent. This device will exhaust hot air from the shed, and help keep the shed comfortable during periods of hot weather.

Wall Anchors for Concrete, Block & Drywall

expanding plastic anchor

This is my FAVORITE plastic anchor for drywall. It prevents damage from condensation should you use a metal expanding anchor! CLICK THE IMAGE to have these delivered to your home. You'll SAVE money buying them online.

DEAR TIM: We just purchased a home and need to build shelves, hang pictures, etc. on an assortment of walls. We have solid concrete, concrete block and drywall walls. Which type of wall anchors work best for each wall? What is the best way to drill into concrete and concrete block? T. I.

DEAR T. I.: It sounds to me like you are going to be busy. Fortunately the wall anchors you need are abundant. A well stocked hardware store should have exactly what you need.

The key to success lies in selecting a strong enough anchor for each particular job. Different sizes and types of anchors support different loads. In order to select the correct anchor, you must anticipate the load which is going to be placed on the anchor. This is not as difficult as it seems.

For example, I calculated that a cubic foot of one of my favorite magazines weighs nearly 60 pounds. If I were to build a set of shelves that was 6 feet wide by 7 feet tall and 1 foot deep, it could possibly be packed with 2,520 pounds of magazines! (CALCULATION: 6 x 7 x 1 x 60lbs = 2,520 pounds) If a total of 10 anchors will be used to secure the shelves to the wall, each anchor needs to have a minimum strength of 252 pounds. High quality anchor manufacturers publish anchor capacities. This information should be readily available at the hardware store.

If you are building these shelves on a solid concrete wall, I would suggest that you use a one piece expansion anchor. I have used thousands of these nifty devices. These anchors have bolt threads at one end and an expansion cone surrounded by metal wedges at the other end. It is driven with a hammer into a specific diameter hole which matches the anchor's outer diameter. Once driven into the hole, you begin to tighten a nut on the threaded end. As the nut turns, the expansion cone drives the wedges tightly into the sides of the hole.

The expansion anchors can hold enormous weight. A typical three eighths inch expansion anchor which is embedded only 2.5 inches in a sound concrete wall can resist 1,200 pounds of pull!

If you need to hang a bracket or something else on a hollow concrete block wall, you should consider using a metal sleeve anchor. This anchor consists of a threaded shaft which is surrounded by a full length expanding sleeve. The shaft has an expansion cone which forces the outer sleeve to mushroom out as a nut at the other end of the shaft is tightened. Once again, you must match the hole that you drill to the size of the anchor. These anchors often have similar strengths as the expansion anchors.

If you hang a picture on drywall, it better be light. Often the drywall is the limiting factor with regards to anchor pullout or failure. 1/2 inch drywall can usually only withstand a pullout force of 15 pounds per anchor. This same drywall can only support a 40 pound load per anchor. Drywall anchors are like giant coarse threaded screws with a hole in the center. You simply screw the anchor into the drywall at the desired location. Then you install a small screw into the center of the anchor.

Drilling holes in concrete or concrete block is a breeze. You should consider purchasing a battery powered hammer drill. These drills spin a carbide tipped bit that chips away at the concrete thousands of time per minute. They can often drill a 4 inch deep by one quarter inch diameter hole in solid concrete in less than 30 seconds. Many of them can accept standard bits to drill in wood and drywall. When drilling in these materials you simply switch off the hammer control.


Concrete Overlays

DEAR TIM: My concrete driveway and sidewalk surfaces are crumbling. The concrete just below the surface appears to be in very good shape. Can a thin concrete overlay be installed over the sound concrete? What needs to be done? Do you think I should hire a professional to do this work? E. R.

Concrete Overlay podcast

CLICK this image and listen to the first call on the podcast. I talk to Vic about how he can use a concrete overlay to save THOUSANDS of $$$. Copyright 2018 Tim Carter

DEAR E. R.: This is your day! Thin concrete overlays are possible. Many of the concrete bridges in our interstate highway system are being restored using this proven technology. What's more, if you have some friends, relatives, and neighbors with strong backs and weak minds, it will be a breeze.

Your best results will be achieved with a fully bonded overlay. This method involves placing a 1 to 2 inch thick layer of concrete which physically and chemically bonds to your existing concrete. Thinner layers ranging from 1/2 to 1 inch can be installed. They require extra attention during and after installation. Thin overlays tend to shrink more readily because of rapid moisture loss while drying. This can cause cracking and future delamination.

The amount of cement used in the concrete mixture and the size of the stones (aggregate) is critical to your success. You need to make sure that each cubic yard of concrete you mix has a minimum of 600 pounds of cement. The maximum diameter of any stone in your mixture should not exceed 1/3 the thickness of the overlay. This means that if you intend to pour a 1 inch overlay, no single stone should be larger than 5/16ths of an inch!


Want perfect concrete work? Find a pro by using my Concrete Work (Sidewalks, Driveways, Patios & Steps) Checklist. I offer a 100% Money Back Guarantee.


The concrete mixture itself contains a combination of stones, coarse builder's sand, cement, and water. If your overlay is very thin, say 1/2 inch, the stones will most likely be eliminated from your mixture.

Before mixing the first batch of material, you need to do several things. Chip away the existing loose material in several places to insure that the concrete below is, in fact, solid. Remove any grease and oil stains with soap and water and/or solvents. Completely rinse the surfaces to remove grease, dirt, dust, etc. Keeping the area to be repaired wet for 12 hours prior to applying the concrete will vastly improve your chances of success. This is especially true if you intend to do a thin overlay of 1 inch or less.

To fully bond the thin overlay to the old concrete, you need to apply a very thin layer of cement paint. Mix 1 part of cement to 1 part of fine sand. Add just enough water to make a rich, creamy mixture that resembles a high quality latex paint. Have one of your strong backed helpers apply this mixture in a 1/16th inch film just ahead of the concrete mixture. Be sure that there is no standing water in any of the repaired areas. This will dilute the bonding agent! It is vitally important that this paint does not dry before it is covered with the thin overlay.

Once the concrete has been installed, it is finished just like ordinary concrete. You can apply a broom finish or a coarse wood trowel finish for great traction. Apply a liquid curing compound immediately as you finish each section. In addition, cover the overlay with plastic to eliminate any water loss. Avoid doing this work on hot, sunny, or breezy days. Cool, overcast weather is the best for new concrete or concrete repair work!

CLICK HERE to read about the phone call with Gary and Linda. They hired a concrete contractor to install a new concrete drive two years ago. Unfortunately the sub-contractor - yes, the contractor hired someone else to do the job - did a very poor job and the surface of the concrete is spalling off.

Wind Blown Rain and Ice Dam Barriers

DEAR TIM: It is time to install a new roof on my house. My roof is subjected to strong wind blown summer rains as well as deep snow in the winter. This past summer leaks developed during an intense storm. Will felt underlayment prevent these leaks? Is there another way to prevent these leaks? Do you have any installation tips for a DIY'r roofer? M. A.

DEAR M. A.: Wind blown rain is a big problem for many homes in the United States. Violent thunderstorms can produce very strong winds that will drive rain up under many roofing materials. Hurricanes produce violent sustained winds that can create indoor waterfalls. Interior water leaks are frequently produced by ice dams. Felt paper will not stop these leaks entirely.

Just about every roof covering depends upon gravity to keep water from entering your home. Slate, clay tiles, metal tiles, asphalt shingles are installed in an overlapping fashion. As you proceed up a roof, each successive layer of roofing material overlaps the row below. As long as water flows down the roof, this system works well. Metal flashings around chimneys and skylights require gravity as well to stop water penetration into your home. However, wind and ice dams cause water to travel backwards up the roof and behind metal flashings.

Once water gets behind roofing materials, there are numerous places it can enter your house. The wood sheathing beneath the roofing materials has cracks and seams. Felt paper has numerous holes from the nails which hold the roofing materials. All of these places allow water to enter your home. New membrane roofing products can be installed which stop these troublesome leaks.

The membrane roofing materials consist of rubberized asphalt which is often covered by a high density polyethylene plastic sheet. The rubberized asphalt seals around nails which penetrate this membrane. These products should be installed in locations where water can easily work its way beneath shingles or other roofing materials. Often these locations can be found at the lower edge of roofs, valleys (where two different roof surfaces meet), rake edges (roof edge), chimney and skylight penetrations, low slope roofs, and areas where roof slopes change.

These roof membranes are sensitive to ultraviolet light. They must be covered by regular roofing materials. Certain ones are available for people who have roofs in high temperature areas such as the southwest. The membranes stick to the wood deck surface and are lapped up onto sidewalls, chimneys, skylights, etc. to produce a watertight installation. Metal flashings, siding, etc. cover this membrane to protect it from sunlight and abuse.

Prior to starting your roofing project, obtain and read the installation procedures for the material you are using. Be sure you have the proper tools and accessories which will allow you to safely accomplish the project. Pay attention to the nailing requirements of the roofing material. For example, asphalt shingles often require a minimum of 4 nails driven at specific locations on each shingle to prevent leaks.

If your roof requires metal flashings, make sure you use a material such as tin, galvanized steel, or copper. These are metals that can be soldered. Don't discount copper because of its cost. You may only spend an extra $100 - 150 for a material that will never rust and is very easy to solder. Not only that, copper flashings, copper coated shingles, granules and copper strips will prevent the unsightly roof algae that affects many roofs. Don't use aluminum flashing material in contact with brick or other masonry structures. The lime in the mortar will corrode the aluminum!

Painting Kitchen Cabinets

DEAR TIM: I would like to have a fresh look in my kitchen. However, my scrooge husband has indicated that we can only spend $1,000. Do you think I can get superior performance from painting my existing cabinetry? If so, what type of paint will deliver top performance? Are there any pitfalls to avoid while attempting this job? What other things can I do to breathe new life into my dull kitchen? I am very handy and will do the work myself. B.E.

Painting Cabinetry eBook AdDEAR B. E.: Painting your existing cabinets is a wonderful alternative to purchasing new cabinetry. What's more, this will give us nearly $950 to spend on other goodies. I firmly believe that you will be delighted with the results.

You have three main options with respect to the final paint finish that you can apply to your cabinets. As you might imagine, all have their advantages and disadvantages. Your primary concern should be the hardness of the final finish. Kitchen cabinets require a hard finish that will resist scratches and chips.

painted bookcase green

The hardest paint that is available to most homeowners is an epoxy modified alkyd paint. These are most commonly found in aerosol spray cans. After these paints cure, they typically have a harder finish than you could obtain with an oil or water based paint that is brushed on. Spraying paint is an art. Sags and runs are possible if you are not careful. Areas adjacent to the cabinets must be meticulously protected from paint overspray. Fumes can be a problem as well.

Alkyd or oil based paints will produce exceptional high gloss finishes and rapid cure times. This is important if you need to get your kitchen up and running again. Many oil based paints will dry to a superior hardness within 48 hours. This allow you to cook and move about without fear of damaging the new finish. However, alkyd/oil paints often produce strong fumes while drying. They require the use of mineral spirits or thinner to clean your tools.

Acrylic water based paints offer acceptable hardness, low odor, and ease of clean up. However, acrylic paints tend not to be as glossy as oil based paints. In addition, it takes considerably longer for acrylic finishes to reach acceptable hardness levels. You may have to wait 5 - 7 days before the finish with withstand significant abuse. Furthermore, you must use an oil based primer over your previously painted or urethaned cabinetry. The oil primers tend to grip the old surface much better than water based primers.

painted kitchen cabinets

Wash the surfaces to be painted with a strong solution of soap and water. Don't be afraid to scrub. After the cabinets dry, remove all doors and empty the drawers. We will paint these in the basement or garage. Remove all hinges, knobs, and other hardware. Sand all surfaces that will receive new paint. Eliminate all sources of dust. Apply the primer with a small roller to speed application. Immediately brush the paint to give it a smoother finished look. Allow the primer to dry for one day. Apply the finish coat as soon as possible using the roller and brush method. Do not reassemble the cabinets until the paint finish has hardened.

The remainder of your cash can be spent on new countertops, a faucet, and possibly some affordable wallpaper. If you do some smart shopping, you will have money left over to buy that delightful sweater you saw in the mail order catalog.


Author's Note: If you want to save thousands of dollars, you should read my Painting Cabinetry eBook. It has step-by-step photos and instructions that show you how to paint cabinets. I guarantee that you will be satisfied.


Read Carolyn's email about painting cabinets and Tim's advise in the January 4, 2009 AsktheBuilder Newsletter.

Grout Removal and Redo

DEAR TIM: The grout in my tub and shower area is a mess. It is difficult to keep clean and has actually crumbled in places. Is it possible to regrout over the existing grout? Or, do I have to remove the ceramic tile and start over? What type of grout should I use? Is it possible to achieve professional results, assuming that I have above average remodeling skills? B. E.

DEAR B. E.: Well, I have good news and bad news ... The good news is that you don't have to remove the existing ceramic tile! The bad news is that you can't regrout over the top of the existing grout. The old grout must be removed by hand or by using a small electric grinder.

There are two hand methods you can use to remove old grout. The remainder of the grout may crumble when you use a carbide tipped scraper tool specifically designed for grout removal. If not, you may have to use a fine tipped screwdriver and a hammer to remove the grout.

The carbide tipped scrapers can be found at most stores that sell ceramic tile. They are very inexpensive. Be careful, as they can easily scratch the glazed tile surface. You apply firm, but gentle pressure, as you draw the scraper across the grout. It may take repeated strokes before you remove a significant portion of the grout. Move on when you expose the unglazed edges of the tile.


Restore the "clean" to your grout. Just go to STAIN-SOLVER to see the beautiful, quick results.


Be sure to drape a cloth tarp in the bottom of the tub before starting this project. Loose pieces of grout can scratch the tub surface if you step or kneel on them. Remove the grout fragments on a regular basis to minimize scratch hazards.

If the carbide tipped tool does no good, you will have to chisel the old grout from between the tiles. This can be accomplished using a flat bladed screw driver or an old wooden chisel with a 1/4 inch blade. Tap the screwdriver or chisel lightly with a hammer. Once you have removed some grout, always chisel away from the grout which is still in place. If you chisel towards existing grout, there is a great chance that you will chip the sides of the tiles.

Once you have completed the job and regained your sanity, it is time to grout. I would suggest that you use a dry set grout with latex additives or a latex-Portland cement grout. These grouts mix with water. They offer superior bonding qualities. In addition, they tend to be less absorptive than standard Portland cement grouts.

Applying the grout is rather simple. You will need two important tools: a hard rubber grout float and a synthetic grout sponge with rounded edges. Two or three buckets of fresh water are also necessary.

Add water to the dry grout mixture, and stir until the grout resembles a creamy cake icing on a hot day. The grout should be firm, but not runny. Trowel the grout onto approximately 6 square feet of tile using the rubber float. Apply pressure to squeeze the grout into the grooves between the tiles. Remove excess grout by pulling the float across the tile at a 45 degree angle.

The sponge is used to remove grout from the face of the tile and to strike the grout joints. Squeeze as much water from the sponge as possible. Rub the sponge lightly in a circular manner across the grouted area. Rinse the sponge frequently. Once again, squeeze all of the water from the sponge. When the tile looks clean, turn the sponge on edge and glide it across the grout lines one at a time. Do this until the grout lines are smooth and uniform in appearance. Avoid using too much water. That is why your previous grout crumbled.

Carpet Pads, Cushions & Insulating Underlayments

DEAR TIM: It is time for new wall to wall carpeting in my home. The carpet will cover both concrete and wood floors. There seem to be so many different carpet pads. Which is the best to use? Is thicker padding better? What can be done to insulate the floors to maximize comfort and reduce noise? R. M.

DEAR R. M.: The abundance of carpet cushion choices can easily confuse most consumers. By the way, cushion is the politically correct term. Not only are there different material types, most of them are available in varying thicknesses. If you make a mistake, you will shorten the life of your carpet and potentially be uncomfortable.

There are three major types of carpet cushions that most homeowners recognize: fiber, sponge and foam rubber. There are different types and grades within each grouping. Thickness of cushion and weight in ounces per square yard are the yardsticks which allow you to differentiate one from another.

The type and amount of foot traffic in a room determines the type of cushion you should use. Heavy traffic areas, stairwells, and hallways require cushions that are no thicker than 3/8 inch. These cushions should also be dense and heavy. Do not use a thick, light weight cushion in these areas. It will allow the carpet backing to flex too much. This can cause the carpeting to fall apart.

If you want a soft, luxurious feel in a bedroom or other lightly traveled room, choose a 1/2 inch thick pad. To increase the life of the carpeting, choose a high density or weight cushion. Remember, the cushion is the foundation for the carpet. It just doesn't make sense to install a flimsy, inexpensive cushion beneath an expensive carpet.

Carpet cushions have wide ranging insulating or R values. They can range from as little as 0.2 R value to as much as 2.1 R. Sponge rubber pads, believe it or not, tend to have lower R values. Rubberized jute fiber and prime urethane foam cushions deliver high R values. For example, a flat rubber cushion that weighs 62 ounces per square yard has an R value of 0.21. You can purchase a 1/2 inch thick prime urethane cushion that will yield an R-value of 2.1!

To block the cold temperatures, which are conducted through your wood or concrete, you can use an underlayment material. These wood fiber boards are made from 100 percent recycled materials. A 1/2 inch thick panel will deliver an additional 1.2 R value. The boards are easy to install. You simply install a 1 and 1/2 inch wide by 1/2 inch thick border around all walls. This will provide an adequate surface to attach the carpet tackless strip which holds the carpeting in place. The insulating boards themselves can be either glued in place or allowed to float beneath the carpet cushion.

Noise reduction and added resiliency are added benefits that you will experience if you choose to install the recycled carpet underlayment material. This is especially important if the room will house a sound system or giant screen TV with surround sound speakers. Cold, hard floors will be a thing of the past if you spend some time choosing the correct carpet cushion and underlayment material.


Author's Notes :

December, 1998

Several days ago, I received a letter from the Carpet and Rug Institute. Their membership represents about 90% of the carpet manufacturers in the USA. They found this column on my website and wished to offer a few suggestions. Just so you know, the data in the column was provided by the Carpet Cushion Council.

The bottom line is that the carpet manufacturers seem to conflict what the cushion manufacturers say. The carpet manufacturers suggest that the you never use a pad that has a thickness greater than 7/16 inch for any carpet. Thin carpets such as Berbers and other short pile carpets should never have a pad thicker than 3/8 inch.

So, there you have it! Whatever you choose to do always make sure you follow the written carpet installation instructions. If you install a pad that is too thick, it may void any warranty.

Basement Remodeling – What Happens When?

DEAR TIM: My children have overtaken our first floor with their toys. I would like to create a recreation room for them in our basement. The floor is concrete. How do I go about starting this project? Is there a wall material which will withstand abuse? Do you have any other suggestions? R.O.

DEAR R. O.: Been there, doing that ... My wife and I are in the same situation. Toys litter the first floor of our house. Kathy, my wife, has instructed me to start a recreation room project to minimize the debris field in our family room.

Finishing an unfinished space is really no different than building a house. The only difference is that the project is smaller in scope. If you plan to add or expand a bathroom or a wet bar as a part of this job, complete all of the plumbing below the concrete floor first. It is important to know wall locations for this work. Drain lines and plumbing vent lines must turn up in the center of certain walls that will surround your bathroom or wet bar.

Once the plumbing has been inspected, patch the concrete floor. Be sure the patch is smooth and in the same plane as the existing floor. Humps or depressions can be telegraphed through resilient flooring or some thinner carpets. If your basement is not waterproofed, you may wish to apply a brush-on cementitious waterproofing compound. Two thin coats applied to a clean, dampened masonry wall can often work wonders.

Wall construction is the next priority. Some people like to use furring strips on concrete block or concrete walls. I prefer to build a 2x4 wall that stands off the masonry wall by one half inch. Masonry walls are not always straight. This space allows you to create a smooth wall in most instances. Install all necessary wood blocking for shelves, wainscoting, crown or other specialty moldings, etc.

The mechanical systems now must be installed. The heating and cooling contractor and the plumber need to meet and coordinate what goes where. The heating contractor's ductwork is often large and cumbersome. The plumber has a little more flexibility with his piping. The electrician should not start until the plumber and heating contractor are complete. Electrical wires can be run just about anywhere. Don't forget to install plenty of telephone outlets for future computer modems. Cable TV and alarm wiring need to be installed at this time as well.

After the electrical work has passed inspection, the exterior walls should be insulated. Try to seal all holes that lead to other rooms or floors at the same time. These are conduits for noise. Don't rely entirely on the ceiling material for sound control. It can be a mistake.

I suggest that you drywall the walls. Then install, using nails only, a decorative paneling wainscoting. Extend the paneling up the wall 32 inches. It will take tons of abuse from dump truck crashes, hockey pucks, and runaway baby carriages. Dings and scratches can be repaired with shoe polish. Should you grow tired of the wainscoting, it can be removed without causing significant damage to the drywall substrate. Consider a suspended acoustical tile ceiling. Drywall ceilings can often make it tough to access utilities that may service other portions of your house.

Your floor covering choice can make or break the room. Think long and hard about wall to wall carpeting or hardwood floors in rooms that are subject to moisture. Vinyl tiles may offer the most flexibility. Using different colors and styles you can create miniature athletic fields, game boards, or other interesting features on the floor. Area rugs or carpet remnants that have bound edges can add warmth and padding in critical areas.


Don't waste your time or money! My Basement Remodeling Checklist will help you keep track of basement remodeling expenses. I offer a 100% Money Back Guarantee.


Remodeling a basement involves lots of tasks. You need to frame walls, install drywall or paneling, build shelves, install doors and trim, suspended ceilings, etc. It helps to have a set of instructions with abundant illustrations. Graphic Guide to Interior Details has it all. This spiral bound book opens easily to the sections that allow you to complete each task. If you follow this book, your basement remodeling job will be heads above the rest!

Acoustical Ceiling Tiles

DEAR TIM: I am thinking about using acoustical ceiling tile for an upcoming project. How effective are they at controlling sound? What happens if they become discolored? Can they be washed or painted at a later date? Do you think I might be able to install a suspended ceiling if I enlist the help of my husband? A. N.

DEAR A. N.: As much as I hate to say it, you might do better doing the job yourself. If your husband has a bad attitude going into the job, the results may be less than satisfactory. I have installed many an acoustical ceiling by myself. I say "Go for it!"

If you are on the fence about using this material because of the ceilings you see at the big box merchandise stores and other commercial outlets, you must visit a ceiling tile showroom. Manufacturers have made vast improvements in the style and selection of acoustical tiles. Years ago you had maybe 5 choices. Today there a minimum of 30 different textures and styles available. What's more, the grid systems are available in a multitude of finishes. Most people are unaware that the grid work which supports the tiles is available in a wood grain, polished brass, chrome, and black finish. Most of us see the standard white gridwork.

The sound deadening properties of the tiles depends upon the thickness, density, and volume of the individual panels. Most acoustical ceiling panels are made from spun mineral wool fiber which is bound together with starch. The starch is often mixed with pigmented clay paints. Generally peaking, the greater amount of fibers in the panel the more sound it can absorb.

You have undoubtedly noticed the holes, crevices, and fissures in these tiles. This is what helps control the sound. Sound travels through air and vibrates things. As the air hits the acoustical tiles, it enters the holes and tiny cracks. There it begins to vibrate the acoustical panel. Some acoustical tiles can offer up to an 80 percent noise reduction coefficient. The ones you and I see in retail stores are in the 50 - 60 percent range.

The tiles themselves actually come in three profiles. Your grocery store probably has the simple square edge tiles. Many styles are available with a notched edge which hides the metal grid system to a degree. To further enhance this effect, you can purchase tiles that have a beveled notched edge. These tiles are extremely attractive.

If you do not like the traditional metal grid systems you can purchase interlocking tiles that staple to wood furring strips. The strips are commonly spaced at 12 inch intervals. There is a wide variety of styles and patterns available with these tiles as well.

When purchasing acoustical ceiling tiles you must be careful! Some tiles have no acoustical properties whatsoever. These tiles look very similar in style and pattern to the acoustical tiles. Be sure to check the labeling and product literature to make sure the ones you select will absorb sound.

Acoustical ceiling tiles can sometimes be cleaned. I would first attempt it with a chemical sponge instead of water. Certain new tiles have a washable finish that can be cleaned with a damp sponge. Older tiles are often impossible to clean. They may have to be painted. To retain the sound deadening properties, you must use a thin paint. The holes and fissures must not become clogged with paint. Figure on applying two thin coats to achieve a uniform color. One thick coat of paint may ruin the sound deadening qualities of the tiles.