Settlement Cracks – Causes and Prevention

settlement crack

Settlement Cracks

DEAR TIM: I am beginning to notice cracks in the foundation, concrete slabs, and some of the interior walls and ceilings of my home. I am concerned that the house may be settling. Do all houses settle? What can cause this to happen? What can one do to minimize cracking in a home? Who is the best person to call for advice? Mandy S., Sulphur Springs, TX

DEAR MANDY: The word settlement, in my opinion, is one of the most misused words in the residential construction industry. There is no doubt that your house may be experiencing settlement. In addition, it may be suffering from upheaval, frost heave, slippage, lumber and concrete shrinkage, and compression stress caused by insect damage! Wow, I sure know how to ruin someone's day, don't I?

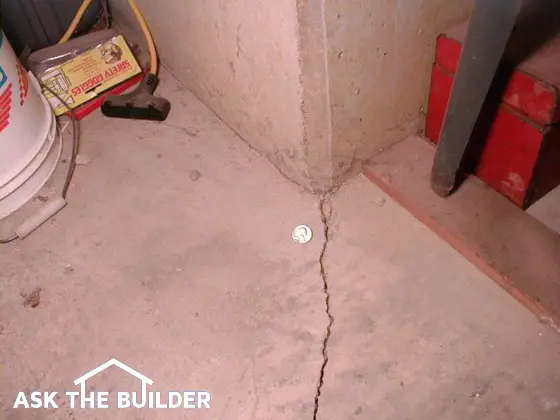
Settlement happens when parts of a house drop below the elevation or height where they were placed during the original construction. There are numerous reasons why this may happen. The soil beneath the foundation or beneath column supports may shrink due to moisture loss. The soil may not have been compacted properly before the foundation was installed. Large pieces of organic material may have been included in the soil under the house. When it decays, the soil above it collapses to fill the void. The list of possibilities is nearly endless. Not all houses settle, but many suffer cracking of one type or another.

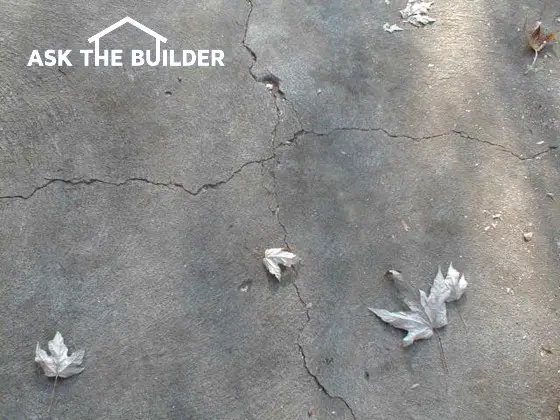
My own home has hairline cracks in the foundation as well as numerous cracks in the basement floor. The cracks are normal concrete shrinkage cracks. Concrete shrinks as it dries and cures. It is not uncommon to see 1/16th inch of shrinkage for every 10 feet of concrete length. This shrinkage tends to pull or tear the concrete apart. Sharp 90 degree corners at windows, doors, and offsets in slabs and foundations are excellent locations for the cracks to begin.

If you get up on my roof and look at my chimney flashings, you would think my house has settled nearly an inch and a half. This relative movement could have been a combination of upheaval of the chimney and settlement of the house, but I am inclined to think it is due entirely to lumber shrinkage. Even kiln dried lumber will shrink as it acclimates with the atmosphere and dry conditions inside a home. A multi-story home, like mine, can easily see 3/4 inch or more shrinkage depending upon the moisture content of the wood when the house was built and the species of lumber that was used.

Some soils are very sensitive to moisture gain or loss. Certain clay soils can expand nearly 20 times their volume if they get saturated with water. If this happens because an under-slab plumbing pipe fails, a large hump can develop in an interior slab. Other expansive clay soils can shrink and take a structure with them as they dry out. If you build in areas that have these types of soils, you need to keep soil moisture as constant as possible. One way to accomplish this is to install perforated drain pipe around the foundation. As part of the piping layout , install a tee fitting and a riser pipe up to the surface. If a drought sets in, use a garden hose to inject water into the piping system. This will trick the soil around the foundation into thinking it is raining at the surface.

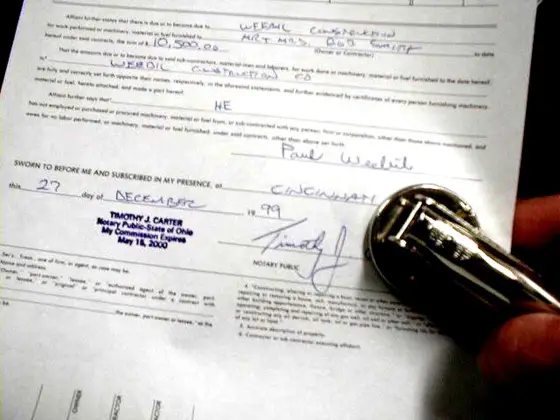
Structural cracking in houses can be minimized if you take precautions. If you are building on fill dirt, make sure it is properly compacted. Geotechnical and soils engineers can perform soil tests to make sure the soil can support the building. If you live in a cold climate, make sure that all footings are installed below the depth that frost normally penetrates the soil. Foundation walls need horizontal steel bars near the bottom and at the top of the wall to offset stress forces. A residential structural engineer can design steel reinforcing rod placements to help hold footings, foundations and slabs together.

To minimize lumber shrinkage, try to get your house under roof as soon as possible. If the lumber does get saturated by rain during the construction process, try to get it to dry out by keeping windows and doors open as construction continues. Consider installing fans to accelerate evaporation. If you can get the framing lumber to shrink before the drywall, finished flooring, cabinets and trim are installed, you will see minimal cracks.

Column 288

Lots and Drainage

! ! ! See Author's Notes at Bottom of Column ! ! !

topographic map

Learning to understand a topographic map that shows elevations will be worth the investment of time.

Drainage Problems

DEAR TIM: My husband and I are getting ready to purchase a lot for a new home. We are concerned about drainage and flooding issues. Our current home has a soggy lot and we would like to avoid that. What should you look for when selecting a lot for both a new and an existing home? Can you do anything to improve the drainage on a lot or to prevent house flooding? Can you look at a plan of the subdivision and tell a difference between lots? Jeeney A., Owensboro, KY

DEAR JEENEY: Drainage problems in and around homes can be a huge source of misery for a homeowner. Periodic flooding from storms, overland storm drainage and even subsurface water can cause damage to a home and its contents. If you choose wisely, you can sleep soundly every night a rain storm pops up. If you choose poorly, you may have many a sleepless night after your first flood.

Lot selection is just as important for people who live in flat coastal areas as it is for people who live in the plains and hilly areas. Each area has its own unique characteristics. The first thing you should be concerned with is the big picture. Take a look at the land around your lot. How much land is directly uphill from the lot? How much surface water is funneled onto or around your lot? You want to avoid lots that are in or adjacent to the bottom of natural drainage swales or shallow valleys. These are Mother Nature's gutters in a very heavy rainfall.

Pay attention to the regional location of your new lot. Is there a tremendous amount of land yet to be developed that may cause the streams around your home to carry more water in a future storm? Storm water retention basins are required in many new developments, however they end up discharging more water into streams and creeks than before the development was undertaken. Prior to development, undisturbed soil actually captures and soaks up a certain amount of rain water. After development, parking lots, driveways, streets, rooftops collect and disgorge this rainwater into the retention basins.

Build Your House Elevated

Consider picking a lot where the actual house location rises up above the surrounding land slightly. If your lot does not have this feature you can often create it artificially. The trick is to hold the top of the foundation or slab up out of the ground 18 to 24 inches and then use excavated foundation dirt to create a gentle grade away from the house in all directions. This slight rise in elevation in low lying areas may keep the inside of your house dry in a torrential rain storm while your neighbors are wading around in one or two inches of water in their slippers.

Try to look for a lot that has perhaps 3 or 4 feet of elevation difference over the entire lot. Lots that have this valuable asset allow you to install subsurface drainage pipes that can drain soggy lots or capture overland storm water that is aiming for your house. You can install a linear french drain or an inter-connect series of these simple drainage trenches to collect subsurface and overland water and then direct it to the low point on your lot.

How can a trench drain help?

These simple trench drains are often only 6 inches wide, 18 to 24 inches deep. You install a 4 inch perforated drainpipe at the bottom of the trench and then fill the trench with 1 inch diameter rounded washed gravel. Grass will eventually cover the top of the gravel to hide the trench. If you want to capture overland water, widen the trench as it nears the surface and create a walking path with flat stones that are surrounded by the washed gravel.

Many land developers sell lots using plans. These plans often contain lines that tell you what the lot topography will look like when all grading is complete. These lines connect points on the lot of equal elevation and are usually drawn in two foot increments. If the lot you are looking at has lots of lines on it that are closely spaced to one another, it means it is a hilly lot. Lines that are V shaped indicate a large or small valley that is present on the lot. If you don't understand the lines, take the plan to the actual lot and see how the actual land relates to the lines. It isn't really that hard to figure out once you see the land!


Author's Notes:

You may wonder if my advice is worth anything. Well, read what Jim Sanders wrote to me when he was at the end of his rope:

"Hi, I just wanted to write to give you the results of my "Trench Drain". I have had a wet crawlspace for 15 years. Water would fill the crawlspace at times, so we actually had to drill weep holes at the base so that it would enter the basement and eventually, the sump pump.

I have tried everything. Several contractors said that the only thing we could do was to bring the water into the house via drainage tile and let it enter the sump pump. That would work, but because I live on a 6' elevation, there is no reason that I should have water problems. It became like clockwork...when it rained, we would rush home from the lake or wherever we were vacationing so that we could be prepared to start the backup generator, in case the power failed. We even had our alarm company put a sump alarm on our system, so they could notify us if we had a power failure. Battery backup was not an option, because sometimes we lose power for days and during any rain, our sump would run every 7 minutes...just like clockwork.

I found your site and read the article on the trench or French drain. At first, it sounded a bit like "holistic healing" to me. I failed to understand why a 2 ft. deep trench, 4 ft. away from the house would do any good. How could this simple thing correct an extreme water problem that has plagued me for years, cracked my foundation, settled my garage floor and ruined almost every vacation?

The Linear French Drain trench running from the house. PHOTO CREDIT: Jim Sanders

The Linear French Drain trench running from the house. PHOTO CREDIT: Jim Sanders

I decided "what the heck". I had to dig by hand using a trenching spade and a pick-ax, because the builder back-filled our property with brick and blacktop. It took quite a bit of time. Because the ground level varies so much on that side of the house, I was not able to achieve exactly 2 ft. deep. It varied from 18" to 30" in spots, but the slope was downhill. The trench is about 80 ft. long. At times, I thought about filling it all in, because I just didn’t believe that it would work.

I stoned it, put tile in, and filled it with #1 round stone. I socked the pipe just for safety measure and I also used geotextile fabric on top, so I could cover with dirt and grass. I also ordered some clay and pitched from the house to the drain.

After a short rain, water is running away from the house. PHOTO CREDIT: Jim Sanders

After a short rain, water is running away from the house. PHOTO CREDIT: Jim Sanders

Result? For the last month, we have had 7 or 8 torrential rains, the worst of which was last night. It rained so hard, that our lawn washed out in spots because of the high clay content. Our sump pump, that normally ran every 7 minutes during and after rain, has not turned on for 4 weeks. The silt at the bottom of the sump well is now dry and cracking. Our crawlspace has not shown a trace of water or even moisture.

Since I couldn’t see correcting the foundation cracks or the garage floor settling and tilting until I corrected the problem's source, I waited to see if the trench drain worked first.

This week, I had a company come in and perform sort of a "mud-jacking" technique on the garage floor, which worked perfectly. Also, during the past few weeks, I parged the cracks in the foundation.

A dry sump pump. PHOTO CREDIT: Jim Sanders

A dry sump pump. PHOTO CREDIT: Jim Sanders

I just wanted you to know how this worked. I stressed for many years over this issue and the solution was nowhere near as difficult as I thought it would be.

As a side note, I went to the end of the drain tile during a hard rain to see what was happening. Water was running out of the drain tile in about the same exact volume that it previously ran out of the weep holes in my crawlspace. This winter will be interesting, because last year, the ground next to the house was so saturated that during a thaw, my sump would run constantly. I'm guessing that the ground between the trench and the house will probably be drier now going into this winter."

- Jim Sanders, Upstate area - New York

CLICK HERE to get FREE & FAST BIDS from local drainage expert contractors.

Column 289


Dust Free Central Vacuums

central vac system

Dust Free Central Vacuums

DEAR TIM: I am thinking of having a central vacuum system installed. Is it possible to install these in an existing house or just new homes only? Are there different systems and sizes? How do you know where to install the inlets? What about accessory tools? George W., Norwich, CT

DEAR GEORGE: Central vacuum systems are superb! I have one in my home and would never think of going back to a traditional upright system. I love the whisper quiet operation and the fact that all dust and dirt is directed to the collection canister and/or outdoors through the vacuum exhaust port. What really appeals to me is their cost. Often you can get a high quality system installed in an existing home for the same money you might spend for a top of the line upright vacuum cleaner.

You absolutely can install a central vacuum system in an existing home. The tubes that transport the dust and debris can be installed in attics, basements and crawl spaces. Even two story houses can be retrofitted. A professional worker can often install a system within one day with minimal mess and hassle. Installing a central vacuum system in a new house is extremely simple. The tubing can often be finished in just several hours.

Not all central vacuum systems are created equal. There are two basic types of systems - one type incorporates filters or filter bags and one system doesn't. Central vacuum systems that use filter bags operate at peak efficiency when the filter bags are brand new. As you vacuum, dust particles clog the filter paper and dirt fills the bag. These characteristics cause the system to suffer a reduction in suction power as dust and dirt build up within the filter bag.

The other type of central vacuum does not use a filter. Using advanced design, the dirt and dust enter the central vacuum canister and swirl around. Centrifugal force created by the cyclonic spinning of the air transports the dirt and dust to the sides of the canister. Here a series of cones and stand pipes stop all but the finest dust. This fine dust is transported to the exterior of your home where it belongs.

Sizing a central vacuum system is important. The smaller your house is the smaller your central vacuum system needs to be. The power of a vacuum system is often measured by how high a column of water it can support or pull. Most manufactures make models that can pull anywhere from a 90 inch to as high as 136 inch water column. An average home that contains 2,400 square feet of finished floor space might easily be serviced with a vacuum system that is rated at 95 inches of water column. Large homes above 6,500 square feet usually require motors that can create a column of water 120 inches or more. Extremely large homes often require two or more separate central vacuum systems.

The positioning of the inlets ports requires some planning. These ports are the locations where you plug in your vacuum hose. Vacuum hoses come in different lengths and some people like long ones and other people prefer to use short ones. Long hoses have greater reach from room to room. If you use one of these, you may only need two inlets per floor that are located in hallways. Short hoses obviously require more inlets per floor. Be sure that you place the inlets on walls where they will not be blocked by furniture. Often the best place is near a doorway.

Central vacuum system manufacturers offer a complete line of accessory cleaning tools. These are often matched to the system and can't always be interchanged between manufacturers. Consider purchasing ones that are electric powered instead of air powered. Air powered accessories might not work at peak efficiency if there is a loss of suction power.

Make sure that you can get at least one of the nifty dustpan inlet accessories. These special inlets are cut into baseboards at the floor level. They are ideal for mud rooms, kitchens, and bathrooms. You simply use a broom to quickly sweep large messes over to the sleek baseboard mounted door. As soon as you open the door with your toe, the motor starts up and your dirt offering is gladly accepted by the vacuum cleaner spirit!

Column 290

New Countertops with Paint

painted countertops

You can buy cool stencils at craft stores. Use the right paints and a little bit of clear water-based urethane, and you are set.

Painting Countertops

DEAR TIM: Our home is 20 years old and the kitchen countertops are plastic laminate, butcher block design, popular in the 70's and early 80's. We would like to redo the worn countertops to a more modern look. We absolutely can't afford to install new tops of any type. Is it possible to create a new, durable surface and not spend more than $75.00 on materials? Ken W., Plano, TX

DEAR KEN: This is your lucky day my friend! You are going to be able to radically change the appearance of those humdrum plastic laminate tops into magnificent works of art in just several days. I know this is going to sound absolutely crazy, but you are going to paint the countertops. This is a job that virtually anyone can do and if you take your time, the tops will be the talk of the town.

Not only are we going to paint the tops, but I suggest you incorporate the extensive use of stencils to create decorative multi-colored patterns that will make your kitchen counter surfaces one-of-a-kind. Stencils are available at many large scale craft stores. You can get ones that create a strand of ivy around the entire counter, fern and regular tree leaves, country kitchen scenes, different fruits, and floral patterns. If you use several colors with the stencils, the finished look will be stunning. Use the stencils on the front edges and vertical back splashes of the countertops if you want to maximize their effect.

If you don't like stenciled patterns then I highly recommend that you think about try a faux finish look. You can use multiple paint colors and different items such as newspaper, sponges, rags, sheet plastic to create textured and dimensional looks within the paint.


Author's Note: I have a wonderful step-by-step eBook that shows you how to get professional results when painting cabinets. It is easy to follow and affordable. Plus, you get the eBook instantly!


The paint in and of itself when applied to a horizontal surface will not be able to withstand the abuse of daily kitchen tasks. It will scuff and scratch easily. To overcome this problem, coat the painted tops with three or four coats of clear floor urethane. Floor urethanes can take enormous amounts of abuse and easily withstand puddles of standing water.

Oil based paints are great for a project like this. They usually cure and harden faster and they have superior adhesion qualities once dry. You can use water based 100 percent acrylic paints, but they would be my second choice. The amount of paint required when using stencils is very little. You might only need 10 or 16 ounces of each color depending upon the size of your counter tops. Craft stores often sell acrylic paints in affordable small squeeze bottles. Custom oil colors may be available at art supply stores.

I need to caution you before you start. This project is going to take you down a one way road. The painting process will be destructive to the plastic laminate surface. But based upon your description of the tops, it sounds like you have nothing to lose and everything to gain.

The plastic laminate tops are superb surfaces to paint. You begin the project by cleaning the tops with soap and water. Remove all traces of dirt, grease and cooking oil. Dry the tops and sand them with a medium grit aluminum oxide sandpaper. Vacuum the dust from the tops and apply your primer coat of paint. Apply the finish coat of paint after the oil primer has completely dried. Allow this second coat to dry. If you are stenciling, now is the time to be creative. Practice stenciling on a painted piece of scrap lumber until you feel comfortable and competent.

Once you have completed your decorative painting and all paints have dried for two days, apply the first coat of clear urethane. Follow the manufacturer's directions with respect to drying times. Sand lightly between coats. To avoid brush strokes in the urethane, thin it slightly. Never exceed the manufacturer's recommendations that are printed on the label.

After you finish this project, you will need to treat the tops with moderate care to preserve the new finish. A cutting board will be mandatory whenever you use a knife and avoid sliding metal cans and other heavy objects across the countertops. Every six months clean the tops, sand them lightly and apply a maintenance coat of clear urethane.

Column 292

Concrete Crack Prevention

concrete cracks

Concrete Crack Prevention

DEAR TIM: We are having a new concrete driveway installed. What can be done to prevent cracks in the new surface? Is it realistic to expect the surface to last for 25 to 30 years with no maintenance? How thick would you pour the drive? Would you install any steel reinforcing? Does the driveway need to be sealed once it is poured? Maria B., Janesville, WI

DEAR MARIA: Concrete is a wonderful driveway surface. If your driveway is installed by a seasoned professional, then your driveway should easily last 30 years. In fact, I have seen concrete driveways in my town that are nearly 50 years old that are still in good condition. Long lasting, crack free concrete does not happen by accident. It must be ordered correctly, installed with great care, finished properly, and cured carefully.

Cracks are to be expected in new concrete. Professional concrete masons realize this fact and take measures to minimize their appearance. Concrete is very strong if you try to squeeze or compress it. But if you try to stretch it or bend it, it usually only exhibits 1/10th the strength that it possesses when you compress it. If the new concrete in your drive is poured over soft, uncompacted soil, your car or a heavy delivery truck will bend and crack the concrete as it passes over the soft spot. This is why concrete needs to be poured on solid, compacted soils.

Concrete also shrinks as it dries and hardens. It can shrink about 1/16th of an inch for every ten feet of length. This shrinkage creates tension within the concrete that tries to tear it apart. Professionals who install concrete driveways install crisp tooled lines in the slabs. These are called control joints. The lines act as pre-weakened stress points that encourage the concrete to crack at these locations. The joints can also be installed as soon as the concrete hardens by using a diamond saw that cuts the line. The control joints must be deep enough to perform their job. The minimum depth of the joint should be 1/4 the thickness of the slab.

Spacing of control joints is critical. Make sure the joints on your driveway are spaced at intervals of 15 feet or less. It is a common practice to make the spacing equal to the width of the driveway. If your driveway slab will have sharp 90 degree corners, control joints should extend from these corners out into the slab. Concrete cracks often radiate from corners, so make sure you discuss the control joint layout with the contractor before the pour begins.

Thicker concrete is a good idea for driveways. I would like to see you install a minimum 5 inch thickness. Often contractors might try to tell you that a 4 inch thickness is sufficient. The cost to upgrade to a 5 inch thickness on an average driveway is chicken feed when you compare it to the total cost of the job. For example, if your driveway measures 720 square feet, a 4 inch thick pour will require 9 cubic yards of concrete. Increasing the thickness to 5 inches requires 11 cubic yards of concrete. The extra two yards of concrete will only cost about $130.00. (1999 pricing - adjust for inflation)

Reinforcing steel is a must in my opinion. Steel is very inexpensive and it helps to strengthen the concrete significantly. Steel will hold cracked slabs together. Without steel, cracks can grow in size and you can get offsets where one part of the slab is higher or lower than an adjacent piece. Steel needs to be placed no more than 2 inches down from the top of the slab for maximum performance.

Concrete that has been ordered with enough cement so that it is a 6 bag mix (564 lbs of cement) or a 4,000 pounds per square inch design strength, contains just enough mix water to give it a 4 inch slump consistency, is finished without the use water, and is moist cured with plastic or with a liquid curing compound should not have to be sealed.

If your concrete driveway is poured correctly, the surface will withstand cold weather, deicing salts, vehicle traffic, basketball games and tricycle road races for many years. Weak concrete that has been ordered and installed improperly needs to be sealed with high quality silane or siloxane water repellents. Do not use film-forming silicone sealers.


Want perfect concrete work? Find a pro by using my Concrete Work (Sidewalks, Driveways, Patios & Steps) Checklist. I offer a 100% Money Back Guarantee.


Author's Notes:

May, 2004

Keep in mind that the above strength rating of 4,000 psi concrete is a minimum standard. There is no reason why you can't order concrete that is 4,500 or even 5,000 psi. It will cost slightly more simply because they are adding more cement per cubic yard. But if you expect the concrete to be subjected to harsh conditions, this extra cement could extend the useful life 25 to even 50 more years!

Column 293

Window Seat

Window Seat

Window Seat

DEAR TIM: I'd really like to have a window seat in my home. I think they're cozy and attractive.

Are there different storage possibilities or configurations? What does it take to build a window seat?

Is it possible to build one on a standard flat wall? Erika N., Seattle, WA

DEAR ERIKA: Why only one?

Multiple Seats Make Cozy Retreats

I think that you should consider building several window seats in different parts of your house. They are excellent multi-purpose fixtures. Not only do they provide extra seating, but they also create lots of useful storage space. In fact, I just talked to my wife about building one in my son's room.

Free & Fast BIDS

CLICK HERE to get FREE & FAST BIDS from local carpenters who can build one or more window seats for you.

Window seats are one part of a home that can change with the seasons. Some people outfit the seat with vibrant upholstered cushions depicting the different seasons of the year or holiday periods.

Some achieve the same effect by using decorative pillows. Because the eye is usually drawn to a window when entering a room, the decorated window seat tends to get immediate attention.

Accessing the storage area beneath a window seat can be accomplished in a number of ways. The first house my wife and I owned had the traditional hinged seat. You flip up the seat and the entire storage area lies before you.

This storage method has some limitations in my opinion. If you need an item that is on the floor or in the lowest part of the storage area, you need to pull everything out to get to it.

The front vertical surface of the seat can be built with swinging cabinet doors or even bi-pass sliding doors. This method of access is not much different than any standard wall or base cabinet. Because window seats are already so low to the ground, you usually only have room for one shelf level. If you decide to place audio or video tapes, disks, or compact disks below a window seat, you can have special shelving dividers built that maximize this type of storage.

I have installed window seats that have drawers beneath them. This configuration offers the least amount of storage space as the drawer body and suspension system use up space that would otherwise be available had cabinet doors or a flip-up lid been used.

Window seat construction can be simple or complex. The simplest window seat is just a bench with no access to the storage space beneath it.

CLICK HERE to get FREE & FAST BIDS from local carpenters who can build one or more window seats for you.

One simply needs to build a simple wall that forms the front face of the seat and then place a piece of plywood on the top of the short wall and the window wall. Complex window seats can be built using specialty hardwood lumbers, exquisite detailing and moldings, and accessories such as built-in indirect lighting and hidden sound system speakers. The possibilities are endless.

Window seats are easy to build if the window is in a small alcove or between two nearby side walls. If you have a plain long flat wall, you can still build a window seat. One option is to install a set of built-in base cabinets with bookshelves above them on either side of the window. Many kitchen cabinet companies make cabinets for this exact purpose. The window seat spans between the two sets of cabinets. The look is stunning.

There are some basic guidelines you should follow with respect to window seat dimensions. Find the most comfortable chair in your home. Model the height and depth of the window seat after this chair. I have found that a finished height of 19 inches off the finished floor is ideal for most window seats. The window seat depth from front to back is also important. Make it too shallow or deep and it can be uncomfortable. The preferred depth should fall somewhere between 17 and 22 inches. If you intend to take an occasional catnap on your window seat, then I suggest you make it 24 inches deep.

If a heating or cooling duct is currently under a window, then simply hire a professional heating or cooling contractor to extend the duct so that it blows the air out the front of the new window seat. You can purchase decorative metal or wood grill covers that will compliment the window seat instead of detracting from it.

CLICK HERE to get FREE & FAST BIDS from local carpenters who can build one or more window seats for you.

Column 295

Toilet Troubles – Catching The Phantom Flusher

toilet repair

Installing the parts you see on the toilet seat will usually silence all but the most possessed of toilets.

DEAR TIM: I am having toilet troubles. Every toilet in my house seems to have a different problem. The second floor toilet fills with water every 4 hours or so without being flushed. The powder room toilet just doesn't flush well. Once flushed, water doesn't seem to leave the bowl area quickly like it did when it was new. The basement toilet moans, groans, and whistles as it fills with water after each flush. Is it time to apply for a loan and call in the plumber? Veronica D., Crown Point, IN

DEAR VERONICA: Don't go to the bank just yet. Believe it or not, each one of those toilet problems can be fixed by a determined homeowner. In fact, I once helped a woman fix a toilet by just giving her simple instructions over the telephone. She succeeded and saved herself some significant money by not calling in a plumber. Keep in mind that a few states have exceedingly restrictive plumbing codes. I know it sounds crazy, but if you live in one of these states, you may not be legally permitted to perform simple repairs on your own toilets. Check your local building department to see if you are permitted to make minor toilet repairs.

Let's start at the top and work down. Your second floor toilet is often referred to as a phantom flusher. You think it has flushed because you here the toilet tank filling with water. No ghosts or goblins flushed the toilet. The ball cock valve in the tank turned itself on because the water level in the tank dropped. This happens because the rubber flapper valve in the bottom of the tank wears out or deforms and doesn't seat properly.

You can test for this problem very easily. Remove any sanitizing products from your toilet that may color the water. Flush the toilet once or twice so the toilet bowl water and tank water are perfectly clear. After the toilet stops running completely, add 10 drops of green food coloring to the toilet tank water. Check the toilet in 30 minutes and see if the water in the toilet bowl has a green tint. If it has, it is time to install a simple flapper valve repair kit. They are sold at virtually every hardware store, plumbing supply house, and home center.

The powder room toilet may have one or more problems. The sluggish flushing could be caused by a partial blockage in the drain line, a blockage within the toilet, or a mineral deposit buildup within the toilet bowl. Take a few moments and thoroughly clean the toilet bowl. Pour a bucket of water rapidly into the bowl. This will evacuate most of the water in the bowl. Wearing rubber gloves, use a sponge to remove the last traces of water from the toilet bowl. Place a small mirror in the bottom of the toilet so that you can see up into the toilet drain pathway. Look for plastic army men, rubber ducks, hair rollers or anything else that may be lodged at the top of the drain passage.
Watch this video on the Flapper Valve.

If you can't see any obstructions, the toilet bowl rim and the syphon jet hole at the bottom of the toilet bowl may be partially clogged with hard water mineral deposits. Remove the toilet tank lid and lay it flat on the floor. Using a large funnel, pour a gallon of white vinegar into the vertical overflow tube in the center of the toilet tank.The vinegar will dissolve hard water deposits in the small holes that are in the underside of the toilet bowl rim and the larger syphon jet hole in the bowl. Use a toothpick and a Popsicle stick in these holes to help loosen hard water scale. In severe cases, you may need to treat the toilet with vinegar several times over a period of days to see an improvement. If not, it is time to call the plumber for this toilet.

The basement toilet complains as it fills because the ball cock valve is probably past its prime. Older valves have a float ball made from plastic or brass. As the water level in the tank rises, the valve starts to slowly close. When the valves get worn, they start to get noisy. Newer toilet fill valves keep the water running at full capacity until the tank is full. These valves are easy to install and are made to fit just about any toilet. Don't be intimidated by toilet repairs. The insides of a toilet tank look confusing, but in reality they are child's play.

Column 297

Hand Tools / Power Tools

Hand tools

Each one of these hand tools will come in handy. I am sure you can identify each one.

DEAR TIM: I am getting ready to move into my first home. I am really excited. But, I just realized that I don't own any tools. My friends and family want to get me started on a tool collection before I move in. What do feel are the most important tools I will need to do a majority of home repairs and improvements? If money were no object, what should I wish for? Ashley W., Danville, VA

DEAR ASHLEY: I remember the euphoria of buying my first home. Your excitement is well deserved and it will be recharged each time you successfully complete a home repair or small home improvement project. You are smart to begin your tool collection now. If you are like most people, you will need tools to do an assortment of projects within the first 24 hours of moving in. My first piece of advice is to buy high quality tools. I have certain tools in my truck and basement that have served me well for nearly 25 years.

Let's talk about your Must-Have tools first. I feel that you should have a new 16 ounce anti-vibration hammer. This type of hammer is designed to absorb shock that can cause arm fatigue and repetitive motion injuries. If you intend to hammer large nails, get a 20 ounce hammer. You will find that an aluminum framing square, retractable razor knife, and a 30 foot tape measure with a 1 inch wide blade will come in very handy.

Next I would like to see you have a 2 foot level. A wide pry bar that works like a traditional crow bar will come in handy for many jobs. A rubber sanding block, adjustable wrench, needle nose pliers and a combination wire cutter / wire stripper will start to round out your hand tool collection.

Be sure to get an assortment of traditional screwdrivers that have both flat head and Phillips tips. A chalk line, professional caulk gun, hacksaw and several putty knives will be needed for many projects.

You absolutely need a power circular saw and a power drill. I have fallen in love with the cordless power tools and really feel the 18 volt models have plenty of power and balance. Many manufacturers offer these two tools in a combination kit that includes a charger and two batteries. Many cordless saws have a 5.5 inch diameter blade that cuts through any 2x material. Many cordless drills have wonderful keyless chucks. You will find that you become very attached to these powerful cordless work-savers.

power tools

Now you are getting into some money. That orange impulse nailer cost $400.00 alone, but it is worth every penny.

When you operate the power tools you will need protective eyeglasses and some foam rubber ear plugs. Certain jobs will require you to get up in the air. A six foot tall step ladder will allow you to tackle many jobs. A tool apron, soft sided tool storage bags, and even a plastic tool caddy on wheels will help you store your tools as you work and protect them when not in use.

If the tool fairy appeared before you and said that you could have every tool you could start to name in the next 60 seconds, here is where I would start (Take a deep breath!)

  • Power miter box saw
  • impulse trim and framing nail gun or a pneumatic nail gun combo kit with hot dog air compressor
  • rotary hammer drill
  • wood rasp
  • cats paw nail puller
  • linesman's pliers
  • coping saw
  • masonry chisels
  • assorted squeeze clamps
  • propane or acetylene torch kit
  • copper tubing cutter
  • 14-inch pipe wrench
  • extension ladder
  • 4 sets of pipe scaffolding
  • socket set and ratchets
  • wet/dry vacuum
  • four foot level
  • stainless steel drywall knives and mud pan
  • pole sander
  • table saw
  • quick release drill bit set
  • power reciprocating saw
  • electronic stud finder
  • pop rivet gun set
  • mason's trowel
  • magnesium concrete hand float
  • wheelbarrow
  • round point shovel
  • square point shovel
  • road broom
  • extension cords
  • belt sander......Bzzzzzzzzz .... Time's Up!

Column 298

Wainscoting – Distinctive Wall Paneling

Wainscoting

Wainscoting | This stuff is so easy to install! Photo courtesy of New England Classic.

DEAR TIM: I am really tired of the plain walls in our dining room. Traditional wood wainscoting seems like it would be a perfect way to give the room character and the walls some relief. Can you apply wainscoting to drywall or plaster walls or do you need to nail it directly to the wood studs. Do you need to be a master carpenter to install it? Is this project a possibility or should I just dream about it? Sara T., Cherry Hill, NJ

DEAR SARA: Wow! Great minds think alike. My wife just decided that I am going to do the same thing to our dining room. I sure hope you two don't get tired of the roof color or the style of kitchen cabinets soon! I must tell you that the raised panel wainscoting idea is a brilliant one. Not only can it be installed in dining rooms, but you can also transform a study, a stairway, a kitchen island, surround a breakfast nook, or just accent one wall in a room. The possibilities are almost endless.

What is Traditional Wainscoting?

Traditional wainscoting found in many older homes is solid wood. It is a system of vertical and horizontal wood members that surround raised or flat wood panels of various styles and sizes. The older systems could only be installed by a carpenter who had a great deal of talent and experience. It is one of the highest forms of finish cabinetry found in a residential home. Fortunately, technology advancements in both materials and manufacturing have made the installation of raised panel wainscoting a job that can be tackled successfully by a person who has some basic tools, is able to follow written instructions, and can use a measuring tape. It is that simple.

How is Modern Wainscoting Different?

Modern wainscoting is a fabulous material. Some types are extremely environmentally friendly. They maximize the use of our precious natural resources. Some modern wainscoting is a combination of thin veneers applied to a dense core of either stable engineered wood or a unique wheatboard core that recycles wheat straw. Cherry, oak, and maple are the natural wood finishes that come with this system. A paint grade is also is available that accepts any standard interior paint. It comes ready to paint from the factory. Both types come ready to assemble from the factory. Only minor trimming at corners is required to fit the pieces together.

This modern method of making wainscoting solves another problem. The solid wood panels used in traditional wainscoting are very susceptible to expansion and contraction caused by changes in humidity. The panels can crack in extreme cases. The engineered products are very stable and should not cause any problems as seasonal swings in humidity occur.

Other modern systems are a blend of solid wood and plywood raised panels covered with hardwood veneers. Walnut, cherry, oak, poplar, and several other wood species can be used. Traditional solid wood systems may be available in your city or town as well. There is a good chance that a woodworking mill is still in business that can easily make the wainscoting components for you. If they do this type of work on a regular basis, they may offer competitive pricing. What's more, they may be able to produce custom profiles on the trim and panels at a small extra charge. Search for these mills under "Woodworking".

If you find that the cost of wainscoting is out of reach at this time, you can create a distinctive wall treatment using simple wood moldings, some glue, and a little time. Visit a lumber yard and purchase several moldings that you can apply to the lower sections of your dining room walls. You should be able to find moldings with interesting profiles that lay flat on the wall. Use a regular miter box and a saw to create proportioned rectangles and squares similar to the raised panels found in wainscoting. The vertical pieces that fall between wall studs can be attached permanently to the wall using a combination of glue and nails driven at an angle through the molding.

Once you have completed all of the rectangles and squares, consider the application of a traditional chair rail molding above these moldings. This final piece of woodwork will set them off perfectly.

Column 299

Avoiding Liens

Avoiding Liens

DEAR TIM: I am building a new home soon. Even though I have the ability to pay for the house myself, I was wondering if it would be a better idea to obtain a loan. Will the bank make sure all of the workers and suppliers get paid so that no liens are filed against my new home? What can the average person do to make sure that every person who works on a project gets paid? Paul W., Woonsocket, RI

DEAR PAUL: A strong economy, impressive gains in the stock market, robust equity in existing homes, and large inheritances allow some people to build new homes without having to borrow funds. I have built several houses for people who were able to open their checkbooks to pay all of the bills. Avoiding legal problems caused by unpaid workers and suppliers is not too difficult, but it does require attention to detail and actually starts during the bid process of the job.


Most lending institutions will not offer you the protection you are looking for. A bank, credit union, or savings and loan simply wants to make sure that the value of the land and the house are equal to or greater than any funds they have paid to others on your behalf. It is possible for a worker or a supplier to file a valid claim against a property even if you have a new home construction loan and the bank's appraiser checks the construction progress before each payment is made.

Protection against liens and other claims starts at the beginning of the job. You should obtain a detailed cost breakdown of the job showing the many different tasks, the cost associated with each of these items, and the name of the sub-contractor or supplier who is providing the goods and the services.

This cost breakdown not only helps you to compare bids from different contractors, but it also becomes the benchmark against which payments are made. For example, if the cost breakdown sheet indicates that the foundation and footing costs $12,500, then the check written to that sub- contractor should not exceed this amount unless authorized written changes were approved by you. In other words, you need to set up a system of checks and balances to make sure that you only pay what you should and that the amount is correct.

Before checks are issued by a lending institution, they almost always require builders, sub- contractors, and suppliers to supply a notarized affidavit, waiver of lien, or release of lien form. These documents are simply legal receipts signed by a company official that give the legal address of the property where the work was done or materials were delivered, the dates that the work was performed or material was delivered, and the amount of money owed for that time period. If the document is executed properly and the notary verifies that the person who signs the document is indeed the company official, then this receipt gives you lots of protection against future claims against the property.

If you live in a larger city or town you can have an affidavit company produce and process the forms for you. These professional services do all of the paperwork and most of them have the highest degree of integrity. They will prepare the affidavits and submit them to you for payment. It is still your responsibility to make sure that the right amount of money is going to the right person. Once you feel all is in order, you write the check to the person or company named on the affidavit.

You also need to perform due diligence. As hard as it may seem, you should visit your job site each day and introduce yourself to the workers. Be cordial and ask them who they are, who they work for. And what they are doing. Write this information down in a journal. When it is time to pay for this aspect of the work, make sure that you see affidavits that have this company name on them. If not, you may be subject to a valid claim of non-payment.

If you decide not to take out a loan, consider making arrangements to issue checks directly to each sub-contractor and material supplier. This gives you a high degree of control as you then know the individual is getting the money. You can also arrange to issue checks that name the builder and the sub-contractor or material supplier. These checks require the signatures of both parties in order to be cashed or deposited. Finally, no one, and I mean no one, gets a check unless they give you an affidavit first!

Column 300