Paint a Toilet? Sure!

DEAR TIM: Many years ago when I built my home I used pink fixtures in my bathroom. They are in excellent condition and I like the color. But a falling hammer unfortunately shattered the toilet bowl. I can't locate a pink toilet that matches. I have no intention of replacing all of the plumbing fixtures. What are my options? Wayne B., Fairborn, OH

DEAR WAYNE: Perhaps you can buy a used toilet. I guarantee you that there are thousands of those pink thrones still in use in many homes built in the 1950's Pink and gray were the rage back then and I know of several homes that have these fixtures. I hope you saved several pieces of the broken pottery or at the very least the toilet tank lid so that you can get a perfect color match.

You actually have several options. The first one that pops into mind is to call many of your local plumbers and bathroom remodeling companies. Offer a bounty for a pink toilet that matches yours. If you can provide the brand or manufacturer of the toilet, it will surely help narrow the search. Plumbers and remodelers constantly are removing perfectly good, but outdated toilets, and tossing them in a dumpster. Some larger cities have architectural salvage businesses that deal in old building materials. You may find one there.

There are small businesses that advertise a re-glazing service. This is a horrible abuse of a word as the process involves spraying on an epoxy paint. If you want a toilet or other plumbing fixture re-glazed, you need to send it back to the factory for another trip through the high temperature kiln. The epoxy paints I have seen applied to fixtures often lack the hardness of the thin glass surface that is achieved when a piece of china is actually fired in a kiln. The epoxy coatings are also susceptible to peeling.

Perhaps you can do what a relative did for my wife and I twenty years ago. My wife purchased some white china kitchen canisters for flour, sugar, tea and salt storage. The surface has a hard fired clear glaze commonly found on china plumbing fixtures. Using high gloss oil paints this talented individual painted green fern leaves and the different words in jet black on each canister. The paint looks as good today as it did the day they were finished. We clean the canisters on a regular basis and the paint has never worn off nor chipped.

Think of the possibilities with respect to a toilet. A local artist or an art student could paint virtually any design in a matching pink color on the toilet. It could be simple pink pinstripes, or outlines along the toilet tank lid. The front vertical face of a toilet tank is an excellent place to paint anything that comes to your mind. The key is to paint the toilet surfaces that don't get wet. If you paint the tank lid, front and sides of the tank and even accents on the side of the bowl, you will be surprised at how well it will stand up to cleaning with a damp cloth. Never paint the inside of the bowl nor the top edge of the bowl.

If you are fortunate and have access to an affordable artist in your area, I suggest you do what my daughter is about to do for myself and my wife. We recently wallpapered a basement bathroom that has a wonderful white toilet. The bathroom has a splendid tropical theme wallpaper border running around the room. My daughter is going to take several elements from this border and paint them on the front of the tank and the tank lid. I can assure you the look will be stunning once complete.

If you decide to go with this custom look, I highly recommend that you have the artist do a quick scale sample on a piece of brilliant white poster board. Tape the sample to the toilet tank or lid and stand back to see if you like the look. Even if a mistake is made during the painting process or you decide at a later date you want a change, you can easily strip off the paint with common paint strippers.

Column 400

Adding a New Tub or Shower

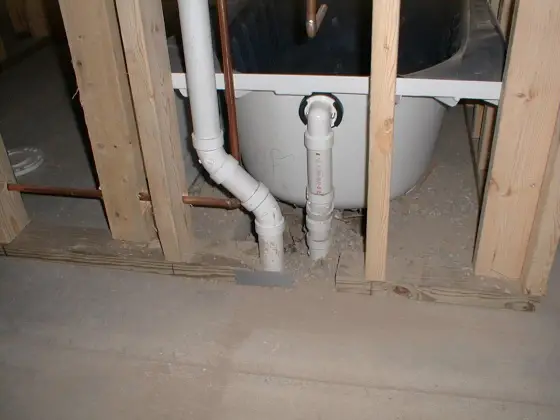
bath tub pipes

The pipe leaving the tub is the overflow drain. It connects below the slab to the waste piping and the trap. Yes, you can't see it! There is a cutout in the concrete slab that allows you or the plumber to connect all of these pipes to the actual drain. The second pipe leaving the wall plate is the vent for this tub.

DEAR TIM: I would like to add a bathtub in a room that has an existing walk in shower. The floor of this room is a concrete slab poured directly on the ground. There is a floor drain within four feet of where I would like to add the tub. Can I just allow the tub drain to flow over to the floor drain? It seems that would work just fine to me. Or do I have to connect it to the pipes below the slab and add vent piping? I live far out in the country and I doubt an inspector would ever know what happens one way or the other. Brad G., Waldo, AR

DEAR BRAD: Plumbing codes were not enacted to simply create work for people who might otherwise not be able to find work. The interest of public health and welfare are the basis for the plumbing code. Plumbing inspectors help to keep you and your family safe from the spread of disease. Consider him to be a friend, not an obstacle. Don't worry, you can work off some of that steam I just caused swinging a 12 or 16 pound sledge hammer.

To answer your first question, you can set the tub on a small platform and pipe the tub water over to the floor drain. Sure, the waste water from the tub would flow into the floor drain and it would travel from there into the plumbing drainage system. But this solution is not a code approved method. The waste water from the tub is often contaminated and can harbor all sorts of bacteria. Allowing this water to flow freely and splash about over the top of the floor drain is simply a health hazard.

The tub drain water needs to be piped directly from the tub outlet into the plumbing drain system. This fixture requires a connection to the plumbing vent system as would every other fixture. Many people are stumped by tub drain connections. In reality they are no different than any other sink in your home. The primary difference is that the tub is a sink that is at floor level.

To help you visualize what is necessary to properly connect this new tub to the plumbing drainage system, take a peek at the underside of your bathroom vanity sink. You should see a vertical pipe that connects to the bottom of the sink. This pipe then connects to a U shaped pipe that is part of a fitting we plumbers call a P-trap. The P-trap is a transitional fitting and redirects the waste water sideways towards the wall.

Behind the plaster or drywall at the sink is another vertical pipe. The sink drain pipe connects to this vertical pipe with a tee fitting. The waste water from the sink flows into the tee fitting and into the plumbing drainage system on its way to the sewer or your septic tank. But rising out of the tee fitting just behind the wall is usually a vent pipe that works its way up to the roof of your home. This vent pipe along with other vent pipes in the house supply air into the plumbing drain system. Water flowing into drainage pipes displaces air that was residing in the pipes just before you pull the plug in a sink or flush a toilet. Vent pipes prevent vacuums that otherwise would resupply this air by sucking the water out of adjacent P-traps in nearby fixtures. The water that sits in a P-trap acts as a seal and prevents foul sewer gas and vermin from making their way into your home.

To connect your new tub you need to mimic this connection. But don't think for a moment that it is easy to do. The drain pipe sizing is critical and the plumbing vent connections also have to be sized and connected correctly. Furthermore, you just don't tie into a plumbing drain system where it is convenient for you. You may choose the wrong place to connect and cause a drainage problem for a nearby fixture. In other words, adding a new fixture to an existing system is not a recommended do-it-yourself project. What's more, many plumbing codes restrict this work to licensed and trained professionals because of associated health risks.

I suggest that you make a deal with a local plumber. Consult with one that will allow you to do all of the back breaking labor to remove the necessary concrete and dirt beneath the slab that allows the plumber to make the necessary connections. You can also do other interior demolition that will expose existing plumbing vent lines. The plumber will hopefully work with you and show you some tricks that will keep your workload to an absolute minimum.

Column 401

Watch this video to see how Tim SOLVED a problem in minutes!

CLICK here to learn more on how Tim can help solve your problems.

Hanging Gutters Requires Skill

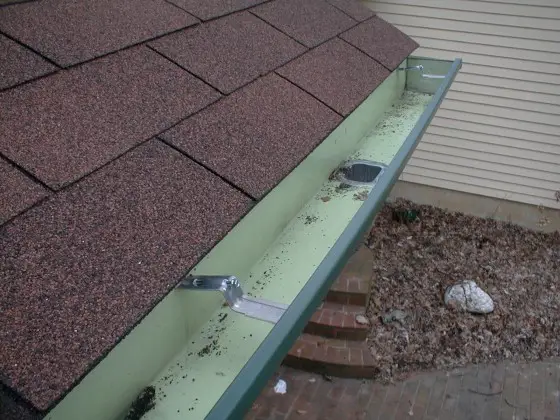
rain gutter

DEAR TIM: I have decided to add aluminum gutters to my home. The lack of them caused cascading rainwater to damage the lower portions of my exterior walls. There is a drip flashing in place that goes under the roofing shingles and extends downward on the face of the fascia board. Does this flashing go behind the gutter or does it drop into the gutter? What is the best way to attach the gutters to the fascia board? Where should the rainwater go? Bob B., New Smyrna Beach, FL

DEAR BOB: You are doing yourself and your home one huge favor. Most people don't have a clue how much water flows off the average house roof in a given year. It is not uncommon for many parts of the United States to have 36 inches or more of rainfall in a year. If your roof area has a footprint of 2,800 square feet and you get 36 inches of rain in a year, the runoff amounts to 62,832 gallons of water. That is enough to fill a gasoline tanker truck nearly nine times!


In need of gutters? Pick out the right ones with my Gutter & Downspout Installation / Repair Checklist. I offer a 100% Money Back Guarantee.


Uncollected rainwater erodes soil and causes excess water to splash up on the side walls of houses. This water can cause painted exterior surfaces to peel, wood framing and siding to rot, masonry walls to effloresce and foundations to settle. Common sense should tell you that the water falling from even a low roof has an enormous amount of energy that allows the water to wreak havoc over a period of time.

Gutters and down spouts collect water and divert it away from the base of the house. Rain water can be used for drinking, cooking and bathing as well as to irrigate gardens and landscaping. People who live in the country routinely use cisterns to capture rainwater for future use. As the population grows in different parts of the nation and puts a stress fresh water supplies, I believe we might see a resurgence of cisterns. At the very least, new homeowners can use rainwater for lawn watering and landscape irrigation.

The flashing that is in place needs to drop down inside the gutter. The bottom edge of this flashing should have a bend in it that directs water towards the center of the gutter. If the flashing does not have this slight bend, capillary attraction can draw water up between the flashing and the back wall of the gutter. This water might actually run down the back of the gutter and rot out the gutter or fascia board.

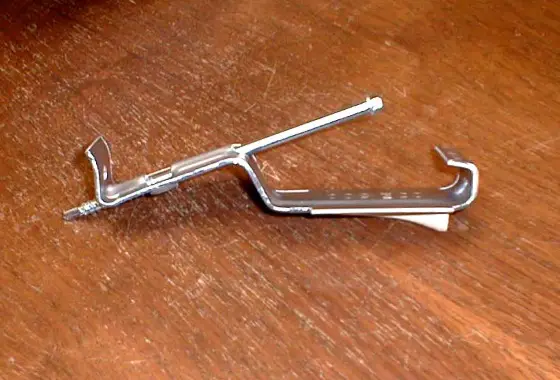
Traditional long spikes and hollow tube ferrules are old technology. You can purchase very nice aluminum gutters that come with special internal hidden hangers that have long screws that pass through the gutter or fascia board and bite into the ends of the roof truss or rafter tails. Be sure the screws hit solid framing material behind the fascia board if you want the gutters to stay on your home. Gutters can fill to the brim with water because of debris that clogs outlet holes. The weight of the water-filled gutters is in the hundreds of pounds. Keep in mind that the average gutter length may only have three or four fasteners and all of this weight is carried solely by them.

gutter hanger

The drip edge flashing often needs to be trimmed around the hidden screw hangers. You can make two vertical cuts on either side of the hanger and simply bend the flashing tab up and over the top of the gutter hanger.

When hanging your gutters, slant them slightly towards each drain outlet hole. You can't use the plumbing rule of thumb of 1/8th inch of fall for each foot of horizontal run. If you do this, the bottom of the gutter can fall beneath the fascia board on long runs. As long as the gutter is level or has a slight pitch, Mother Nature will direct the water to the outlet hole in the gutter.

If you do not pipe your rain water to a cistern, check with your local building officials with respect to this runoff. Many cities have strict codes that address where this water must be piped. It is almost always against the law to pipe this storm water into sanitary sewers. Storm water that is mixed with sanitary sewage can send too much water to the sewage plant and cause flooding inside houses. Many cities and towns have separate storm water systems and often request that you connect roof drains to these systems.

Column 402

Foundation Choices Are Many

foundation

DEAR TIM: I'll be very brief. My wife and I are building a new home soon and wonder which foundation is the best. Should we do a simple slab on grade, a crawl space or a full foundation with a basement? What are the pros and cons of each? Daniel V., Potsdam, NY

DEAR DANIEL: You are fortunate to have all three choices. Many people, because of local soil and groundwater conditions, often have only one or two options when it comes to house foundations. In certain places, constructing a full basement means blasting through solid rock. In other places, the ground water table may be lurking just a few feet below the surface limiting these folks to a simple slab on grade.

The slab on grade choice is very attractive to builders because of its relatively low cost. Excavation is kept to a minimum and the construction schedule can often be accelerated. The day after the slab is poured, wall framing can often begin.

But slabs come with some baggage. Frequently, plumbing drainage and water supply lines are buried beneath the slab. If something goes wrong or a leak develops, repairs can be costly. Heating or cooling ductwork buried underneath the slab can sometimes fill with water during wet seasons. Should this happen, mold can form and spores might be blasted into the home each time the furnace or air conditioner fires up. Thermal conduction issues are always present. Slabs poured in colder climates can conduct cold back into the house unless special precautions are taken. Homes built on slabs often offer little protection during tornadoes or hurricanes, unless a special masonry or concrete safe room is built within the house. These safe rooms can masquerade as a large walk-in closet.

A foundation system that sports a crawl space is indeed a step or two above a slab foundation. Generally speaking, a footing needs to be poured and short foundation walls are built to support the home. Some crawl spaces are indeed just that offering only 16 to 18 inches of clearance between the bottom of the floor joists and the soil. Other crawl spaces are tall enough to crouch in. Crawl spaces are a slight money saving option. Little time is saved during construction when a crawl space is selected in lieu of a full height foundation.

Crawl space foundations allow you to install plumbing and heating utilities so that they are accessible. The floor system over and the foundation walls inside of the crawl space almost always need to be insulated. A high performance vapor barrier that is sealed to the foundation walls must be placed over the soil in the crawl space. If this vapor barrier is missing, water vapor will readily travel up into the wood floor system and then into the house. This water vapor can cause severe mold problems. Homes built over crawl spaces offer minimal protection in severe weather unless you can install a trapdoor in a closet that allows quick entry into the crawl space.

Ask any homeowner who has a dry full height foundation and they will often tell you they would never be without one. The cost per square foot for this bonus space is often a fraction of what you pay for the living space stacked above it. If you do an actual cost analysis of a full height foundation versus a crawl space, you will find it costs very little to upgrade to the full foundation. Talk to experienced Realtors or appraisers in your area. They will often tell you that full basements make a house more attractive to potential buyers.

A full foundation offers superb protection in the event of severe weather. During the wet season it is not a challenge to keep a basement bone dry. The builder simply needs to apply a real waterproofing material such as synthetic rubber or liquid asphalt that has rubber additives. These materials can bridge small hairline cracks that might otherwise leak water. If you intend to finish off the basement space at a later date, be sure to install a true waterproofing material not the traditional hot asphalt damp-proofing spray.

Finally, if you can afford the extra cost, ask your builder to consider extra height foundation walls that allow you to have a clear ceiling height of eight feet or more beneath any and all beams that support floor joists. Furthermore, increase the height of the actual steel I beams. If you go from a traditional eight inch beam to a twelve inch high beam, the support columns in the basement can often be placed as far apart as 16 to 18 feet.

Column 403

Hunting For A Professional

yellow pages

This is how you used to look up professionals and contractors. The Internet has replaced the Yellow Pages Directory.

DEAR TIM: What's happening with the vast numbers of painters, plumbers and carpet installers masquerading as "professionals" these days? When they show up hours late, it's a blessing because so many don't bother to show up at all! You're waiting around an entire Saturday (or worse, taking a weekday off work) and they don't even call. Haven't these morons ever heard of a telephone, and don't they realize how they're damaging their reputations? Just how does one find a true professional? Colleen A. Cleveland, OH

DEAR COLLEEN: If it is any comfort whatsoever, you are not alone. I hear from hundreds of frustrated homeowners who are at their wits end. It is my opinion that professional tradespeople are an endangered species. Ask anyone who has more than their fair share of gray hair and they will tell you that finding a professional today is harder than Chinese arithmetic. The trick to success is understanding the dynamics of what is really going on in the marketplace.

Imagine for a moment the residential construction business. It is a profession that requires little, if any, formal education or training to be a player. In the modern world of today you almost always need a focused career-oriented education to get hired and then survive as an accountant, advertising executive, dental hygienist, etc. Put a brush in the hand of a person that can fog a mirror and presto, you have a painter. Even if this person is the best painter in your area, that does not automatically make them a great business person. Therein lies the dilemma.

Add to this the steady stream of phone calls that carpenters, painters, roofers, etc. get day in day out from other homeowners. You are just one of many. So what if the carpet installer, handyman, or window contractor doesn't show up at your place? Many don't care as they might have ten other houses to go to and will more than likely have twenty appointments just over the horizon for next week. Are you starting to get the picture?


How would you like me to build your new home? It's probably impossible for me to fit your job into my schedule, but I will gladly share hundreds of my tricks and building secrets with you and your builder. Check out my New House Specifications.


Controlled chaos usually surrounds the average plumber, bricklayer or tile setter. Many of these individuals operate as the craftsperson, the receptionist, the bookkeeper, the delivery person, etc. in their business- often at the same time. Cellular phones have just made the problem worse as they allow the painter, electrician, drywall finisher to multi-task and communicate while doing other things. Very few of these possess mystic powers and have great difficulty being in two places at one time. If there is a problem at some other location when the roofer, concrete mason, or siding installer should be at your home, odds are you will get stood up.

Don't give up hope, though. Just as you need to go deep into the forest to find rare animals, be prepared to do the same to locate professional craftspeople who possess social skills and treat you with respect. To spot a professional, why not go where they go? The first place I would visit is a wholesale supply house that sells the materials the pros use each and every day. For example, look in the Yellow Pages, or search online. Bypass the heading "Plumbing Contractors" and proceed to the one that says "Plumbing Fixtures and Supplies". You will discover some well hidden companies that sell hard-to-get plumbing fittings. The same type of businesses exist for electricians, roofers, carpenters, painters, etc.

Visit these businesses mid-morning after the morning rush. Look for an older counter person or ask to speak with the general manager. Tell them you are looking for an individual who has been buying there for 10- 15 years, has a minimum of 20 years experience, and buys nothing but the best material. Ask this same person to name three customers they would solicit bids from if they needed work performed at their own homes.

If you are lucky enough to have a technical school or a high school that offers technical courses in your city, contact the teacher who is in charge of the Building Technology section. Frequently this teacher knows which students were blessed with the most potential. Ask for names of the top three students in the most recent graduating classes. These students are most likely in the work force and you need to get them in your cross hairs. Keep in mind that many of these formal education settings offer classes in business etiquette in an attempt to train the students to be both great craftspeople and superb business leaders.

Column 404

Fixing a Pocket Door

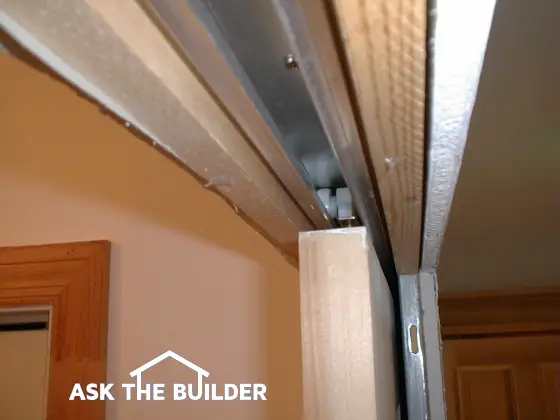
pocket door track

This is the track of a modern pocket door. The finish jambs have not been installed and I can both adjust the door and actually remove the door from the wheeled trolleys. When I do install the finish jambs, they will be screwed into the rough jambs with decorative screws that are flush with the surface of the wood. This way I can easily remove the finish jambs should I have to work on the door.

DEAR TIM: I have a troublesome pocket door between my master bedroom and the master bath. The door constantly jumps off the single rail track. I am convinced I need to install new hardware to permanently solve the problem. What is the best hardware to use and is there an easy way to complete the repair? Jorge F., Chula Vista, CA

DEAR JORGE: I must tell you that I love pocket doors but only ones that work smoothly. As you might expect, I have had to troubleshoot more than my fair share of minimum quality pocket door rollers and tracks that give homeowners problems on a routine basis. Twisted doors, settlement issues, poor initial installation, etc. can cause pocket doors to become problem doors. The good news is that you should be able to quickly replace several parts or install a new pocket door frame kit. Choose wisely and your door will be trouble free from now on.

Purchasing a new pocket door frame and track is relatively easy. Most traditional lumber yards that sell doors can supply you with a top quality kit. You are looking for a frame that has a one piece box shaped track system that has two J shaped tracks that face each other. This track accepts two tricycle type roller trucks that attach to the top of the door. Once the three wheeled trucks are placed in the track and the door is connected to these truck assemblies, it is impossible for the door to jump from the track. The design is simply brilliant. I have installed many of these and even have one in my own home. The doors glide back and forth as smoothly as I swing in my hammock on a lazy summer afternoon.

Just so you know, getting the parts is the easy part of the job. Performing the surgery to replace the old frame can be tricky. The difficulty of the task depends upon the wall treatment on each side of the pocket door. If the surfaces are wallpapered, then be prepared for misery. If the surfaces are painted drywall, it is entirely possible that the walls and door can be restored to as good as new in as little as 48 hours.

Removal of the trim casing around the door is the first step you must do to remove the pocket door. If you take your time using wide pry bars, you can often salvage this trim. The jamb material that covers the rough framing is the next thing to remove. At this point you have completely exposed half of the track. If you determine that the width and height of the new track match the existing one, you are in fantastic shape. Your challenge now is to gain access to the hidden part of the track.

The metal pocket door track typically is connected to a wooden frame member with screws. Remove the door from the pocket and take it off the track. Use a flashlight and peer up into the pocket cavity. There is a good chance you will see the screws that fasten the track to the frame. It is now time to cut an access hole on one side of the pocket wall. This hole will allow you to get your hand or arm into the pocket so that you can loosen and remove the screws and subsequently the track.

Once the track is removed, you simply cut the new track to the appropriate length and install it in place of the old one. Keep in mind that the track does not touch the rough jamb at the open end of the frame. There has to be sufficient space between the track and the jamb to insert the tricycle roller trucks. Be sure that the new track is level. The new rollers and track are so well engineered that an out of level track can cause the door to open and close on its own.

If your new track does not match the old one in width and height, the job becomes more difficult. You will most likely have to tear out the old frame and install a new one from scratch. This sounds harder than it is. Believe it or not, I have completely removed the drywall from both sides, demolished the old pocket door frame and installed a new pocket door frame including new drywall in as little as two hours. Purchase some dry setting type joint compound that sets in 30 minutes and you can actually be ready to paint the new drywall in as little as four hours.

Column 405

Underlayment for Floors

DEAR TIM: In the very near future, I will be installing lots of new and different flooring materials in my home. Can I just remove the carpeting and install my flooring material over the existing subfloor or do I need to install an underlayment? Since I want my new floors to look as good as possible, what is the best thing to do? I am very concerned about the kitchen and bathroom areas since water seems to find its way through and under any finished flooring material. Jennifer M., Atlanta, GA

DEAR JENNIFER: You are very wise to think before you act with respect to all of your new flooring. It is my guess that the total cost of the new flooring will be substantial and the last thing you want is for it to fail or fail prematurely because it was installed improperly. Finished flooring, even carpeting, needs a solid foundation for it to perform well over time. All too often some builders and remodelers as well as poorly trained installers overlook the importance of floor underlayments. Most flooring failures or problems are traced to inadequate or poorly installed flooring underlayments.

For many years, wood based products have dominated the flooring underlayment industry. Plywood, oriented strand board, sawdust composites, cement board, etc. are widely available and are commonly the material used in both new home construction and remodeling jobs. The wood based underlayments can warp and swell when exposed to moisture. This can cause the finished flooring to buckle and fail even if the underlayment relaxes after it dries out.

Many consumers and tradespeople, unfortunately, assume lots of things about finished flooring such as ceramic tile, hardwood, laminate flooring, cork, sheet vinyl, vinyl tile, etc. They feel that if the sub-floor or underlayment looks and feels substantial then it is fine to proceed with the finished flooring. The truth of the matter is that it is far more complicated. Many finished flooring products have specific recommendations with respect to the type of material the finished flooring is placed upon. Even adhesive manufacturers are sensitive to the type of underlayment being used. For example, an adhesive may work well with the vinyl or ceramic tile, but who cares about that if it bonds poorly to the underlayment?

A new underlayment product has recently hit the marketplace that is very attractive to a wide bandwidth of the flooring industry. This product is a gypsum fiber panel that has many positive qualities. It is smooth, has superior water resistance, has higher impact resistance than traditional wood based products, can be cut with a utility razor knife, is made with 95 percent recycled materials and is competitively priced.

Keep in mind that many traditional wood based underlayments contain resins, adhesives, solvents or dyes that can sometimes seep through and into the finished flooring material. If this happens, your finished flooring can be ruined. The new gypsum fiber underlayment does not contain any of these problematic ingredients.

The new gypsum fiber product is available in two thicknesses: 1/4 and 3/8 inch. This variety allows you to create flush finish floor transitions when you change from one material to another. There is no reason why an angled transition threshold has to be used if you are installing finished flooring materials that are different thicknesses.

Many flooring problems happen in houses that are built over crawl spaces. All too often an underlayment will buckle or warp because of water vapor that escapes from the soil beneath the crawl space and then permeates the subfloor and underlayment. If you have a crawl space, be sure you cover the soil with a high performance vapor barrier before you install any underlayment or finished flooring material.

It is also very important to make sure that existing wood subfloors are dry before you install an underlayment. The moisture content of a wood subfloor should not exceed 15 percent. Use a moisture meter to test for moisture content. Be sure that the fasteners used to install the underlayment are driven correctly. The top of the fastener should be flush with the top of the underlayment or slightly below the surface. Above all, make sure that you are using an approved underlayment. Get written specifications from the finished flooring manufacturer and choose a product that is on the list.

Drain Water From Your Wetland Lot

! ! ! See Author's Notes at Bottom of Column ! ! !

DEAR TIM: I have a large fenced yard that is used as a corral for my two very large dogs. Spring rainfall turns the yard into a swamp and my dogs need a bath before they come indoors. What can I do to dry out the soil? To add insult to injury, water from the yard seeps into my basement. Is there a way to solve both problems at the same time? Meredith R., Des Moines, IA

DEAR MEREDITH: From the sound of it one might think you could saddle up and ride those dogs! I have seen similar dog runs that turn into a quagmire as the back and forth movement of the heavy animals churns the wet soil. Fortunately, there is a solution to both of your problems. I can promise a bone dry basement and faster draining dog pen soil, but I can't tell you that the dogs will be lily white after a series of rainy days.
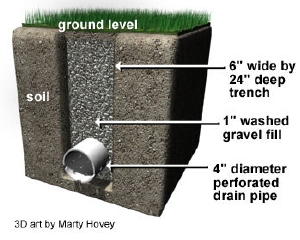
linear French drain

Remember, the holes in the perforated pipe point down. If they point up, they get clogged by pieces of gravel.

People all over the USA have problems with yard flooding. Sandy soils found in Florida, the high desert of California, and in the desert southwest are not immune from ponding after periods of heavy rain. You can effectively drain soil if you understand how water moves through it.

When rain falls from the sky it enters the topsoil. Topsoil consists of small pieces of soil, rock particles, organic matter, water and air. Topsoil thickness varies widely and those people who have clay soils know that the deeper you go into the soil, the more compact it is. In fact, some soils are so dense that they will readily hold water just as a bowl or pot.

As the rainwater enters the topsoil, it begins to fill the space in the soil that just moments before held air. In periods of heavy rainfall all or most of the air is expelled from the soil. Hundreds of thousands of gallons of water can be stored in the topsoil layer. This water begins to move under the force of gravity and the weight of the water within the soil. If the soil is sandy, the water may flow down deeply into the subsoil. But if the soil has a high clay content, the water actually begins to move sideways through the upper layers of the top soil. Clay subsoils typically have few air voids and these dense soils block the downward movement of water deep into the earth.

Water, as most things, desires to take the path of least resistance. As it moves sideways through most soils, you can intercept it and re-direct it to a low spot on your property. I have dried out many a lot and stopped thousands of basement leaks using a linear French drain.

This drain system consists of a 6 inch wide by 24 inch deep trench that works like a moat to protect your lot and home from subsurface water attack. A four inch perforated drain pipe is placed in the bottom of the trench. The pipe is then covered with one inch or slightly larger washed gravel to within one inch of the top of the trench. As the water passes sideways through the soil it contacts the gravel. The water decides that it is much easier to drop down through the gravel and into the perforated pipe rather than push its way through the soil.

The trick to trench placement is simple. You want the trench in a location so that it intercepts the water before it hits the house and/or the dog run area. If your yard is on a slope, you want the trench or trenches on the high side of your property. This way you collect all of the water flowing through the soil uphill from your lot.

The depth of the trench can remain a constant 24 inches as it passes by and around your house. If your lot is sloping, the constant trench depth will create a natural slope to the perforated pipe in the bottom of the trench. Once the trench system passes your home, you can start to make the grade at the bottom of the trench less or even level.

If the bottom of the trench becomes level and your ground is still sloping, the bottom of the trench will eventually surface. Ideally you want this to happen at the lowest part of your lot. The water collected by the trench system is discharged on top of the land only to re-enter the soil on its way to the nearest creek or brook.

Before you install this system be sure to check for underground utilities. Digging by hand or with a power ditching device can result in serious injury or death if you strike electric or natural gas lines. It is also a good idea to check with your local building department or municipal office with respect to storm water management regulations. Some areas may want you to pipe this water into a storm water retention basin.

Author's Notes:

October, 1999

Do you wonder if linear French drains really work? Read an e-mail I received from Pat Jones in Vienna, Virginia:

"A year ago last spring, I called your radio show from my home in Vienna, VA. I described my problem with water in my basement. It was very predictable, every time it rained 2" or more in 24 hours I would get water in my basement. Anyway, you advised me that a French drain would solve my problem.

"So I rented the ditch witch and got a bunch of friends, following your on-line tips we installed the drain. Your tip about the plywood to have the dirt flow onto was a great labor saver. We did have a lot of trouble with rocks and tree roots stalling the machine but in the end it was a job well done.

"Of course our work and your advice caused the drought in the Washington, DC area. We waited almost a year and a half before we got to really test the French drain. However when hurricane Floyd came through and gave us 4" in less than a day and the basement was high and dry I figured it was worth the drought. Now the neighbors are asking my advice, and I point them to your web page.

"When we talked you said to let you know how it worked out. It worked out great!!

Thank you very much,"

Patrick Jones

November, 2003

The straw layer mentioned in the column above is not necessary if you fill the entire trench with gravel to within one inch of the top. The reason is simple: Silt does not pass sideways through topsoil. The silt that turns stormwater runoff brown is eroded soil particles that are running in overland flow.

Silt particles get trapped and filtered in the upper layers of top soil. The vast amount of water captured by a linear French drain is water traveling sideways through soil. It is generally clear and free of silt. To prove this point, spring water and water taken from underground wells is almost always crystal clear. The silt was left behind at the surface as the water was entering the ground.

June, 2008

You may wonder if my advice is worth anything. Well, read what Jim Sanders wrote to me when he was at the end of his rope:

"Hi, I just wanted to write to give you the results of my "Trench Drain". I have had a wet crawlspace for 15 years. Water would fill the crawlspace at times, so we actually had to drill weepholes at the base so that it would enter the basement and eventually, the sump pump.

I have tried everything. Several contractors said that the only thing we could do was to bring the water into the house via drainage tile and let it enter the sump pump. That would work, but because I live on a 6' elevation, there is no reason that I should have water problems. It became like clockwork...when it rained, we would rush home from the lake or wherever we were vacationing so that we could be prepared to start the backup generator, in case the power failed. We even had our alarm company put a sump alarm on our system, so they could notify us if we had a power failure. Battery backup was not an option, because sometimes we loose power for days and during any rain, our sump would run every 7 minutes...just like clockwork.

I found your site and read the article on the trench or French drain. At first, it sounded a bit like "holistic healing" to me. I failed to understand why a 2 ft. deep trench, 4 ft. away from the house would do any good. How could this simple thing correct an extreme water problem that has plagued me for years, cracked my foundation, settled my garage floor and ruined almost every vacation?
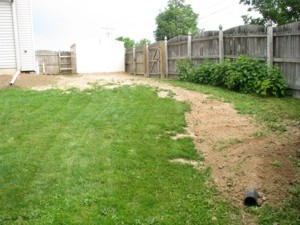
The Linear French Drain trench running from the house. PHOTO CREDIT: Jim Sanders

The Linear French Drain trench running from the house. PHOTO CREDIT: Jim Sanders

I decided "what the heck". I had to dig by hand using a trenching spade and a pick-axe, because the builder back-filled our property with brick and blacktop. It took quite a bit of time. Because the ground level varies so much on that side of the house, I was not able to achieve exactly 2 ft. deep. It varied from 18" to 30" in spots, but the slope was downhill. The trench is about 80 ft. long. At times, I thought about filling it all in, because I just didn't believe that it would work.

I stoned it, put tile in, and filled it with #1 round stone. I socked the pipe just for safety measure and I also used geotext fabric on top, so I could cover with dirt and grass. I also ordered some clay and pitched from the house to the drain.
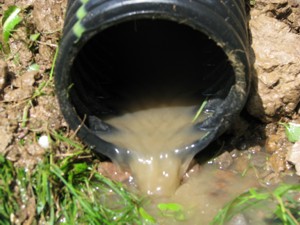
After a short rain, water is running away from the house. PHOTO CREDIT: Jim Sanders

After a short rain, water is running away from the house. PHOTO CREDIT: Jim Sanders

Result? For the last month, we have had 7 or 8 torrential rains, the worst of which was last night. It rained so hard, that our lawn washed out in spots because of the high clay content. Our sump pump, that normally ran every 7 minutes during and after rain, has not turned on for 4 weeks. The silt at the bottom of the sump well is now dry and cracking. Our crawlspace has not shown a trace of water or even moisture.

Since I couldn't see correcting the foundation cracks or the garage floor settling and tilting until I corrected the problem's source, I waited to see if the trench drain worked first.

This week, I had a company come in and perform sort of a "mud-jacking" technique on the garage floor, which worked perfectly. Also, during the past few weeks, I parged the cracks in the foundation.
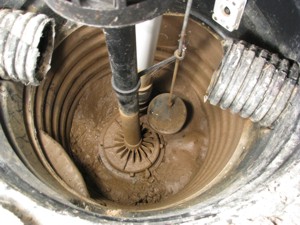
A dry sump pump. PHOTO CREDIT: Jim Sanders

A dry sump pump. PHOTO CREDIT: Jim Sanders

I just wanted you to know how this worked. I stressed for many years over this issue and the solution was nowhere near as difficult as I thought it would be.

As a side note, I went to the end of the drain tile during a hard rain to see what was happening. Water was running out of the drain tile in about the same exact volume that it previously ran out of the weepholes in my crawlspace. This winter will be interesting, because last year, the ground next to the house was so saturated that during a thaw, my sump would run constantly. I'm guessing that the ground between the trench and the house will probably be drier now going into this winter."

- Jim Sanders, Upstate area - New York

Column 407

Deck Cleaning Dilemma

deck cleaning

Deck Cleaning Dilemma


DEAR TIM: My older CCA treated lumber deck has me very concerned. Television reports and print articles have implied that CCA lumber has been banned by the Environmental Protection Agency (EPA). Can I safely clean and seal my existing deck or do I need to replace it with a different wood? What can I do to minimize any hazard that might be present with this chemically treated lumber product? What is the best way to clean and seal my wood deck? Cary G., Norfolk, VA

DEAR CARY: It is my guess that the television and print editors were either tired, over-zealous or asleep at their desks if you are accurately describing what you saw and read. The EPA released a statement on February 12, 2002 that among other things stated, "EPA has not concluded that CCA-treated wood poses unreasonable risks to the public for existing CCA-treated wood being used around or near their homes or from wood that remains available in stores. EPA does not believe there is any reason to remove or replace CCA-treated structures, including decks or playground equipment. EPA is not recommending that existing structures or surrounding soils be removed or replaced." That being said, I feel your existing decking is fine if you treat it with some respect.

The CCA chemical treatment of wood has been used since the 1940's. Copper, chromium, and arsenic are dissolved in water and then injected into the lumber under high pressure. The three chemicals act as a preservative and inhibit attack by insects and wood destroying fungi that typically would cause untreated wood to be destroyed or rot when subject to outdoor elements. During the past few years the general public has formed a perception that unsafe amounts of these chemicals are leaching from the treated wood.

The fact is that chemicals can leach from the wood. Remember, they are water soluble. This means that rain water or snow melt can soak into treated lumber and put the chemicals back into solution. This tainted water can then flow off or under the deck and possibly contaminate you, your children or your surrounding ground. Are there enough chemicals to be concerned about? I imagine it depends upon which study you believe. Currently the EPA feels that the lumber does not pose an "unreasonable" risk.

But stop and think of the dynamics of what is going on. Since we know the chemicals dissolve in water, you can minimize and possibly eliminate any risk if you stop water from entering the wood in the first place. This can be achieved successfully and easily if you treat the deck with a top quality synthetic resin water repellent. These products seem to work better than many popular deck sealants that contain natural oils. What's more, the natural oil products become food for algae and mildew as the mildewcides in the products wear off. In short order, many decks using natural oil sealers tend to turn black and green as the algae and mildew feast on the sealers. The synthetic resin sealers do not support mildew and algae growth.

EB015 Cleaning & Sealing Deck eBoo CoverDecks need to be very clean before you treat them. The use of pressure washers, in my opinion, has never been a good idea. The pressurized stream of water can erode the soft light colored spring wood that is found between the darker grains of summer wood in each piece of lumber. I am now concerned that pressure washers can inject water deep into the lumber and bring back with it some of the CCA chemicals. It is also my feeling that if you collected the water that is blasted from the deck by the pressure washer you would find it contains millions of tiny wood fibers that contain the CCA chemicals.

Quite possibly a safer way to clean wood decks is the use of oxygen bleach. This product is a non-toxic powder that dissolves in water. It is not harsh as is chlorine bleach. Oxygen bleach does not remove the color from wood. It does not kill surrounding vegetation as does chlorine bleach. Many off the shelf deck cleaning products contain chlorine bleach but they disguise it using the chemical name. Avoid products that contain sodium hypochlorite - the chemical name for chlorine bleach.

Once the oxygen bleach dissolves in water, you simply apply the solution to your deck. Keep the deck wet with the solution and stand back and watch as millions of tiny oxygen bubbles work to clean the wood. After a 10 or 15 minute wait, lightly brush the wood with a broom or scrub brush and then rinse with water using an ordinary low pressure garden hose. The results will be outstanding. You only need to wait several hours to seal the deck if you purchase a water based environmentally friendly synthetic resin deck sealer. Keep the deck sealed every two years and I think you can stop worrying.


Message from Tim Carter:

Years ago while researching a column about cleaning decks, I discovered the wonders of Oxygen Bleach. It is perhaps the 'greenest' cleaner I know of as it uses oxygen ions to break apart stains, dirt and odor molecules. There are no harsh chemicals, and it works on just about anything that is water washable.

I decided to create my own special blend using ingredients made in the USA. In fact, the raw materials in the active ingredient are food-grade quality registered with the FDA. I call my product Stain Solver. I urge you to use it to help with cleaning your deck or wood. You will be amazed at the results!

Column 408

Flagstone Patios

flagstone patio

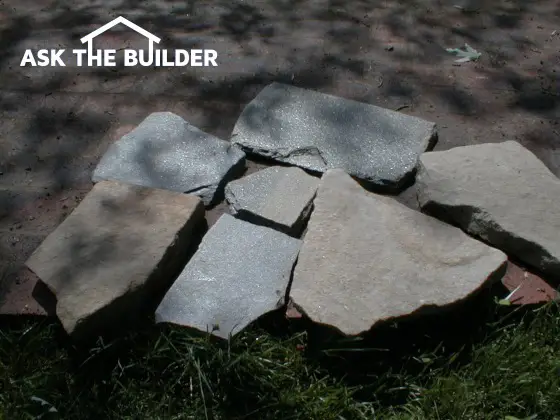
Be aware that flagstone comes in different thicknesses. It can range anywhere from 1.5 inches thick down to one-half inch thick. If you do not account for this when you start installing the product, your patio will have all sorts of humps and depressions as you struggle to install the material.

DEAR TIM: I want to dress up the look of our existing concrete patio. Is it possible to install flagstone or similar material directly over the concrete? What do you use to adhere the flagstone to the concrete? Can I enlarge the patio without fear of future cracking where old meets new? Kathy D., Batavia, IL

DEAR KATHY: Wow! What a gorgeous patio you will have. Flagstone can be installed directly on concrete. In fact, it is the only way I would do it if you desire an easy to maintain surface and one that stays flat for the entire time you intend to use it. Your biggest challenge will be getting used to working with flagstone. It is one of those natural building materials that can drive you crazy. But the insanity is worth it once you are finished.

To maintain the top of the patio in the same plane, you install different thicknesses of Portland cement mortar beneath each individual piece of flagstone. It is wise to get all of your material delivered at one time and sort through it until you find the thickest piece. This sole piece dictates the height above the current patio that you must reach as you install all of the pieces.

I prefer to install flagstone in a wet bed of Portland cement mortar. This is a simple blend of medium sand, regular Portland cement and clean water. Mixing two measures of sand to one measure of cement will yield a very rich blend that will permanently bond the flagstone to the existing concrete. If you desire an insurance policy to make sure the flagstone does not delaminate, apply a thin coat of wet cement paint on the concrete just before you place the mortar onto the concrete. The cement paint is simply pure Portland cement that is mixed with water until it resembles paint. Only mix as much mortar and paint as you can use in 2 hours.

There are two schools of thought with respect to the consistency of the mortar that you work with. Flagstone and many other natural stones absorb water slowly. Masons refer to this as suction. Low or poor suction means that the mortar does not firm up and the rock can swim or float on the wet mortar for a period of time. Some masons prefer to make the mortar damp so that the flagstone is very firm the moment it is set. I have found that there is indeed a happy medium.


Tens of thousands of buildings products and masonry tools for sale on eBay? These are not scam items, but first-class goods.

If you are getting ready to install a flagstone patio, surely you are interested in saving some extra money, right? Well, my very good friend Chuck Eglinton can show you how to do just that by purchasing the needed supplies and tools on eBay. Chuck is an eBay expert and helps people win hundreds of auctions each day. He knows the secrets!

He wrote this very cool step-by-step authoritative training manual to get you started on eBay. If you are an eBay user now, Chuck will show you how to save even more sweet moola. Chuck's training guide is an Instant Download Product and you can get it right now by clicking here.


Mortar that has a higher moisture content and is blended to the above specifications produces millions of tiny crystals that grow into the pores of the flagstone and concrete patio. These are the mechanical connections that lock the stone into place. Damp mortar might not yield as many crystals. The trick is to make up a small batch of mortar and practice. Trust me, you will know when it is too wet. I prefer my mortar to have the consistency of cake icing that just barely pours out of a mixing bowl.

Enlarging your patio is not a problem. You simply need to bond your existing patio with the new concrete base. I do this by drilling one half inch diameter holes in the middle of the edge of the existing patio. Drill the holes approximately four inches deep and drive twelve inch long one half inch diameter steel reinforcing rods into the holes. A four pound hammer does this very quickly.

Install long pieces of the same type of steel in the new slab. Place the steel on two foot centers both directions and support it with small pieces of stone so that the steel ends up in the middle of the concrete once it is poured. Be sure the long rods are tied to the dowel rod pins that have been driven into the existing patio. This steel will hold the concrete together in the event it cracks in the future.

Keep in mind that the shape of your new flagstone patio can vary a little bit. You do not have to extend the flagstone to the edges of your existing patio. Furthermore, the new patio section can be flared or curved. You can also add landscape features and fountains that overlap on to the existing patio. Curves always seem to add interest in the event your existing patio is a traditional square or rectangle.

Column 409