Concrete Deck and House Piers

plastic concrete pier form in hole

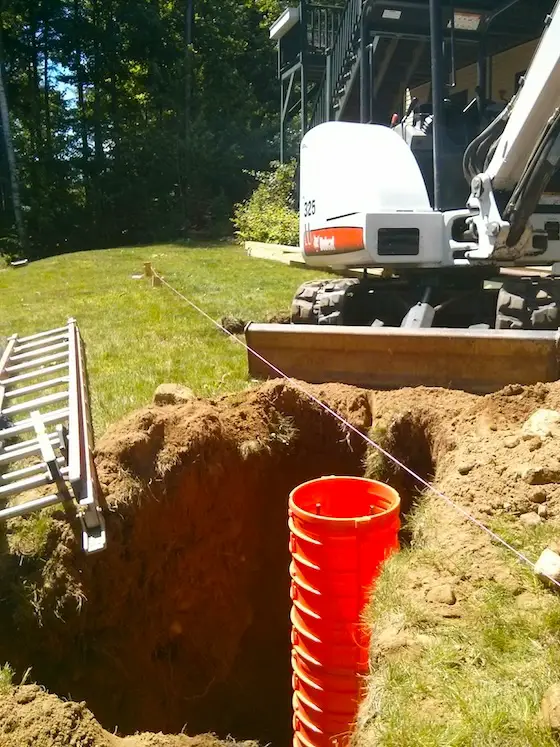
Concrete Deck and House Piers - This orange tube is going to be filled with concrete. The bottom of the hole is below the New Hampshire frost level. The bottom of the plastic form flares out to spread the concentrated load from above. Copyright 2024 Tim Carter

Concrete Deck and House Piers - Think of Your Legs

Mother Nature is so smart. She taught us to build strong buildings, decks, docks, etc. Just look at your own body, for goodness sake. Your legs and feet do the same thing that concrete piers do in the construction world.

Your legs are vertical columns that the rest of your body rests upon. Your feet spread out the concentrated load that’s above your narrow ankles. The foundation industry borrowed the term footing from human anatomy. The spread footing of a building is the lowest structural element, and it contacts the earth just as your foot does when you walk or run.

My First Piers Like Table Legs

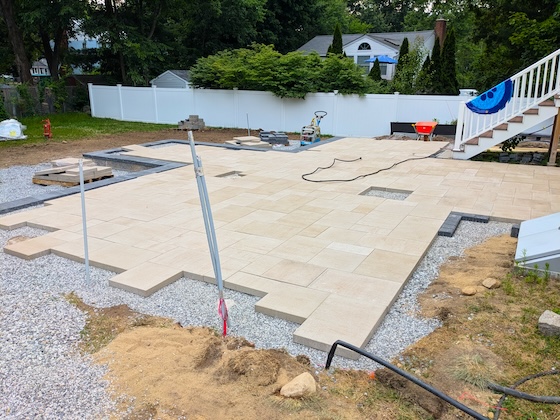
I installed my first piers forty years ago. I was building a very nice paver-brick patio in the rear yard of my second home. I needed to pour a concrete slab and ensure the patio wouldn’t twist or turn from frost heave in the soil.

I used a post-hole digger to create 24-inch-deep 6-inch-diameter holes in the ground. The holes were spaced on 6-foot centers both ways under the patio. I installed a 1/2-inch rebar in the center of the slab, making sure the steel crossed the top of each pier hole.

Wet plastic concrete flowed into the holes as each wheelbarrow was toted down to the patio. The slab resembled my dining room table, although there were six piers under it, not four like the wood table up in the house.

That patio is still in perfect shape today. The couple that purchased the house from me told me they never had issues, and the patio never tilted or moved. My patio was different from a deck because the slab's weight was spread out over the ground.

Deck Piers Support Concentrated Loads

Decks that way several tons often only have two or three support columns that press down on the earth. This concentrated weight should have a wide spread footing under each deck post.

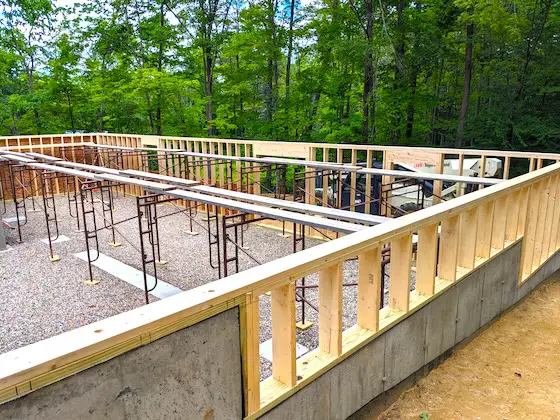
Most architects and structural engineers will specify a 2-foot-diameter concrete footing for a concrete column or pier that supports a deck. The concrete doesn’t have to be poured all at the same time, but it’s a good idea if you can make that happen. If you have to pour the footing separately, then stub up some 1/2-inch diameter steel rods about 18 inches high that will connect the pier to the footing.

More Load = Larger Diameter

As the load above the pier increases, the diameter of the pier and the footing below must also get larger. It’s never a good idea to guess. Piers that have tons of weight should be designed by a structural engineer.

You can use concrete blocks to construct piers. I’ve built many. It’s always a best practice to stub out steel rods from the footing that enters the center of the hollow block cores. The cores should be filled with concrete to make the pier solid. Install additional vertical steel rods in the wet concrete extending to the pier's top.

In my opinion, the easiest way to pour a concrete pier that’s buried in the soil is to use a plastic pier form. The ones I use snap together in seconds. They come with a large, wide bottom section that acts as the footing. The best part is that the 1/2-inch rebar for the footing and the vertical column come precut with the forms.

I set the form in the correct position, ensuring the concrete's top will be about four inches above the grade. I brace the form with a few 2x4s. The next step is to install all the fill around the pier. I compact that fill and often add a little water as I do it. You can remove the braces once the fill is about halfway up and the plastic form is stable.

Within a few minutes, the hole around the pier is filled and strong enough to accept the weight of a loaded wheelbarrow full of concrete. This method is also safer. There’s no hole for a person to fall into while you try to figure out how to shovel concrete into a traditional cardboard form.

Add Reinforcing Steel

Avoid the temptation to save money by eliminating the steel rods in piers. Concrete is a very strong material when compressed. Tension, or bending, forces can snap concrete piers like a dry twig. Concrete usually only has one-tenth the strength in tension as it has in compression.

Steel is a magical material with tremendous tensile strength. The average piece of steel rebar you buy at a home center has 40,000 pounds of tensile strength, compared to concrete, which may have 400 pounds of tensile strength on its best day.

Column 1572

Lochmere Ted Bilodeau Sr Tuesday Golf League

Lochmere Ted Bilodeau Sr Tuesday Golf League

Lochmere Country Club in Tilton, New Hampshire, is one of the best golf courses in the state. It's challenging, and the course superintendent does a magnificent job maintaining it. The greens are cut short and quite fast.

I've played in the Lochmere Tuesday afternoon golf league for two years. My partner and I won the league championship in 2023.

I got off to a very rough start in 2024. My poor play resulted in us winning no matches for many weeks.

lochmere country club hole 14

You're looking up the fairway of hole 14 at Lochmere Country Club. The ball at the bottom of the photo hit the green three inches to the left of the cup and rolled ten feet to this spot. It traveled 146 yards in the air. I choked on the birdie putt but did manage to make par.

How the Lochmere Tuesday Golf League Operates

League play begins around the middle of May. There are thirty two-man teams that play just nine holes each week for fifteen weeks.

The fifteen matches end on the second week of August. Three weeks of playoffs follow regular season play to determine the league championship team.

Two flights of fifteen teams swarm over the entire course starting at about 3 PM. One flight plays the front nine, and the other flight plays the back nine.

Each week you alternate which nine holes of the course you play. It's not a shotgun start, so if your opponents show up late, you might not get home until 7 PM. The Wednesday league is a shotgun start.

USGA Rules Apply

The league plays using the official USGA rules. The USGA lost ball and out-of-bounds rule can cause minor conflicts. Some league members are unfamiliar with the lost-ball rule and think they can just drop a ball back in play where it's thought to be lost. The rule states you must go back to where the ball was hit before it was lost.

The official USGA rule talks about a local rule for casual play. This rule states that a player who has lost a ball can drop no more than two club lengths into the fairway and no closer to the pin forward of where the ball is thought to be lost. A two-stroke penalty is applied if the player chooses to do this. Once again, the local rule must be in place; otherwise, you must go back to where you struck the ball before it was lost. Check with the Lochmere Pro to see if this local rule applies. As of 2024, this local rule did NOT apply at Lochmere.

The league played from the white tees at Lochmere during the 2024 season.

Scoring Points

Each hole counts for one point. If both team members are present to play, that team gets one point. Eleven points are up for grabs if all four players in a match are present. The most points a team can score in a round is 10, assuming the other team shows up to play. A team would have to win outright all nine holes to score ten points.

A team wins a hole outright when one team member scores a lower net score than any other player on the other team. That team gets one point, and the other team cards a zero for that hole. If a player on each team has the lowest net score, resulting in a tie, each team gets a half point for that hole.

In a typical match, one team might finish with 6.5 points and the other 4.5 points. I've seen matches end with one team scoring 8.5 points and the other 2.5 points.

Lochmere Tuesday Golf League Handicaps

Handicaps are used to try to equalize the skill level of the league members. The handicap range is tight. The lowest handicap is 8, and the highest is 14. League members are not required to maintain an official GHIN handicap.

If you have a GHIN handicap in excess of 28, you play in the Lochmere Tuesday golf league at a disadvantage. This league handicap system favors players with a low GHIN handicap, as they don't have to give away as many strokes as they should.

For example, in one match during the 2024 season, a player with a 12 handicap on the official league scorecard had seven pars in nine holes. In another match, a player with a 10 handicap on the official scorecard scored 38 in nine holes. Any math expert will tell you both outcomes, while possible, are extremely rare.

The narrow band of handicaps creates additional inequity. All players must hit from the white tee box. The league is comprised of members ranging in age from 76 to 31. The senior players can't hit the ball off the tee as far as the younger players.

At the very least, the Lochmere Tuesday golf league organizer should use the white/gold tee box option for any member who is 60 years of age or older. There are four holes on the front and back nine where the older players should be allowed to hit from the gold forward tee boxes. This would help equalize the age difference.

Hole 7 is an excellent example. This par-5 hole is 480 yards from the white tee box. It's a very narrow shot. There are wetlands and trees on the left and dense forest down the right side. If you slice, you're toast from the white tees. The gold tees on this hole are forward at least 50 or 60 yards. Look at this satellite photo. An older golfer who doesn't have power will just barely make the fairway. If a wind is blowing from the southeast, forget it. Your ball will be in the rough just over the cart path.

hole 7 lochmere country club nh

The white arrow points to the white tee box. The gold arrow points to the gold tee box. The distance between them is no less than 50 or 60 yards.

lochmere score card

You can see why the white/gold tee box option should be used. Look at how far back the white tees are on those eight holes. CLICK the image above or HERE to see the LARGE SIZE scorecard at the Lochmere Country Club website.

Lack of Transparency

The league organizer offers no transparency concerning the scoring. Each week an email is sent to the league members showing the standings of each team and their total points. The league organizer doesn't share the actual scores posted by each player.

There is no transparency as to how the handicaps are tabulated.

The Lochmere Wednesday League is the exact opposite. The organizer for this league offers full transparency. Each member of the league can see the score of all the other members for each match. The handicap calculation is visible for all to see.

Summary

As of 2024, the Lochmere Tuesday golf league is weighted for players with a low handicap. There is a lack of transparency with respect to players' scores and how handicaps are tabulated. If you just want to go out and play golf on Tuesday's and don't care about scores and handicaps, then by all means consider this league. The course itself is the best one I've played on in New Hampshire. The grounds and greens are always in excellent condition.


How to Avoid Arguments With Contractors

outdoor patio under construction

See the electrical conduits poking up out of the ground? What happens weeks from now when they’re not exactly right? Copyright 2024 Tim Carter

How to Avoid Arguments With Contractors

How many times have you hired contractors in your life? My guess is quite a few. If you had to rate each experience much like you might a meal how many 5-star ratings would you have doled out? While I’m not a betting man, I’d say fewer than five percent.

I’d wager most of your ratings would be in the 2 to 3-star range. Remember the arguments you’ve had in the past? Do you recall your disappointment when the contractor didn’t show up for days at a time? How about the time when the materials delivered turned out to be wrong and another two-week delay stacked up on top of a job already a month overdue?

Allow me to share a few true stories and let me know if it reminds you of one of your experiences. Over the past six weeks I’ve witnessed a slow-moving train wreck. A person I know decided to put a patio in their backyard. Early on, I knew problems would crop up as the job concluded. I had a tough time being a bystander.

Outdoor Electrical Conduit Under Patios

One of the first things that happened on the job was the installation of underground electrical conduit. This was put in to provide power to a future hot tub and a fancy outdoor kitchen. As you might suspect, I’ve had to do this on my jobs for decades. You get one chance to get it right and installing a future conduit under a finished patio is nearly impossible unless one of your ancestors happened to be a POW in Poland that dug the real Great Escape tunnel out of Stalag Luft III.

Perhaps I’m a strange builder. I’m always thinking of the future. I always installed conduits that were one size larger than required. I always installed a pull string with the cable that’s in the conduit. Who knows, maybe an additional cable needs to be pulled in the future? The pull string makes this possible. The electrician on this job I was watching did neither.

A few days after the hot tub was installed, the electrician showed up. He direct-wired the hot tub. The homeowner discovered this at the end of the day and was none too happy. He had wanted it wired a different way. The outdoor kitchen is not yet installed, so I don’t know what will happen with that.

Let’s move on. Five years ago I was installing all of the plumbing, radiant heat, and electric in my daughter’s new home. She and her husband were constantly frustrated with the progress being made by the young brash builder.

 Builder Ignores Detailed Plans

The plans for the house were as detailed as any I had ever seen. I had worked with my daughter for months helping her with the drawings. I knew it was important to include very precise enlarged detail drawings showing how something should be installed. Most of these were ignored by the builder and his employees. It turns out they “did things a different way”.

I’ll never forget the day they came to rip off all of the house wrap and spent hours hammering in thousands of non-approved staples into the wall sheathing rather than remove them. It turns out they had installed the wrong house wrap. When they installed the correct product, they failed to follow the instructions and some of it peeled off requiring a third installation.

Homeowners Must Do Frequent Quality Control

Each week I receive countless emails from homeowners like you describing nightmare encounters with contractors of all types. When I do autopsies on the issues, the cause for the misery is almost always the same. The homeowner placed far too much trust in the contractor hoping all would go well. Quality control on the part of the homeowner doesn’t happen as frequently as it should.

It’s not always easy to get what you want. You have to take ownership in almost all situations. This means you need to have meetings with the contractor, or his subs, at the beginning of important phases of work. You can’t assume the workers know exactly what you want done. It’s foolhardy to think verbal conversations held at your dining room table will transform into your dreams months later. You can’t assume the workers have read and understand the plans.

Just because you told the contractor what you wanted a month ago in a meeting, or even if it’s on the plan, you can’t assume it’s going to get done. You must have numerous conversations and you must check the work in progress during these critical times.

I know, this seems to be far too much work. Or perhaps you don’t know what needs to be done. I’m sorry to say if you want happiness at the end of your job, you need to get plugged into the process. It’s never been easier than now to get a full understanding of how products should be installed. Many manufacturers have clear and helpful videos on their websites showing what needs to be done.

On big jobs you need to do your own quality checks. You need to make sure measurements are correct. You need to get proof the correct products have been ordered. You need to check products when they arrive on the job site.

I can hear you now. “Tim, this is too much work! I’m hiring the contractor so I don’t have to do all this!” Well, decades ago there were far more great contractors than there are now. It’s sad but true. Roll up your sleeves and be prepared to help run your job.

Column 1571

How to Add a Bathroom

pvc pipes in basement wall hung toiled rough in

How to Add a Bathroom - You normally never see the pipes that carry wastewater away from a bathroom. This is a rare instance of a basement bathroom where the sewer line exits the house about 7 inches above the concrete floor. Copyright 2024 Tim Carter

How to Add a Bathroom

You may or may not know this, but I’ve been a master plumber for nearly four decades. I used to do all the plumbing in all the houses I built and in the remodeling jobs that had a plumbing component. I want to let you know if you’re thinking of adding a bathroom to your existing home that’s it’s not as hard as you might think.

Plumbing is Very Complex

Plumbing is indeed a three-dimensional puzzle. That’s one of the reasons I was intrigued by the challenges each job presented to me. I use my talents now to draw 3D riser diagrams for homeowners, architects, and business owners who need a permit. Plumbing departments all across the USA require riser diagrams. The diagram tells the plumbing department that you know the correct pipe sizes for all the drains and vents. The drawings also show how to connect all the pipes together.

riser diagram gray water

Here's a riser isometric drawing showing the separation of gray water from black water in a home. CLICK or TAP HERE to have me draw your riser diagram.

The raging inflation mixed with the high labor costs I’m seeing all across the USA have more and more homeowners like you attempting to install plumbing on your own. I may be one of the few plumbers that applaud this. While you need to have a good grasp of the plumbing code, it’s possible you can successfully install the drains and vent pipes for a typical bathroom. It may seem daunting, but allow me to pull the curtain back so you can see just how easy it might be.

While I no longer do plumbing for customers, my kids tug on me to put my skills to work on a regular basis. I’m in the midst of helping my son finish off his basement. We were able to include a full bathroom that will add lots of value to his home. Bathrooms are prized by most people looking for homes. You can verify this talking with a top-producing real estate agent in your city or town.

Pipe Sizes Matter

Here’s what you need to know about adding a bathroom in your home. First, a single 3-inch-diameter pipe is required. This pipe will connect to the toilet and the wastewater from a shower, tub, and one or more vanities will connect to this pipe as well.

In fact, the plumbing code allows up to two toilets to be connected to one 3-inch pipe that eventually connects to the larger 4-inch building drain in a crawlspace or under a basement slab.

Showers require a 2-inch drain pipe. Bathtubs and vanities are allowed to drain into a 1.5-inch pipe. That said, I prefer to install a 2-inch pipe for tubs. It’s so much easier to send a drain-cleaning snake down a 2-inch pipe rather a smaller 1.5-inch pipe.

Use Wyes not Tees

It’s important to realize that when you connect drain pipes that you use a wye fitting. A wye fitting looks much like the letter Y. In many ways it resembles how streams connect to larger rivers. You’ll typically see a stream enter a larger river at a 45-degree angle. This is how the blood vessels in your body work too. This angle forces the water downstream in the piping system.

Sanitary Tees Create Waterfalls

You can use fittings called sanitary tees for plumbing fixtures. Think of a sanitary tee the way you’d think of a waterfall out in nature. A river is flowing horizontally and all of a sudden the water goes over the edge to fall vertically.

The vanity in your new bathroom will undoubtedly use a sanitary tee. You can sometimes find them under a tub or shower too. Toilets can employ a sanitary tee as well so long as you have enough room to make one work. They work well where the vertical stack (waterfall) is within 3 feet of the toilet.

Venting Confuses Most Homeowners

If you decide to tackle a bathroom project yourself, I think you need to focus your attention on the vent pipes for all the fixtures. Vent pipes are a mystery to most homeowners. Each fixture requires a vent pipe.

The purpose of the vent pipe is to supply atmospheric air back into the system once wastewater is sent down the pipes. Think about your plumbing pipes before you flush a toilet. The pipes are just filled with air before you use the toilet. When you flush the toilet, you inject lots of water into the 3-inch pipe. This water pushes the air in front of it as the water makes its way to the sewer or septic tank. The air must be replaced and the vent pipes do this with ease if you size them correctly.

Not only do the vent pipes need to be sized correctly, but they also need to be in specific locations with respect to the location of the actual plumbing fixtures. This is all covered in the plumbing code but you may find it mind-numbing to read about them. I created a How to Vent Plumbing video for you. It’s on my www.AsktheBuilder.com website. I feel it does a splendid job of showing you all of this vent magic.

I want you to consider doing your own plumbing. It’s very fulfilling and there is a multitude of great information you can draw upon out on the Internet. You can also get on the phone with me if you feel you want a concierge plumber by your side!

CLICK HERE to have me CALL YOU ON THE PHONE or do a VIDEO CALL.

Column 1570

Bad Deck Flashing Causes Rot

rotted wood house corner under a deck

This is severe wood rot that has compromised the corner of this home. Poor workmanship is the cause. The carpenter installed the flashing wrong. Copyright 2024 Tim Carter

Bad Deck Flashing Causes Rot

Ed, my golf league partner, asked me a few days ago if there was a product to fix some wood rot he had discovered at his home. You may be battling wood rot too. In your case it might be interior wall studs or floor joists that get wet from a plumbing leak. Or, you may have some decorative exterior wood trim that’s falling apart. This happened to my very good friend Steve out in California. Allow untreated wood to stay wet for long periods of time and you’re going to experience wood rot.

I told Ed that there was an amazing wood epoxy and a wood hardener that he could use assuming the rot was minimal. I clarified that he had to send me a few photos of the problem the next day.

When the photos arrived, I immediately texted Ed saying, “This is serious. I need to stop by.” Ninety minutes later I was at Ed’s home talking with him and his lovely wife. I visit homeowners quite frequently as many hire me to consult with them. They all want to know the same things:

  • what caused their problem
  • what is the best way to fix it

The wood rot was concentrated at a corner of Ed’s house under a deck. I had asked him to remove the few decking boards above the rot. He had already removed the wood siding, which exposed the rot.

Much of the oriented strand board (OSB) at the corner had disintegrated. The two 2x6s that made up the house corner were rotted out completely. The water damage had been happening for years. It was not going to be an easy repair because the rot extended up behind the exterior deck ledger boards.

An Inferior L-Shaped Flashing

An inferior flashing on top of the deck ledger was the root cause of the leak that caused the wood rot. But the builder made another serious mistake. There was no water barrier at all on the exterior walls. The OSB was just covered with shiplap wood siding.

No Water Barrier Covering the OSB!

If the builder had installed a water barrier correctly, there’s a good chance the flashing leak would have only rotted out the wood siding. But Ed’s OSB and the wood studs behind it were doomed.

I had discovered the same thing at my own home years ago. Many builders in New Hampshire, in my opinion based on visiting hundreds of defective homes, do very poor work. Most have no understanding of water’s surface tension.

Mimic Mother Nature to Stop Rot

You can prevent wood rot when building a home if you just mimic Mother Nature. Have you ever given thought to how wildlife of all types avoids hypothermia? I see ducks and loons bobbing around happy as can be in the lake next to my home when the water temperature is 34 F and it’s raining.

The feathers on ducks, loons, eagles, hawks, and just about every other bird are oriented to shed water. One feather overlaps the feather(s) below it. Roofers do this same thing with the shingles on your roof.

Carpenters need to do the same thing with the products used on the exterior of your home. It Ed’s case, and that of thousands of other homes no doubt, this overlap principle was not followed when it came time to install the deck ledger board against the house.

You Need a Special Flashing Detail

A waterproof membrane needs to be installed over the wood sheathing behind the ledger board. The wood siding is then installed up to the height of the top of where the ledger board will be. The ledger is then installed over the top of the siding.

Once the ledger is installed, a piece of rubberized adhesive flashing can be attached to the waterproof membrane. This flexible flashing should extend over the top of the ledger board and then down the face of the ledger about 3/4 inch. A copper flashing should be installed over this rubberized flashing. This flashing needs to be bent over the top of the ledger board and extend out over the deck ledger board. Ed’s builder/carpenter did this but he let it stop at the outer edge of the ledger board.

Each time it rained, the water went to the end of the flashing and then traveled backwards under the flashing. This is natural and is caused by the surface tension of water.

What should have happened is the flashing should have been 3/4-inch longer and then bent down and over the face of the ledger board. The last quarter inch should have been bent out at a 45-degree angle so the water would form droplets and fall to the ground below the deck.

The deck joists need to have a small 45-degree angled fire cut made at the top so the top of the joist doesn’t touch the flashing. This detail is one of the many things that have transitioned from history to legend to myth just as J.R.R. Tolkien said about the ring.

I created a full-color illustration of this flashing detail that you can purchase from my website.

Column 1569

How to Protect Exterior Wood

weathered picnic table american dirus dog

This weathered wood picnic table sits just 12 feet from the shore of Bass Harbor in Maine. The harsh marine environment will destroy the table if it’s not sealed. That's an American Dirus dog bred to look like an extinct direwolf yet she contains NO wolf DNA. Copyright 2024 Tim Carter

How to Protect Exterior Wood

A week ago, my lovely wife and our 2-year-old American Dirus dog were on Mt. Desert Island in Downeast Maine. We rented a tiny cottage just 12 feet from the shoreline of Bass Harbor. If you’re not familiar with this part of the USA, I can assure you it’s a harsh marine environment. Anything made from wood or iron that’s not protected from the sun and the sea will succumb to the elements and have a very short service life.

Early each morning I took our dog out so she could relieve herself. I sat with a cup of coffee on a gray weathered picnic table watching the 11-foot ebb tide leave the bay. The ultraviolet (UV) rays of the sun, salt spray, and rain, and snow had tortured the table. Perhaps it was intentional so the table matched the rustic weathered appearance of the proud and tired cottage. If so, the property owner achieved the goal.

Weathered Treated Lumber Picnic Table

If this picnic table is not cleaned and sealed in a year or two, it will start to resemble the decking and hand rail on the pier that extended out from the land just 30 feet from the table. Some pieces of the decking and railing had cracks as large as one-quarter inch. Raised summer-wood grain on the hand rail was as sharp as a razor. These slivers of wood could cut your soft skin with little effort.

Allow me to expound and the mechanics of wood weathering. I feel if you understand what’s going on, you’ll be much more inclined to take care of all of the exterior wood on and around your home. This includes decks, fences, siding, wood furniture, playsets, etc.

UV Light Photon Damage

UV rays are far more powerful than you might imagine. About five percent of them contain active photons. These photons resemble microscopic cruise missiles. When the photons strike any surface, they cause damage.

They’re so powerful they can break atomic bonds of softer metals such as copper, zinc, and lead. This is why copper can be used to protect asphalt shingles from decay. I covered that in my Roofing Ripoff book, but that’s a column for another day. Have you ever wondered why the galvanized roof panels on old barns begin to rust? Where did the zinc coating go? The photons blasted it apart and the rain washed the zinc to the ground around the barn.

Knowing this, you can see how destroying wood is child’s play for UV rays. The rays break apart the bonds of the lignin in wood. The damage extends to the coloration of the wood. It’s why unprotected wood turns gray. The softer spring wood that’s lighter in color than the dark summer wood bands falls apart faster. Just as your skin needs sunscreen to prevent sunburn, so does all your exterior wood. Paint and pigmented sealers are very good wood sunscreens.

Water Causes Wood to Swell & Shrink

Water is the next demon that haunts your exterior wood. Wood will rot without protection from water. The picnic table I sat at each morning was probably constructed from lumber that had been infused with copper. Copper is a natural biocide. The fungi that cause wood rot can’t survive in the presence of copper.

Wood is an amazing material, but as with just about everything, it has an Achilles’ heel. It’s hygroscopic. This means the shape and size of wood change as the moisture content within it goes up and down. In other words, wood swells and shrinks. Metal doesn’t do this. This is one reason why the paint on your car never seems to peel yet no matter what you do, you can’t seem to stop paint from peeling on all your exterior wood items. The swelling of the wood is so great the paint can’t maintain its grip.

Checking Cracks are the Harbingers of Damage

Small checking cracks are the first things that develop on unprotected wood. These cracks are very small, about the width of a hair on your head. Checking cracks are the gateway to full-blown destruction. Each time it rains, the water enters the crack. The wood begins to swell and slowly starts to tear itself apart.

Repeated wetting and drying causes more wood fibers to break just as you can do by bending the aluminum tab on a soda can back and forth. Over time the crack gets bigger and bigger as water is allowed to get deeper into the wood. I know you’ve seen cracked exterior wood. The cracks can get so deep the entire piece of wood splits apart.

Now you know what to do. You need to stop UV rays and water from getting to your wood. UV protection is the easiest thing to achieve. Water penetration is far more difficult. Each piece of exterior wood must be completely coated on all sides and edges with paint or a sealer to prevent water infiltration.

This means if you’re building a picnic table like the one I sat on, you must cut all the pieces first and then paint or seal them before you assemble the table. You’re trying to make it impossible for water to get into the wood where one piece touches another piece. Most people won’t go to all this trouble. It’s the primary reason you see paint peel from exterior wood. Water is seeping into the wood in all the places where it’s not painted.

Column 1568

Old House Heating and Air Conditioning

victorian house painted lady newfound lake nh

This old Victorian home in New Hampshire can be outfitted with a proper heating and cooling system so each room is comfortable year-round. Copyright 2024 Tim Carter

Old House Heating and Air Conditioning - Pure Comfort in Every Room

My days have been getting busier and busier, and I'm doing troubleshooting and coaching calls with homeowners just like you. Are you suffering from the heat and humidity like the young man I talked with in Chicago last week? If so, you’ll enjoy the following story. I suggest you pay attention if you’re getting ready to build a new home with central air conditioning or heating.

My Childhood Home

Allow me to share some context. I grew up in a solid masonry two-bedroom house in Cincinnati, Ohio. It had single-pane casement windows with no weatherstripping. I believe there were only two heating ducts on the first floor and maybe three up on the second floor. There was a large register cover on the floor at the base of the steps that led to the second floor. This is how the air got back to the furnace.

The winters could be cold. When the forced-air furnace ignited, I’d lay on the floor in the living room with my stocking feet over the register that was blowing hot air into the room. The metal register cover got so hot I had to move my feet occasionally. The house was comfortable in the winter, but the central air conditioning couldn’t make the second floor as cool as the first floor.

Victorian Home in Chicago

A few weeks ago, the young man I spoke with had the same issue in an old frame Victorian house in Chicago. He rents it out, and his tenants were complaining that the second and third floors were not as cool as the first floor.

I asked the owner several questions and discovered immediately why his tenants were uncomfortable. The ducts that supplied the heat and cooling were set up much like my childhood home. It was a hot mess, and no pun was intended. Too little cold air was being sent to the upper floors. To make matters worse, there were no return ducts high on the walls of each room. These ducts vacuum the hot air and send it back to the air handler to be cooled.

Duct Design is Complex

Heating and cooling (HVAC) systems are very complex. How complex, you ask? Think about the vascular system in your own body. Each time your heart pumps, it sends a pulse of oxygenated blood out to all points of your body. At the same instant, the same amount of blood that needs to be re-oxygenated is returned. This is exactly how your HVAC system should be designed.

Each room of your house needs a certain amount of hot or cold air to maintain a comfortable temperature. Complex calculations need to be made to determine the number and size of ducts in each room.

Supply Ducts on Exterior Walls

It’s best to put supply registers on outside walls, which are most vulnerable to the heat and cold outdoors. The return air duct needs to be on an interior wall across the room. This allows the heated or cooled air to be pulled across your body as you’re in the room.

Design Ducts Like Your Blood Vessels

It gets even more complex, and this is causing much angst among tens of thousands of homeowners like you. The supply duct system in your home needs to once again mimic the blood vessels in your body. The size of your aorta as it leaves your heart is huge compared to the tiny supply blood vessels in your fingers or toes.

Mother Nature designed our bodies so the blood pressure is equal everywhere in all the vessels. It maintains this pressure by making sure the vessels get smaller and smaller the farther away they are from your heart.

The supply duct system in your home needs to do the same thing so that the static pressure of the air coming out of each duct in any room is nearly identical. Do you have a house where the farthest room from the furnace has just a tiny puff of air coming out of the register? I’m sure the supply ducts were not properly reduced in size, and they’re too big.

High-Velocity Flexible Ducts

Let’s get back to my Chicago homeowner, who was on the consult phone call. I told him great news: a few companies specialize in retrofitting older homes with high-velocity flexible supply ducts that can be snaked up walls and across ceilings.

These systems can supply the exact amount of hot or cold air to each room, ensuring the entire house is at the same temperature. Don’t forget, to make the magic happen, you need to ensure air is being sucked out of each room that can get back to the furnace or air conditioner.

I know what you’re thinking, “Tim, what about just using a mini-split system? These are really being pushed hard by many HVAC installers.” Allow me to share my feelings about them.

Four years ago, I was helping build my daughter’s new home in Bar Harbor, Maine. They rented a brand-new apartment equipped with a mini-split system. The apartment was open-concept, with the kitchen, dining, and living room in one huge space. My bedroom was on an outside corner wall. It got so cold at night in my bedroom that there was frost on the windows! The door was closed, and no heated air could get into the room.

Column 1567

Cracks – Pinpoint the Cause Before Repairing

crack in mortar in a brick column

This crack in a small brick pier indicates a semi-serious structural problem. Don’t ignore things like this. Copyright 2024 Tim Carter

Crack Repair - Pinpoint the Cause Before Repairing

Houses are just like you and me. As they age, they develop wrinkles or cracks. Some people don’t like wrinkled skin. Just as Ponce de León was searching for the fountain of youth, many people look for products to recreate their smooth teenage skin. Home centers sell tons of crack-filling products each year that homeowners use in and around their homes. Cosmetic manufacturers may sell a similar amount, for all I know.

I have first-hand experience with the magic one can employ to disguise wrinkles on faces and cracks in houses. Nearly twenty years ago, I was a judge on the reality TV show The Mansion. Each day, I sat in a chair, and a professional makeup woman touched me up before we started to record.

One day, we were talking about spackling cracks in her old plaster walls. After I told her how to bridge the cracks using mesh tape, she told me about a special cosmetic liquid that does the same thing for facial wrinkles. “Oh, I use an amazing clear liquid on a person’s wrinkles before I apply the foundation. The liquid dries fast and bridges all but the deepest wrinkles. This liquid makes older skin look as smooth as silk.”

It just so happens that years later, there are clear products you can use to fill cracks in many things around your home. I’ve had great luck with certain caulks that dry crystal clear. I used some on the rear window of my pickup truck cap to seal a leak. It’s held up well now for two years.

Masonry Cracks

But what about cracks in concrete slabs, brick, stone, concrete or concrete block foundations, and any other exterior parts of your home? If the cracks could talk, what would they say to you? I can tell you they’d have several different stories about why they suddenly appear.

Here’s an example. About a month ago Louis reached out to me using the Ask Tim page of my www.AsktheBuilder.com website. Louis lives in Pittsburgh, PA. He sent a great photo of an exterior brick column at his home. The column was no longer perfectly straight and had a crack in it. Think what a small stick would look like if you tried to snap it in half.

Louis provided me with a very important piece of information to help diagnose what was causing the crack. He mentioned two things. First, there was a crack that ran from the ceiling to the floor in a room addition that was built in 1980. He mentioned he noticed the cracks at the same time not too long ago.

Think about that data point. All was well for a little over forty years! Pittsburgh’s topography is quite hilly. The cracks might be caused by land movement. A broken sewer pipe could be eroding the ground under the room addition. There are all sorts of things that could be going on. My advice to Louis is that he needs to pinpoint the cause of the cracks before he wastes time repairing them, only to find them reappear in weeks or a month.

Concrete Shrinkage Cracks

Some cracks around your home are minor and are to be expected. Every year, I receive quite a few emails from homeowners like you who are steaming mad about cracks in their new concrete driveways, sidewalks, and patios. They feel the new concrete should be free of all blemishes.

The truth is concrete shrinks 1/16th of an inch for every ten horizontal feet that’s poured. Did you know that? This shrinkage creates a tension force that tears the concrete apart just as you might rip a piece of paper in two. Professional concrete masons know all about this tension force. This is why they use tools or cut control joints in concrete slabs. The joints are an attempt to control where the crack will develop. A straight line looks so much better than a jagged crack in a concrete slab.

Control Where Cracks Happen in Concrete

Control joint depth is critical. The minimum depth is 1/4th the thickness of the slab. Most tools used to create joints will not cut that deep. It’s best to saw cut control joints in concrete.

If you want to ensure the cracks in concrete stay small, be sure to install reinforcing steel. I’ve had great success over the years using 1/2-inch rebar placed on 2-foot centers in both directions, much like graph paper looks. I ensure at least 1.5 inches of concrete under the steel bars.

Keep a Journal

If you see a crack start to develop, you should start to keep a journal. Take a pencil or permanent marker and make a line across the crack. Use a ruler with millimeter markings and measure the width of the crack. Take readings once a month to see if the crack is getting wider. Be sure to record the date you take each measurement. Note any other strange things that might be happening in or around your home that are not ordinary. A professional will use this data to help diagnose the cause of the crack.

Hygroscopic Cracks Tough to Control

Realize some cracks in your home come and go as the seasons change. If your home is framed with lumber, the seasonal change in humidity can cause much of the lumber in your home to swell and then contract as the humidity drops in cooler weather. There’s not much you can do to prevent this movement.

Column 1566

DIY Home Building

concrete foundation rough framing new house

This is a small house being built just miles from where I live. Many things can go wrong in a hurry if you don’t know what you’re doing. Copyright 2024 Tim Carter

DIY Home Building - Be Prepared for Delays and Heartache

As I look back on the decades of giving advice to homeowners like you, one thing stands out in my mind. I’ve always tried my best to tell you the truth about how hard or easy some tasks might be. That’s the opposite tact of most of the home improvement entertainment shows I see on TV. Most share half-truths. I’m sure you’re aware that a half-truth is a whole lie.

Over the past year, I’ve been hired as a consultant to guide several people in the construction of new homes. Using technology, I can do this quite effectively, as video calls put me at a job site thousands of miles away. Should you be thinking of tackling a new home build by yourself, I thought you might benefit from a few short stories about these other homeowners I’ve worked with.

I Can Be Your Virtual General Contractor

Fifteen months ago, a woman hired me to be her virtual general contractor. (GC) She told me she was going to be the on-site GC but figured she needed someone with actual experience to provide backup assistance. Six months ago, I discovered there was a second GC on the job that she hadn’t told me about. As you might imagine, things got awkward in a flash.

The woman made critical mistakes early in the process, long before she hired me. She and her husband had bought an existing home and decided to tear it down and build a new house on the existing foundation. They hired an architect. Using the homeowners’ dreams and ideas, this architect toiled on a plan that had several major flaws. The biggest one was the roof design.

The roof was to be a huge slanted surface that mimicked the house’s steep driveway. The massive beams, thick sheathing that doubled as a finished interior ceiling, and the thick closed-cell foam required to insulate the roof cost collectively over $100,000.00. That price doesn’t include the huge crane required to position the beams or any later to build the roof.

A crack in the existing foundation was not spotted until days before the framing was to begin. The floor trusses ordered for the job were placed too close to one another. The list of mistakes that caused major issues grew by the day. A first-floor bathroom had to be redesigned on the fly because the layout put a toilet directly on top of one of the floor trusses.

All of this could have been avoided if the woman had hired me before she even thought of talking to an architect. Fortunately, the woman’s husband was a very successful businessman. It was made clear to me that they had an unlimited budget to fix mistakes as they popped up. My guess is that you don’t have an unlimited budget.

Idaho Homeowner Surprised by Out-of-Square Foundation

Next up is a man building a house in the great state of Idaho. He’s on a tight budget and decided to do all of the plumbing on the job. He discovered I’ve been a master plumber since 1981 and felt I could help long distance. I drew his riser diagram so he could get a permit. We then started to do regular video calls so I could tell him exactly how to install the pipes under his concrete slab.

This homeowner was using a general contractor, but we discovered the foundation was poured out of square by two inches just last week. While you may think this is no big deal, it can lead to serious issues. In this man’s case, quite a few of the pipes poking up through the concrete slab are no longer in the center of the exterior and interior walls where they should be.

How could this have been prevented? If you decide to roll up your sleeves and get involved in a home-building project, you need to be very careful about placing trust in people you’ve never worked with before. This man and his wife could have determined that the foundation was out of square when the footing was poured. It would have taken them about thirty minutes to establish the square corners of the foundation on top of the hard concrete footing.

This man could have calculated the diagonal measurements that ensure the foundation is square using a simple calculator or a free one online. He could have purchased a 100-foot tape measure and marked the precise corners of the foundation on the footings in minutes.

Then, once the foundation forms were set, he could have checked them again before the concrete was poured. Had he hired me months before he did, I would have given him a checklist of things to do at these early stages of construction.

One of the things on the checklist is making sure the top of the foundation is correct. Most builders place foundations too deep into the ground. When this happens, it’s very hard for the grade to slope away from the house in all directions.

The building code is quite clear, and the ground must slope away from the foundation a minimum of 6 inches in the first ten horizontal feet away from the house. What’s more, you should have a minimum of six inches of foundation exposed all the way around the house.

Is it starting to make sense? Think of all the things you don’t know what to do or look for before you get into a very deep financial mess.

Column 1565

Wood Rot Prevention

house wrap

This blue wrap is designed to prevent wood rot on a wood-framed house. It has it own adhesive backing and will adhere to clean and dry wood sheathing. Copyright 2024 Tim Carter

Wood Rot Prevention - There are Many Ways to Prevent Rot

The inspiration for this column came to me this morning as I was greeting people at church. My wife and I are the head ushers at the 10:30 AM mass. In between people dashing through the door to avoid the drops of rain falling from the steel-gray clouds, I looked across the street. A project at a multifamily building was finally completed.

The final job was to erect a new sign near the sidewalk. This sign was covered by a simple roof structure that was anchored to the ground with two rough-sawn 8x8s. They were either oak or cedar. I suspect cedar based on the nut-brown color. A week ago, I saw all the lumber on a pallet ready to be installed over the past few days. That’s how I know the posts were solid wood.

Cedar contains natural wood-preservative chemicals, much like redwood. But it’s not immune to wood rot. In this case, the architect called for the wood posts to be buried and surrounded by concrete. This prevents the structure from tipping over in a windstorm. Vandals could also push it over if above-ground posts were connected to the piers using normal deck-post hardware.

The better solution might have been to use 6x6 treated lumber posts rated for burial and ground contact. Using a table saw, a good carpenter could have easily duplicated the look of a solid cedar post by wrapping the treated lumber posts with four mitered pieces of 3/4-inch cedar.

Are you building a new home or a room addition? Will it be built using lumber? If so, it’s vital this wood be protected from water that will leak past brick and stone veneer, vinyl siding, wood or fiber-cement siding, or any other exterior finish. Builders used 30-pound tar paper many decades ago to waterproof their wood-frame houses.

Tar Paper is Time Tested

I had the good fortune to work with tar paper early in my career. I cut my teeth in the rehabilitation and remodeling business. I took apart old houses and could see tar paper that was 80 years old and still doing its job of keeping wood rot at bay.

felt paper vapor barrier

Tar paper has a proven track record of success. It will keep this shed dry for hundreds of years if the shed is maintained. Copyright 2024 Tim Carter

Many new products have replaced tar paper. Your job is to get one that allows water vapor to pass through it but not liquid water. Just about every water barrier sold has this capability.

Use Treated Wood Plywood Indoors

Think about the interior areas of your house that might suffer the most from water or water leaks. Bathrooms come to mind. Imagine treating the wood floor joists with copper naphthenate. This is a liquid you can paint onto any untreated lumber. Copper is a natural biocide. It’s the primary component in treated lumber you purchase for outdoor use.

You can even purchase treated plywood for floors if you want to prevent tubs and toilets from falling into the room below. Last week, I purchased some for my lovely wife to use as a false floor in some outdoor planters. Some engineered subflooring says its water resistant and maybe waterproof but I prefer to use real treated plywood. That’s what you’ll find in my outdoor shed. I didn’t want to ever worry if the floor would rot out.

Door and Window Flashing

Are new windows or exterior doors in your immediate or near future? If you have wood under these, you need to make sure water never gets to the wood. Flashing kits are available for exterior doors. You can also make your own using thin, moldable copper. Flashing tapes can be used to create waterproofing under windows. There are quite a few very good videos, including one I recorded years ago, showing how to use this tape under doors and windows.

Roof Flashings - Rot Magnets

What about your roof? Do you know that most wood rot on roofs happens near or below roof flashings? Flashings are transitional roofing materials. They connect roofing material to things that are not roofs.

Bad Step Flashing Job

The step flashing overlap one another and are to be laced into the shingles. The idiot roofer here didn't install them at the right angle. Rain, especially wind-driven rain, can blow under the upper left corner of each piece you see. Copyright 2017 Tim Carter

Understand that caulk is not a long-term solution to fix poor flashing jobs. Roofing cement is no better. This black asphalt cement is just a temporary patching material. The sun’s ultraviolet rays work rapidly to destroy exposed asphalt.

Flashing work must be superior to prevent wood rot on your roof. Once again, there are lots of great videos online, some by flashing manufacturers, that show you the correct way to create rot-proof roofs. You need to understand the process so that when you interview roofers, you can see if they know the best way to install the flashings.

Column 1564