Shed Repair Tips
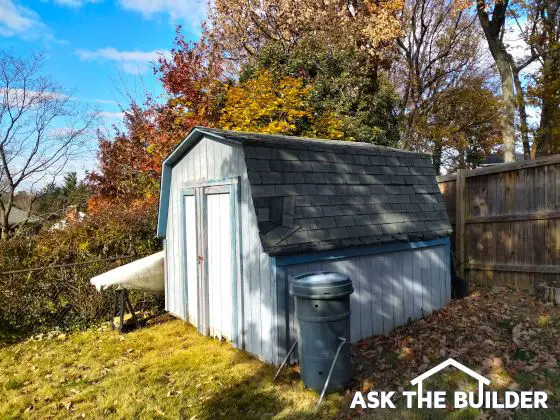
This shed has seen better days but it can be restored and improved with moderate skills. (C) Copyright 2019 Tim Carter
DEAR TIM: I’ve got a quaint outdoor shed that I’ve neglected. The wood at the bottom is rotting and the shingles must be replaced. I need it more than ever and recently discovered it’s not to code in my county. I want to repair it and improve it but I’m told the shed has to be moved and enlarged. This makes me sad because it’s a perfect size and I like where it is on my lot. What are my options? Meghan C., Alexandria, VA?
DEAR MEGHAN: I’ve seen my fair share of neglected sheds that’s for sure. When I peered at the photos you sent me, I immediately saw one problem that led to the wood rot. The shed was placed or built too close to the soil. The rear of the shed has soil piled up against the wood.
You’ve come to the right place for help because not only was I a builder/remodeler for 30+ years, but I also served on my village’s planning and zoning board for eight years. I’ve got a fairly good grasp of zoning codes that restrict sheds and similar accessory structures.
It’s important to realize you may have received some bad advice. I discovered long ago to rarely trust the spoken word when it comes to zoning issues. I always get a copy of the zoning code and read it. I want to see exactly where it says such and such is not allowed. Ask the person who told you to move and enlarge it to point this out in the local current zoning documents.
First and foremost, your shed may not be in violation of the zoning code. I don’t have a copy of your zoning code, but it very likely has a grandfather clause. Simply put if something that was fine to do years ago has become illegal because of new regulations, the offending *thing* normally can stay in place.
However, some codes do have restrictions about the amount of improvement that can be done to a grandfathered shed or structure. You have to read your code and see what it says. If there’s an upper limit percentage of repair, you can sometimes jump through a loophole and make the repairs over a period of time so at no given time do you bump up against the upper limit of the allowable repairs.
Let’s assume you discover you can repair the shed and it can stay in its current location. Here’s the laundry list of how I’d proceed with the repairs.
I would strongly urge you to raise the shed up into the air so the bottom of the wood siding is at least 6 inches away from the soil. Since sheds don’t weigh much, three smaller hydraulic car jacks may be all you need. Perhaps a few neighbors have these.
You’ll have to probably slide a new 4x4 under the existing floor beams on each side of the shed to lift it. The hydraulic jacks will be set under this 4x4, two under one 4x4 and the third one in the middle of the other 4x4. You’ll pump all three jack handles so the shed pops up out of the ground, is level front to back and side to side, and is at the right height. Place a solid concrete block under the 4x4s or the floor beams to provide solid support between the shed and the soil.
Most homeowners don’t think about wind, but it can be a major concern with outdoor sheds like yours. Strong winds can cause a shed, or even a small house, to tumble across your yard. Investigate using hold-down anchors to make sure your shed stays put when the next fierce thunderstorm, or worse, blasts through your backyard.
The rotted portions of the wood siding can be replaced with new siding. You can go back with wood, but you may want to choose fiber cement as it will last longer. You just have to cut away the rotten wood by coming up a foot or so and cut a nice straight line.
You’ll have to slide a piece of z-flashing up under the remaining siding after you make this cut. But before you do that, paint the fresh cut edge of the existing siding with two or three coats of paint. This will help prevent wood rot in the future. The top of the z-flashing slides up behind the existing siding and the front edge laps over the top of the replacement siding.
The roof shingles are perhaps the easiest part of the project. Use a flat garden spade to remove the shingles and inspect the sheathing to ensure there’s no rot. If you detect rotten roof sheathing, replace it.
There are countless decent videos on YouTube that show you how to install simple asphalt shingles. It’s key to have a metal drip edge on the sides and bottom edge. Some shingle manufacturers have installation videos that show what to do. You’ll be amazed at how easy it is to install shingles and since you’re not that high up, it’s relatively safe.
Keep in mind that if you install a thin piece of copper 6 to 12 inches wide at the top of the shingles on both sides of the roof, you’ll never have to install new shingles again in your lifetime. I discovered three years ago that copper that washes down onto shingles prevents asphalt from becoming brittle. This means your new shingles can last for 40 or 50 years!
Column 1286
Tim built custom homes and did ultra-custom remodeling for 20+ years before launching his Ask the Builder media presence. He was selected as one of the Big 50 by Remodeling magazine in 1993. This award gave birth to Ask the Builder in October 1993. Tim also operates https://DrawPlumbingPlans.com. His @askthebuilder YouTube channel was the first home improvement channel on YouTube.