Storage Shelving
DEAR TIM: I’m in desperate need of storage shelving. Valuable tools and supplies are scattered on the floor of my garage. How hard is it to build storage shelves? What tools and supplies do you need? My shelving and storage needs are not that great, but I do have room for shelves that would be about 8-feet long. How have you solved this problem I’m sure many homeowners have? Gretchen S., Avalon, CA
DEAR GRETCHEN: I’ve built and assembled home storage shelving in each house I’ve lived in. Over time, I feel I’ve perfected a system that I feel is easy to construct and requires minimal carpentry skills. The most recent home storage shelves I built in the garage of my New Hampshire home really got the attention of my neighbor. He was impressed with how strong my garage storage shelves were, and how efficiently the space was used.
I happen to be fond of wood storage shelves because they are easy to construct, and the material is readily available from a local lumber yard. I’ve discovered that all my heavy tools, tool boxes and supplies do very well on shelving made from one-half-inch-thick plywood. The depth of the shelves can be any dimension, but if you make them 15 and 7/8-inch deep, you can get three shelves from a standard sheet of plywood.
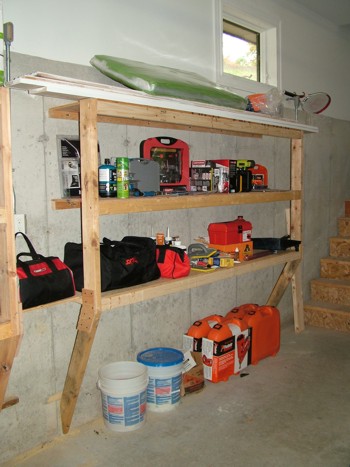
These heavy-duty storage shelves were made in several hours with a few sheets of plywood and some 2x4s. PHOTO CREDIT: Tim Carter
The tools you need to build my favorite shelves are probably on your garage floor. You’ll need either a circular saw or preferably a miter saw. A screw gun or drill equipped with a screw bit is also helpful. You’ll need a level, measuring tape, and possibly a hammer.
For every three shelves that are just under 16-inches deep and 8 feet long, you’ll need one 4x8 sheet of one-half-inch plywood, three 2x3x8, three 2x2x8 and two 2x4x8. You’ll also need a one-pound box of 2.5-inch drywall screws, and a one-pound box of 1.25-inch drywall screws.
Before you get started on constructing the storage shelving units, you need to do a little planning. Move the cars out of your garage, clean it and assemble the tools and supplies you intend to put on the shelves. Try to group things that you use most often and things that are somewhat heavy and cumbersome.
The things that are used most often need to be on the shelves that are easiest to reach. Heavy things need to be on lower shelves so that you don’t attempt to lift them over your head.
Once you’ve sorted all the things, you need to take a tape measure to see how tall the tallest item will be on any given shelf. I’ve discovered through trial and error that my garage storage shelving is most efficient when the first shelf is 36 inches off the garage floor and there is 17 inches of clear space between the top of a shelf and the bottom of the horizontal 2x3 that forms the support beam for the next shelf above.
If you want to build my system, you simply screw the 2x2s to the wall making sure they are level and the ends are plumb. To create the 17-inch free space between shelves, just install the 2x2s so that the top of each one is 20 inches from the top of the one below it.
I rip the full sheet of plywood into three shelves that are 15 and 7/8-inch wide by 8 feet long. I then lay the sheet onto a 2x3 that’s standing on end on the garage floor. Use the smaller 1.25-inch drywall screws to attach the plywood to the 2x3. The 2x3 acts as a small support beam on the front edge of each shelf. Once all the shelves are assembled, you then screw them into the 2x2s on the wall using the same small screws. Have a helper hold the shelves while you do this. Once three screws are in place, the shelf will droop a little but will be stable. Install at least six screws evenly spaced through the shelf into the 2x2.
The last step is to place the 2x4’s vertically at the front corners of the shelves. The 2x4s are placed flat against the ends of the 2x3s. Using a small level, you level the shelf front to back and then screw through the 2x4 into the end of the 2x3. Use the longer drywall screws for this. I always drill pilot holes through the 2x4s, and I like to install at least two screws at each end for added strength. Do this with each shelf and at both ends. Once you’re finished admiring your work, start moving all your tools and supplies onto your new shelves.
Metal storage shelves and steel storage shelves can be found in some of the houses I used to live in. While they look sturdy, I’ve had failures. Several of the shelves have bent under moderate loads. You also have to securely fasten the entire shelving unit to the wall so it doesn’t tip over.
Industrial storage shelving can sometimes be overkill. Be sure you look at all your options before purchasing this system. Perhaps my favorite accessory is storage bin shelving. I have these small plastic storage bins for all my nails, screws, bolts, nuts and misc. hardware. These storage bins fit perfectly stacked on top of one another on my wood shelves. They even have a handy slot on the front to mark what’s in each bin.
Column 799
Tim built custom homes and did ultra-custom remodeling for 20+ years before launching his Ask the Builder media presence. He was selected as one of the Big 50 by Remodeling magazine in 1993. This award gave birth to Ask the Builder in October 1993. Tim also operates https://DrawPlumbingPlans.com. His @askthebuilder YouTube channel was the first home improvement channel on YouTube.