Stripping Wallpaper – Now it is Easy!
©2017 Tim Carter
DEAR TIM: I have a big mess on my hands. I started to strip some wallpaper. Progress is very slow. To add insult to injury, the paper facing of the drywall has peeled off in some areas as I removed the wallpaper. What can I do to make the removal job go faster? How can the damaged drywall be repaired? Dorothy M., Ft. Pierce, FL
DEAR DOROTHY: Years ago when I was in college, I worked for a man who hired me to strip real wallpaper from old buildings. It was fairly easy work.
A water-vinegar solution would readily soak into the actual paper and soften the old wallpaper paste. Once the paper was saturated with water, you could practically scrape it using your fingernail. Scraping tools worked better and they rarely gouged the hard plaster walls.
New vinyl coated papers, foil wall coverings, and other types of painted coverings make it tough to strip wallpaper. The coatings on top of the paper work well to make them washable, but they block water from softening the old paste.
Drywall surfaces are tender. Even the most talented and careful person can gouge and score drywall using a traditional putty knife or wallpaper scraper. Fortunately, there are new products, methods and tools that make wallpaper removal an easy job.
The key to removing coated papers from drywall lies in piercing the surface of the paper with thousands of tiny holes so that new fast acting enzyme solutions can break down the wallpaper adhesives.
Just A Few Tools
Let's get started with the tools. Fortunately, you don't need many tools to wallpaper.
Here's a list that will get you going on this job:
- retractable razor knife with snap-off blades
- 4.5 or 6-inch drywall taping knife
- smoothing brush or plastic smoother
- 4-foot level
- grout sponge
- measuring tape
- paint roller & pan
- paint brush
Click the Image Below to get all, or some, of the tools now:

CLICK HERE to get all the tools I recommend in one place. It's easy and fast.
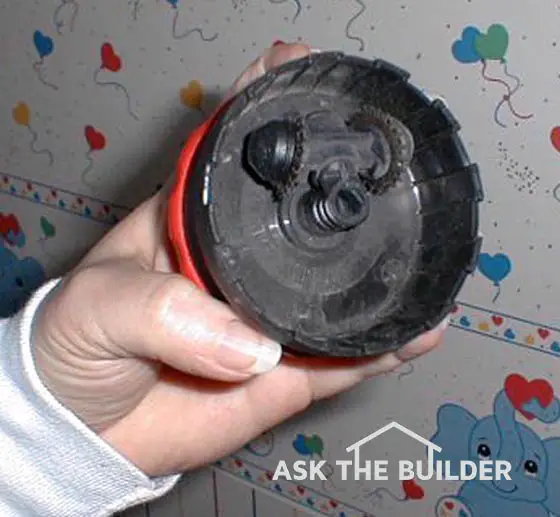
You can purchase nifty tools at most wallpaper or hardware stores that fit into the palm of your hand. These tools have small spiked wheels in the center of the tool that rotate like casters on the bottom of an office chair.
You randomly glide the tool over the wallpaper using moderate force and the tiny wheels make holes that prick the paper, but not the drywall. The more passes you make, the more holes that are created.
Once the paper has been punctured, you apply a liquid or gel like enzyme-based solution that passes through the tiny holes and works quickly to break down the adhesive bonds of the wallpaper glue.
These solutions can often soften old glue in 20 to 30 minutes. The non-toxic enzyme based products clean up easily with soap and water.
If you are patient and allow the soaking solutions to do their job, the paper will often readily pull away from the drywall or plaster in large sheets. If you need to scrape the paper, you can use a new scraping tool that has a preset blade angle.
The moderately sharp blade attacks the paper from a very low angle. This enables you to remove large amounts of softened paper with minimal or no wall surface damage. Once the wallpaper has been removed, you need to clean all residual glue from the surfaces with soap and water.
To repair the areas where the top layer of drywall paper has been removed, you will need some white shellac and regular drywall topping compound. Paint the damaged area of the drywall with the white shellac and let it dry.
The shellac blocks water from penetrating into the base layers of drywall paper. Without this protection, the water in the drywall topping compound will often cause bubbles to form in this absorbent paper.
You will probably need to apply two or three thin layers of topping compound. Be sure to apply the compound 3 inches beyond the edge of the damaged area. This allows you to feather the patching compound and more easily disguise the repair.
Once this compound has dried, sand it lightly. Prime this new compound with a primer/sealer before you paint or re-wallpaper the drywall.
If you really want to get the facts on wallpaper, removal techniques, the facts on primers, sealers, sizing, adhesives, and installation you need to obtain The Complete Guide to Wallpapering.
Written by a second generation paperhanger, this book is invaluable. This book tells you everything you could ever imagine about wallpapering. It is the best book on wallpapering I have ever seen!
Related Articles: Drywall Repair, Wallpaper Removal
Column 250
Tim built custom homes and did ultra-custom remodeling for 20+ years before launching his Ask the Builder media presence. He was selected as one of the Big 50 by Remodeling magazine in 1993. This award gave birth to Ask the Builder in October 1993. Tim also operates https://DrawPlumbingPlans.com. His @askthebuilder YouTube channel was the first home improvement channel on YouTube.