Wall Framing Basics
DEAR TIM: I am going to frame some exterior wood walls and don't have a clue where to start. As with anything, I am sure there are some pitfalls to avoid and labor-saving tips that will allow my walls to be perfect or nearly so. Can you give me a quick run down of what I need to know to ensure the job will go smoothly? Patrick G., Racine, WI
DEAR PATRICK: Your question brings back a vivid memory. Years ago I was building a room addition on a house and immediately next door the neighbor started to build his own room addition. He framed his exterior walls in the air and had all sorts of clamps and devices to hold the pieces of wood together as he tried to nail them. It was a comedy of errors and it took him five times longer to do it his way than if he had just mimicked what I was doing with my crew.
The first thing you need to know is that you should use Mother Nature's gravity to your advantage. Frame all of your walls on the ground or the floor surface and then tilt them up once they are finished. Some carpenters go so far as to completely apply the exterior finish siding and trim on the walls before they are tilted up. You need to be a highly-skilled craftsman to make this work, so don't try it for a few years.
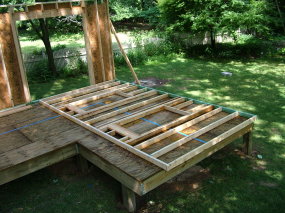
The wall on the floor is square and ready for OSB sheathing. The bottom and top plate are exactly the same length. The king studs in the wall are also the same height. Doing this ensures the wall will be square when the diagonal measurements from corner to corner are the same. PHOTO BY: Tim Carter
The walls themselves and the floor plan shape they create must be square if you want the next story and / or the roof to go on with no problems. The building term square means that a rectangular or square shape of an object is made up of four 90 degree angles. If you remember your high school geometry, you may recall you can have at least two other objects that also have four sides to them; a rhombus and a trapezoid. You want to avoid these shapes at all costs.
The first thing to do is to create a layout on the ground where the walls will go. Make sure the layout is square. You can use an inexpensive construction calculator to do the math or you can make your own 90 degree angles with common, known math solutions. For example, you can use the tried and tested method of the 3, 4, 5 right-triangle solution. A triangle that has three sides where one is 3 feet long, another is 4 feet and the final leg is 5 feet long creates a right triangle. The intersection of the 3 foot and 4 foot leg create a perfect 90 degree angle.
Any multiples of these dimensions also work; 6, 8, 10 or 12, 16, and 20 are also combinations that yield a perfect 90 degree angle.
When you start to frame your walls, the height of all of the main studs must be exactly the same. Check them as mill-cut studs are by no means always perfect. Recently, I ordered 100 2x4 by 8 feet studs and quickly learned that some in the pile were exactly 8 feet long while others where 96 and 5/16ths long. That is a significant difference.
The top and bottom plates of the walls also need to be the exact same length. After you nail the studs to the plates, you have created a parallelogram that you must now nudge into a perfect square or rectangle with four 90 degree angles at each corner.
To square up the wall once all parts are nailed together, make sure the bottom plate is in a straight line. You can do this by snapping a chalk line on the floor and tapping the bottom plate so that its edge is along this line for its entire length. If the floor is wood, tack the bottom plate to the floor to ensure it stays put along the chalk line.
The last step is to check the diagonal measurements across the wall. Use a helper with this task. If you both attach a tape measure to a corner and then pull across the wall to the opposite diagonal corner, your tapes will create a giant X on the wall. Measure accurately from corner to corner.
At first, each of you will likely have different measurements. Whoever has the longer of the two measurements should take a hammer and tap the end of the top plate towards the other person. This will shorten the long diagonal measurement and make the other measurement start to grow. When both measurements are identical, the wall is perfectly square.
Once the wall is perfectly square, it is time to apply the sheathing. This material comes in 4 x 8 foot sheets and is usually one-half inch thick. You want to apply either OSB, plywood or some other structural material at each corner of the wall. Once this material is nailed in place to the wall studs, the wall will remain square and will not rack under wind or seismic loads. This bracing is a critical framing requirement.
It is far easier to apply this sheathing while the wall is flat on the ground. Resist the temptation to stand the wall up without the sheathing. The wall will be heavier with the sheathing in place, but you can get some help from friends or neighbors to help you tilt the walls into position.
Column 577
Tim built custom homes and did ultra-custom remodeling for 20+ years before launching his Ask the Builder media presence. He was selected as one of the Big 50 by Remodeling magazine in 1993. This award gave birth to Ask the Builder in October 1993. Tim also operates https://DrawPlumbingPlans.com. His @askthebuilder YouTube channel was the first home improvement channel on YouTube.
How do you repair wood rot on an existing exterior wall involving a window?. our home is 130 years old, and poorly maintained by previous owners. I was removing caulking around the sill and it came loose. when I pulled lightly it just came out. the original framing is minimal how do I fix this HELP!