Wood Shrinks and Expands
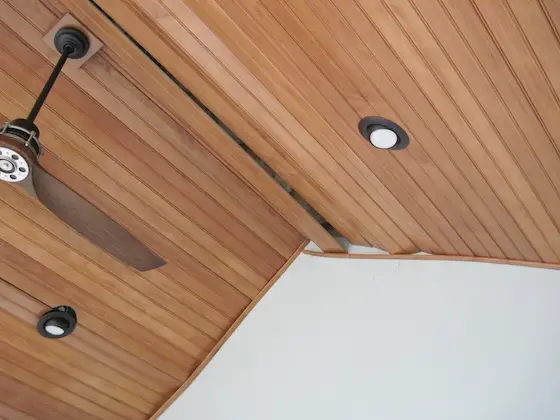
Wood shrinks and swells - This sunroom ceiling is suffering from expansion issues. Copyright 2024 Tim Carter
Wood Shrinks and Swells Unequally - Not Like Fine Leather Gloves
Wood is a true gift from God. It’s not much different than tomatoes, wheat, or corn in that wood is really a crop. Any farmer that’s lucky enough to have a stand, or bush, of maple trees on his farm will tell you that his first crop of the year is maple syrup. Trees are routinely harvested here in my great state of New Hampshire, but the growing season is not 120 days like most fruits and vegetables, it’s decades.
We are lucky enough here in the USA to have countless trees. The lumber harvested from them allows us to build durable homes, outdoor decks, pergolas, play sets, forts, furniture, and countless other indoor and outdoor projects.
While wood has many positive attributes, it also has one negative quality that causes homeowners like you enormous frustration, pain, and money. Wood happens to be hygroscopic. This means it can absorb liquid water or water vapor. It can also release both much like you squeeze water from a sponge.
The issue with wood is that when it absorbs or releases water in either state, it can swell or shrink. As if this movement is not bad enough, the swelling or shrinkage is not at all equal across the length, thickness, and width of any given piece of lumber.
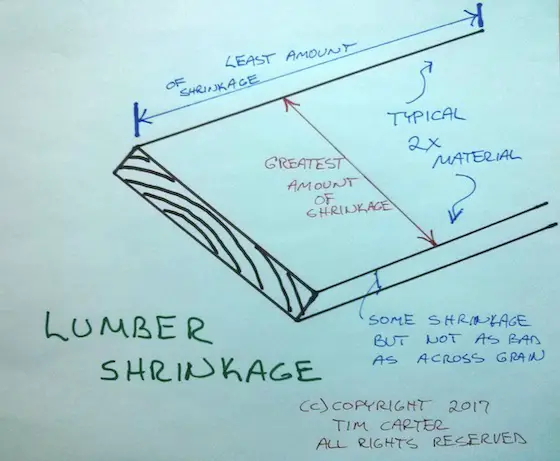
Imagine this is a 2x4 or a 2x12. It's a crude 3D drawing I made, but I think you can make sense of it. (C) Copyright 2024 Tim Carter
I’ll share two stories to drive home this point. Almost forty years ago I built a stunning three-story Queen Anne Victorian replica home for my family. The joists used for the first and second-story floors were 2x12s cut from Southern Yellow Pine trees. The third-story floor was framed with 2x10s.
I also had two very tall chimneys that extended all the way from the basement up through the roof. When we roofed the house, I had to install tin-coated steel flashing to prevent leaks. Some of this metal was embedded into the mortar joints of the chimney and the rest of the flashing was attached to the wooden roof sheathing.
The metal counter flashings attached to the chimney were cut so a 1/4-inch gap remained above the step flashings on the roof. Ten years later I was up on the roof installing a solar-powered attic fan that ended up being a waste of time and effort. I happened to look at the chimney flashing and was stunned.
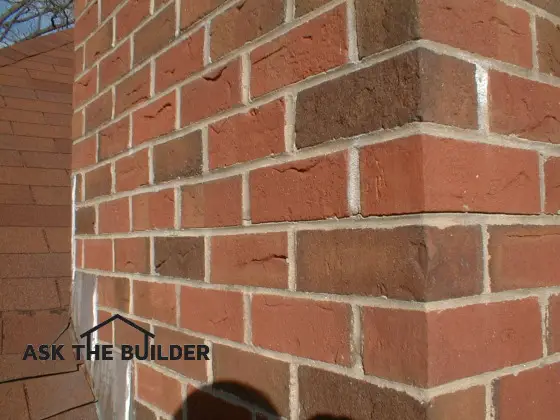
Metal counter-flashing can be seen in the far corner of my chimney.
The gap between the two flashings was now 2 inches! This meant that the chimney grew taller or the house dropped. Builders and remodelers blame cracks in houses all the time on settlement making you think your entire house is sinking into the soil.
If this were the case at my home, there would have been no gap as the chimney footing and the house footing would have both dropped into the soil. Yes, I know as a college-trained geologist, some houses can sink into the soil, but that’s not the cause of most cracks and it most certainly was not the cause of the huge gap between my roof flashing!
The cause was lumber shrinkage. My 2x12 and 2x10 floor joists from the lumber mill were no longer as wide as they were when I nailed them all together. It turns out lumber shrinks or swells the most across the width, or face, of a board. It shrinks the least along its length.
Just days ago I employed this knowledge to help a woman in Ohio. She purchased one of my phone coaching calls. It turns out her new beautiful room sun room addition had a serious issue with the ceiling made from real wood. It was tongue-in-groove maple beadboard. It’s important to realize this room had a steep vaulted ceiling.
She sent me photos of the buckled wood up near the peak of the vaulted ceiling. It was a huge mess. I requested a photo of the floor of the room. I suspected this woman was like my wife. My hunch was right as the room was filled with many large plants.
I asked about the roof ventilation and the insulation used in the ceiling. It turns out the builder made two huge mistakes. First, he used closed-cell spray insulation. This product does not allow water vapor to pass through it. Second, he didn’t create a pathway at the peak of the roof for air to escape out to the roof ridge vent.
The house plants in the room were belching water vapor into the air. This water was concentrated in a layer of very warm air at the top of the vaulted ceiling. I’m sure you remember from your high school physics class that warm air can hold more moisture.
The wood at the top of the ceiling was absorbing all of this water and expanding. It’s easy to solve the problem. She just has to remove the last row of beadboard on each side of the vaulted ceiling. To hide this gap, she can nail the same stained beadboard to a piece of plywood that will form a flat surface up at the peak of the ceiling.
This flat piece will have beveled edges and it will be secured to the roof ridge board. It’s vital this flat board not be secured to the beadboard. The beadboard ceiling will now have a generous 3-inch space on each side of the ceiling to expand and contract as the seasons change.
Column 1553
Tim built custom homes and did ultra-custom remodeling for 20+ years before launching his Ask the Builder media presence. He was selected as one of the Big 50 by Remodeling magazine in 1993. This award gave birth to Ask the Builder in October 1993. Tim also operates https://DrawPlumbingPlans.com. His @askthebuilder YouTube channel was the first home improvement channel on YouTube.
Tim, I have been a loyal reader and fan of yours for years but one thing sparked my interest was the gold emblem with the statement that you are a master plumber in 50 states. I carried a Illinois Plumbing license for over 30 years, but Illinois doesn't have a Master Plumbing designation. Keep up the good work.