You Can Build a New Interior Wall in an Hour
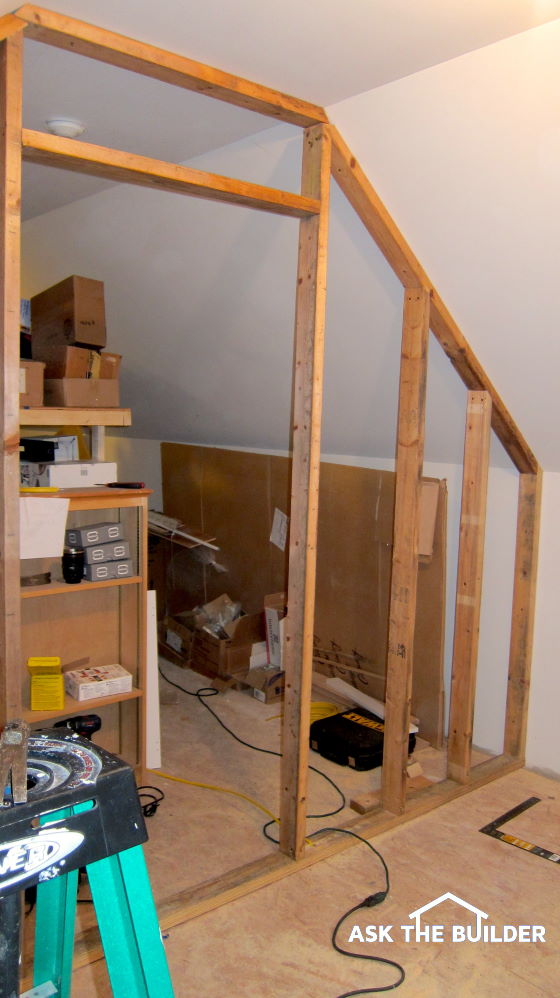
Build a New Interior Wall | This is a new interior wall in an existing home. The angled ceiling makes the job a bit more difficult. Copyright 2021 Tim Carter
Go Ahead, Build a New Interior Wall in an Hour or Less
Do you want to build a new interior wall inside your home? Perhaps you’re trying to create a new small space for a home office, hobby room, or you have a bigger appetite and are transforming a dank basement into a cozy finished living space. But you have no idea where to start. I’ve been there. I’ve experienced your anxiety.
Every now and then, it’s quite interesting to go back in time. I clearly remember having to build my first partition wall inside a house. I was a soaking wet-behind-the-ears carpenter working for a small remodeling company. One of my college professors, Dr. Larsen, had asked me to install a half bathroom in his home. I had no idea what to do so I told him that my boss could do the job.
Once the simple plans were drawn and the contract signed, I was sent to my professor’s house to start the job. I had previously painted the outside of the home three years before and Dr. Larsen and his wife trusted me. Little did they know, I had no clue how to efficiently build the three simple walls needed for the small new bathroom.
I survived with the help of a few phone calls to my boss. It was a humbling experience as I discovered you don’t know what you don’t know. Keep in mind this was decades before the Internet and YouTube. You have no idea how much of an advantage you now have when it comes to all things about how to repair and build things around your home. Count your blessings!
New Construction Walls are Easy
Building a new interior wall in an existing house can be much different than doing it on a new home job site. When we carpenters build a wall for a new home, we typically build it flat on the floor. Once all the studs are nailed to the bottom and top plates, we tilt the wall up and secure it so it doesn’t fall over.
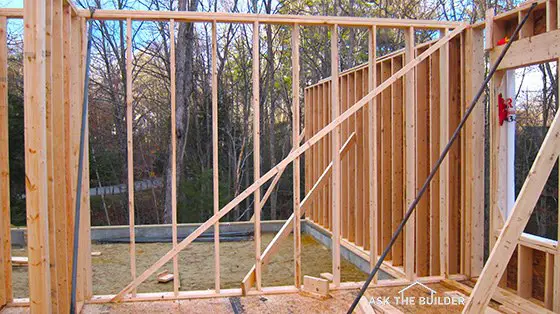
See that angled board nailed to the vertical wall studs? It extends from the top right corner of the wall to the lower-left corner bottom plate. It’s a temporary diagonal wall brace used to stabilize the framing while the house is built. © 2021 Tim Carter Builder
You can’t always do this in an existing home, especially if the ceilings in the room are finished with drywall or plaster. As you tilt the wall up, it binds against the ceiling. If you’re challenged by a finished ceiling, you’ll most likely have to install your top and bottom plates making sure the plates are plumb in the same plane. You’ll then cut each wall stud to fit snugly between the plates and toenail them in place. Drill angled pilot holes in the ends of the wall studs for the nails. Use no less than 3-inch-long 16d sinker nails to connect the wall studs to the plates.
Tilt-Up Wall Between Open Floor Joists
If there is no ceiling, you can tilt the wall up so long as you orient the wall in the same direction as the floor joists above. You simply make sure the top of the wall rises up in between two parallel floor joists. Once the wall is vertical, you can then slide it into position under the floor joists assuming you didn’t make the wall too tall!
Stack Studs on Top of Joists
It’s important for you to consider stacked framing. If your new wall is going to be perpendicular to the way the floor joists below or above run, you should make every attempt possible to layout your wall so the wall studs are located directly above or below the joists. This alignment allows plumbers and HVAC contractors to route their pipes and ducts with ease.
You may discover the carpenters that built your home didn’t go to the trouble to stack all their framing. The floor joists for each floor may not line up. If this is your case, then you need to decide if it’s better to align your new wall studs with the floor joists below or above the wall. This really only comes into play if you have plumbing pipes and heating or air-conditioning ducts in your new wall. Electrical cables are so small and flexible they can easily navigate unstacked framing.
16 Inches on Center
It’s vital that your wall studs are spaced so your drywall ends in the center of a wall stud. Your goal is to minimize cutting thin slivers of drywall off the end of a long piece so you can butt two pieces together. Sixteen inches on center is the gold standard for spacing wall studs.
Correct Door Rough Openings
Don’t fret about how to create the opening for a door. It’s not that hard and you just need to do a little math. My recommendation is to purchase your new prehung door and have it at your home. You’ll create the rough opening in the wall by taking measurements off the door jamb.
Measure the total overall width of the door jamb up at the top where the horizontal door jamb is attached to the two side jambs of the door. Add one-half inch to your measurement. This will be the width of your rough opening. Note how much the side jambs of the door frame hang below the bottom of the door. In almost all cases, you’ll be trimming some of this length off when you install the door. Ideally, you want just one-half inch of space between the bottom of the door and the top of your finished flooring.
You can usually safely make the height of the door rough opening just one-quarter inch longer than the factory length of the door jambs. Trust me, the finished molding you install over the door on top of the drywall will cover even a one-inch gap between the top of the door jamb and the bottom of the rough opening.
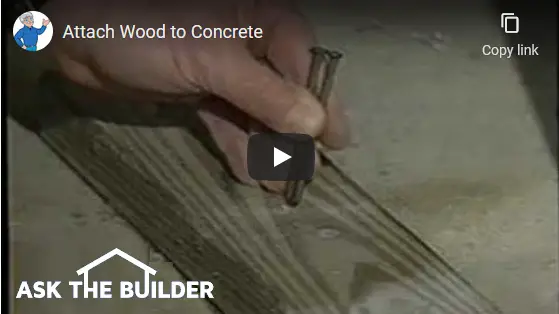
If you’re attaching your bottom wall plate to a concrete floor, see how easy it is to secure the plate using just two regular 16d nails! Watch my video!
Tim built custom homes and did ultra-custom remodeling for 20+ years before launching his Ask the Builder media presence. He was selected as one of the Big 50 by Remodeling magazine in 1993. This award gave birth to Ask the Builder in October 1993. Tim also operates https://DrawPlumbingPlans.com. His @askthebuilder YouTube channel was the first home improvement channel on YouTube.