Pocket Door Installation Tips
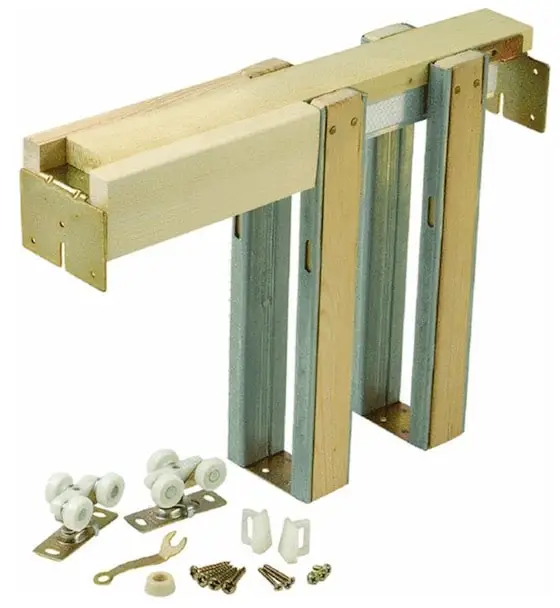
Pocket door installation starts with using the best kit. This is a miniature version of a Johnson pocket door kit. The vertical legs create the pocket. The track is hidden in the horizontal top member. The three-wheel trolleys are in the lower left. Copyright 2018 Tim Carter
"Installing pocket doors is not as tough as it sounds or looks, especially if you buy a quality hardware set. Remember, the key to a trouble-free installation lies in a proper rough opening."
Pocket Door Installation Checklist:
- purchase an LE Johnson kit - best made in the USA
- read installation instructions
- perform string test to ensure rough opening is not twisted
- follow simple instructions and be done in 30 minutes or less
Related Links
How To Install A Pocket Door - By Tim Carter
Tim's Favorite Feature of Older Homes (and new ones)
Pocket Door Installation Tips
The following instructions will help you install just about any pocket door hardware kit. I URGE you to completely read and follow the enclosed instructions you will find with your pocket door hardware. These systems are really easy to install. They require minimal tools and some patience.
Free & Fast Bids
CLICK HERE to get FREE & FAST BIDS from local pocket door carpenters.
What is The Pocket Door Rough Opening?
The rough opening for the pocket door is the rectangle created by the wall studs. It's a very specific height and width both called out in the written pocket door installation instructions.
The rough opening is the foundation of your system. Get this wrong and you will suffer later. The rough opening will seem huge. Why?
The rough opening will be more than twice as wide as a usual one. The width is almost always two times the actual finished door with plus one inch.
For example, a 2-foot 8-inch door (32 inches) the rough opening needs to be 65 inches. The height of the rough opening off the rough floor surface is usually 84.5 inches. Be sure you measure from the highest point of the subfloor if your floor is out of level.
It's important to realize the rough opening needs to be plumb, level and NOT twisted (a helix). Perform a string test to ensure the rough opening is not twisted.
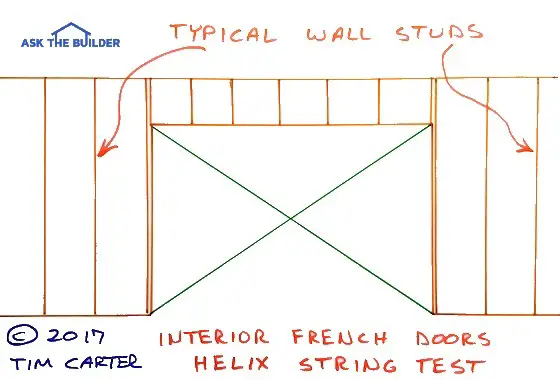
This is a crude drawing of a rough opening for a pocket door. The green lines are pieces of string attached to the corners of the rough opening. They must barely touch at the center of the "X". Switch one string back and forth across the other string to ensure it's just barely touching at the center of the X. Copyright 2018 Tim Carter ALL RIGHTS RESERVED. Do NOT COPY
How Level Must the Top of the Door Be?
The top of the rough opening really needs to be level. This is where the track is attached.
The side jambs must be plumb. That should be common sense.
Another key point is the bottom plate of the wall (before it is cut out) must be directly above the top plate.
All too often rookies frame the pocket door rough opening without a bottom plate in place. One end or both of the side rough jambs can drift out of plumb this way.
How Do You do the String Test?
String a line tightly from one corner to the opposite diagonal corner. Do the same across the other corners to make an X. The strings should just barely touch one another.
If there is a gap between the strings or one string presses significantly against the other, your rough opening is twisted or in a helix! You fix this by adjusting the position of the bottom of the vertical rough jamb studs.
How Do You Install the Pocket Door Track?
The Johnson pocket door track is the first thing to install. Two L-shaped brackets, one at each end, make this a simple task.
Each track is slightly different. Follow the individual instructions. Make sure it is level before you proceed with anything else!
How Do You Install the Thin Pocket Door Studs?
You install the pocket door studs by first snapping a fine chalk line that represents the sides of where the bottom wall plate would be if it were in place.
Snap chalk lines that are directly below the top plate. If your rough frame is not a helix, this is easy. Just snap the lines where the bottom plate stops at each end. These chalk lines serve as your reference point so you can properly locate your floor plates that hold the side split jambs.
What are the Pocket Door Side Split Jambs?
The side split jambs are the thin studs that create the pocket. The placement of two of these is critical.
They form the beginning of the pocket. Your instructions will tell you precisely where to mount these. The other two jambs simply are placed halfway between the first two and the actual wall studs.
How do you Finish the Wall?
If you installed the frame correctly, you can now add your drywall or plaster. Be sure your nails do not go through the thin side split jambs! If they do, they will scratch the door.
How Does the Door Connect to the Track?
The door connects to the track with two simple parts:
- mounting plates for the top of the door
- trolleys that connect to the door mounting plates
Paint the top and bottom of the door two coats before you attach plates to the top of the door.
Doors will warp and twist if you don't seal the top and bottom with paint or a clear finish.
After the mounting plates are put on the top of the door, place the pocket door trolleys into the track. The mounting plates on the top of the door allow you to hang the door.
How Do You Install the Finish Pocket Door Jambs?
Once this is complete, the door will slide in and out of the pocket. You can now install the finish side jambs. Always install the top jambs last. Be sure to install these with finish screws, NOT nails. To remove the door at a later date, you will need to remove at least one top jamb.
When you attach the door trim casing, try not to nail into the finish jamb material. This will interfere with the removal of the jambs at a later date.
The finish jambs can be tough to fabricate on your own. It requires using a table saw and sanding the rough cut edges. Certain manufacturers sell these materials already sanded and cut to size. It is a tremendous advantage to use these.
Installing pocket doors is not as tough as it sounds or looks, especially if you buy a quality hardware set. Remember, the key to a trouble-free installation lies in a proper rough opening. If you get the rough opening right, the rest of the job will flow like a smooth vodka and tonic.
Once again, read the instructions carefully!
CLICK HERE to get FREE & FAST BIDS from local pocket door carpenters.
Column B190
Tim built custom homes and did ultra-custom remodeling for 20+ years before launching his Ask the Builder media presence. He was selected as one of the Big 50 by Remodeling magazine in 1993. This award gave birth to Ask the Builder in October 1993. Tim also operates https://DrawPlumbingPlans.com. His @askthebuilder YouTube channel was the first home improvement channel on YouTube.

Can I slide the old rollers off and existing track and slide new ones on if the wall is finished. It looks like there is not enough room at the end of the track.
I have 3 questions about your instructions: I want to be sure I am not misinterpreting the instructions and making assumptions about what is meant.
1. The rough opening is "2x the door with plus one inch" do you mean 2x the door width plus 1 inch?
2. How can the bottom plate, before it is cut out, be directly above the top plate? Do you mean the top plate needs to be directly above the bottom plate?
3.The instructions to seal all sides of the door before installing. do you mean it will come loose if I don't or that I will void the warranty, i.e. lose it?
Sharon, this is why I created this product - 15-Minute Consult. This requires more than simple typed answers.
Setting the nail height 3/4 from finished floor vs 1 1/2 from sub floor, why such a big difference if I set it at 1 1/2 from subfloor but later put in 1/2 thick floor tiles wont I have a big gap at the bottom of the door
Hi,
I'm trying to learn the minimum opening required to accommodate the installation of a 24" pocket door.
Thanks for your help!
Lindy