House Maintenance Ignorance

weathered cedar shakes

This shake siding has been neglected for decades. The cost to replace it exceeds $10,000. It could have been maintained for pennies on the dollar over the years. Copyright 2026 Tim Carter

House Maintenance Ignorance - Doing So Costs $$$

I shared with you last week that my youngest daughter is trying to purchase a home. She’s looking in central New Hampshire. This part of the state has a vast inventory of old homes. After all, New Hampshire was one of the original thirteen colonies and became the 9th US state in 1788. Many of these houses have substantial amounts of accumulated neglect.

My job in this column is to share with you what happens if you start to ignore periodic maintenance at your home. At first, it might be small things. Small things grow into big things. Defects start to become invisible to you, as you walk past them every day.

The last two houses my daughter asked me to look at were abysmal. The first home was built in 1790, and the second one was built in 1951. Think about that. The first home was built seventy years before the US Civil War. Layers of lead paint were peeling from windows, woodwork, and walls. There was deteriorated shake siding, and a laundry list of other things that needed immediate attention.

The only reason I even considered looking at this house was the brand-new three-car garage the owner had built in the past three years. Why he spent all this money on a detached garage instead of investing it in the house, I’ll never know. I knew this enormous garage could be rented out to store boats, motorcycles, jet skis, and snowmobiles. This income would have covered almost seventy percent of the mortgage.

My daughter made the correct choice to kick this house to the curb. The second time she saw it, she was overwhelmed with the amount of work that had to be done to bring it up to a decent living standard. She was terrified of the lead paint hazard, as she should be with her 23-month-old daughter.

I shared with the listing realtor that the homeowner’s failure to maintain the house caused my daughter to walk away. I estimated the house needed at least $175,000 worth of work. I did the simple math and determined the cost per square foot of buying and fixing up this house would be greater than the cost per square foot of a brand new home. Never forget that when you buy a new home, you often don’t need to do any significant maintenance for fifteen or twenty years.

The online listing photos of the second house, thanks to the magic of artificial intelligence, looked delightful. But it was another example of slathering lipstick on a pig. The list of defects in this second home was as long as a summer solstice day.

The listing realtor shared that the owner was partially disabled and unable to do the repairs herself. It’s also possible the owner had run into financial hard times. I understand that all too well. However, the owner was unwilling to discount the asking price to cover the cost of the accumulated neglect. My conservative three-page estimate put the repairs at just under $68,000.00.

Why is this important to you? I feel you need to know I was a real estate broker for over twenty years, in addition to being a home builder. I know that one in ten people at any given time would love to sell their home. You might be one.

The real estate market is dynamic. It changes each day depending on who is in the marketplace trying to sell or buy. The issue we have now is that many sellers are blinded by the fog of cheap money. I’ll go one step further; let’s call it what it was, stupid, cheap money.

For the past thirteen years or so, real estate prices rose to stratospheric levels because the interest rates on home loans were so low. Look at the historic records, and you’ll discover that 30-year loan rates below 4 percent didn’t exist except in the past fifteen years or so. I was able to refinance my own home loan in 2011 with an unbelievable 2.65 percent interest rate!

As interest rates drop, a buyer can afford to buy (borrow) more money. This automatically causes the prices of homes to rise faster than they should. Loan interest rates are now doing the opposite. They’re rising faster than flash flood waters. Many sellers are unwilling to recognize that the prices of their homes are dropping because the interest rates are now rising.

This means that your home must be in excellent shape to stand out in the marketplace. Your home should be the belle of the ball. This will allow you to get the highest sales price possible.

You couldn’t live in a more DIY friendly time than now. There are countless online videos that show you how to do minor projects and even some tougher ones once you accumulate some confidence. I’ve got over 1,000 of them on my Ask the Builder YouTube channel. Investing some sweat equity by painting and repairing things might allow you to collect tens of thousands of dollars or more at the closing table.

I’m available to answer any questions you have about what to look for when looking at an existing home for sale. Just use this link to set up a phone call:  https://go.askthebuilder.com/coaching

Column 1685
House Inspection Checklist

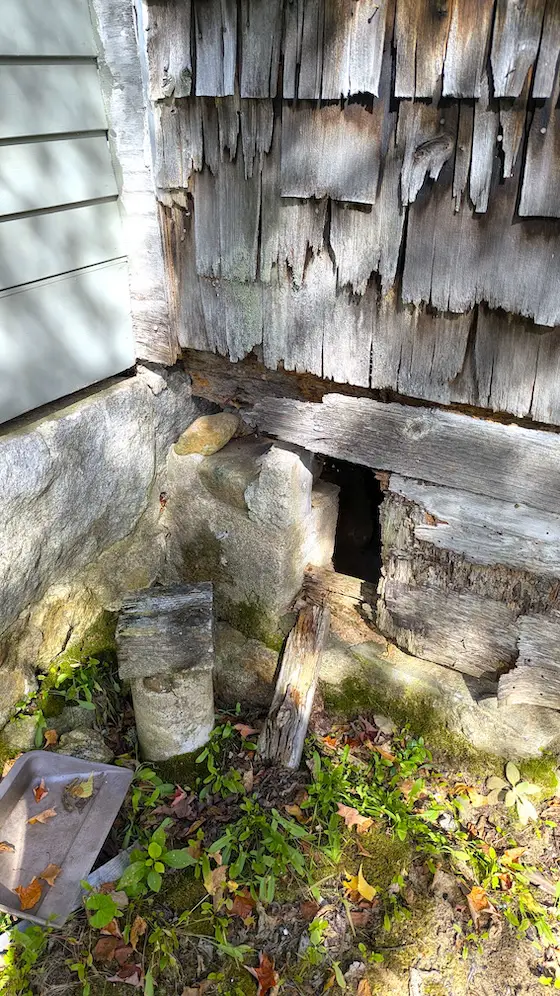
hole in foundation distressed shake siding

This massive hole is obvious. But how many subtle defects will you miss when looking at a house for sale? Copyright 2026 Tim Carter

House Inspection Checklist - Mine Can Save You Big $$$

This column could save you, or a loved one, tens of thousands of dollars. There’s a very good chance you’ll relate to the following story, especially if you can recall purchasing your first home.

I have three children. It was a dream of mine before they were a glint in my eye to help them build or remodel their homes. I’ve achieved 2/3rds of the dream. I helped build my oldest daughter’s new home in Bar Harbor, Maine. I installed the plumbing, electrical, and radiant heat systems in her home. It was a tremendous amount of work, but very fulfilling.

My son purchased a brand-new home four years ago. I helped him build a large patio three summers ago. We’ve added 1,100 square feet of finished living space in the past two years by transforming his unfinished basement. I’ve devoted quite a few past columns to this endeavor.

My youngest daughter is now trying to purchase her first home. The marketplace is awash with sellers trying to unload their homes. Mortgage interest rates are climbing faster than a squirrel scaling a tree after my dog chases it. Listing prices in many instances are dropping like a skydiver jumping out of an airplane.

Just five years ago, it was a seller’s market. I remember attending open houses with my son. There were often twenty other buyers clawing at each other in the house. Buyers were receiving multiple offers, many of which were over asking price. It was insane.

2026 Buyer's Market

The pendulum has swung the other way. It’s now a buyer’s market. Buyers have a huge advantage over sellers and can negotiate many things, including sales prices below asking prices. The issue is that many sellers are not willing to accept the reality that they bought their homes when interest rates supported high prices. As interest rates rise, the price of a home has to drop since a buyer can only afford a certain monthly payment.

The issue with a first-home buyer is he or she often injects far too much emotion into the process. My daughter wants a home more than a small child wants a piece of delicious candy. This is a recipe for financial disaster. I feel you need a bit more context; I was an Ohio real estate broker for twenty-plus years in addition to being a builder. I’ve seen a first-home buyer ignore serious defects in a home in their lust to buy it.

Many years ago, I developed a handy checklist for homebuyers. It contains over 100 items you should evaluate as you walk through a house you’re thinking of buying. You don’t have to be an expert, as it just asks you to judge the appearance of this or that.

For example, one of the items you look at might be the furnace or boiler. I think you’ll agree that you can determine one that’s very new vs. one that’s rusted, filthy, and otherwise thirty or more years old.

I believe when the checklist asks you to look at the foundation walls or a concrete slab, you can spot cracks. Some cracks might be harmless normal shrinkage cracks, but others might indicate a serious structural issue. If you don’t know the difference, then you’ll be able to employ a certified inspector later in the process to make the determination.

I designed the checklist to stifle the emotion that bubbles to the surface when looking at a home. It’s normal to downplay cosmetic defects while your brain paints a picture of a delightful home decorated the way you want. The issue is you often don’t do the math to get from the harsh reality of a neglected home to one that looks like it’s a feature article in a home magazine.

This past weekend my daughter used my checklist while she went through the third house in her hunt. I’m happy to say the checklist did its job. She was able to spot quite a few cosmetic items and two major structural items that need to be addressed.

The buyer's broker representing my daughter had never seen a checklist like mine. She commented that it will help her communicate to the listing agent why my daughter’s offer is so far below the current asking price.

I urge you to consider using my checklist. At the very least, it might save you hundreds of dollars. My checklist might uncover one or more dealbreakers that force you to walk away long before you go to the effort to hire a professional inspector

You can obtain the checklist using this link: https://go.askthebuilder.com/checklist. Be sure to type the word go followed by a period.

I’m available to answer any questions you have about what to look for when looking at an existing home for sale. Just use this link to set up a phone call:  https://go.askthebuilder.com/coaching

Column 1684

Concrete Foundation Patch Repair

patched concrete foundation

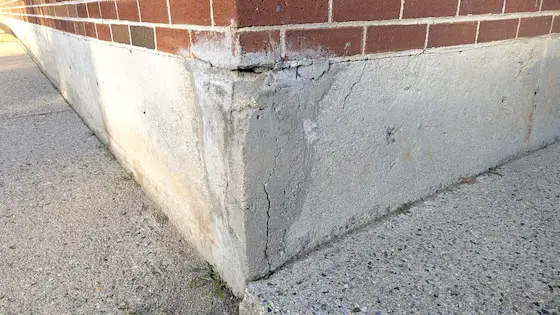
The person who tried to patch this concrete foundation either didn’t care and/or didn’t bother to research how to achieve professional results. Copyright 2026 Tim Carter

Concrete Foundation Patch Repair

Several nights ago, I helped launch a floating paper lantern with my granddaughter, my daughter, and my lovely wife. It was just after sunset with a slight chill in the air. We were at the north end of Lake Winnipesaukee in central New Hampshire. Hundreds of others were there lighting small squat candles in their cedar-plank lanterns. A gentle breeze carried the lanterns out into the lake. It was a perfect night to create a memory.

We found a place to park at the local post office. I backed into a parking space so I would have great visibility when pulling out in the dark. I noticed a botched patching job at the rear of the post office. Cement was smeared on the face of three red bricks that sat on top of the cast concrete foundation.

Some contractor, or postal maintenance employee, had botched the repair. The workmanship was so bad, I wondered if my toddler granddaughter could have produced a better result. The corner of the foundation had fallen away, and the contractor tried to do his best to add new material to re-create the corner.

You may have a similar job to do or some other task where a hole or divot needs to be filled. I was taught decades ago by an elderly concrete mason a magic trick that ensures the repair patch will last for fifty or more years. I’m happy to share his wisdom with you, hoping you have success as I have had countless times.

The repair process starts by removing all loose material. This includes all dust and any organic debris, dirt, etc. This is one job where a pressure washer excels.

The next step is to assemble the materials you need. You can purchase small bags of pure Porland cement from a home center or hardware store. You’ll need sand and some gravel. Sand and gravel come in different sizes, shapes, and colors.

Match the Sand

It pays to take a close look at the finished surface of the concrete you’re trying to patch. It may have a sandy texture. Look closely at the sand. Sand is nothing more than very small pieces of rock. Look at the shape and color of the sand. Try to obtain sand that has the same blend of both particle size and color. This will pay off in spades a month from now.

Gravel is what gives concrete its strength. Gravel also comes in different shapes and colors since it’s also rock. My favorite gravel is pea gravel. It derives its name because the small rounded stones would pass for tasty green peas if you painted them a vibrant green!

Use the Correct Gravel

The size of the gravel used in your patching material depends on the thickness of the patch. The diameter of the gravel should never exceed 1/3rd the depth of the patch. For example, let’s say the depth of your patch will be just under one inch. This means no piece of gravel should be greater than one quarter of an inch. Many rookies don’t adhere to this important repair axiom.

You only need four things to create the repair compound: Portland cement, gravel, sand, and clean water. The ratio of the ingredients is very important. Realize that the cement is the glue that bonds the sand and stones in your mix together. The cement also bonds to the concrete you’re patching.

I like to blend 3 parts gravel, 2 parts sand, and 1.5 parts cement to make my mix. I mix all three together in the dry state until it’s a homogeneous mix in color. I then add just enough water to create a plastic mix that resembles a chunky chili or oatmeal. Should you add too much water, the resulting patching compound will not be as strong as it could be.

Secret Cement Paint

The old concrete mason’s secret was cement paint. This is hard-earned knowledge that’s transformed from history, to legend, to myth. Cement paint is just a mixture of Portland cement and water. You mix the two together until they resemble a thin paint. You don’t need to mix much, but you need to mix it just before you intend to use it.

Mist the concrete you’re about to patch with water. Use an old spray bottle. Just get it damp. Brush on a thin layer of the cement paint. Immediately cover the cement paint with your patching mixture. It’s best to avoid working in direct sunlight or on a windy day. This causes the cement paint and patching compound to dry to quickly. Overcast weather with temperatures in the 60-70℉ range is best.

Use a wood or magnesium float to smooth the patching compound. If you’ve not worked with one, I suggest you practice first. You can also watch countless concrete finishing videos on YouTube.

Thirty days after you finish the job, you can acid wash the repair. This extra step will help make your patch look like the original concrete. Use muriatic acid for this task. Mix one part acid to ten parts water. Read all the safety instructions on the acid container! The acid will wash away the fine cement paste at the surface of the repair, allowing you to see the sand. If you did a great job of matching the sand and gravel colors, your patch will look superb.

I’m available to help answer any questions you have about patching concrete. Just use this link to set up a phone call:  https://go.askthebuilder.com/coaching

Column 1683

AquiPor Porous Concrete Questions

AquiPor Porous Concrete Questions - Only Time Will Tell

I received an email from Greg Johnson on September 16, 2026. His signature tag indicated he was the CEO and Co-Founder of Aquipor. Here's what he sent me:
Hi ,

I wanted to invite you to a small technical session I’m hosting for people in the concrete, infrastructure, and related industries.

AquiPor has developed a patented technology that transforms conventional concrete into a permeable surface with sub-micron porosity, allowing stormwater to pass through the concrete while filtering pollutants at the surface.
Rather than doing a typical webinar, I want to keep these sessions small and conversational.
I’ll spend about 15 minutes showing you:

  • How the technology works
  • What makes AquiPor different from traditional pervious concrete
  • What we’ve learned from our latest real-world installations
  • Where we’re headed next

Then we’ll open it up for Q&A. If you have technical questions about the material, manufacturing, installation, performance, or commercialization, you’ll be able to ask me directly.
This summer we completed our largest project to date, roughly 3,000 square feet of AquiPor porous pavers at the Estates at Farragut. The project also demonstrated that AquiPor can fit into existing concrete manufacturing and installation workflows.
I’m hosting two sessions:

Tuesday, September 22 - 11:30 AM PT (2:30PM ET)
Thursday, September 24 -  3:00 PM PT (6:00PM ET)
Choose the session that works best for you → Register Here - (I disabled the link for all the obvious reasons)
I’d be glad to have you there.

Greg Johnson
AquiPor Technologies, Inc.
Cofounder | CEO

# # #

You can visit the Aquipor website and view a video of a slab of concrete soaking up water like a sponge.

I responded the next morning, saying:

Greg,

My college degree is in geology with a focus on hydrogeology.

While Aquipor appears to be a magic product, there's nothing on the website describing how it maintains the clear pathway from the surface to the underslab layer of soil. How exactly will fine silt and clay particles that enter Aquipor be removed? The concrete matrix will eventually clog just like any other filter.

Once this happens, your Aquipor will act like normal concrete, not allowing water to pass through the matrix.

That's not going to happen with Aquipor.  Prove me wrong.

I've yet to receive a reply from Mr. Johnson as of September 18, 2026

These are the questions I'd ask Mr. Johnson if I were to interview him:

What happens if the subsoil under your Aquipor concrete is a dense clay? Will the clay block the downward movement of water resulting in overland flow of stormwater across the concrete?

Air, oil, and water filters clog with debris, dust, dirt, etc. Some can be cleaned, but most are disposed of and a new filter is installed. Aquipor appears to be a concrete filter. How will one clean the accumulated dirt and debris out of the concrete?

What kind of long-term testing was done to show that Aquipor continues to soak up water at the same rate as the day after it was poured? Can you share who did the testing as well as the test results?

Those are just a few of the questions I'd ask. What kind of questions can you come up with? Just put them in the comments.

Kenny Chesney wrote a song about my skepticism. Listen to the lyrics:

Power Sander for Wood

kreg palm sander

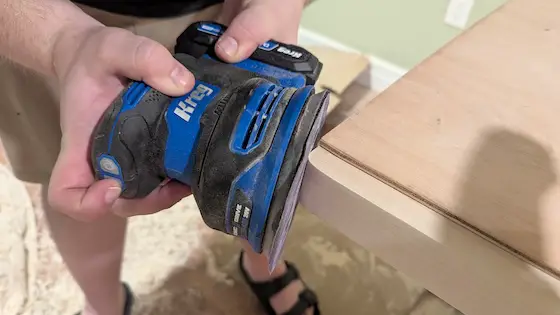
A battery-powered palm orbital sander rounded off this square corner in less than a minute. Copyright 2026 Tim Carter

Power Sander for Wood

I’m a big fan of sanding tools. You should be too if you desire professional results on all your projects. These magic tools also save vast amounts of time.

Days ago, I watched my son use a dandy battery-powered orbital palm sander to round off a square corner on a solid maple countertop. He transformed the sharp corner into a safe rounded corner in about 45 seconds. Without the power tool, he might have invested ten minutes or more.

A palm sander is a small vibrating machine. The one my son uses has a circular pad. It spins in an orbital motion much like you might swirl your hand on a window while cleaning it. This orbital motion helps prevent damage to the item you’re sanding. They’re marvelous inventions.

You can use a palm sander for many tasks. I like to assemble fine furniture from kits. A palm sander, in my opinion, is the best tool to create silky-smooth surfaces on the hardwood pieces before staining.

It’s best to practice with one on a scrap piece of wood if you’ve never used one. A palm sander is very easy to master once you match the correct grit sandpaper to the job at hand. Minimal pressure against the surface is all that’s required. Allow the tool and sandpaper to do the job, not your muscles. You can damage the tool if you apply too much pressure.

While he was doing this task, I was using my trusty belt sander. My job was to sand down the edge of a decorative board so it would fit the wavy contour of a long wall. Carpenters refer to this as scribing. It’s an art, to be sure.

A belt sander resembles an upside-down treadmill. The belts are normally 3 or 4 inches wide. The sander contacts about 18 square inches of material at once. It’s an aggressive tool that requires much respect.

My belt sander is a treasured tool. It’s a high-quality one made by Bosch. I’ve had this corded tool for almost forty years. I’m starting to think that it’s indestructible.

You can sand larger things with a belt sander with ease. Let’s say you want to smooth an outdoor picnic tabletop that’s been abused. A belt sander can make the table look like new in just minutes using several grades of sandpaper. A coarser-grit sandpaper is used for the initial sanding. You then switch to finer and finer grits to make the wood as smooth as glass.

I’ve found that moving the belt sander in a slow orbital motion is best to prevent damage. This tool can cut down into wood in a jiffy, creating damage if you’re not careful. I recorded a video showing how to use a belt sander on an oak tabletop.

Let’s say you can’t afford an electric belt sander. You can purchase a hand-powered tool that does almost the same thing. Some drywall finishers use a pole sander to smooth walls and ceilings. A sanding screen attaches to the flat pad at the end of the pole. New sanding screens do a great job of sanding rough wood.

Keep in mind that not all sandpapers are the same. The light-brown ones you see are almost always aluminum oxide grit. These possess a magical self-sharpening power as you use them. The red or orangish-red sandpapers contain garnet grit. The grit tends to round off and dull as you use the sandpaper. This paper is perfect to help burnish the object you’re sanding.

You can minimize your sanding effort by cutting away excess wood using rasps. A rasp is a hand tool that works just like a fingernail file. I always had one in my tool belt to help me cut away wood when working with wood siding and door and window trim.

The common rasp has both a flat and curved face. It also has coarse and fine cutting surfaces. It’s an invaluable, affordable tool you should own that will save you time. I just looked on Amazon, and you can get two of them for $7. What a deal!

CLICK HERE to purchase two great wood rasps.

I’m available to help answer any questions you have about sanding anything. Just use this link to set up a phone call:  https://go.askthebuilder.com/coaching

Column 1682

Secret Hiding Containers

secret cabinet in speakeasy

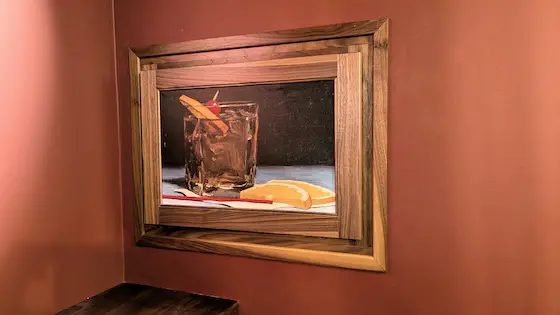
This artwork can be found in my son’s speakeasy. Behind it is a clever hiding place for rare and expensive spirits he doesn’t want his friends to see. Copyright 2026 Tim Carter

Secret Hiding Containers

Not too long ago, I conducted a survey. I reached out to the tens of thousands of those who receive my free newsletter. I called it the Magic Wand Survey. I asked, “If you could wave a magic wand and have any useful and cool feature installed in your home, what would it be?” You can subscribe to my free newsletter here.

A vast majority of folks wanted clever and secret places in their homes to store all sorts of valuables, large and small. I wasn’t shocked by this because I have installed all sorts of secret hiding places in the homes I’ve built for customers. The owner of the first custom home I built decades ago had me install a metal floor safe in his master bedroom closet. It was hidden under the carpet.

I provided a place in the survey in case a person wanted to share an idea of their own. The responses were amazing. I’m in the process of compiling all of the survey input and ideas into a useful book. I hope to complete it in the next six months.

Fires & Floods

Quite a few people wanted to make sure their possessions would survive a fire or a flood. These two natural events require special containers. It’s much easier to protect valuable items from water than it is from extreme heat. You can purchase affordable plastic containers with waterproof seals that will keep things dry, even if submerged under a few feet of water. I recommend you test these yourself before you trust them with irreplaceable items.

You can do an interesting test in your own oven to show how your important papers can succumb to a fire. Print out a test document on regular paper. Preheat your oven to 325℉. Place the paper in the oven and stand there watching what happens. Do not leave the paper in the oven unattended.

You’ll probably discover the paper will discolor. If the temperature exceeds 350℉, the paper may start to brown considerably. House fires produce temperatures far in excess of 350℉! You can purchase fireproof safes that can protect documents for a short period of time, assuming the fire department arrives and quenches the fire in short order.

My close friend and his wife’s house burnt to the ground twenty months ago in the tragic Eaton Fire in Southern California. Just about everything in the house was reduced to ashes by the raging fire. That said, some of his wife’s religious holy cards were only singed. That was truly a miracle. This video shows swirling embers created by the Eaton Fire:

Keep in mind that photographs, film, slides, treasured magnetic tapes, and all forms of digital storage are much more susceptible to high temperatures. As soon as the temperature exceeds 125℉, all of the above are subject to damage.

You can increase the chances of survival by surrounding your fireproof container with 8 or 12 inches of solid masonry. This is a proven fireproof method because it’s how we protect wood houses from fires. Any master mason will tell you that building a chimney surrounded by that much solid masonry will prevent the nearby wood from catching on fire.

You can put your fireproof safe on the lowest level of your home and cover it with solid concrete blocks. Put your safe on a concrete floor and then surround it with the solid masonry.

Let’s assume you’re not too worried about a fire or flood. You then have lots of easy options to hide valuables in your home. The trick is to think like a magician. The art of magic is making things disappear right before your eyes.

I’m sure you’ve seen old movies where a person had a hidden safe behind a framed photo or painting on a wall. My son and I just used this old trick in his basement speakeasy. We were able to create a hidden space 20 inches deep in a wall shared with the bathroom.

We built a cabinet that slid into the deep wall space. We outfitted the cabinet with special hinges that allowed a painting to lift out and up like fancy gull-wing doors on a car. He intends to put very expensive distilled spirits in this hidden cabinet.

A friend of mine stores currency and other valuables in his refrigerator. He salvaged a mayonnaise jar, cleaned it, and then painted the inside of the jar with paint that matches the color of the mayonnaise. That’s pretty clever.

If you’re building a new home, you have all sorts of opportunities to create hidden spaces. I happen to have one in my home. I was able to create a 24-inch-wide space 8 feet high between two rooms. Normally, one wall would be shared by the rooms. I built two walls with the cavity between them. I gain access to this narrow space in another room, hiding the opening with a tall lightweight piece of art that hangs using a French cleat. I can lift up the art in seconds to gain access to the hiding space.

You can hide small items in any number of things that would trick a burglar. Go to this link, and you’ll be amazed at how all of these things would work in your home!

Column 1681

Epoxy Repair for Concrete

epoxy repair for concrete fiber cement siding

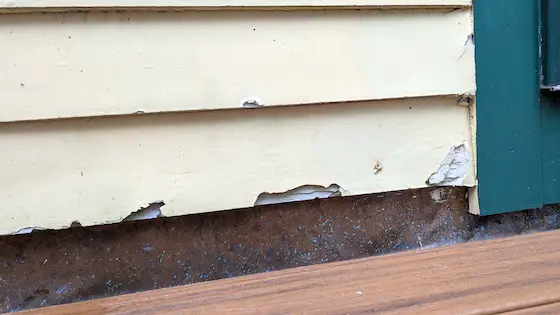
This ice-damaged fiber-cement siding will look like the one above once the gouges are filled with masonry epoxy that’s easy to use. I can CALL YOU ON THE PHONE to describe how to do the repair. Copyright 2026 Tim Carter

Epoxy Repair for Concrete

Several days ago I had a phone conversation with Wayne, a very good friend, after he and I completed our morning ritual Morse code conversation. He approached me at the ripe age of 74, wanting to learn Morse code. I took him under my wing, and now he’s very proficient.

He asked me about repairing a concrete curb in his rear yard. A chunk about the size of a baseball had cracked off. Wayne shared that he could place it back together and you would only see the fine line of the fracture. He wanted my advice about a great way to reattach it.

I said, “Wayne, I’d use masonry epoxy. There are all types. Some you can inject into cracks, some are translucent, some are like peanut butter. I’ve had success with every one I’ve tried. I did an almost identical repair to a small concrete garden sculpture a year ago. A small water feature figurine’s head cracked off. The epoxy repair is almost invisible.”

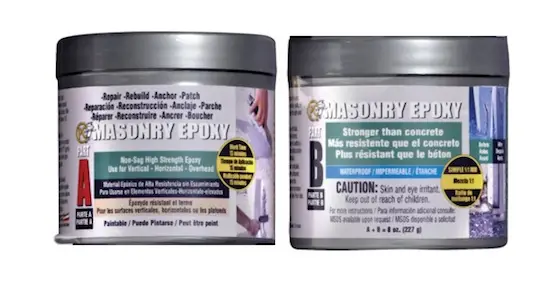
I convinced him to use the two-part epoxy that mixes with very little effort. All he would need would be a very thin coat on the fractured face of the concrete to bond the two pieces of concrete together for a very long time. The epoxy ends up stronger than the concrete itself, and it’s rated for exterior cold-climate exposure.

I’m about to use the same material to repair ice-damaged fiber-cement siding that’s adjacent to my deck. I live in central New Hampshire where winters are known to be cold, snowy, and icy. Ice-cold rain splashes up from the deck in December and gets the lower edge of the siding wet. The painter, I believe, never coated this edge of the siding. In his defense, it wasn’t an easy task, and without a mirror, you wouldn’t know whether you got good coverage.

Season after season, the water soaked into the siding and would freeze. The expanding ice was able to fracture the wood fibers used in the siding. If my house had the original fiber-cement siding of old that used asbestos fibers instead of wood, I’d not have to do the repair. There are no less than ten old houses within five miles of my house that have this ancient durable siding. All of them have no frost damage to the lower row of the siding. The asbestos only poses a health hazard if you start to beat on it with a hammer, creating clouds of dust. Most people don’t do this to their siding, at least not here in New England.

My siding repair is the hardest of all. The epoxy I intend to use is thick, but it can sag. I plan to slide a piece of heavy-duty aluminum foil up behind the siding, leaving about 2 inches hanging below the bottom edge. I’ll bend that excess out away from the wall.

concrete epoxy cans

Heres the same epoxy but it comes in little jars in case you want to mix it and apply it with a putty knife. CLICK THE PHOTO NOW TO HAVE THIS EPOXY DELIVERED TO YOUR HOME.

I’ll then wedge a straight 3/4-inch-thick board up against the bottom of the siding. This will act much like a form board a mason places when pouring a concrete sidewalk or driveway. I’ll then fold the aluminum foil over this form board. The foil prevents the epoxy from bonding to the form board.

Once the epoxy is applied and has cured, I’ll remove the form board after 24 hours. I’ll trim off any excess foil, lightly sand the epoxy, and paint it to match the other siding. It takes very little skill to get professional results.

The epoxies are not limited to masonry repairs. I’ve used an amazing two-part epoxy for rotted wood repairs. It’s important to note that the epoxy doesn’t take the place of the structural component of a piece of wood. It just seems to work much better than traditional exterior spackling products, especially if you have a deep repair.

The wood epoxy I’ve had the best success with also has a liquid wood hardener that’s used as a first step. Dry, rotted wood often is brittle like a saltine cracker. The liquid hardener is brushed onto the rotted wood. It soaks in and dries in hours, causing the wood to be far less brittle. This allows you to apply the epoxy without crushing the wood structure.

I love how easy it is to sand the wood epoxy. It’s perfect for exterior painted trim. Using an affordable orbital sander, you can make the epoxy silky smooth. Think of all the big holes, cracks, gouges, etc. that you can repair with this magic epoxy.

This wood epoxy is not meant for use with semi-transparent stains. The epoxy dries a solid putty color. If you’re trying to match the grain and appearance of real wood, you’ll have to do that on top of the epoxy using a wood-graining kit.

I know you want to know what epoxy I’ve used with great success. Here’s a link to both the masonry and wood epoxies that I’ve had the best luck with. Follow the instructions and you’ll do well too: https://amzn.to/4xuhAje

I’m available to hold your hand over the phone to do repairs using these two epoxies. Just use this link to set up a phone call:  https://go.askthebuilder.com/coaching

Column 1680

ADU & New House Cost Calculator

new house with zip sheathing

The owners of this new home used a special spreadsheet containing secret formulas that calculated the cost of their new home within a fraction of the actual cost. It saved them thousands of dollars and prevented lost sleep. Copyright 2026 Tim Carter

ADU and New House Cost Calculator.

You may be sitting on the ADU or new-home-construction fence, wringing your hands and wallowing in worry about what it’s really going to cost. You’re frozen with fear that the price of your project will exceed your budget by many thousands of dollars.

The risk is multiplied if you’re about to engage an architect to draw up plans for this undertaking. A custom plan in today’s market is going to set you back tens of thousands of dollars. Can you imagine the pain you’ll feel when a builder uses those plans and comes back with a price $100,000 or more higher than the budget you shared with your architect six months earlier? Don’t expect a refund from the architect.

Your inaction may cause even more pain. Inflation is raising the prices of both labor and materials for new homes. You might not think of something as simple as fuel. Diesel fuel prices are soaring. Hundreds, perhaps thousands, of gallons of this liquid gold will be burned directly and indirectly. Heavy equipment working on your job site and trucks delivering supplies burn diesel.

Imagine if you could conjure up a ballpark price of what your ADU or new home might cost using a very simple spreadsheet. I’m talking about one that contains built-in secret formulas used for years by me and just about every mortgage lender in the USA.

This simple tool empowers you to predict, with a high degree of accuracy, the actual construction cost. You just have to come up with some very important data you can share with a few subcontractors. This data can be located at most, if not all, websites that sell house plans. When you settle on a house that appeals to you, a large photo is displayed on its sales page, a small floor plan you can enlarge, and most importantly, the total square footage of the house is shown.

This free data will allow you to estimate the cost of quite a few things. The floor plan will show the layout of all the rooms. Window and door sizes can be estimated with a little help and common sense. All plumbing fixtures can be determined, even though the exact type of toilets, sinks, and faucets are not yet specified.

You can often pay a very reasonable fee to a subcontractor to provide you with an accurate estimate for the labor and materials. Do this with several different ones, and it will be a tiny fraction of what you would have paid an architect to produce full-blown plans.

A window and door supplier can use the information you gathered to produce an estimate for all your windows and doors. You’ll be asked for your input as to the level of quality you desire so they can give you an accurate estimate.

A roofer can look at the preliminary drawings and usually provide a very accurate price. You’ll just have to make a decision on the type of roofing you would use on your new home.

Armed with these fresh estimates and the spreadsheet I used for decades, you can now spend a few minutes and produce a very close price on what that house would cost to build in your city or town.

The ability of the spreadsheet to calculate the cost of the entire house based on just one estimate for say the roofing, plumbing, or electrical bids lies in a universal axiom adopted by mortgage lenders decades ago. Home construction lenders protect themselves as they disburse monies to the builder during the construction process.

The lender sends out an appraiser to the job site. This trained professional notes all those aspects of the house that are complete the day of his inspection. The lender doesn’t want to expose itself to a loss by giving out more money than is due at the time.

Years of lending experience, as well as access to detailed bids, allowed lenders to assign a percentage to each aspect of the home building process. For example, their research shows that the cost of installing a poured concrete foundation might represent X percent of the total cost of the house. The same is true for a list of 50-plus items on the spreadsheet.

A lending officer years ago shared a confidential appraisal worksheet with me that showed the percentages. I decided to check its accuracy decades ago against the detailed line-item bids I produced for homeowners. I was stunned by the accuracy of the secret percentages. This spreadsheet ended up saving me hundreds of hours of time. I could come up with a bid price by only getting bids from a few of my subcontractors. My total bid price was always very close to my competitors.

I’ve decided to make this spreadsheet available to you. It comes with a set of instructions detailing how to best use it to get a very accurate price for your ADU, your dream home, or a simple small home you’re thinking of building. The spreadsheet will work with any spreadsheet software.

I’ve lowered the price by a substantial amount as a gift to you. You can get your ADU and New House Cost Calculator here.

Column 1679

Vessel Sink Drain

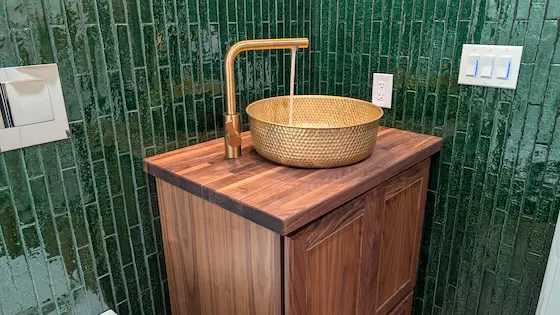
brass vessel sink green vertical subway tile walnut vanity

This solid-brass vessel sink is installed on a solid walnut butcher block top. The crackled green subway tile walls create a dramatic look. Copyright 2026 Tim Carter

Vessel Sink Drain

A Vessel Sink Drain is Much Higher

I installed a stunning vessel sink two weeks ago at my son’s house. We’re in the homestretch of a large basement remodeling project. It’s fulfilling to see all of our hard work and planning pay off. My biggest thrill has been watching him soak up building knowledge like a bone-dry sponge. Ask my sweet, loving wife, and she’ll tell you that before our children were even a glint in our eyes, I had proclaimed that I wanted to help my kids build or remodel their own homes.

Vessel Sinks are Not New!

Vessel sinks are a fascinating throwback to the days of old. My wife and I were antique lovers and hunters before we were married. We accumulated all sorts of things from the late 1800s, including two solid-walnut breakdown wardrobes, a very old solid walnut drop-leaf table with tiger-stripe maple legs, and a solid-oak washstand complete with a water pitcher and wash basin.

You probably take your vanity and kitchen sinks for granted. Keep in mind indoor plumbing for the masses didn’t really exist until the late 1800s and early 1900s. There were no sinks in homes before this. You’d use a giant china wash basin or a crude bucket to wash your face!

You’d pour the warm or cold water into the giant basin or bowl. The next step would be you bending over the basin to then splash water up onto your face. The giant basin captured most, but not all, of the water.

A modern vessel sink is just a new and improved basin! Some are works of art. My son’s is solid brass. All of the modern vessel sinks have a hole in the bottom, allowing the water to flow into your plumbing system.

Vessel Sink Drain Problem

There are several very important things you need to consider should you decide you want a vessel sink. The biggest mistake I see is that they end up too high. Washing your hands can be awkward as you have to lift your hands up to get over the rim of the sink.

The good news is vanity cabinets are available in different heights to compensate for this. The best way to ensure your sink is the right height for you is to try to match the height of the sink you want to the height of a large kitchen mixing bowl.

Take your mixing bowl and set it on your kitchen countertop. The odds are your countertop is about 36 inches above the finished floor. If you’re a tall person, that might be the right height. I’m not too tall, and that standard kitchen-countertop height! would be too tall for me.

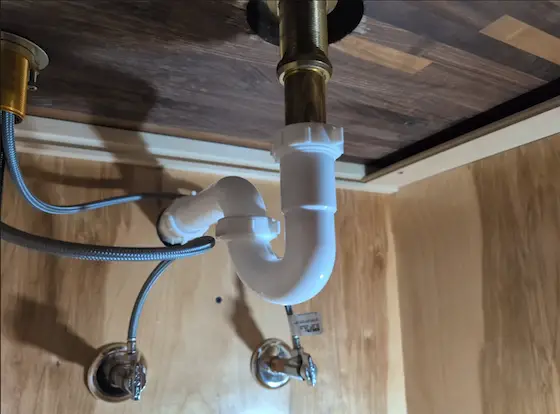
vessel sink drain with p-trap & countertop

Look how high this vessel sink drain is. It exits the vanity cabinet just below the rear screw cleat! Copyright 2026 Tim Carter

The drain pipe that sticks out of the wall also needs to be much higher than normal. If you don’t do this, you end up with a tremendous amount of wasted space in the vanity cabinet. The plumber will have to install a very long tailpiece from the bottom of the sink to the P-trap. I ended up roughing in the drain pipe about 28 inches above the finished floor in my son’s basement. That’s almost 10 inches higher than normal.

The Faucet Must Be Special

You’ll have to have a special faucet that has a high arm that clears the top rim of the sink. You’ll discover it’s best to have a single-handle faucet. You should consider one that has a swivel faucet arm, as the valve handle will end up almost 90 degrees away from the direction of the faucet arm.

The length of the horizontal part of the faucet arm is also critical. It needs to be long enough to get well into the inner diameter of the vessel sink. If it’s too short, when you wash your hands, your hands will bump up against the rear wall of the sink. Water will splash out of the sink, creating a very big mess.

Don’t hope the countertop fabricator will get the location of the faucet hole right. It’s best for you to do a dry run using a piece of cardboard, your new vessel sink, and your faucet. Cut the cardboard to match what the actual size of the countertop will be. The next step is to set the vessel sink on the cardboard so the front of it is about 3 inches from the front edge.

Hold the faucet next to the sink, making sure you can operate the valve handle with ease. Make a mark on the cardboard where the center of the faucet hole should be. Cut the hole and see if everything is just how you want it.

It’s best to do this exercise with an inexpensive piece of 1/4-inch luan plywood. This way you can install the faucet as it will be in a real countertop. You must make sure the faucet has all the necessary clearances.

Column 1678

Undermount Sinks Add Value to a Home

The Builder's Guide to Seamless Undermount Sink Installations

Undermount sinks have become a popular choice among homeowners who want a clean, modern look in their kitchens and bathrooms.

This style of installation removes the visible rim of the sink, creating a seamless transition between the countertop and the basin. Builders are increasingly asked to deliver this finish, and client expectations are high. A truly seamless result depends on careful planning from the start, precise execution during construction, and attention to detail in the final stages. Poor installations are one of the most common sources of callbacks and dissatisfaction. This guide covers the key principles builders should follow to achieve professional, long-lasting results.

Why Builders Choose Undermount Sinks

Undermount sinks are attractive and practical, both of which make them a perfect fit for the current trend of clean-lined millwork. Without a raised lip around the sink basin, there are fewer lines in the countertop to break up and nothing to catch debris as you swipe the countertop clean. Undermount sinks also create more counter space. In homes where kitchen or bathroom size is tight, homeowners really appreciate an extra inch of counter space. All of these benefits have led to the undermount becoming standard for many homes. Installed correctly, undermount sinks give a kitchen or bath a professional, finished look that clients love.

Planning and Coordination Before Installation

A successful undermount installation starts well before the countertop arrives. Good communication among the sink specifications, cabinet building, and countertop templating is key. The sink must be selected prior to templating, so the cutout can be sized appropriately.

Sink material, size, depth, and mounting method influence both the required cabinet support structure and the countertop fabrication. A reliable countertop company will help ensure that there is no misalignment or inadequate support in the final countertop. Builders who view this as an exercise in collaboration with other trades are less likely to run into problems come installation time.

Tools and Materials Needed for a Professional Result

An ideal undermount sink installation process involves having the right materials and tools. To achieve a professional finished product, you should use a strong support frame or brackets beneath the sink, quality clips or mounting hardware to fix the sink in place, a high-grade construction adhesive, and the proper sealant that forms a barrier between the sink and the countertop. You’ll also need the right tools to measure accurately and a template to follow when making your cutouts. Choosing the correct materials is critical because sub-par glue or insufficient supports will result in the sink moving, unsightly gaps, leaks, and even a wholesale failure. Spending the money to get high-quality products at this stage will mean that you get many years of performance out of your sink installation.

Step-by-Step Installation Process

In order to get the best results, the installation process should proceed in a specific order.

The cabinet underneath must be prepped with enough support framing according to the specifications of the sink manufacturer.

After the templating and cutting, the sink should be fit from below and the necessary clips or brackets properly attached.

The adhesive should be applied in the right manner so that it creates a bond strong enough to support the weight of a full sink, among other things.

The sink should then be fully seated and a continuous bead of sealant should run around the section where the sink meets the countertop.

The sealant should then be properly tooled so that it is both strong and watertight.

By taking a bit more time with the support structure, along with the application of the sink and the sealing process, you'll likely prevent common problems associated with the sink issue.

Common Mistakes and How to Avoid Them

A few commonplace errors can compromise an undermount sink install. Insufficient support under the sink may cause it to pull away or separate over time. A bad seal on the joint leading to moisture creeping into the cabinet may result from an unlevel substrate. A sink placed out of square or inappropriately in the cutout will leave a noticeable gap after installation that can be difficult to correct.

By understanding in advance the necessary support, using carefully tested hardware and sealants and checking levels and placement before the final set, installers can prevent these errors and make sure that their installations go smoothly.

Finishing Touches and Quality Control

After the sink is placed and sealed, there are a few steps to make sure that everything is in place. Clean the sealant from the top and sides of the sink while it’s still fresh so that the barrier works without looking unfinished. Make sure the sink is supported and level. Verify that the sink is fully supported and that it is set level.

Lastly, take a look at the line of sealant; it should be one continuous bead with a tooled, uniform appearance. Taking your client on a walk-through will ensure that they’re satisfied with the result, and verifying these details will only add to their confidence in you. It’s a few extra minutes of work, sure, but it’ll help you catch any errors before you leave the job site.

Long-Term Performance and Maintenance Advice

Builders can provide clients with useful guidance on maintaining an undermount sink installation. Proper sealing at the joint is the most important factor in preventing water damage. Clients should be advised to avoid harsh abrasive cleaners that can damage the sealant over time. Regular inspection of the sealant line allows for early maintenance if any deterioration occurs. When these simple practices are followed, a well-installed undermount sink can remain functional and attractive for many years.

Sourcing Quality Undermount Sinks

Choosing a well-made undermount sink from a reputable supplier contributes to a successful installation. Reliable products tend to have consistent dimensions and clear installation instructions, which helps reduce complications on site. Many builders look for reliable options when selecting an undermount sink for their projects, as this supports both the quality of the work and long-term client satisfaction.

Conclusion

Achieving a seamless undermount sink installation depends on early planning, proper coordination, and careful execution at every stage. When builders pay close attention to support, alignment, and sealing, the result is a durable and attractive installation that meets client expectations. Attention to detail during both planning and installation leads to fewer problems over time and stronger professional outcomes.