Gutter Guard Cleaning

micro mesh gutter guard clogged with moss, algae, and mildew

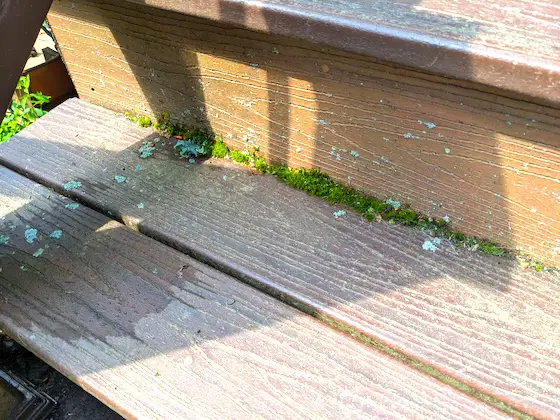
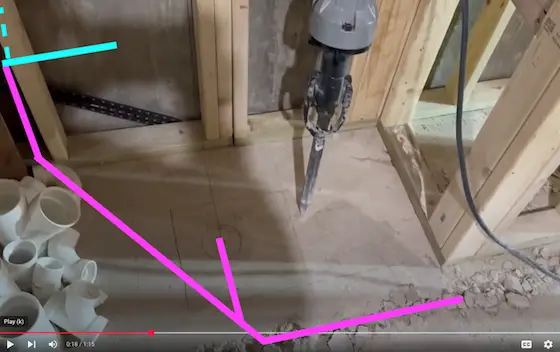
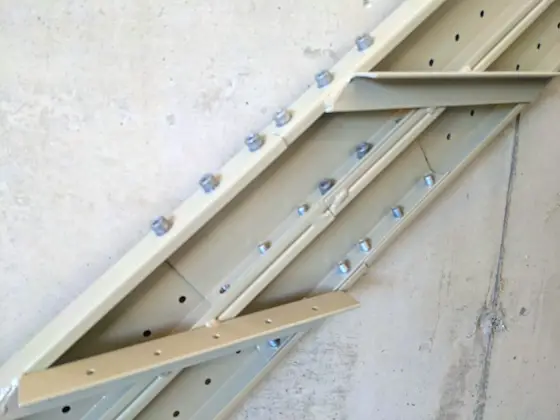
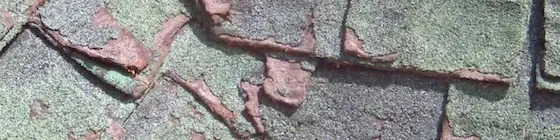
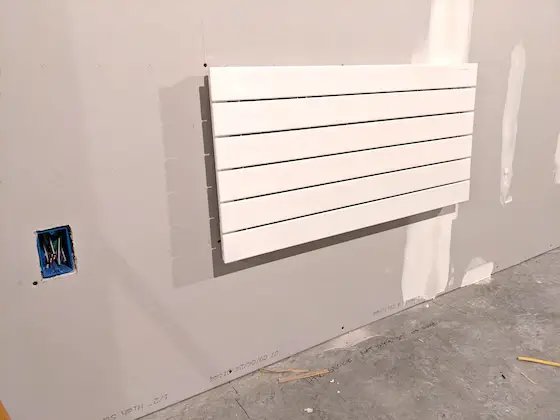
These are micro mesh gutter guards. I installed them myself ten years ago. Organic debris, algae, and moss clogged the tiny openings causing them to fail. A pressure washer restored the guard on the left to original condition. Copyright 2025 Tim Carter ALL RIGHTS RESERVED

Gutter Guard Cleaning - You WILL Be Up on Your Roof

Do you attend home and garden shows? These events are almost always held in the spring. They’re a great place to see new products for both the interior and exterior of your home.

I recall thirty years ago, when the gutter guard industry began to gain momentum. This was just after I started writing this syndicated column. New styles and gutter guard designs were popping up as fast as dandelions in my lawn. The manufacturers all said you’d never have to get up on your roof to clean your gutters again. Most of them were not telling the truth.

My home was surrounded by evergreen and deciduous trees. It was a perfect candidate for gutter guards. I had over 240 feet of gutter to protect. The first product I used was an abysmal failure.

Money was tighter than a banjo string around the Carter house at that time. I purchased a flimsy plastic gutter guard that had diamond-shaped holes punched in it. A kernel of corn could easily pass through the knockouts.

The primary reason the gutter guards failed is that the guards lay pretty much flat across the top of my gutters. I had installed my gutters somewhat high on the 1x6 redwood fascia board. I created a shelf for the leaves, twigs, dead flower blossoms, pine needles, and bits of tree bark.

Lately, I’ve seen TV commercials for a similar gutter guard made from metal. The company shows the gutter guards being installed just as I did all those years ago. I can see on my TV screen their guards creating a very flat surface.

Gutter Leaf Guard

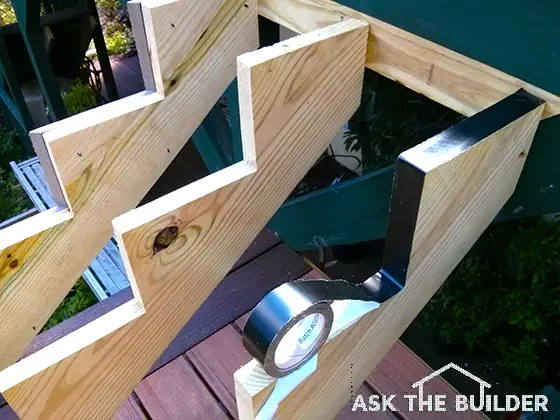
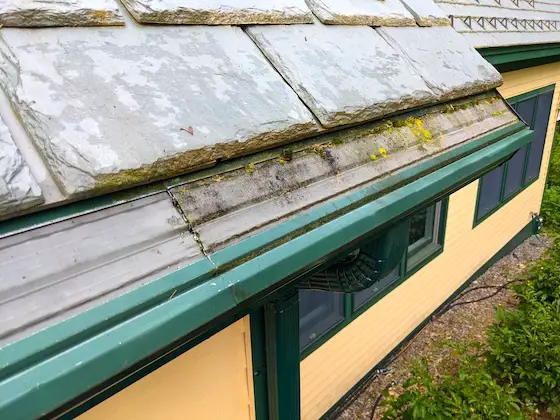
This gutter guard has been undergoing testing for ten months. It's not allowing things into the gutter, but the flat shelf it's created is not allowing debris to wash or blow off the roof. PHOTO CREDIT: Tim Carter

Within a year or two, my gutter guards were clogged. The debris couldn’t wash off the flat surface. Wind was useless except to blow off fresh, dried leaves. Pine needles mixed with all the other fine debris rendered the guards useless. I discovered that the top surface of the gutter guard must be in the same plane as the roof, so debris has the best chance of washing off with each hard rainfall.

cross section showing the gutter guard

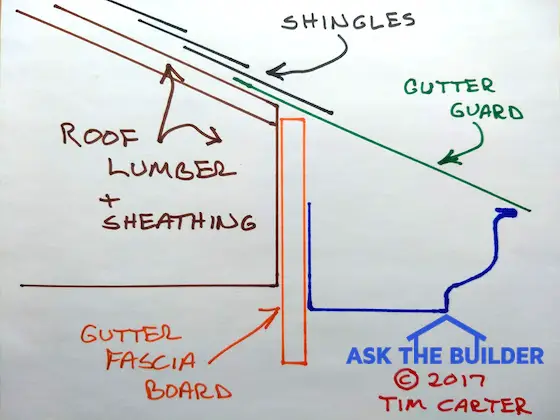
Here's a quick cross-section showing how the gutter guard - in green - is in the same plane as the roofing material. The drawing is not to scale. I used to make drawings like this sitting at customers' kitchen tables. Copyright 2025 Tim Carter

I decided to test various types of gutter guards. Companies were all too happy to send me a small amount of their product to test. The vast majority of the gutter guards failed. They either clogged up, or the reverse-curve models allowed small debris into the gutter, defeating the purpose of the product!

A reverse-curve gutter guard typically has a solid top with a bullnose curve and slot running along the front edge of the guard. The surface tension of water allows it to roll into the gutter even during heavy downpours. Large debris can’t enter the narrow slot, but small things can.

I demonstrated this phenomenon at the International Builders Show years ago. A company that manufactured a reverse-curve model was exhibiting its latest product. They had a model of a small roof set up in their booth. A recirculating pump and piping delivered water to the top of the small roof. The artificial rain ran down the roof surface and into the gutter guard. The gutter delivered the water back to the pump, sending it back up to the top for another ride down the roof.

While the company representative was speaking with a builder, I went over and stood next to the model. I proceeded to tear up small pieces of paper, about the size of my thumbnail. I felt these would represent tiny leaves or parts of bigger leaves that might litter a roof. I dropped the pieces of paper onto the roof, and the next thing I knew, they were all inside the gutter. Not one of them was deflected to the ground by the magic gutter guard! When the representative saw what I was doing, he told me to leave.

A few years later, I came across a micro-mesh gutter guard. I thought this might indeed be the Holy Grail. I tested two of them. One failed simply because the manufacturer installed it, creating the same shelf I had done with my first guard. The other manufacturer insisted on lowering my gutter so that the front tip of the gutter was in the same plane as the roof. This guard worked perfectly.

That said, I had always felt that even the micro-mesh gutter guard would fail. My gut was right. I installed this same gutter guard on my New Hampshire home ten years ago. Last year, I noticed more water seemed to be coming off the gutter guards. I inspected the guards and found the ultra-fine mesh was clogged in many places by algae, moss, lichens, and a very fine black organic deposit.

I fired up my electric pressure washer. The intense stream of water restored the gutter guards to like-new condition in seconds.

Gutter guard companies and salesmen may be spewing half-truths to you. I’ve been a building and remodeling expert witness for over twenty-five years. We have a saying: A half-truth is a whole lie. You, or someone else, will be doing maintenance on your gutter guards. They will have to be cleaned at some point.

Column 1616

Cleaning a Composite Deck

pressure wash trex transcend composite decking

I’m pressure washing my maintenance-free deck. Beware of mendacious marketing managers! Copyright 2025 Tim Carter ALL RIGHTS RESERVED

Cleaning a Composite Deck - Pressure Washers and Brooms

I gave my electric pressure washer a vigorous workout this weekend. I cleaned 1,100 square feet of Trex Transcend composite decking, 100 feet of guardrails, and a 16-foot-long staircase. The project spanned two days. The decking I cleaned was marketed years ago as being maintenance-free. Bah humbug!

Allow me to provide some context. I remember when I was a young carpenter. I purchased my lumber from Hyde Park Lumber Company in Cincinnati, Ohio. The orange and blue big-box retailers were not yet a glint in the eye of the founders.

Pressure-Treated Lumber Lies

I walked into the lumber company to purchase materials and saw a placard on the counter advertising new maintenance-free pressure-treated lumber. Yes, at one time, residential pressure-treated lumber was a new thing! The manufacturers thought it would be maintenance-free. They based their claim thinking how railroad ties, utility poles, pier piles, and other outdoor lumber are not normally maintained once installed. That’s speculation on my part.

We all discovered the claim was wrong. Pressure-treated lumber requires excessive maintenance. You often need to clean and seal a wood deck every two years. You may be searching for a non-peeling sealer like those still hunting for the Holy Grail. Huge cracks, warping, splinters, etc. are in your future if you don’t maintain your exterior treated lumber.

Trex Generation One Lie

This reality led to the first generation of composite decking. People desired a no-maintenance product. I remember when Trex was introduced. It dominated the marketplace even though it was quite unattractive. It was marketed as maintenance-free too.

You and millions of other homeowners demanded a more realistic composite deck material. Generation two and three composite decking was born decades later. I have some at my own home. The composite decking I have on my own deck is so realistic it garnered a compliment from She Who Must Be Obeyed. My wife is a harsh critic when it comes to products that try to imitate wood.

The maintenance-free claims continue to be spewed out by many retailers, salesmen, builders, remodelers, etc. I knew better as possibly you did too. Decks get dirty. Decks foster algae, moss, and lichen growth. Some deciduous trees bombard decks with an ultra-fine aerosol of sugars. This provides the food for mildew, mold, algae, etc.

moss lichens algae on trex trancend decking

Moss, lichens, and algae can grow with ease on plastic-coated Trex Transcend decking. Photo credit: Tim Carter Copyright 2025 ALL RIGHTS RESERVED

That’s the battle I wage here at my home. My deck is surrounded by both deciduous and evergreen trees. I get abundant rainfall in New Hampshire. My deck, and maybe yours, is nothing more than a giant petri dish.

Cleaning Depends on Pollen/Algae

I clean my composite deck every few years. The determining factor is how bad the pollen season is in any given year. This year, the pollen was so heavy I thought green snow was covering my deck. Hard rainfalls washed much of the green dust down into Lake Winnisquam, but some dug into the embossed wood grain in my decking.

trex transcend decking algae pollen

This is before cleaning. Copyright 2025 Tim Carter ALL RIGHTS RESERVED

clean trex transcend decking

This is what an electric pressure washer can do in about five minutes. Copyright 2025 Tim Carter ALL RIGHTS RESERVED

Cleaning composite decking can add years to its useful life. The grooves between my decking can get clogged with organic debris. This debris holds moisture. My composite decking has the traditional wood-fiber and plastic core, but the top of it is solid plastic. This cap with the embossed grain and variegated coloration creates the real-wood look.

Debris Accelerates Decking Failure

The edges of the decking need to dry out. Wet debris packed into the cracks prevents this. Be sure you clean out the grooves of your composite decking.

You increase safety when you clean your deck. I call algae green ice. I’ll never forget the first time I almost fell on a wet algae-covered surface. I was in college, and one of my geology professors hired me and my partner John to paint his house. A roof over his front porch had a sloped wood-shake roof. Algae covered the wood shakes.

I was cleaning the stucco house before painting it. The roof got wet, and without warning I slipped on the wet algae. I didn’t fall off the roof, but it was a close call. Keeping algae off your deck may prevent a broken hip or wrist.

Push Broom & Soap

Pressure washing takes time. You can do a faster cleaning using soapy water and a softer push broom. A quick cleaning twice a season will remove the sugars that fuel the algae growth before it requires a pressure washer.

The corporate attorneys for some decking manufacturers have reigned in the optimistic marketing managers. You’ll now see clever descriptions such as minimal maintenance. If it’s minimal, I sure as heck don’t want maximum maintenance based on how much time I spent this past weekend!

Column 1615

DIY Plumbing Vent

pvc toilet drain pipe with vent

This is a toilet drain pipe. The smaller pipe that connects on the right side is a vent pipe. It looks like it’s installed correctly until you look what happens on the other side of the wood beam! Copyright 2025 Tim Carter

DIY Plumbing Vent and Other Mistakes - Use My Phone Coaching Service

I did an in-person inspection consultation several days ago. A man purchased a 50-year-old home next to a ski resort. He and his family are avid snow skiers and were tired of renting expensive condominiums. He wanted my opinion about the condition of the house, and how to schedule remodeling work that might span two or three years.

CLICK HERE to set up a DIY Plumbing Vent phone coaching call.

Part of my coaching service is to mark up photos you send me. I will show you exactly how to install the pipes. LOOK AT THIS ONE:

basement slab electric hammer

I’m not sure of how much money he has, and it’s none of my business. That said, I know he’s going to need at least $500,000, or more, to remodel both the inside and outside of the home based on the plans he showed me. This tired home requires a full facelift both inside and outside.

Radiant Heating System on One Zone!

I discovered the radiant heating system and most of the plumbing drains and vents are installed incorrectly. It turns out the previous owner was an avid DIYr. He knew just enough about building and remodeling to be very dangerous.

The first thing I noticed upon entering the house was the 3-inch toilet drain pipe visible between two ceiling joists above my head. This pipe had an oversized 2-inch vent pipe. A 1 1/2-inch vent would have been sufficient and code-compliant.

The DIYr had to flat-vent the drain pipe because it was in a narrow joist space. He did the right thing by rotating his fitting. This prevents toilet water from back flowing into the vent pipe. Unfortunately, he used a tee fitting instead of a wye. A tee fitting allows two pipes to connect at a 90-degree angle. A wye fitting makes the connection at a 45-degree angle. Wyes mimic Mother Nature. Many streams tend to merge into rivers much like you merge into high-speed traffic on highways.

Using the tee fitting wasn’t his most grievous error. He extended his vent pipe about 30 inches and then went down four inches. He was extending the pipe to a place where he could turn it up into a wall. This horizontal length of pipe is no different than the p-trap under your fixtures. My guess is after all these years, that horizontal pipe had filled with water rendering the vent useless.

Vent pipes need to be sloped at all times like drain pipes. This allows the condensation inside the pipes to drain by gravity to the sewer or septic tank.
This DIYr also made a serious mistake on all his soldered copper water lines. I could see the green remnants of the liquid flux that had flowed down over the tubing as he soldered. He didn’t clean the flux off the pipe. This excess flux can lead to corrosion in the future. Old towels cut up into rags do a great job of removing this soft flux once the copper pipe is cool enough to touch.

Water Lines Must Be Big

You might make a serious mistake sizing water lines. I’m discovering more and more that folks who install a luxury shower are disappointed when water dribbles from the body sprays and shower head. Luxury showers can gulp 10 or 11 gallons of water per minute when you transform your shower area into a car wash. One-half-inch-diameter water lines will not suffice. In some cases, 3/4-inch-diameter water lines may not work. Keep in mind that PEX water lines often have a smaller inner diameter than copper!

luxury shower with body sprays

There's water flowing from the large shower head. However, as soon as you turn on the three body sprays water dribbles out of every orifice in this luxury shower. The East Coast plumber was a dunce. Copyright 2025 Tim Carter

The current craze of luxury vinyl plank (LVP) flooring may cause a water leak in your home. It happened to a friend of mine. You, or the flooring installer, may remove a toilet in a bathroom allowing the LVP to be placed under the commode. If the toilet was installed with a time-tested wax ring, you automatically break the seal when you lift it up.

A secondary problem can occur because the top of the toilet flange is now flush or below the new finished surface of the LVP. Toilets are designed such that the toilet flange should sit on top of the finished flooring. You may have to stack two wax rings on top of one another to get a water and gas-tight seal.

Teflon tape can cause you to pull out your hair. I’ve never been a big fan of it. I prefer to use gloppy thread-sealant compound brushed onto the male threads of a pipe. DIYrs often don’t wrap the teflon tape onto the threads tight enough, or they wrap it on the wrong direction. Teflon tape needs to be wrapped in a clockwise fashion as you look at the end of the threaded end of a pipe.

Are you thinking about installing a new garden hose faucet? Most plumbers and almost all DIYrs pipe hose faucets with a 1/2-inch-diameter supply line. You’ll be astonished how much more water you get out of a garden hose by feeding the hose bib with a 3/4-inch pipe.

If this new hose faucet is going to be inside a garage, consider installing a hot/cold hose bib like I have at my own home. These hose faucets work just like your kitchen sink. You can have all hot water, all cold, or mix them for warm water. Washing dogs, cars, or any other item in chilly weather is so much nicer when you have hot or warm water.

Column 1614

DIY Stair Stringer

fast stairs steel stair riser kit with solid oak treads

Building safe stairs is hard unless you use prefabricated steel components that bolt together in minutes. A link to the company that makes them is below in the article. These are made for both interior and exterior applications for pros and DIYrs. Copyright 2025 Tim Carter

DIY Stair Stringer Kit - Build Your Stairs in One Hour

You probably give little thought to the stairs you go up or down to reach different levels of your home, deck, or patio. I’ll wager that if I handed you a measuring tape, a framing square, a pencil, and a level, you’d scratch your head and not even know where to start the layout required to build a safe set of code-compliant stairs.

If you want to TRY to do it, READ MY Building Stairs eBook.

The good news is you can eliminate all that hassle by purchasing a product I just installed a few days ago in my son’s garage. I was astonished at how easy it was to create a safe set of steps leading from the first floor of his home down to his concrete garage floor.

The best part is it brought back fond memories of the erector set toy I had as a child. CLICK HERE to see some wonderful modern metal erector set toys. They make great gifts for grandchildren.

erector set toy

Stairs are Slanted Floors

I feel it’s essential for you to realize how many sets of stairs you might traverse are borderline safe. Let’s assume you live in a multi-story home, or one with a basement, that has a wood-floor system. The first thing to realize is that stairs are no different than the floors you walk across in a room. Your feet walk on the flooring. On a set of stairs we call the flooring treads.

The flooring in your home is supported by wood joists. These need to be strong because they often span distances of 12, or more, feet. The joists in stairs are called stringers. The only difference between stairs and your floor is the stairs are a tilted floor much like a child’s slide.

Do NOT Notch Stringers!

All too many carpenters take a shortcut when building stairs. They start with strong dimensional 2x12s (superior floor joists), and cut out triangular notches that create the risers and the flat surface for the treads. This surgery transforms the strong 2x12s into sub-standard 2x6s. You’d never want floor joists in your home to be bouncy 2x6s, so why would you ever accept them in a set of stairs?

deck stairs tape on stringers

Look how much wood is left after you NOTCH them!!! It's LESS than a 2x6 for goodness sake. It's better to create mortises for the treads. Copyright 2025 Tim Carter

Keep in mind the stringers are the bones of the stairs. They’re what support you and your friend when you’re carrying up or down the 300-pound refrigerator. I never cut notches in my wood stairs. I created 1/2-inch-deep mortises in my 2x12s to preserve the strength of the stringers. These mortises take much more time to create which is why most carpenters don’t do it.

The prefabricated stringer kit product I worked with days ago in my son’s house are made from steel. The stringers are not notched. The manufacturer welds onto the stringers steel angle irons that support the treads. The critical angled cuts required that allow the stringers to rest against the wall, landing, and floor have been made at the factory.

fast stairs stringer with tread support angle iron

These are the angle irons that support the treads. Copyright 2025 Tim Carter

These stringer kits are available in four different models. It just so happened the distance from the landing in my son’s garage to his concrete floor allowed us to use the model A. This one is closest to the safest and most comfortable combination of riser height to stair-tread depth.

I always built my own stairs, when I could control the distance between floor levels, with a 7.5-inch riser and a 10-inch tread. The model A stringers come with a 7 and 7/16ths-inch riser and a 10.25-inch tread. This creates a 36.5-degree angle.

Once you’ve selected the model you need to match up with the height difference between the levels your stairs will serve, you get all the parts you need to create the stairs. You just have to provide the treads and the railing.

All of the heavy-duty bolts and washers are included to assemble the steel parts. All of the components have been pre-drilled and the required holes treaded. You even get a large hex wrench to tighten the bolts.

My son decided to use solid-oak treads. A local lumber mill had affordable pieces of sanded oak that was 1 and 3/4-inch thick. It was select grade with no knots. He also wanted an open-stairs look so there are no solid risers in between the treads. The finished look is amazing.

I decided to create a series of very short videos about the stairs. I show the initial problem we faced and why we had to install new stairs. I then decided to focus on the components and the things you need to realize as you proceed with the assembly.

You can view all of these videos on my www.AsktheBuilder.com website. You can also view them in a playlist on YouTube.

I rarely promote companies in my columns for a host of reasons. Stair safety is one of my pet peeves. I feel it’s incumbent on me to provide you with the name of the website where I procured the stringer kit. Go here to Fast Stairs and wait until you see photographs of all the amazing stairs built using the exact same kit I used.

Column 1613

Why Do Ceramic Tiles Crack?

cracked floor tile missing grout

An inferior flexing wood-floor system caused the grout to crumble. Once the grout was gone, the tile cracked because it had no lateral support. It’s going to require many of those fancy pieces of paper to repair it. Copyright 2025 Tim Carter

Why Do Ceramic Tiles Crack? - 100% Installation Errors

Ceramic floor tile has a rich legacy as a durable flooring material. You’ve undoubtedly walked across it in countless public buildings. Hotel lobbies, commercial buildings, and even my own previous parish church sported this artificial stone product. The tile in my church was over 100 years old, and it looked perfect, just like the day it was installed. Do you recall ever seeing a cracked tile or missing grout in all of the tile you’ve seen in public buildings? There’s a reason why.

Ceramic tile is quite particular when it comes to installation. You’ll discover one thing all crack-free ceramic tile floors have in common should you be inclined to think about what’s underneath the kiln-fired clay tile. The tile is adhered to a solid base that doesn’t flex. The best bases are constructed to also be crack-free.

Soft Clay Becomes Solid Rock

It’s essential for you to realize the strength characteristics of tile. All ceramic tile is made from pliable clay much like that you used to squish through your toes in a mud puddle after a summer rain shower. Once clay is molded and then fired in a kiln, magic happens. The high temperatures in the kiln rearrange the atoms in the soft clay. New bonds are created transforming the soft clay into a very hard material not unlike rock. In fact, the more silica in the clay, the stronger the tile will be.

Tile is Weak When Bent

Natural rock is very strong when you compress it. It can take many thousands of pounds per square inch of pressure to crack it. However, when you try to bend rock, it’s not nearly as strong. Bending is a tension force that stretches the rock. Rock and ceramic tile often have only one-tenth the strength in tension as they do when compressed.

Keeping in mind how thin most ceramic floor tiles are, you never want the base under the tile to move, nor do you want a hollow space, even as thin as a piece of paper, under a ceramic floor tile. Should this happen, the tile will crack when a concentrated weight is placed on it.

Rookie Restaurant Mistake

Many years ago, before I knew this, I was hired to install ceramic tile in a restaurant kitchen. My only experience at that very young age was using the organic mastic adhesive. This material is not much different than cold cake icing. I installed the tile on top of a crack-free reinforced concrete slab.

The tile looked great when I was finished. A week later, the general contractor called me up, telling me my tile had cracked. The cracks were in the tiles under the feet of the heavy kitchen equipment. The legs of the fixtures were not much different than a woman’s spike high-heel shoe.

The organic mastic under the tile was allowing the tile to bend under the concentrated weight. If I had used cement-based thinset instead of mastic, the tile wouldn’t have cracked. Thinset doesn’t compress like the flexible mastic.

Floor Tile Over Wood Floors

My daughter installed large-format ceramic tile in her home six years ago. I didn’t build this house. The contractor she hired resisted taking my advice about many things. He had a fragile ego and thought he knew better.

The floor trusses were designed to the minimum code standard with regard to allowable flex. You might not realize you can specify how stiff floor trusses can be. The same is true for engineered floor joists or regular dimensional 2x floor joists. You can design wood floor systems to almost be as stiff as concrete albeit it will cost you a significant amount of money to achieve wood floors that don’t deflect like a trampoline.

The second mistake my daughter’s builder made was to rely on ring-shanked nails and adhesive to hold the 3/4-inch subfloor to the wood floor trusses. The subflooring was  installed on a cold snowy winter day. I know, as I was there recording it on video. I’m convinced the adhesive in the large tubes was freezing minutes after it was applied to the top of the trusses.

The subflooring should have been screwed to the floor trusses instead of nailed. Several days ago I was walking across her kitchen floor and could hear the subflooring squeak as it moved up and down under each of my footfalls.

It’s no wonder the grout in between my daughter’s floor tiles has crumbled. It’s no wonder at least twenty of her tiles have cracks in them. Her ceramic tile floor is a hot mess.

There is now only way to repair my daughter’s tile floor. You may have the same issue after all. All of the grout must be removed. Cracked tiles have to be replaced. Silicone grout should be used in between each tile. This material remains flexible for its entire life. It doesn’t get hard like traditional cement-based grouts. Cement-based grouts crumble when they flex.

Column 1612

Fiber Optic Installation Process

plywood box for fiber optic router

This new alcove, located high up in my central hallway, is where the fiber optic cable terminates inside my home. It will connect to a powerful wireless router that will provide high-speed Internet throughout my entire home. Copyright 2025 Tim Carter

Fiber Optic Installation Process - Router Placement Trick

I’m guessing you log onto the Internet each day. I travel the information superhighway all day long as part of my business. Fiber optic cables have now been extended throughout my small town in New Hampshire, and I’m ecstatic about their arrival. I remember using a 300-baud modem back in the 1980s. It would transmit text via telephone lines at about the same speed as you see headlines crawl at the bottom of your TV screen.

I had to get my house ready for this installation. You may have to do the same thing should you want reliability for years to come. If you’re building a new home, it’s vital you do several things to get ready for this latest technology trend.

Underground utilities serve my house. I didn’t build the current house I live in, and I can assure you I would have planned for the electric, cable TV, and all future underground utilities to enter this house at a more convenient location.

In my case, all of the underground conduits terminate at the far corner of my attached garage. This is the worst possible location. I would have had all the utilities enter the house immediately adjacent to the mechanical room, where my electrical circuit breaker panels are located.

Fiber Optic is Fragile

Fiber optic cable, in my opinion, is more fragile than traditional solid copper coaxial cable. This means it needs to be protected from unintentional abuse years from now. I had to install sixty feet of electrical conduit to serve as the raceway from the distant garage corner to where it makes sense to have the fiber optic cable enter inside my home.

Your fiber optic cable may be one of two sizes. The outer diameter of the more robust cable is about the size of a standard No. 2 pencil. A much smaller cable can also snake its way through your home. It has an outer diameter about the size of a cocktail straw. You can see why this tiny cable requires significant protection from being damaged.

Allow me to share what we did at my son’s home and at my house. Three years ago, my son moved into a brand-new home. It was a speculative home built by a builder for the market. My son is a software engineer, and video gaming is one of his hobbies. He knew that while wireless WiFi is good, a solid Ethernet cable is better if you want the best speed.

Ethernet Cables are Better than WiFi

One weekend, we extended Ethernet cables to four different locations on his main living level. It was easy work because the basement was unfinished. We moved the cable hookup to a future closet space under the stairwell leading to the basement. The wireless WiFi router was also placed in this space.

My son would have installed conduit from this future closet to all the locations if he had been involved in the design of the home. Plastic conduit is easy to work with, and it’s a great DIY project if you're building new. Plan it so you have the fewest long-radius bends in the conduit. One-half-inch conduit is great for the small fiber optic cable.

My situation was quite different. I had a complex conundrum to solve. It was impossible for me to install Ethernet cables to the key rooms in my existing multi-story home. I would have had to chop out lots of drywall to accomplish this. She who must be obeyed would not tolerate this mess!

I decided to install a powerful wireless WiFi router in the wall about 8 feet off the ground above my entrance hall coat closet. This is a great central location. The wireless signal would reach all three levels of my home with ease since the staircases are adjacent to the entrance hall. My open floor plan would ensure a strong signal throughout the main living level.

I had the good fortune to have a vaulted ceiling in my entrance hall. This void space extended over a mudroom that connects the entrance hall to the garage. I was able to snake a conduit from the void space over the entrance hall coat closet to the garage ceiling.

Plywood Box Creates an Alcove in an Hour

I then constructed a box made from 3/4-inch plywood. The box was 24 inches wide, 16 inches tall, and 12 inches deep. I built the box in about 40 minutes. It would have taken hours and hours of painstaking work to create this above the closet using lumber and drywall. Once the plywood is painted, everyone will think it’s drywall.

This open alcove will house the optical network terminal (ONT) and the wireless router. The ONT is a small magic box about the size of a deck of cards.

The wireless WiFi router requires a 120-volt electrical outlet. I decided to power this outlet through a switch that’s next to the closet light switch. This way, I don’t need a ladder to unplug the router to reset its RAM memory from time to time.

Column 1611

Exterior Paint Peeling Repair

porch post base paint peeling

The paint failure at the bottom of this wood post can be traced to the hidden cut edge that is sitting on the treated lumber. The odds are the cut edge is bare wood. Copyright 2025 Tim Carter

Exterior Paint Peeling Repair - Beware of Lead

Do you get frustrated when the expensive exterior paint you use peels, flakes, or cracks in just a few years? You’re not alone. I’m about to survey my thousands of newsletter subscribers. I’m willing to bet you a two-step mocha-chip ice cream sundae that a majority of them suffer as you do.

I’m convinced your disappointment can be traced to several things you might not know about paint. I believe that once you have a grasp of the product, you’ll start to get the same results I get when I paint outdoors.

What would you say if I told you I painted my Cincinnati, Ohio, house 25 years ago, and it looks as good today as it did back then? The paint has not peeled or flaked off. I’m having the exact same result with my current home in New Hampshire. It was last painted fifteen years ago with the best paint I could buy. Allow me to share with you the simple secrets to obtain results like mine.

marvin windows reviews

This is the rear of my Cincinnati Queen Anne Victorian home. This urethane-resin paint was 20 years old when I snapped this photo. Copyright 2025 Tim Carter

It’s essential to know that paint is just colored glue. Paint chemists refer to the glue as resin. There are many different types of glue. For example, the basic white glue kids use in kindergarten is nearly identical to the lowest-quality paint you can buy. You know yellow carpenter’s glue is far superior and as you might surmise, you can get paints that have this better resin base.

Epoxy is very strong, and yes, you can purchase epoxy paint. The only issue is it’s a bit more difficult to work with. Have you ever applied clear urethane to woodwork or furniture? Have you noticed how sticky and durable it is?

Urethane Resin Paint is the Best

That’s the exterior paint that I use - paint that has a urethane resin. It’s water-based and easy to apply and clean up as any water-based exterior paint.

CLICK HERE to shop for great Urethane-Resin house paint.

Your past failures with exterior paint might be traced to any number of shortcuts or mistakes. Allow me to share what I feel might be the most common ones. First and foremost, when was the last time you read and followed the instructions on the label of the paint can? I’d be willing to up my bet that less than 20 percent of homeowners take the time to do this.
Just about every label I’ve read mentions applying the paint to a clean, dry surface. What’s your definition of clean? Would you say your oily filthy body is clean if you stand in a shower under the highest pressure your skin can tolerate for twenty minutes before you towel off?

Pressure Washing is Not the Best

The answer is no. Yet, you may have used a pressure washer the last time you painted something outdoors to clean it. Have you ever used a pressure washer to clean your filthy car holding the wand as close to the surface as you feel comfortable? If you then allowed your car to air dry, you’ll notice there is still a stubborn thin film of dirt on the paint. Your car is not clean after it’s pressure-washed.

To get your body clean in a shower, you probably rub your skin with soap. You might even use a brush or microfiber towel. This mechanical agitation of the surface in conjunction with the soap is what gets your skin clean. You should do the exact same thing with whatever you intend to paint. Special brushes used to clean large RVs are perfect for house cleaning. I have a special one I’ve had for thirty years that does a tremendous job.

Hygroscopic Wood Swells and Shrinks

Wood is the most difficult thing for paint to adhere to. Wood is hygroscopic. This means it changes its shape in response to moisture content. The steel or plastic on your car doesn’t do this. The expansion and contraction of the wood can be greater than what a cheap paint can handle. If so, the paint looses its grip on the wood and peels or flakes.

You can minimize the expansion and contraction of wood by painting all the sides and cut edges of the wood. Imagine shrink-wrapping the wood with paint. I know this is lots of extra work, but it will pay off in spades long-term. It’s especially important to always paint the end grain of wood. This is where water enters into wood with ease.

Pay attention to what the paint label says about the air temperature. It will provide a minimum and maximum temperature range for application. Don’t exceed this! What’s more, follow the sun. Painted surfaces should not be exposed to direct sunlight if at all possible. The paint will dry too quickly. The best days to paint are overcast ones with no or light wind.

Does your label say to use a primer? If so, did you you know that you get the best results by applying the finish paint as soon as the primer is dry to the touch? The finish paint and the primer can chemically bond to one another since the primer has yet to fully cure. Try to do whatever is possible to take advantage of this magic.

Column 1610

Roof Maxx vs. Copper Roof Strips

Roof Maxx™ vs. Copper Roof Strips - Copper is Guaranteed to Keep Your Roof in Great Shape

I've seen quite a few TV commercials for a product called Roof Maxx™.

Have you seen them too?

My 30-year asphalt shingles started to fail in just nine years. Fourteen years after they were installed, this is what my shingles looked like.

sun-damaged asphalt shingles

I was so angry, I researched why asphalt shingles fall apart long before they should.

You can read all about this in my short Roofing Ripoff book.

Many people call me on the phone to ask about Roof Maxx™. They have discovered my Roof Maxx™ review, which I published several years ago.

Below are the rhetorical questions I ask when talking to them on the phone. Most purchase a small PDF file from me that shows how to SLOW the AGING of their asphalt shingle roofs using copper. CLICK HERE to purchase the PDF file.

In my opinion, there's a MUCH BETTER way to prolong the life of asphalt shingles.

I can PROVE THIS CLAIM.

Copper roof strips are guaranteed to slow the aging of your asphalt shingles.

I was the first person in the world to discover that copper ions do a superb job of adding decades of life to asphalt shingles. Look at this photo:

copper stops shingle deterioration

Look at how the small amount of copper that washes down from the roof of the cupola prevents the shingles from aging. The shingles to the right are missing all their granules and are curled like potato chips. Copyright 2025 Tim Carter ALL RIGHTS RESERVED

worn asphalt shingles

Look at how most of the colored granules are missing on the shingles. They are now unprotected from the photons in the ultraviolet light. How can one deny that copper ions extend the life of asphalt shingles after seeing this photo?  Copyright 2025 Tim Carter ALL RIGHTS RESERVED

Do You Ask These Questions?

Roof Maxx™ has not been around for very many years. Where is the actual proof that Roof Maxx™ does as it claims?

The UV rays of the sun are so powerful that they can blast metal ions from lead, zinc, and copper flashings. What do the UV rays do to a plant-based liquid?

Is the liquid used by the Roof Maxx™ contractors concentrated to save on shipping costs? If so, how do you know the applicator is not diluting it too much to increase his/her profits?

How do you know if your asphalt shingles are too far gone and you're wasting your money by squirting a liquid on them?

How do you know if enough of the liquid is being sprayed on your roof?

Do you continue to experience granule loss after the liquid has been sprayed on your shingles? If so, this may mean the liquid is not working.

How to Use Copper to Save Your Roof

Look at how I installed copper roof strips on my daughter's new home:

copper strips on roof ridge

I applied these copper strips to my daughter’s new home five years ago. Invisible atoms of copper wash down onto the shingles each time it rains. This can add 40, or more, years worth of service life to the roof. Copyright 2024 Tim Carter

You can purchase a simple how-to guide from me that shares what copper to buy and how to install it. 

CLICK HERE to get your INSTANT DOWNLOAD.


Hang Heavy Mirror on Drywall

heavy runtal electric wall heater on drywall

Hidden behind this 50-pound expensive wall heater are flat 2x4s nailed between the vertical wall studs. These critical framing members are blocking and ensure the heater never falls to the floor. Copyright 2025 Tim Carter

Hang a Heavy Mirror on Drywall - Blocking is Best

Have you ever struggled attaching heavy objects to a wall or a ceiling? You may employ a stud finder hunting and hoping wall studs are exactly where you need them to be. Some just throw in the towel and count on hollow wall anchors to do the job. You don’t ever have to use those when building a new home or doing remodeling.

The most recent trend over the past decade would be a flat-screen TV. These electronic marvels along with the wall-mounting bracket keep getting larger and heavier. You don’t want to hope they never fall to the ground. Kitchen wall cabinets, heavy mirrors, and paintings are just a few other things that must stay put.

Solid Wood Blocking is Best

Talk to any seasoned finish carpenter and she or he will tell you blocking is your best bet if you never want to rely on hollow wall anchors. Blocking is strategically placed wood, 3/4 of an inch or thicker, that gets covered by the finished wall covering. This wood is secured between vertical wall studs, ceiling joists, or trusses in locations where you know weeks or months from now you’ll be driving mounting screws or lag bolts.

Last year, while working on my son’s large basement remodeling project, we installed all sorts of blocking. In one instance, he wasn’t sure that early in the job the height of shelves would be in two alcoves on either side of his giant flat-screen TV. We solved this problem by installing 4-feet-tall pieces of CDX 3/4-inch-thick plywood.

CDX Plywood Works Well

This plywood was screwed to 2x2 pieces of lumber. The face of the plywood ended up flush with the face of the vertical 2x4s that created the alcoves. Months from now when the shelves are installed he can install nails or screws anywhere on the sides of the alcoves knowing he’ll hit solid wood.

We also installed critical blocking behind all of the electric wall heaters. These heaters each weigh about 50 pounds. They’re expensive and you never want them to fall to the ground. Horizontal 2x4s were nailed in between the vertical 2x4s. We referred to the heater installation instructions for guidance as to the recommended height above the finished floor for the blocking.

Shoot Photos or Videos

Not only did I take photos of the finished blocking with the centerline height above the floor marked on the flat 2x4s, but I also wrote this same information on the concrete slab with a Sharpie permanent marker. It was then child’s play to locate the center of the blocking once it was hidden from view by the drywall.

We used the 3/4-inch plywood trick in a closet under the stairs that lead to the first floor. My son wanted all of the Internet electronics, including the router, modem, and ethernet switch mounted to the wall. We laid all the components on the floor in a logical arrangement so the cables would work and be manageable. This allowed us to place the pieces of plywood exactly where they needed to be.

Our blocking mission didn’t end there, nor should yours! We had to install two rows of flat 2x4 blocking for a very expensive towel warmer in his bathroom. Once again, we didn’t want to guess the correct location. The towel warmer instructions gave a recommended height off the finished floor for the fixture.

Kitchen Cabinets Need Blocking

I’ve sworn like a sailor years ago hunting for wall studs for kitchen wall cabinets. I was determined we’d never have to do that on this job. Wall cabinets are going to be installed on a wall in his small speakeasy. Once again, we installed flat 2x4s at the correct height to match up with the inside rail at the top of the cabinets.

Blocking requires you or your builder to think ahead. This is a small price to pay in the planning phase. It eliminates frustration when it comes time to install things on walls and ceilings.

Here’s what many don’t realize about drywall. Most drywall specifications call for screw spacing to be 16 inches on center for walls. Celling drywall fasteners should be 12 inches on center.

Have you looked at how small the bugle head of a drywall screw is? Do you want to count on that to hold the drywall to the wall when you install a hollow-wall anchor? Yes, there are four screws on each wall stud. But what happens if the drywall hanger overdrives the screws and tears the facing paper? What happens if there’s a leak, the drywall gets wet, and the gypsum core turns to mush at the anchor location?

Don’t forget to take the requisite photographs or videos of the blocking before it gets covered up. Write the centerline heights of the blocking on the face of the wood with a Sharpie.

Column 1609