Kitchen Lighting Ideas
DEAR TIM: Now that we're past Christmas, it's full steam ahead on our kitchen remodel. One of the things that I've never liked about our kitchen is the drab lighting. All we have is an ancient surface mounted center light that takes two 75-watt bulbs. There are shadows everywhere. If I could hand you a magic wand, what would you conjure up for my kitchen? What lighting ideas have you brought to life that have dazzled your customers and made their kitchens look like what I see in magazines? Terri P., Erie, PA
DEAR TERRI: It's funny you bring up magic because I have the phrase Skills and Magic on my business card that I hand out to passengers on the scenic train where I'm a conductor during the summer months. You can see their eyebrows raise when they get to that part of the card wondering what I can do. In your case, I'm going to do my best to give you the kitchen lighting of your dreams.
You'd be surprised how often contractors, some kitchen planners and architects pay lip service to the lighting aspect of a kitchen. Not only does lighting help you see what you're doing when you work in the space, but it can also do a magnificent job of highlighting some of the cabinet, countertop and backsplash finishes that are part of the room.
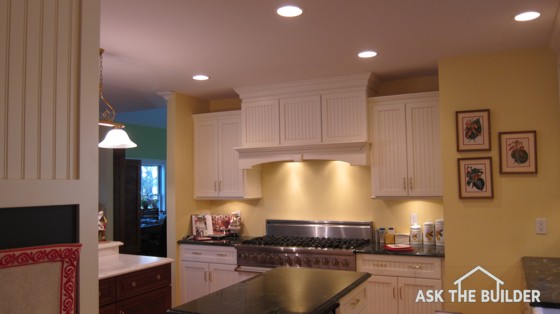
There are three levels of light in this kitchen, four if you count the bright lights under the stove hood! Photo credit: Tim Carter
Perhaps the most striking kitchen lighting I've ever had the pleasure of installing happened in two similar jobs. One kitchen had a small vaulted ceiling while the other one was a traditional flat ceiling. But in both cases, a false shallow soffit was installed above the cabinets that didn't extend to the ceiling. It was more like a shelf. This detail was extended around the entire room and allowed me to install soft rope lighting that produced an indirect glow of light off the kitchen ceiling. That was the first layer of light in the room.
The next layer of light in both kitchens came from any number of recessed lights that were strategically placed in the room so there were no shadows or dull spots on any of the kitchen countertops, islands, sinks or other work areas. Usually the spacing between lights was never more than 5 feet on center.
To give the homeowners flexibility, not all of the recessed lights were put on one switch circuit. The homeowner could turn on some or all of the lights depending on where they were working in the room. To ensure the effect would work and the lighting wouldn't be too harsh or weak, we tested the illumination just after the recessed cans were installed and no drywall was up in the space. We would do this at night to see what the lights would do when they're most needed.
I recommend you do the same as you'll get a great idea of how bright or dark the room will be during the rough construction phase. This is the time to ensure you have enough light in the room, not after the drywall is up, finished and painted.
I made sure there was always a recessed light centered over each major appliance and any large kitchen pantries. The center of the light fixture was no more than a foot from the front face of the cabinet or appliance. If you're going to do this, be certain the recessed light fixture trim is clear of any crown molding or other trim being used in the kitchen. You really have to plan for this so there are no surprises at the final finishing stages of the job.
The third layer of light we used in both jobs came from gorgeous pendant lights that were placed over islands in the room. The bottom of the fixtures never hung lower than 6 and one-half feet off the floor so as to not block the view across the room as people would stand and talk.
If you decide to install a hanging fixture like this, pay close attention to it in the lighting showroom to ensure there's no glare from the bulb. The fixture needs to just broadcast a cone of light down to the island surface, not horizontally so as to blind someone in the room.
The fourth layer of light in both kitchens was generated by under-cabinet lights and in one of the jobs over-cabinet lights. These were hidden in both cases by gorgeous molding that outlined the bottom of the cabinets and by crown molding that finished off the top of the cabinets.
Once again, this layer of lighting had its own switching system and was dimmable so you could use these lights as a very soft night light system to make the kitchen very romantic or just give it an ultra-soft feel.
In my opinion, the key to eye-popping kitchen lighting is to think about it in layers much like you might dress if it's cold outside. You can turn on more lighting if the situation calls for it, or you just have on just enough lighting to satisfy your mood.
At my own home, we've done all four layers and when we have family gatherings and the kitchen is the hub of activity, all lights are on. This makes the room come alive. Don't forget that you can also mix and match bulb wattage to produce different effects.
Column 1072
Tim built custom homes and did ultra-custom remodeling for 20+ years before launching his Ask the Builder media presence. He was selected as one of the Big 50 by Remodeling magazine in 1993. This award gave birth to Ask the Builder in October 1993. Tim also operates https://DrawPlumbingPlans.com. His @askthebuilder YouTube channel was the first home improvement channel on YouTube.