DIY PEX Water Lines

pex and copper water lines in basement

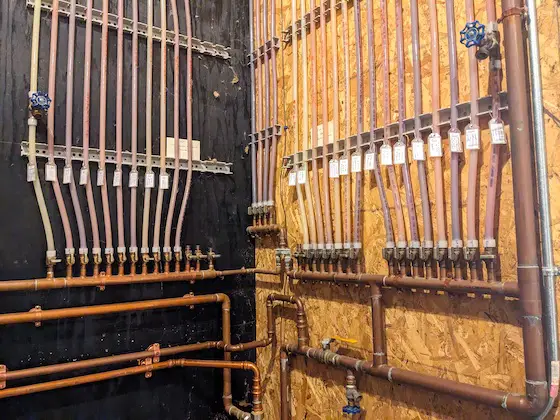
DIY PEX Water Lines -These are the hot and cold PEX water lines in my own home. I know it appears complex like spaghetti thrown on a wall, but it’s not. DIY plumbing has never been easier. Copyright 2023 Tim Carter ALL RIGHTS RESERVED

DIY PEX Water Lines - You Can Do It

Are you finding it difficult to get people to work on your home within your budget? Each day visitors to my website share horror stories about out-of-control prices being charged by workers. Inflation is raging and the economic law of supply vs. demand is in play.

I’m blessed to be able to use this column to share my knowledge. It allows me to empower you to do many jobs you might never think of doing yourself. Just this past week I saved myself about $500 by installing a new venturi fan in the bowels of my combo high-efficiency boiler. It looked intimidating once the cover was off the front of the boiler but the step-by-step instructions that came with the replacement part made the job very easy.

Allow me to share some of the forty-five years' worth of plumbing experience I have in my tiny gray cells. I’ve been a master plumber since 1981 and love to teach others how to install water lines, drain and waste pipes, and vent pipes. Just two years ago I helped Zoe over the phone. She installed all of the plumbing pipes in her new home in New Mexico. If Zoe can do plumbing work, by gosh so can you!

In the past, working with water lines required a decent amount of experience. You had to know how to solder copper tubing. I recorded a step-by-step video of this process over twenty years ago. Watch it now as it's still relevant:

The great news is you can solder with a simple torch you purchase at a big box store. If you have an expensive tool, you don’t need to solder. You can use copper press fittings that seal the joint with a rubber o-ring. Here's how easy it is to use the copper press tool:

CPVC Was the First

That said, the advent of plastic has revolutionized the installation of water lines in homes. You have lots of choices today. CPVC tubing is one option and it’s decades old. When it first hit the market, it was the belle of the ball. Not so any longer.

In my opinion, the paradigm shift in residential plumbing happened with PEX tubing. Prior to this, every time you had to change direction using copper or CPVC, you needed a fitting. Installing those required time and expertise and each fitting became a possible leak location.

PEX Installs Like Electric Cables - Easy!

PEX tubing installs just like Romex electric cables. Imagine running a 50-foot-long garden hose through the joists of your home from the mechanical room to a second-floor bathroom. PEX is flexible and you can design your system like mine where you just have a fitting at the manifold in your mechanical room and the other fitting is at the shutoff valve under the faucet. Female dogs, cats, and other animals have manifolds on their chests so lots of little animals can feed at once. Manifolds are wonderful things to have in a plumbing system.

While I’ve never done an actual side-by-side test, I’d venture to say PEX saves about 95% of the labor I’d have used to install a typical run of copper tubing from a mechanical room to a faucet.

What would you say if I told you that you can purchase the hand tool to install PEX for less than $100.00? A plumber would charge you that just to start up his truck and drive to your home!

Would you believe me if I told you I could teach you how to install PEX fittings in less than one minute? You’d probably think I fell off a ladder and hit my head. Truth be told, it’s extremely easy to do. Watch this video:

PEX can be installed very similar to an existing daisy-chain setup as is often done with copper or CPVC. In this setup, you do not use a manifold. Instead, you have lots of fittings throughout the house where you branch off a larger pipe that works its way through the house. Think of how branches extend off a tree trunk or how your blood vessels are in your own body.

I prefer installing PEX using a manifold system. This uses more PEX tubing, but it eliminates all the fittings hidden in the walls and ceilings of your home. Each hot and cold water line feeding a faucet originates in the mechanical room. On the manifold, there’s a separate shutoff valve for each line. This allows you to turn off the water to a particular faucet while water flows to all other fixtures in the house. This is a dandy feature to have, trust me.

You can mix and match if you want. Let’s say you need to add a bathroom or a kitchen. If you have copper tubing in your home and want to use PEX, you just solder in a tee with a PEX adapter. The PEX attaches to the brass fitting and away you go!

Should you decide to run PEX yourself, be sure you always put a strong piece of tape on the cut end of the PEX. This prevents dirt, sawdust, wood chips, etc. from entering the pipe as you extend the tubing through your framing.

You can purchase all sorts of metal and plastic accessories that help you terminate the PEX under all your sinks. Be sure you read the installation manual that comes with the PEX and pay attention to hole sizes.

If you plan to run PEX to a bathroom rain-head shower be sure to run dual hot and cold lines to ensure you have plenty of flow. The same goes for large tubs. Don’t forget to insulate around all the tubs so the bath water stays nice and hot long enough for you to fully relax!

Column 1506

Build a Perfect Pergola

cedar pergola benson park

How to Build a Perfect Pergola | While this weathered pergola at Benson Park looks challenging to build, you should think of it like eating an elephant. Pachyderms are best eaten one bite at a time. Copyright 2023 Tim Carter

How to Build a Perfect Pergola - It Starts With Planning

A few days ago I took my American Dirus dog for a walk in southern New Hampshire while my wife was shopping for plants with my son. Willow and I went to Benson Park, an old zoo in Hudson, NH that’s now a marvelous city park. It was alive with the laughter of children and I could sense the excitement that hundreds of thousands, maybe millions, of people who had walked the same pathways over the past seven decades. All those years ago they were about to see camels, alligators, bears, elephants and many more exotic animals.

Click here to see exotic Willow that looks like a wolf but has NO wolf DNA in her.

american dirus dog wolfdog

This is Willow. She wears the bright vest so we can see her in the woods. Her fur coat is so well crafted and colored, it's perfect camouflage making it hard to spot her. Copyright 2023 Tim Carter

Park benches were as abundant within the park as popcorn would have been on a summer’s day. One particular one caught my eye as it was nestled under a weathered simple, yet elegant, pergola.

Rough Sawn Cedar is Exceptional

While Willow was using her nose to make a mental note of all the other dogs who had been to the same spot, I used my eyes to capture the timber eye candy. I thanked the architect or carpenter who had come up with the idea for the pergola’s interlocking 5/4 x 10 rough-sawn cedar used to create the shade screen that measured 12 by 16 feet. It was the perfect size in my opinion.

pergola interlocking roof shade screen cedar wood

The pieces of wood that create the shade screen interlock with notches created in the top and bottom of the timbers. Think about how cardboard does the same thing to make spacers for glassware. Copyright Tim Carter 2023

As strange as it seems, the first thing that I noticed was the extra simple trim lumber that had been used to fatten the four support posts. While it was unnecessary, this small touch created both visual appeal as well as a subliminal message of strength. Think about an elephant’s lower legs compared to a gazelle’s. The elephant telegraphs sturdiness, power, and stability.

Only Paint if your Pergola is in the Atacama Desert

Fortunately, no one had ever painted this masterpiece. Painted exterior wood almost always peels. The expansion/contraction coefficient of the wood is much greater than that of most paints. To prevent paint from peeling, you need to keep it dry. This is why you rarely see painted wood inside a home peel. But put that same piece of wood outdoors where water can get on it and you'll have peeling paint in no time. The wood used for a pergola is exposed to every drop of rain. Never ever paint a pergola unless it's located in the Atacama Desert where there's been no recorded rainfall for hundreds of years.

I’m sure the Benson Park pergola had been stained at one time but that was years ago as the cedar wood now sports a distinctive gray color much like my own hair. It’s vital the park staff clean and seal the wood soon in my opinion. Water and sunlight will eventually take their toll and the majestic pergola could end up as dumpster fodder or kindling wood.

When you seal your pergola, or any outdoor wood, always try to use a penetrating sealer made with synthetic resins. You also want one with a medium color. The color pigments act like sunscreen sacrificing themselves to the ultraviolet (UV) rays that contain photons. Keep in mind penetrating wood sealers don’t peel like film-forming sealers that seem to dominate the marketplace.

Film-Forming Sealers are BAD

The cynic in me thinks the sealer manufacturers promote film-forming sealers because when they fail, your deck, pergola, or outdoor wood furniture looks horrible faster. This means you need to buy more sealer in fewer years.

If you plan to build a pergola this summer like the one I saw at Benson Park, you only need a few tools. But before you buy any lumber, you need to visit your local zoning office to see if you’re even allowed to build one. Some cities, towns, and even HOAs have very rigid and restrictive codes that limit what you can do on your own land.

What Will Happen Under the Pergola?

Once you know you’re allowed to construct your pergola, it’s time to think about its primary purpose. Will it be simply decoration or will it be functional? What will you do under it? Sip an iced coffee, read a book, play harmonica, set up your outdoor amateur radio, or play chess? Give thought to the furniture you’ll need and make sure it fits with ease under the structure. You don’t want to be bumping into the support posts.

I can’t stress enough the importance of this planning step. All too often folks think a certain size will work because the space seems so large. But as you start to move furniture in, the large space shrinks more than a golf glove that gets soaking wet and then dries in the sun.

Stainless-Steel Fasteners are Best

Spend the extra money to use stainless-steel nails, screws, bolts, and nuts. Beware of cheap electroplated galvanized hardware. It looks great but that ultra-thin coating of zinc wears off faster than a two-week honeymoon. Once the metal begins to rust, it can permanently stain your expensive cedar or redwood.

Don’t underestimate the power of the wind. You’ll thank your lucky stars that you attached the pergola to concrete piers using hold-down anchors when you get an alert on your phone about an approaching severe storm packing wind gusts of 50 mph or more. The last thing you want is to see your pergola lift up off the ground and float or tumble into a neighbor’s yard.

I feel my best piece of advice is to go hunting for pergolas near your home. You might find them at garden centers, city or county parks, or in public gardens. Take your tape measure and notebook with you. When you spot one that makes you melt, it’s time to take measurements, photos, and even sketch it so you can re-create it in your backyard. Don’t try to reinvent the wheel, it’s better to just copy one or tweak one that you already love.

Column 1505

Top Residential Building Mistakes

attic truss for residential roof

Top Building Mistakes - You can avoid paying self-storage fees if you use these attic trusses instead of normal space-wasting ones. Copyright 2023 Tim Carter ALL RIGHTS RESERVED

Top Residential Building Mistakes - There are So Many!

Each week I have the good fortune to speak on the phone with homeowners all across the USA who ask me to solve problems at their homes. Many of these homeowners like you are facing expensive repairs because of mistakes made by the home builder. Each error is avoidable. GO HERE to arrange a coaching phone call so I can SOLVE YOUR PROBLEMS.

tim carter master plumber

Call ME now so I can help you!

This unique interactive experience allows me to observe, on a macro scale, the top mistakes made by builders, and often architects. These mistakes are avoidable and the extra money spent to build the right way pays off in spades years later.

Just last week I was on the phone with a man who was in shock. His father’s home had been built into the ground 2 feet deeper than it should have been. The builder then piled up dirt on the side of the house to hide his mistake. Years later the leaks caused wood rot that was the worst I’ve ever seen.

This mistake might have been prevented had the architect included a standard detail drawing showing exactly how high the foundation drawing should be in relation to all the ground around the house. The building code, a set of minimum standards, states that the ground around all sides of a house must have 6 inches of fall in the first ten horizontal feet of run away from the house. What’s more, a minimum of 6 inches of foundation should extend up above the ground! Remember, these are MINIMUM standards. Greater fall and more exposed foundation are better.

foundation height above grade sketch

Frequently homeowners ask me if they can alter roof trusses so they can create more storage space. The frustrated homeowners long for a traditional attic as one sees in older homes. More and more attics are transitioning from history to legend to myth as architects and builders use standard trusses.

The good news is you can purchase attic trusses or even smaller storage trusses. These install the exact same way as space-wasting normal trusses. While they cost more, the long-term savings are tremendous. Rent a small 10x15 off-site self-storage unit and after ten years you’ll have spent $18,480! Why not invest a few thousand extra dollars when building your home to have permanent full attic space?

Each summer and winter homeowners beg me over the phone to make them more comfortable. Parts of their homes are either too hot or too cold. These building problems almost always are traced to a forced-air system that was installed with little thought.

If you use forced air for heating or cooling, it’s important to realize it mimics how blood flows throughout your body. Every room in a house, except for kitchens and bathrooms, should have a return air duct as well as one, or more, supply ducts. Supply ducts should be located on outside walls and the return ducts should be on opposite interior walls. This forces the air to flow across the room and your body as it makes its way back to the furnace or AC unit.

The size of the supply ducts is critical. Think of how the blood pressure is the same at your heart as it is at the tip of your finger. Mother Nature made sure your blood vessels get smaller the farther away from your heart. Your HVAC contractor needs to do the same with the supply ducts to maintain the static pressure in the system.

return duct supply and suppl duct

Note how the duct on the left next to the beam gets smaller. The air is moving TOWARD you in the photo as it's the supply trunk line. Copyright 2023 Tim Carter

Every other week I field calls from frustrated homeowners who are tired of hearing Niagara Falls in the ceilings and walls of their homes each time someone flushes a second-floor toilet. This audio agony can be avoided by using no-hub cast iron pipes for the main vertical stack in a home. It only takes a few extra minutes to install this pipe and it provides quiet plumbing for decades.

cast iron plumbing stack

Cast Iron Plumbing Stack | Here's a 4-inch no-hub cast iron plumbing stack that branches off to two different full bathrooms. I installed this in a Bar Harbor home in 2019. Copyright 2023 Tim Carter

A month wouldn’t be complete if I didn’t have a conversation about how to modify a garage to create more space. I lay this problem at the feet of the architect in all instances. After ending the call I always wonder if the architect who drew the plans for the garage had ever parked a car in a garage. What thought entered her/his head when the car door dented the door of the other car in the garage? Did she/he grumble about squeezing between the car and the garbage cans, bikes, or lawnmowers along the side walls of the garage?

If you have a deck or patio at your home, there’s a great chance you’ve muttered disparaging comments about your home’s builder or architect each time you tried to squeeze by someone seated at a table. All too often I see decks and patios that are far too small. All one has to do to size a deck or patio is look inside a home. Is your current dining room too small? Do you have plenty of space to walk around seated family members? Or do you have to shuffle sideways past a wall or piece of furniture?

When you do the simple math, you’ll discover a deck or patio has to be 12x12 feet minimum to accommodate a table and chair set that seats four or six people. Once again, larger is better. Purchase your deck or patio furniture first before building. Set it out on the grass or driveway and test to see how much space you need behind a person seated at the table to get by. Trust me, you’ll be stunned.

Column 1504

High Hardware Prices and Your Garage

hardware bins on garage shelves

Based on a cursory inventory of this clutter, I estimate you’re looking at approximately $5,000.00 worth of simple hardware. Copyright 2023 Tim Carter ALL RIGHTS RESERVED

High Hardware Prices and Your Garage and Workshop

I took over the grocery shopping duties to give my lovely wife a break. She did it for over forty years. Each week I continue to be astonished at the prices of ordinary food staples like bacon, eggs, bread, and milk. Do you suffer from the same sticker shock? Do you have dusty cartons of egg money hidden in your garage or basement? I’m quite sure you do and you don’t even realize it.
Right next door to my grocery store is a regional hardware store. Weeks ago I was in need of some toggle bolts to reinstall a running board on my truck. My bill for the four bolts, the toggle nuts, four fender washers, and four lock washers was just under $10. I was aghast at this price. One would think it was silver plated, but alas it was all zinc.

A year ago I had a similar experience. I purchased six one-pound boxes of coarse-thread drywall screws at a big box store thinking they’d have the best price. I wanted them in various lengths as they come in very handy for any number of projects. I had to trade a $50 bill to get these pieces of hardware. I was in shock when I just got back a few coins in change.

A few days ago I started a de-cluttering project allowing me to reclaim my garage. You might be like me and have too much stuff. So much that I had to park my truck outside all winter. Living in snowy New Hampshire I find that unacceptable and most inconvenient.

On one wall of my garage I have 8-foot-tall shelves packed with plastic bins of all sorts of hardware. Many of these bins used to be in my utility-body truck I drove each day when I built homes. I had my own traveling hardware store so I rarely had to make a special run to get certain nails, screws, or bolts. Since they don’t go bad, I’ve kept them all these years.

While they’re not in perfect order, I’ve come to realize I have thousands of dollars of hardware in my garage. It’s possible there could be nearly $5,000 worth based on current prices. How much treasure disguised as nuts, bolts, and screws do you have in your garage or basement? How often do your kids make fun of you for saving it all? It appears you were wise to do it. The trick is to have it sorted so you know what you have.

How about power tools? How many corded power tools do you own? Based on the stratospheric prices I see for replacement batteries for new power tools, I can assure you that corded power tools are going to be worth lots of money in the future.

In fact, you may want to take any spare money you have and buy common corded circular saws, drills, and belt sanders and keep them warm and dry in their unopened boxes. The day will come when someone thinks it’s smarter to deal with an extension cord like I did for decades rather than pay $200 or $300 for a replacement battery each year.

Let’s discuss hiding treasure. I happen to know you might be quite interested in this topic. I’m in the process of completing a book about all the things people want in their homes. While doing the research, I discovered the second-most popular wish items were secret places to hide valuables in the ordinary home.

As you might suspect, I received lots of great suggestions to add to those I already knew about and use myself. It’s important to realize you need to be cognizant of both water and fire dangers. Some irreplaceable things of yours may be damaged by both. Then again, there are some metallic objects that don’t mind water and quite high temperatures.

One of the challenges is outsmarting burglars and thieves. I’m guessing not many would read a home improvement column like this so I feel safe sharing some ideas. Small items can be hidden inside a paint roller that you, cough cough, forgot to clean. You took it off the frame but then got distracted, remember? Even the roller pan didn’t get cleaned. You’d be surprised the number of small valuables you can fit inside the roller as you slide it back on the frame.

Did you know you can buy a tiny can of paint that’s the exact same color as mayonnaise? Imagine if you carefully cleaned a used jar and then coated the inside of it with the paint allowing it to dry. Fill the jar up and put it back in the refrigerator or pantry.

What about creating a hidden drawer under your workbench top? Can you envision how simple this is to do? Lots of thin objects could be stored in a workbench that measures 20 inches deep by 7 feet long!

Are you remodeling? Think about creating a 30-inch-wide secret space with a bedroom wall on one side and a closet wall on the other. Assuming the end of this cavity is in a hallway or another room, the opening to the space could be covered by a tall thin mirror that hangs on a french cleat. Or, you might just use a big poster of Raquel Welch or Cary Grant. Who would ever suspect there was a hole behind the poster?

Column 1503

Sources of Sewer Gas

wax gaskets on recessed toilet flange laminate flooring

Sources of Sewer Gas - The red arrow points to the white toilet flange that’s currently buried under two layers of laminate flooring. It was supposed to be installed on top of the flooring! Copyright 2023 Tim Carter ALL RIGHTS RESERVED

Sources of Sewer Gas - It's Easy to Find the Leaks

Two months ago I received a desperation text from a young woman who’s the cantor at my church. All of a sudden she was smelling noxious sewer gas in her condominium. She had moved in just two months before and for weeks and weeks there had not been a problem.

If you’re a new reader, you may not know that in addition to being a builder, I’ve been a master plumber since 1981. I was attracted to plumbing work because drain, waste, and vent pipes along with water lines present intriguing three-dimensional riddles that must be solved as you build a home. I love it when someone poses a riddle, even if the riddle is presented by inanimate objects like pipes!

Not only did this woman with the voice of an angel smell sewer gas, but she also had noticed a water stain in the ceiling above her fitness equipment down in the basement. I made a trip over to her home and within minutes I had figured out the issue.

“Did anything different happen here just before you started to smell the odor?” This is the first question I ask when I begin my sewer gas investigations. Each week I talk to people on the phone or in a video call helping them LOCATE the source of the sewer gas in their homes. Go here to set up a phone or video call with me.

“Well, I had new flooring installed upstairs,” she replied.

“Let’s go up and see what’s going on,” I responded. Once we climbed the stairs, I headed to that part of her condo that was above her fitness room. Lo and behold I ended up in a half-bathroom.

When I asked her if the flooring installers had removed the toilet, she answered, “Oh yes, the installer disconnected the toilet and re-installed it again an hour later once the new flooring was down. He said I might need a plumber to come in but didn’t say why.”

There’s no might about it. The flooring contractor broke the seal between the toilet and the drain pipes which prevents both water and sewer gas from escaping into this woman’s condo. He failed to install a new wax gasket to account for the extra thickness of the laminate flooring he put down. Each time the toilet was flushed, water sloshed around and leaked out through the broken seal. Sewer gas was constantly seeping out from under the toilet.

It took me just ten minutes to fix the problem. But the astonishing thing I discovered when I pulled the toilet up is that the original plumber had made a grave mistake. He had installed the toilet flange directly on top of the subfloor of the condo. I was looking at a toilet flange buried beneath two layers of laminate flooring!

A toilet flange is a special plumbing fitting that is permanently attached to the drain pipe under the toilet. It is supposed to be screwed to the floor and it also has slots that accept brass bolts used to connect the toilet to the flange.

The flange flares out and a flat surface is at the top. Wax gaskets placed on this flange provide the all-important seal between the underside of the toilet and the flange. When installed correctly, wax gaskets can last for hundreds of years never allowing water or sewer gas to escape. It’s mission-critical for the flange to be installed on top of the finished floor.

Just two years ago I had to solve a similar problem. A man in Massachusetts hired me to drive hours a few hours to his home because his wife was extremely ill. Several doctors were unable to figure out why she felt so bad. Her husband thought it might be sewer gas but was not sure.

I met there with a local plumber and a company that does smoke testing. Once I had the smoke tester start his machine, it produced vast amounts of harmless Hollywood smoke that issued from the bottom of two toilets in the house. Both bathrooms had been recently remodeled. A tile contractor installed new tile on top of the old tile.

I oversaw the plumber installing the correct amount of wax rings on top of the toilet flanges and reset the toilets correctly. We did a second smoke test and all was well. Within a day the woman started feeling much better.

After this happened I decided to create a small sewer-gas how-to guide to help folks like you solve your own sewer-gas dilemmas. There are many sources of sewer gas and I explain how to locate them. You can save hundreds of dollars solving the problems yourself instead of calling in a plumber.

Column 1502

The Fog of Complacency – How to Be Prepared

water damaged hardwood floor warped

Water dripping silently through the night caused thousands of dollars of damage including warping this hardwood floor. Copyright 2023 Tim Carter ALL RIGHTS RESERVED

Disaster Preparation - 3 Easy Things to Do Now

You might think that everything is rainbows and unicorns at my house. I can see how you might think I don’t suffer from home improvement trials and tribulations. After all, what could possibly go wrong at my house? I’ll answer. All the same things that go wrong without warning at your home.

Several nights ago we had a disaster unfold in the middle of the night. It actually started hours before, but my wife didn’t alert me to a tiny clue she had felt earlier in the day.

As it turns out, a mouse gnawed at a plastic PEX water line that was running from the basement up to a second-floor bathroom. The pipe passed through an oversized hole created by the plumber 20+ years ago. Had the plumber installed caulk to fill the hole, I’d not be typing this.

pex pipe gnawed by mouse passing through top wall plate

The mouse had sharp teeth. They can chew through aluminum coil stock too. Only steel will stop a mouse. Copyright 2023 Tim Carter ALL RIGHTS RESERVED

It’s important for you to realize I didn’t build the house I currently live in. Had I done so, I can assure you no mice would be inside, and even if they did somehow sneak in through an open garage door, they’d not be able to travel through the walls and ceilings at will as they currently do. The builder of my home was a dunce. I was only supposed to live in this transitional house for two years but now I’m going on year fourteen. That’s a story for another column.

The mischievous rodent ended up nibbling through the plastic pipe just enough to create a silent leak that reacted to gravity. The water soon ponded under the hardwood floor in our bedroom causing it to swell. My lovely wife felt a new bump in the floor as she walked on the oriental rug that covers the floor but didn’t think too much about it.

pex pipe gnawed by a mouse

Look how determined the mouse was. I captured the mouse a few days later and the chubby fellow turned out to be an Olympic swimmer! Copyright 2023 Tim Carter ALL RIGHTS RESERVED

Hours later in the middle of the night I had a nature call to the bathroom and felt a much larger hump in the floor that had never been there before. But in my zombie sleep-walking state, I noticed it but crawled back under the covers thinking I’d inspect later to see what toy the cats might have shoved under the edge of the carpet. Once up at dawn, I immediately saw we had a serious problem. By then, the water had traveled to a basement bedroom ruining the ceiling and laminate floor down there.

Even though I couldn’t see the leak, I engaged my critical-thinking skills and knew the water had to be leaking above the master bedroom. The only water above that room was a second-floor bathroom. I raced to the basement and immediately turned off the cold and hot water valves on the manifold in the boiler room stopping all water from going to that room. By then the damage was done. I know It could have been so much worse.

Your Fog of Complacency - Make it Dissipate

What is the teaching moment here for you? It’s a number of things. I want to dissipate the fog of complacency that has enveloped you no doubt. Let’s get started.

Where is Your Water Shutoff? Does it WORK?

First and foremost you need to know how to shut off the water in your home should you have a leak. Just knowing the location of the valve is not good enough. When was the last time it was exercised? I’ve been a master plumber since 1981 and can tell you that valves need to be exercised just like your body. You need to turn them on and off at least twice a year. You may discover that when you go to turn it off, it doesn’t turn or you break the valve.

In my case, my wife and I were lucky that one-of-a-kind irreplaceable and sentimental items were not destroyed. Will that happen to you? Do you know where the hidden water lines are in your home? Where do they run across ceilings? If a water leak happens, what will get wet below? Now is the time move things to a new location where water, heat, or sunlight will not damage some of your family treasures. Think about placing extremely valuable things in waterproof containers.

Can You Get Emergency Plumbing Repairs Done?

What happens if you can’t get a plumber to come to your rescue immediately? Based on the email I receive from homeowners like you it’s getting harder and harder to find workmen who will respond at a moment’s notice. Are you able to make emergency repairs to your water lines yourself? My guess is you would say you have no idea how to solder copper waters lines.

The good news is you don’t need to know how to solder copper. Or, if you have PEX tubing like me, you don’t need to have special tools for the most part to stop a slow or catastrophic leak.

No-Solder REPAIR Connectors

Should you have a catastrophic full-pressure leak, you can cut the copper pipe, slide on an open ball valve and use a press tool to crimp the valve onto the copper tubing. It takes seconds. Once crimped you turn the valve handle and the water stops flowing. The only issue is you have to have the valve on hand and you need the special expensive crimping tool. They can be rented, but hundreds or thousands of gallons of water could have flooded your home before you get back from the tool-rental business.

Believe it or not, there’s an even easier way to repair a leaking copper, PEX, PE-RT, and CPVC water lines. You can cut the pipe, remove any burrs and push onto the end of the pipe push-to-connect fittings. My go-to choice are TotalFit™ ones made by Uponor. I have Uponor PEX in my home.

If you can put the cap back on a Sharpie permanent marker, you can install these magic push-to-connect fittings.

uponor totalfit connectors adapters fittings

These are just a few of the Uponor push-to-connect fittings. You should have an assortment on hand at your home for EMERGENCIES.

It’s key for you to have an assortment of them on hand as well as the correct tool to cut the pipe cleanly. You might also get the special inexpensive de-burring tool. Once you see how easy it is to make an emergency repair, you’ll sleep like a baby.

Column 1501

Stop Getting Scammed by Contractors

new vinyl siding being installed on a home

What’s the best way to protect yourself from a scam or disappointment when you’re building a new home, residing your home, or doing any other project? Copyright 2023 Tim Carter ALL RIGHTS RESERVED

How To Stop Contractor Scams - True Stories

This is a milestone column for me. It’s my 1500th weekly column. For weeks leading up to this day I’ve wanted to produce a column that will save you vast sums of money, prevent confrontations, sleepless nights, and arguments. My goal is to empower you with all you need to know so that you have the same friendly relationship with your contractor for many years as I had with Matt and Ginny Motz and almost all of my clients.
Based on my five decades of work experience, I know you’re in one camp or the other. What are those camps or tribes? Ponder these true stories and decide for yourself.

Twenty years ago my future son-in-law came into my office as I was doing some HTML coding on my website. He asked about it and also wanted to know exactly what my Ask the Builder business was all about. One thing led to another and we started looking at my incoming email messages from homeowners like you.

This was the moment in time I discovered he was a brilliant young man. After looking at six emails in a row, he said, “Mr. Carter, you may not realize this but you’re in the life-preserver business. Each one of those homeowners is yelling at the top of their lungs for you to throw them a life preserver. You’re not in the how-to-swim business as you just told me.”

He was referring to the fact that all my previous columns had been focused on sharing how to do this or that so that work is done the right way. Apparently, 95 percent of the people I was getting emails from weren’t paying attention to that messaging. They were drowning in DIY nightmares or jobs gone wrong with contractors. I’ve never forgotten that day and should have hung a life preserver on my office wall as a stark reminder.

Roy's Trust Buried in His Basement

To prove this point, just two weeks ago I received this dreadful email from one of my newsletter subscribers. Roy has read each of my weekly newsletters for over ten years. He wrote, “Thanks for sharing the story about Angel who built a dormer with your advice. What an inspiration!

I wish I had called you before letting a con man steal my money and not finishing my basement. The worst thing is the relationship and mental/psychological stress, not the money.  Being taken advantage of when ‘you should have known better’ and ‘how did you not ask for advice’ has taken a huge toll on me.

The money is a factor, obviously, but it can be replaced. The others may take years, if ever, to overcome. Finding out from our local permits department that this happens EVERY DAY to people was of no relief. It especially hurt me knowing that I am a subscriber of yours and could have asked for guidance, but I fell into his trap and got tunnel vision.”

There are a handful of reasons why Roy got into trouble. The contractor could have been a pro at using powerful seductive psychology to persuade Roy to sign a contract. I’ve written extensively about this psychology in past columns and newsletters. Roy may have put far too much trust in the contractor. I could go on and on.

Laurie's Move to VT

Just days ago Laurie hired me to help her. She lives in Texas and is about to buy a lot in Vermont where she’ll build a new timber-framed home. She’ll end up just about 100 miles from where I live in central New Hampshire. She had a list of very good questions. She wanted to know about how to purchase 10 or 15 acres that would require no blasting of bedrock ledge. She wanted to know about septic design.

Her list of questions also included what it might cost to create a driveway into this wooded lot. Perhaps the biggest conundrum was separating the responsibilities of the timber-frame company and the actual builder. You see, the timber-frame company just sets their custom wood frame on a foundation provided by others.

The difference between Roy and Laurie is as stark as night to day. Laurie sat and put thought into quite a few of the very important issues that she’s about to confront. I informed her that I could offer lots more assistance and even drive to Vermont to help her choose the best lot if she wanted. After all, my college degree is in geology with a focus on hydrogeology. This means I know how to build houses that don’t have water leaks.

Reviewing Mike's Siding Contract

Just before writing this column, I sent a list of eleven items that need attention to Mike down in Florida. He’s getting new siding on his home and wanted me to review the proposal his contractor sent to him. Mike and Laurie are in the same camp. They put the brakes on before breaking out the ballpoint pen. You should do the same. Engage your critical-thinking skills and stop trusting contractors. Get advice from someone that doesn’t have a dog in the fight or research the best way to install things.

Go here to have me REVIEW your bids or contracts. My guess is I can help prevent scams and save you BIG MONEY.

Column 1500

Red Pilling People

Red Pilling People - Wake UP!

It's time for you to wake up. While you may not think you're a slave, it's pretty much true.

"It is the world that has been pulled over your eyes, to blind you from the truth.

What truth?

That you are a slave, INSERT YOUR NAME."


Angel Builds a New Dormer

new dormer rough framing

Imagine a young woman mother of three young boys cutting a hole in her roof like this to create a dormer. If she can do a big job like this, so can you. Copyright 2023 Tim Carter

Angel Builds a New Dormer - With a Little Help From a Friend

One of the most fulfilling moments of my career happened just a few days ago. It’s a story worth sharing for so many reasons, not the least of which it should inspire you to do something up until a moment ago you thought impossible. It’s a tale of the three Ds: diligence, determination, and dedication mixed with a heaping spoonful of courage.

Just before dinner, the perky tone of my phone indicated a text just arrived. I looked at the screen and it was from Angel Lovings, a 28-year-old mom of three mischievous boys, four if you count her husband. They live in Schenectady, New York.

Just before Christmas of 2021, Angel purchased a consult phone call from me that would change both of our lives. She typed, “I am trying to build a dormer and wanted to know if it would be possible for you to give me step-by-step instructions of what I need to do and a list of materials…I really need your help.”

Having completed thousands of phone calls like this in the past, my responsibility is to assess a homeowner’s skills and expectations in the first few moments of a call. The last thing I want is for you to get into a situation where a contractor will swoop in and pick your bones and savings account clean. Angel’s burning desire to complete this project was more intense than the largest bonfire I’ve ever stood next to. Five minutes into the call I knew her boys were going to have a bright and delightful attic playroom made possible by their mom’s sweat and sore back.

It’s important to realize when I looked at the text I saw a photo of a completed dormer poking out of a steep slate roof of a 100-plus-year-old home. Angel wrote, “Hi friend. It’s Angel… the dormer went really well…no leaking and we made it through the winter pretty good…”

I was bursting with excitement and replied, “…No leaks!!!! VICTORY! I’m so proud of you!!” I shared this news with my wife Kathy and she was just as excited as I was. I decided to interview Angel so you could tap into her inner strength. Using some of her inspirational nectar, you’ll be able to tackle a project and save yourself tens of thousands of dollars.

Once on the phone, I discovered much more about Angel. She and her husband both work full-time. They have three sons, although Angel had hoped her last child would be a girl but God had other plans.

When I dug deeper into how much DIY experience she and her husband had she said with no hesitation, “We didn’t know how to do anything. We built bed frames for our kids.” Let that marinate in your brain for a moment and then try to picture cutting a hole in your roof that measures ten feet wide by 12 feet long.

hole cut in roof for future dormer

If you have a guardian angel like me as your lifeline, you can do a tough job like this. Copyright 2023 Tim Carter ALL RIGHTS RESERVED

Angel was quick to offer up, “We didn’t hire a contractor because the bids were too expensive and in our immediate metropolitan area no one could do the job.” I know you’re likely in this situation. I get about fifty emails a week at my website complaining about high prices and contractors that won’t return phone calls. Angel didn’t let that huge obstacle stop her from reaching her goal. Nor should you.

Sixteen months earlier on our first call Angel shared she had gone to the library to read books about framing and building dormers. I wanted to know what finally gave her the confidence she could start to take slate off a steep roof. She surprised me saying, “I read a lot of books about how to frame and build dormers, but they left many questions unanswered. The most important thing was being able to get in touch with you.”

I wondered about fear because it can be paralyzing. When I asked Angel about this she replied, “My biggest fear was what happens if something goes wrong. Having someone like you to talk to knowing you have my back allowed me to contain my fear.“

As the conversation unfolded, Angel told me they only bought a circular saw, a reciprocating saw, and a nail gun to build the dormer. They already had a 4-foot level, a tape measure or two, and a ladder. Believe it or not, you only need all of that and a few more simple tools to build a dormer.

I was curious as to what Angel would have done differently if she could go back in time. As we all know hindsight is 20/20 and she didn’t hesitate to say, “I would have started earlier. We let the summer and dry weather slip by. Once we cut the hole in the roof it rained every day and we kept the house dry using a big tarp. Had we started two months earlier it would have never rained a drop on the job.” You’re preaching to the choir, Angel! Rain is something most contractors fight on a routine basis.

I congratulated Angel at the end of the call and once again told her how proud I was of her and her husband. We said our goodbyes and I sat and thought about what she had done in just four months' time working on the weekends. An hour later, my phone rang and there was Angel’s excited voice saying, “Tim, guess what? I just found out I’m allowed to do all of the electric and plumbing too! I know you can help me and you’re going to save me an additional $10,000.00.”

Indeed I will. Along the way, Angel is going to become even more confident. I wouldn’t be surprised in several years she decides to build her own home like I helped Zoe do in New Mexico two years ago. Trust me, you can do things you think are impossible!

finished dormer with vinyl siding

This is the finished dormer. It's not perfect but it's better than most remodelers might achieve. The most important part is there were no leaks all winter. Copyright 2023 Tim Carter

Column 1499

A Canadian Remodeling Nightmare

illustration of exterior door installation in frame wall

This crude illustration shows how the exterior door should have been installed. Copyright 2023 Tim Carter ALL RIGHTS RESERVED

A Canadian Remodeling Nightmare - Betrayal of Trust

I’d like to share a story with you. This saga transpired over the past six weeks and I feel it contains a valuable teaching moment that is guaranteed to save you thousands of dollars, allow you to sleep at night, and go to dinner with your remodeling contractor at the end of the job.

This is a tale about trust, honor, and betrayal. Perhaps you’ve been betrayed in the past by a friend, a lover, or a contractor. No matter who it is, it’s always painful.

Weeks ago a woman who lives in Ontario, Canada purchased one of my short consult phone calls. She was upset about a new exterior door that was installed in the basement of her home. The purpose of the call was to get my opinion as to whether it looked okay and if she was just being too persnickety.

As I always do, I asked for her to send me as many photographs as possible so I could get a handle on the situation. Fortunately, she sent great ones that allowed me to see every aspect of the job.

This job was very complex. The homeowner had decided to build a new patio beneath a deck. The basement of the house was only partially below grade and the door was installed in the exterior wall in the basement under the outdoor deck.

To install the door, the contractor had to excavate the ground beneath the deck to be able to install the patio. This patio extended to the outer deck support columns. The contractor may or may not have known but the footing piers under these columns would have to be sunk lower into the ground as they no longer would have enough soil cover to protect against frost heave.

I immediately saw a grave error in one of the photographs. The contractor had cut a notch in the foundation to accommodate the new door. But the top of the notch was 6 inches above the basement floor!

Other photos indicated that he had already installed the new patio outside and it was also above the basement floor. I couldn’t tell if the patio was sloped away from the house so as to direct water away from the basement.

The notch in the foundation was not wide enough. This meant it was impossible to position the door far enough back in the wall in line with the wall framing that sat on top of the foundation wall.

But it gets worse. The contractor had not created a slope on the horizontal part of the notch in the foundation. This slope was necessary to shed water away from the underside of the door threshold. Without this slope, there was a very good chance water would leak into the basement under the threshold.

I told the distraught woman that I could make a simple color drawing showing exactly where the door frame should be in relation to the exterior of the concrete foundation and the existing wood-frame exterior wall. I also sent her several links to great illustrations and cross-sections that I found on the websites of top exterior door manufacturers.

Furthermore, I sent her links to several YouTube videos, including one of mine, that showed how to install a new exterior door in an existing wall. I believe she watched them, but it’s possible she didn’t comprehend all the information.

Money Equals Power

The good news is she was still in possession of well over $30,000. I had told her under NO circumstances to release another dollar to the contractor until such time as the door was installed correctly. She followed this advice.

But just a week ago she texted me sharing that the contractor was putting all sorts of pressure on her to pay him a large sum of money even though nothing had been done to correct the door installation.

This woman also got a call from the contractor’s family divorce lawyer demanding money from her. Can you believe that? You might now understand why the contractor was trying to get his hands on money.

The bad news is the woman told me she was about to hire an attorney to sue the contractor. I told her in no uncertain terms, DO NOT HIRE A LAWYER. I wrote a column about why not to do this about two years ago. That column is on my www.AsktheBuilder.com website.

The simple reason is you have better odds of winning money playing blackjack in Las Vegas than suing a contractor. First and foremost we already know this contractor has no money!

Avoiding Nightmares

How could all of this be avoided? The woman should have had superb drawings showing exactly how everything was to be installed. There should have been fantastic written specifications. She should have then talked to the general manager(GM) of the best traditional lumberyard in her city to find out the names of the contractors the GM would use to remodel his house!

How to Find the BEST Contractor

I recorded four videos showing you exactly how to find the BEST contractor in your city or town. GO HERE to watch all of them.

Column 1498