Wash Windows Without Streaks TIPS
- Do NOT use newspaper and witches brew
- Do NOT use vinegar and water
- WATCH videos below with tips from PRO window washers
- Liquid soap, lambs wool and great squeegee are all that's needed
- CLICK HERE to Get Tim's FREE & FUNNY Newsletter!
You may think it's too cold to wash windows, but it's probably not. Professionals wash windows in the winter unless it's bitter cold outdoors. There's no reason why you can't be outside if you just dress for the weather.
You may not need to go outdoors if you have some modern windows that tilt inside for easy cleaning or are hinged so you can reach the outside glass with little effort.
While we're at it, it's time to dispel some of the many myths out there about how to get sparkling clean glass. You may swear on a stack of bibles that vinegar and water is the way to go. Or maybe you love using that blue liquid in a spray bottle. Or are you one who would bet their life on using newspapers to clean glass? If you use newspapers, you're leaving all sorts of ink behind on the glass.
Guess what? I reached out to the top management of huge companies that clean hundreds of thousands of square feet of glass in giant office buildings to see how the professionals do it. You're not going to believe how simple it is to get glass clean like the pros and you have just about everything you need in your kitchen right now!
Fast & Free BIDS
CLICK HERE to get FREE & FAST BIDS from local window cleaning contractors.
Degree of Difficulty: 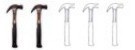
Step One: You're going to need a bucket, some clean dry rags, a bottle of liquid dish soap, a sponge and a great squeegee. If you want to work fast like a pro, then you'll maybe want to invest in a lambs-wool cleaning tool that's shaped like a squeegee.
Step Two: Let's step back and understand the window cleaning process before you get to work. If you were to take a spray bottle of water and go out and spray it on your dirty car and then rub your car with some paper towels or a clean rag do you think it would be really clean? The answer is no. For the most part, you're just spreading the dirt around. Some dirt will come off the car on the paper towels or rags, but not all of it.
To get glass clean, you need to saturate the glass with a film of water that has a small amount of soap in it and swab the glass with a micro-fiber cleaning tool to remove the dirt. Most professionals use the lambs-wool cleaning pad tool for this part of the job.
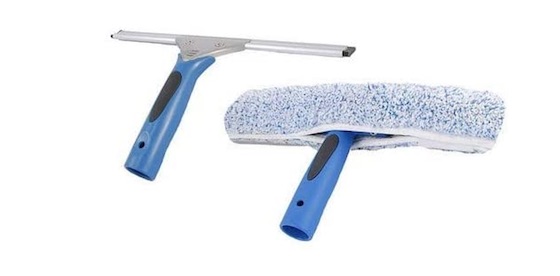
The microfiber tool on the right is what you should use to clean your windows. CLICK or TAP HERE or the photo to order one and have it at your home in days.
Step Three: Fill your bucket with two gallons of water. Add ten drops of liquid dish soap to this water. The soap acts as a lubricant on the glass and helps to cut down on the surface tension of the water.
Step Four: Dip your sponge or lambs-wool tool into the cleaning water and get it wet. Squeeze some of the water from whatever you're using, but not all of it. You want enough water to be present that the glass surface will get wet and the dirt on the glass will easily transfer to your sponge or lambs-wool tool as it glides across the surface. This is the step where the glass gets clean.
CLICK HERE to get FREE & FAST BIDS from local window cleaning contractors.
Step Five: Flip the sponge if necessary to the other side if the glass is exceptionally dirty. Your goal is to transfer all of the dirt from the glass to the sponge or lambs-wool tool in a matter of seconds by floating it across the glass. Professionals can swab a standard-sized house window in seconds and achieve this result.
Step Six: It's now time to use the squeegee. The purpose of the squeegee is to just remove the excess water beads that are on the glass. The squeegee is NOT cleaning the glass. You've already done this in steps four and five.
Step Seven: It's best to go sideways when using the squeegee starting at the top of the window. You may make clumsy strokes at first, so be patient. Hold the squeegee at a slight angle much like a snowplow so the excess water is pushed down the window and doesn't go beyond the tip of the squeegee that's pointing to the sky.
Step Eight: After you have squeegeed the entire pane of glass, you may have some water droplets where the glass meets the edge of the window frame. Use your dry rags to wipe this off never allowing the rag to drift back onto the main part of the glass.
Summary: The next time you see a professional window cleaner stop and watch how he works. You'll be amazed at the process and how fluid he is with his hand and arm motions. It will take you a while to get as good as they are, but that's okay, you're working on your dime.
Window Washing Videos
Watch these two videos to see how pros get glass perfectly clean. It's SUPER EASY.
CLICK HERE to get FREE & FAST BIDS from local window cleaning contractors.
Column HT032