How To Build A Shed

How To Build A Shed

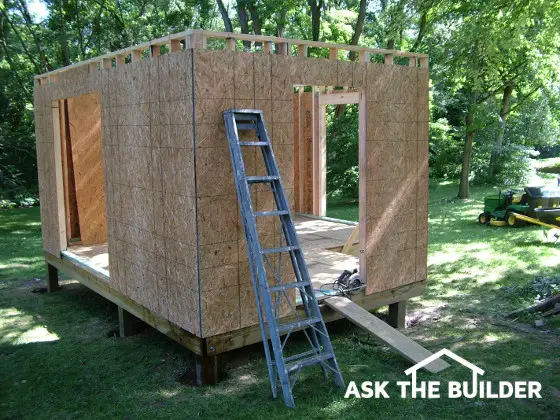
How to Build a Shed | Framing the walls of a shed requires minimal carpentry skills. This shed is being built to look exactly like the house. Look just below for the finished photo of this shed. © Copyright 2017 Tim Carter

How To Build A Shed TIPS

DEAR TIM: I need to know how to build a shed. As I looked for leaf-raking tools in the debris field formally known as my garage, I realized I need a storage shed.

I went out and looked at different outdoor storage sheds at dealers and home centers, but I want to build my own.

Are wood sheds the way to go? Brian F., Lancaster, PA

DEAR BRIAN: It is going to be very difficult in this short column to teach you how to build a shed.

How Hard is it to Build a Shed?

There are hundreds of individual steps involved and some of the most important are in simply planning your storage shed. For example, you may want to talk with your wife and build both a combination storage shed and garden shed at the same time.

I did this two years ago, and it has turned out to be a huge success with my wife.

backyard shed

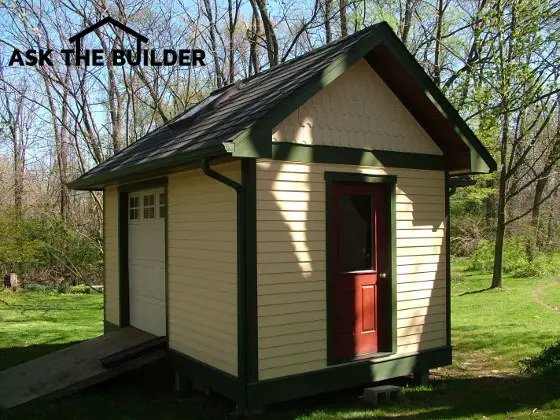
This is the finished shed from the photo at the top of the column. My house is a Queen Anne Victorian home, so the shed is a perfect match. Look at the photo just below of my home. The shed is at the end of my driveway.

queen anne victorian home cincinnati oh

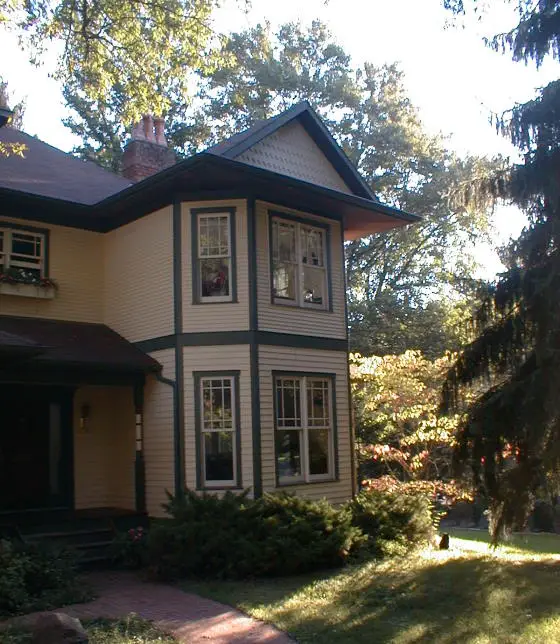
This is my home. You can see the shed is a perfect match even the fancy shake shingles in the gable end!

Can You Call Me To Help Me Build a Shed?

Yes, I can call you to help you build your shed. I do many consult phone calls each week and they save homeowners lots of time and money. CLICK or TAP HERE to set up an affordable consult phone call.

Most recent customers to order a phone consult: Manu, Alexandria, VA | Patti, Ft. Worth, TX | Warren, Hamilton, OH | Sandra, Bend, OR | Brandon, Rapid City, SD | Alice, Plant City, FL | Loreli, Worcester, MA

Free & Fast BIDS

CLICK HERE to get FREE & FAST BIDS from local companies that will build a shed for you in no time.

What is the Biggest Shed Mistake?

The biggest mistake I see homeowners make is they don't think about how big the shed should really be. Watch this simple video to get an idea how SIMPLE it is to calculate the size you really need.

Can You Build A Shed Without Plans?

I built my entire shed without any plans but it's not a good idea for you to try it. I was able to do this because I've built so many things.

You'll not be able to survive without plans. I had a fantastic architect draw up the plans of my shed AFTER it was built.

Why? So I could SHARE with you how to do it.

You don't have to build the EXACT shed I have. You can modify the plans to fit what size you want / need.

The plans will help you VISUALIZE what you need to do. I've never ever seen such detailed shed plans in my career.

You can BUY THE SHED PLANS NOW for just $9.95. You print them out on regular paper.

Here are just TWO of the SEVENTEEN pages in these fantastic plans. I know you CAN'T READ them, but you will be able to see all the print and measurements when you DOWNLOAD the real ones.

how to build a shed

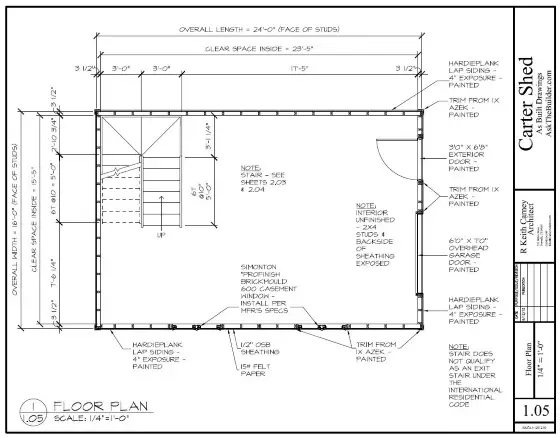
This is the floor plan. It shows you where EACH STUD goes!! CLICK THE IMAGE NOW TO BUY THEM. INSTANT DOWNLOAD.

How To Build A Shed

This is a page showing a cross section of the shed. There are 17 pages to the set of plans!! CLICK THE IMAGE NOW TO BUY THEM. INSTANT DOWNLOAD

What is the First Step in Building a Shed?

The first place to start the how-to-build-a-shed process is with your local government officials. You need to see how your zoning laws deal with sheds as well as your local building codes.

For example, where I live the building department is not concerned with sheds that are under a certain square footage. You may discover you do not need a building permit.

Should the Shed Have a Wood Or Concrete Floor?

A shed is best to have a concrete floor, but wood works well too. Be sure the wood joists and the plywood are treated lumber so they don't rot.

Once you have learned you can build the shed in compliance with all laws, then make a decision if the shed will have a wood floor or a concrete slab. I've built sheds both ways, and feel one with a wood floor works well if you build it using the right materials.

If you want your storage shed to be problem-free for years, you need to make sure it has a great foundation that will not move. I prefer working with wood because it is affordable and easy to cut, move and erect.

Should Sheds Be Protected From Frost Heave?

Structures built in climates where the ground freezes must be protected from frost heave. When soil freezes, the water in the soil expands.

This can lift the soil dramatically causing all sorts of structural stresses for those structures built without frost-protected foundations.

CLICK HERE to get FREE & FAST BIDS from local companies that will build a shed for you in no time.

Is a Turned-Down Slab a Good Idea?

A frost-protected foundation can be full-length poured concrete footers that extend below the level that frost penetrates or round concrete pads that support treated-lumber posts.

I like using the wood-post method as it resembles building a traditional wood deck. For a simple outdoor shed, you may only have to dig four 16 or 24-inch diameter holes for the entire foundation.

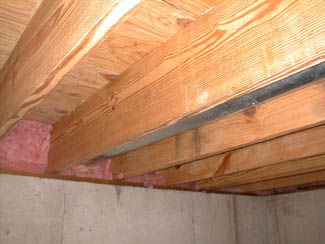
What Type of Wood Floor Should Be Used?

The wood-floor system should be made with treated lumber that will resist wood rot and any attack by wood-destroying insects. I also use treated-lumber plywood for the floor of my storage sheds. This way any water that drips from tractors, tools or other things will not cause any damage to the shed flooring structure.

You can get treated plywood at any local lumberyard. Most homeowners have no idea this great product exists. it makes a fantastic shed floor.

Should I Use a Treated-Lumber Bottom Wall Plate?

When you frame your shed walls, use ordinary framing lumber but always use a treated lumber bottom plate. In case water does get into the shed, this treated lumber bottom wall plate helps resist wood rot.

Be sure to use plywood or oriented strand board on all of the corners of the walls of the shed. This makes the walls very strong so they resist racking forces caused by roof load and wind.

Are Trusses or Common Rafters Best for a Shed?

You can buy prefabricated roof trusses for the roof structure, but cutting simple roof rafters is not that hard. If your budget is tight, you will probably discover that framing the roof without trusses is the better alternative. You will simply have to learn how to cut simple rafters.

CLICK HERE to get FREE & FAST BIDS from local companies that will build a shed for you in no time.

Should the Walls be Covered with Felt Paper?

Be sure you cover the exterior walls and roof with overlapping asphalt felt paper before you apply siding or shingles. The felt paper will prevent any wood rot in case a leak develops over time.

Watch this short video about how well felt paper works.

Can I Use a Narrow Overhead Garage Door?

A 6-foot-wide narrow overhead garage door is an excellent choice. They don't blow open, they're affordable, and come in many styles.

When you decide on doors to get into and out of your storage shed, give a hard look at smaller overhead garage doors. Everyone who see the six-foot-wide metal overhead garage door in my garden shed marvels at it. Here's a video of my small shed overhead door:

It provides ample room to get my garden tractor in and out, is lightweight and easy to open and close and it is attractive. It only took me 90 minutes to install this gorgeous overhead shed door.


Can I Build The Shed By Myself?

Many of the actual tasks that you will do to build the shed can be done alone. You will probably need help lifting some of the longer walls that are framed on the floor. It is dangerous to try to lift and secure the walls by yourself, although it is possible to do.

You may want some help as you apply sheathing to the roof rafters or trusses.

Should the Floor & Walls Be Square?

Be sure to take your time to get the floor of the shed perfectly square and level. If you take the extra time to do this, it will pay off in spades as you frame the walls and install the roof. Out-of-square foundations or floors will cause you fits through the entire building process.

Watch this video to see how to square up floors and walls.


CLICK HERE to get FREE & FAST BIDS from local companies that will build a shed for you in no time.

Column 697

Ceramic Floor Tile Installation Tips and Secrets

Ceramic Floor Tile Installation TIPS

St Joseph Church Tile Floor

This floor tile was installed over 100 years ago. It's in perfect condition. You can do work like this too even though you're not a master tile setter. Keep reading and watch my videos below. Copyright 2022 Tim Carter

  • Be sure there are no hollow spots under tile
  • Use self-leveling floor compounds - SEE LINK BELOW
  • WATCH floor tile grouting video series below
  • Too much water ruins grout
  • Get Tim's FREE & FUNNY Newsletter!

DEAR TIM: My husband and I are deep into installing new flooring in our home. Flood damage ruined the carpet. We decided to install a combination of laminate flooring and ceramic tile. The tile work is much harder than I thought. We're installing the large tile directly on top of the concrete slab. I'm using plastic spacers to keep the grout lines straight, but I'm having great difficulty.

I've never grouted before and am worried about messing that up. Help! I don't want to ruin this project. Marilyn H. New Bern, NC

DEAR MARILYN: I'm sorry about your recent disaster, but I'm happy that you've bounced back with a great DIY attitude.

How to Install Ceramic Floor Tile - A Process

In my opinion, self-sufficiency and do-it-yourself is part of what built our great nation. You're going to be very proud of your work once it's complete. I also want to add that it's beneficial to push against your comfort-zone envelope and be slightly uncomfortable. That's how you improve your skills.

CLICK HERE to get FREE & FAST BIDS from local floor tile contractors if you decide not to do DIY.

Installing Ceramic Floor Tile - A Solid Base is Necessary

Ceramic tile is a very rigid product that has high compressive strength. This means you can squeeze it and it won't crush. However, ceramic tile, concrete, and natural stone have low tensile strength. This means if you try to bend a piece of tile, it doesn't take much effort to crack or snap it.

How To Prevent Tile Cracks

To prevent cracked floor tile, you need to make sure there are no void spaces between the tile and the floor surface it rests on. A void space under a tile will cause the tile to bend as you apply pressure to the top of the tile.

The larger the tile you're installing, the more difficult this task becomes as it's very hard to get a floor surface in the same plane. You can use fantastic pourable self-leveling floor compounds to get a perfectly flat floor surface if you plan ahead.

Floor Leveling Compound

This is a powder you mix with water. You then pour it and it levels itself. It's magic. CLICK THE IMAGE NOW TO ORDER IT.

Fix Cracks With Epoxy

Cracks in a concrete slab can, and often do, telegraph through the floor tile. If your slab has cracks, consider using special injectable concrete epoxies to repair the cracks so the concrete doesn't move.

concrete epoxy

Here's one great concrete epoxy you can squirt down into wider cracks. CLICK THE IMAGE NOW TO HAVE THIS DELIVERED TO YOUR HOME ASAP.

Get FREE & FAST BIDS from local floor tile contractors if you decide not to do DIY.

Crack Isolation Membranes

Professionals often install crack-isolation membranes between the tile and concrete slabs. These help keep ceramic tile crack-free for the life of the floor.

These membranes are mission-critical and do whatever is necessary to make sure you install one.

ceramic floor tile installation

This patterned ceramic tile floor is well on its way to completion. The plastic spacers could cause problems. Copyright 2022 Tim Carter

Forget About Plastic Spacers

I discovered long ago the plastic spacers used to keep grout lines straight don't always work as intended. It's not because the spacers are defective.

Realize the spacers are probably manufactured with very tight tolerances, but the ceramic tile may be off slightly.

If you have a variance of just 1/32 inch between tiles, that can create a 1/16-inch difference if two of those tiles are installed side-by-side. Pretty soon the grout lines will look more like a sinuous stream channel if you use the plastic spacers.

Create a Crossword Puzzle Grid

My preferred method of installing floor tile is to create a grid on the floor using a chalk-line. I calculate the exact distance, based on the width of the tile and the grout line spacing I want for either a 3x3 tile grid or possibly a 4x4 tile grid. I snap the lines making sure they're accurate and lay the tile to the edges of the grid lines. The center tile are just installed by sight making sure the grout lines are consistent and straight.

Grout Disguises Minor Tile Offsets

Realize that prior to the grout being installed the lines between the tiles may appear slightly less than perfect. Grout has a magical quality to mask these very slight imperfections. Twisted or crooked tiles will still look twisted and crooked with grout.

Grouting Videos - MUST WATCH

Watch these four videos that show you step-by-step how to grout floor tile. Don't skip one thing I say in the videos!


How to Grout Ceramic Floor Tile

When you get ready to grout, you can spoil all your hard work up to this point. Rookie tile setters often make any number of mistakes when mixing, applying, or finishing the grout. I recommend that you purchase some very inexpensive floor tiles and install them on a 3x5 piece of cement backer board that just is laying in your garage. Practice grouting on this test area until you perfect your skills.

Don't Add Too Much Water

Mix the grout so it's the consistency of bricklayer's mortar. If it flows from a bucket like pancake batter, it's too wet. Too much water when mixing or finishing the grout joints weakens the grout. This will cause it to crack or crumble in the months ahead.

Use a Hard Rubber Float

Apply the grout with a hard-rubber float at a 30 or 45-degree angle to the grout lines. This diagonal stroke will ensure the grout is flush with the top of the tile. Do not rub the grout with the sponge until it firms up enough so you don't remove grout from the joints.

rubber grout float

This is just like the rubber grout float I've used for decades. Care for it and it will treat you well. CLICK THE IMAGE NOW TO ORDER ONE.

Watch out for Low Air Humidity

Low humidity and hot temperatures will cause floor grout to set up rapidly making it very hard to finish. You need to discover on your own how much grout you can install and finish at one time.

Mix Small Amounts of Grout

Only mix enough grout in a bucket that you can install and finish in one hour. You can always mix more. Don't add water to stiff grout in the bucket. Re-tempering the grout with water will weaken it.

Column 1006

Sound Underlayment Laminate Flooring

Sound Underlayment Laminate Flooring TIPS

Sound Control In Condos

Anne Sluder, who lives in a condo with noisy neighbors below her in St. Petersburg, Florida, asked me the following question:

"What product do you put down under laminate floor to block noise for the unit under you, when you're installing flooring in  unit  on second-floor of condo building?"

This is an easy one!!

Free & Fast BIDS

CLICK HERE to get FREE & FAST BIDS from local flooring contractors who can install soundproofing underlayment.

Cork Underlayment Is Best

Anne, I would get myself some nice 1/4-inch thick cork underlayment to put down under the new laminate floor.

Look at the following photo. I've used cork underlayment just like this to dampen sound in between floors. CLICK THE PHOTO.

This is a very affordable underlayment that can STOP and DAMPEN sound. CLICK THE IMAGE NOW TO HAVE IT DELIVERED TO YOUR HOME ASAP.

Cork has amazing sound-deadening properties.

I've written many past columns about Soundproofing. You should read a few to get up to speed, because you need to locate any possible air leaks between the two units too.

Soundproofing Articles - Discover More Tips

Here one called Sound and Noise Control.

Here's a good one that deals with Soundproofing Existing Construction like you have. 

CLICK HERE to get FREE & FAST BIDS from local flooring contractors who can install soundproofing underlayment.

Floor Squeak and Bounce Repair

Floor Squeak
These are 2x12 floor joists under my own laundry room. They span approximately 16 feet and there is simply no bounce in that floor.

Floor Squeak and Bounce Repair TIPS

  • Building code is a set of minimum standards
  • Not all joists have the same strength and stiffness - look at span tables
  • WATCH floor squeak repair video below
  • Screw subfloor to joists to eliminate most squeaks
  • CLICK HERE to Get Tim's FREE & FUNNY Newsletter!

DEAR TIM: The wood floors in my new home are driving me crazy. When I walk across them, they feel soft and bounce up and down.

Some places actually squeak. The building inspector has indicated the floors do indeed meet the building code.

What in the world can be done now to stiffen the floors so they feel more solid? Do I have to start over? What should have been done to prevent both problems? Dewey B., Birmingham, AL

DEAR DEWEY: I can absolutely understand your frustration and disappointment.

New Should Be Defect-Free

Anytime we buy something new, it is perfectly normal to have high expectations with respect to the final fit and finish of a product. When it comes to a new home, one would tend to assume the floors would be solid and squeak-free.

Unfortunately, your expectations, and those of tens of thousands of other homeowners, are in conflict with the building code. I wish it were not so, but it is reality.

Building Code = Minimum Standards

I happen to have a high regard for the building code. It is a fantastic document in many respects. I count among many of my friends several retired and active building inspectors.

But one thing I've learned in all of my years in the industry is the building code is a set of minimum standards.

FREE & FAST BIDS

CLICK HERE to Get FREE & FAST BIDS from local flooring companies that can remove squeaks from your floors.

70% Test Grade

A builder who works within the code is simply passing a series of tests each time an inspection is scheduled. To pass the code inspections or tests, a builder simply has to obtain a grade of 70 percent as one would in a school exam or test.

In fact, the system is actually more basic: You either pass the inspection or you fail it. The contract you signed with your builder may not require him to get a better score. You can make that happen by specifying better materials and installation methods that exceed code requirements.

Minimum Span Tables

The building code has a detailed section dealing with wood floor design. It calls out the maximum distance floor joists can span for different sized lumber set at different spacings.

You can see all of this complexity if you look at lumber span tables. Beware, they might make your eyes hurt!

There are span tables for different species of lumber. Here are span tables for southern yellow pine. It's a very strong wood.

Check out this set of span tables. It has Douglas Fir and other species in it. Note the difference between Douglas Fir and the others! 

Grade & Species Differences

What's more, it indirectly talks about the grade and species of lumber. Keep in mind that different species and grades of lumber have a wide range of strength characteristics for identically sized pieces of lumber.

A 2x8 made from dense select Douglas fir-larch will perform quite differently than say an identical sized piece of #2 Ponderosa pine. The floor joists permitted by code allow safe floors to be built that are soft and spongy. But most people want solid and safe floors.

Removing Bounce

Taking the bounce out of the floors will not be easy. It can be done, but it will require significant modifications since your home is now complete.

The engineering solutions to make it happen are as abundant as applause at a grade school play. You or your builder will need to consult with a structural engineer that has extensive residential experience with wood floor systems.

CLICK HERE to Get FREE & FAST BIDS from local flooring companies that can remove squeaks from your floors.

Residential Structural Engineers

To ensure that you'll be satisfied, ask the engineer for a few references. Call the homeowners and ask them if the engineer's solution produced floors that were sound and stiff.

CLICK HERE to get FREE & FAST BIDS from local structural engineers who can design a fix for your bouncy floors.

This is very important, and you'll be paid back in spades if you take this extra time.

Squeaks Are Easier

The secondary squeaking problem is more of a nuisance than anything. The squeaks can almost always be traced to nails driven through the sub-flooring into the floors joists.

For any number of reasons, the nails may have withdrawn slightly or the subfloor was never fastened tightly to the joists. As you walk across the floor, your weight causes the subfloor to slide up and down the nail shafts. This slight movement produces the agonizing squeak.

Floor Squeak Video

Watch this video to see a simple DIY floor squeak solution. It works most of the time.

Tiny Slits In Carpet

If your finished flooring surface is carpeting, you can solve the problem by driving screws through the subfloor into the floor joists. To prevent the carpet fibers from pulling, you need to make a precise surgical slit in the carpet backing before you drive each screw.

Squeaks in floors covered with tile, hardwood, sheet vinyl laminate, etc. are almost impossible to fix without removing the finished floor or parts of it.

Avoid Problems

These problems could have been avoided in the planning and construction phase. A seasoned architect and builder might have specified a floor joist package that would have produced the firmness you wanted.

If you would have discovered the spongy feel during a walk-through just after the framing was complete, simple engineering solutions could have been enacted at a low cost.

The squeaks could have been totally prevented if the builder had installed coarse-threaded screws through the subfloor into the floor joists just before the finish flooring was installed. Unfortunately, hindsight is always 20/20.

Great Sub-Floor Adhesive

When building, be sure to use a high-quality sub-floor adhesive. Click the following image to see them. The more expensive ones are usually contain better ingredients.

subfloor adhesives in tubes

There are quite a few subfloor adhesives. Here's one way to locate the best one. The BEST ONES usually contain MORE of the GREAT INGREDIENTS, so they cost more. Use price as your barometer. CLICK THE IMAGE TO ORDER SOME ADHESIVE NOW AND IT WILL BE DELIVERED TO YOU.


CLICK HERE to Get FREE & FAST BIDS from local flooring companies that can remove squeaks from your floors.

Related Column = Preventing Squeaky Floors

Column 467

Cork Flooring Products

Cork Flooring Product TIPS

  • Flooring products respond to trends
  • Cork comes from the Mediterranean Sea countries
  • Dream DIY material - it's very easy to work with
  • Density is everything - best cork flooring is denser and heavier
  • CLICK HERE to Get Tim's FREE & FUNNY Newsletter!

Cork Is Magical

Cork flooring is simply spectacular. It is distinctive, yet affordable.

Cork has been serving as an exemplary flooring material for well over 100 years. It was environmentally friendly long before the current eco-movement leaders were in their diapers.

There are many positive attributes about this flooring material and few negatives. I feel that it offers a homeowner a most unusual choice when considering flooring.

Get FREE & FAST BIDS

CLICK HERE to get FREE & FAST BIDS from local flooring contractors who will install cork in your home.

Trends Ebb & Flow

The popularity of cork flooring peaked in the late 1950's and early 1960's. As with colors (who can remember avocado and harvest gold appliances?), cork simply lost favor with designers and architects.

It's most unfortunate as this flooring material is timeless. Perhaps the abundance of natural wood products within our own geographic borders contributed.

I've installed cork in my own home and have put it down for customers. Everyone has loved it. I really like how quiet it is.

It does a great job of absorbing sound in a family game or recreation room.

This is the exact cork flooring I used in my entire finished basement, including the AsktheBuilder.com world headquarters. CLICK THE IMAGE NOW TO ORDER IT FOR YOUR HOME.

Mediterranean Origin

Cork is only commercially grown in the Mediterranean countries. Quite possibly the best quality cork is harvested from cork trees in Portugal. Spain, France and some North African countries also grow and export cork. Cork trees simply have adapted to the balmy climate in this part of the world.

Possible Comeback

It appears to me that cork flooring is making a comeback. I consider it to be one of the most beautiful and durable flooring materials to have in a home.

It's easy on your feet and ears. It can be refinished just like a wood floor.

DIY Dream Material

Better yet, it is a DIYer's dream material. It's quite possibly the easiest flooring material to install that I have ever worked with.

If you install the traditional 12-inch by 12-inch tiles, all you need is a simple razor knife for cutting and a trowel to spread mastic. It doesn't get much easier than that.

Selecting a Cork Floor

Cork flooring is available unfinished or pre-finished. The pre-finished cork comes with either an acrylic, urethane or wax finish.

The acrylic finish is actually an ultraviolet light cured process. It's very similar to the process that creates product labels that have that very high gloss finish you see.

This finish can be installed quickly by automated machinery. It's only downfall is that it is a somewhat soft finish similar to wax. Scratches can be a problem if you tend not to vacuum regularly.

Urethane coated cork flooring probably offers the best finish. The urethane is no different than the material you might put on your hardwood floor. It is applied in controlled factory conditions.

Urethanes and acrylic finishes allow you to simply screen the cork flooring as the finish wears. The screening process is just an ultra-light sanding. You then apply a maintenance coat of urethane to make the floors shine like glass.

CLICK HERE to get FREE & FAST BIDS from local flooring contractors who will install cork in your home.

Wax Finishes More Work

Wax finishes are just that - wax. Wax is tough to maintain. You need to have a low speed (and sometimes a high speed) buffer on hand to polish and burnish the floor.

I can't even imagine going to this kind of trouble in this day and age! It is beyond me as to why wax finished cork is even available! I do not recommend that you even consider it for household use. When I buy my cork flooring, I'm getting the pre-finished urethane brand!

Density is Important

It shouldn't surprise you that all cork is not the same. Different trees produce cork of different densities.

The lighter (less dense) the cork, the more easily it is damaged and the less wear and tear it can withstand. Density is measured in a given weight per cubic foot of material. Manufacturers will tell you what the density of their product is.

The denser products will always cost more. Use price as a barometer when trying to figure out the best cork to buy for your floor.

CLICK HERE to get FREE & FAST BIDS from local flooring contractors who will install cork in your home.

Column B183

Gutter Leak Repair Spray

Gutter Leak Repair Spray TIPS

Seal the Connections

Aluminum gutters and downspouts are prone to leaking at the seams where the parts connect. Installers will either crimp the end caps and outlet tubes or they may pop rivet them.

Some outlet tubes are just friction fit and can move over time without a mechanical connection like a crimp or pop rivet.

Galvanized Gutters Were Soldered

Old galvanized gutters made years ago by craftsmen used to be soldered with molten lead solder.

It was a true art form.

Modern Sealants

Today manufacturers like Alcoa and Geocel make amazing adhesive sealants that stick quite well to clean aluminum. I've used the Alcoa aluminized sealant for years, but recently I switched to a modern sealant made by Geocel.

Gutter Seal Video

Here's a video showing how to seal a leaking gutter. Pay attention to the cleaning part!

Miracle Spray Product?

But I've also seen miracle sprays on sensational TV commercials. There's an old saying that I feel comes into play here:

"If it looks too good to be true, it probably isn't."

I've not tried the miracle spray gutter leak products, but I'm inclined to think they might not last. It's a rubber-based product and I wonder about it's ability to create a long-lasting repair patch.

It may work for a short time, but then fail.

I have tried with great success the following sealant made by a great company Geocel.

instant gutter seal

This is a product that applies just like caulk. I've used it at my own home and it works very well. CLICK THE IMAGE NOW TO ORDER THIS PRODUCT AND HAVE IT DELIVERED TO YOUR DOORSTEP.

You may want to try the miracle gutter leak repair spray. Here it is:

Flex Seal Liquid Rubber Sealant

This is the magic spray product. It's rubber based. I've not used it. I don't want to spray it on my own gutters to only find out it doesn't work and then it's hard to remove. CLICK THE IMAGE NOW IF YOU WANT TO BUY SOME AND TAKE A CHANCE.

Clean Surfaces Before Repair

Oxygen Bleach

Stain Solver is MADE in the USA with USA ingredients that are food-grade quality. CLICK THE IMAGE to order some NOW.

To ensure any of the products you use do stop the leaks, you need to really do a fantastic job of cleaning the inside surfaces of the gutter before you apply the repair products.

You can use regular liquid dish soap and water if you want. You might get better results if you use a certified organic oxygen bleach like Stain Solver.

Stain Solver is made in the USA with USA ingredients. It's non-toxic and really cleans outdoor surfaces well.

The key is to get all the gunk out of the gutter, rinse it well with a garden hose and then start to clean.

There will be a film of dirt left behind after you rinse with the hose. Don't feel your aluminum is clean at this point.

Use A Brush

Mix up your cleaning solution, pour it into the gutter at the seam and use a small brush to get into any cracks or crevices where there could be dirt.

Use an old rag or any other cleaning tool to get the flat surfaces clean.

Rinse and allow to dry.

Then apply the magic sealant you decided to use.

Best Laminate Flooring

oak laminate flooring

This is the exact product I have in my man cave. You'll trick 9 out of 10 people. They'll think it's reclaimed oak from a barn. CLICK THE IMAGE NOW TO HAVE THIS DELIVERED TO YOUR HOME.

Best Laminate Flooring TIPS

  • Buy the one Tim Carter uses in his own man cave!
  • Get one that's so realistic it fools most visitors
  • WATCH the DIY install video series below
  • Follow simple instructions for a one-day install
  • CLICK HERE to Get Tim's FREE & FUNNY Newsletter!

Cynthia Russell wants to install laminate flooring in her Standish, MI home. But she's having trouble locating the best brand. Here's her tale:

"We are considering putting laminated flooring in our house.

We were looking at Pergo flooring, but after doing some research I found only negative reviews.

We also looked at Diamond flooring. The Diamond flooring is 5/8 in thick. What would you recommend using?"

Here's my answer:

Cynthia, I recently installed a laminate floor in my man cave / ham radio shack / office. I'm really pleased with the product and how easy it was to install.

If you’re interested in learning more about the estimates to install laminate flooring I have an article here.

My floor was a laminate that looked just like reclaimed oak from an old warehouse or barn. It's so realistic it fools just about everyone that looks at it.

CLICK HERE to get FREE & FAST BIDS from local flooring contractors who can install your laminate floor - often in one day!

How To Install Best Laminate Flooring Videos

I also taped a three-part video series about my project. Here are the videos.

When you watch them, I believe I'll convince you this is a project most DIY people can do. You just have to follow the simple instructions.

CLICK HERE to get FREE & FAST BIDS from local flooring contractors who can install your laminate floor - often in one day!

Preventing Squeaky Floors

Preventing Squeaky Floor TIPS

  • Know causes first so you can nip squeaks in the bud
  • Nail shaft movement most common cause
  • WATCH floor squeak solution video below
  • Use great subfloor adhesives - see below - and screw the floor
  • CLICK HERE to Get Tim's FREE & FUNNY Newsletter!

How many old homes have you walked through where you hear annoying squeaks with each footstep? If you live in such a home it is possible, in certain instances, to get used to the noise.

Somehow your brain seems to block it out. It is even possible to sometimes cure squeaky floors. But most people I know who are buying or building a new home will not and should not tolerate squeaky floors.

After all, preventing squeaks in wood floors is as simple as falling off a log. Anyone can do that.

Common Squeak Causes

Squeaks in wood floors can be traced to any number of causes. Perhaps the most common cause is wood sub-flooring that is not tightly secured to the floor joists.

In many instances, the loose sub-flooring sits slightly above the floor joist. When a person walks across the sub-flooring, their weight causes the wood flooring to move down until it contacts the floor joist.

As the person walks away from that spot, the wood flooring rises up to its original position.

CLICK HERE to get FREE & FAST BIDS from local flooring contractors that can solve your squeaks.

Nail Shafts Are Source

As the wood sub-flooring is going up and down, it slides past the nail shafts of the nails that were used by the carpenter to fasten the sub-flooring to the joists. The movement of the wood along the nail shafts produces the annoying squeak.

Floor Squeak Solution Video

Watch the following video to see one way to stop floor squeaks.

Metal Ductwork

Squeaks can also originate from metal ductwork that delivers heated and air conditioned air into each room of your new home. The installer of the metal ductwork, if not careful, can install this sheet metal ducting such that it gets into a slight bind.

As you walk across the floor, downward pressure on the ductwork can create the oilcan effect and cause the metal ducting to squeak or pop.

Old Diagonal Bridging

Some carpenters and builders may also use diagonal bridging in between floor joists. The individual pieces of bridging that create the letter X in between the joists must not touch one another.

There should be a spacing of approximately one-half inch so that they can move independently as loads are placed upon the floor joists. If the bracing touches and moves, it can also produce the elusive squeak that causes the grimace on your face.

CLICK HERE to get FREE & FAST BIDS from local flooring contractors that can solve your squeaks.

Prevention

As you might imagine, knowing the causes, allows you to be proactive in preventing floor squeaks in your new home. I encourage frank discussions with the builder or the sub-division sales agent during the planning stages.

Ask pointed questions as to how squeaks will be prevented. Beware of answers that include glue and ring shanked nails. I've walked across hundreds of floors that have been glued and fastened with ring shanked nails that squeak horribly.

Subfloor Adhesives

The chemistry of subfloor adhesives has come a long way. Each manufacturer is trying to outdo the other.

Those that make great products stand to capture large chunks of the marketplace. Here are a few of the adhesives that are quite popular:

subfloor adhesives

There are quite a few subfloor adhesives. Here's one way to locate the best one. The BEST ONES usually contain MORE of the GREAT INGREDIENTS so they cost more. Use price as your barometer. CLICK THE IMAGE TO ORDER SOME ADHESIVE NOW AND IT WILL BE DELIVERED TO YOU.

Granted, if used properly, sub-floor adhesive and ring shanked nails can minimize or eliminate many squeaks. But all too often, the glue and the nails are not installed correctly. Catching work defects is another great way to stop squeaks before they get covered up.

Glue Skins Over

One of the reasons subfloor adhesive fails is the glue can skin over before the wood subfloor is attached to the floor joists. Some rough carpenters put down a sheet of subfloor and only tack the corners or edges.

If the panel has any bow up or down to it, there's a void space between the panel and the joist. The glue can then skin over and when the panel is eventually nailed, the glue serves no purpose.

Nail Immediately

The subfloor panel needs to be nailed or screwed to the joist completely as soon as it's put down. The spacing of the fasteners might be one every 8 inches along each joist.

Do Inspections

Be sure to visit your new home as it is built. It is vitally important that you ask for permission and be aware of safety hazards when you do construction site visits. Inspect it as often as possible for defects that cause squeaks.

Try to visit the job site early in the morning when it is quiet. Walk through the home and listen for squeaks. It may take repeated visits to discover squeaks because of wet or damp framing lumber.

Wet Lumber Masks Squeaks

Wet lumber can swell and this often masks squeaks. As the lumber dries and shrinks, the conditions for squeak production increase. You absolutely must do an intense survey just before drywall is applied to walls and ceilings.

Screw Hallways & Main Room Pathways

Wood sub-flooring can be screwed to floor joists before finished flooring is installed. Use coarse threaded drywall screws that penetrate at least three quarter inch into the floor joists. Be sure the flooring in all hallways and in the open areas of rooms is screwed to the joists.

Once finished floors are installed, it can be an enormous challenge to fix squeaky floors. Prevention of squeaks is absolutely the best course of action.

CLICK HERE to get FREE & FAST BIDS from local flooring contractors that can solve your squeaks.

Related Column = Floor Squeak and Bounce Repair

Column NH048

March 29, 2017 AsktheBuilder Newsletter

In two weeks, I'll be getting ready to start packing for a quick trip to New Orleans, LA.

I was invited by a very good friend of mine. I'll be there with him and four other guys on a Little-Man-Self-Discovery trip. In other words, just 48 hours of hanging with some good friends.

When I got the invitation I was most thankful and I responded, "Dan, do you mind if I bring my ham radio equipment and get on the air?" I've set a new personal goal to make a contact from each of the 50 US states.

He responded back, "Oh, that would be fantastic. I talked to my brother about it and he wants to see how it's done."

I'm looking forward to some warm WX as we say in Morse. I've still got giant piles of snow around my house here in central New Hampshire.

You need to enter the Snow-Be-Gone Contest NOW before I shut down entries. CLICK HERE.

Kathy, Kelly and I went to a great local farm this past Sunday to see them boil maple sap to make the real deal - New Hampshire maple syrup. Boy was it good!

Cork Flooring - Often Forgotten

If you're a new subscriber, I'm in the early stages of revising all of the pages on my website. They get new content, links to the products I love and use, links to get FREE & FAST BIDS from local contractors in your city and much more.

You can see all the LATEST REVISED columns by going to my Question & Answer category at AsktheBuilder.com. Once there, just start marching down the list.

When I revise a column, it gets put at the TOP OF THE STACK. Go look now to see how many you've missed!!!!

CLICK HERE to get to the Q & A category.

About an hour ago, I revised a column I wrote about nine years ago. It's about a flooring you should be aware of.

Cork

CLICK HERE to see gorgeous photos and to see how durable this flooring is. You'll not believe it.

Stainless Steel Flashing

It's a really long story and you'll hear more about it the day you're able to purchase my Roofing Ripoff book.

You probably didn't know that you can buy a super-thin sheet of stainless steel that has butyl adhesive on it, did you?

Why would you want this?

Stainless steel is immune to almost all corrosion.

UV light from the sun doesn't harm stainless steel.

It's the PERFECT flashing material for treated lumber ledger boards. Many many remodelers and builders use aluminum.

Aluminum is the WORST material to use because it corrodes from the galvanic reaction between it and the copper in the treated lumber!

It's the PERFECT flashing for under exterior doors and windows.

It's the PERFECT flashing for under all brick ledges where you might have a row lock under or over a window or door.

This material is so thin you can FORM IT INTO ANY SHAPE you need by hand.

NO TOOLS are required other than a regular tin snips to cut it the length you want.

It has a high-quality butyl rubber adhesive on the back so it grips to just about anything.

It's a MIRACLE product.

Guess who's selling it now and can SHIP IT TO YOUR DOORSTEP?

Me. 😉

CLICK HERE to see all the specs on this amazing material.

Oh, you can order it too at the same time!!!! You should consider getting a 6-inch-wide roll and start to play with it.

There are hundreds of uses for it around your home. You can even use it to cap the top of your deck joists so they don't rot out.

Reclaimed Oak Flooring

Anyone who climbs the steps to my man cave / ham radio shack / office usually comments about my gorgeous oak plank flooring in my cave.

I usually don't lead them on and come clean telling them it's a modern laminate flooring.

But it's so realistic, it even fools people who are oak experts.

Watch the video here to see what I'm talking about. If you don't want to do the cork, you may want to consider this affordable alternative.

CLICK HERE to see this fooler flooring.

Hybrid Water Heaters

Yesterday, I was spending time managing some of the many comments I get on AsktheBuilder.com.

I was approving and responding to a great one that a woman left at the bottom of my column about Tankless Water Heaters.

If you're thinking of getting a tankless water heater to SAVE MONEY, you MUST READ my past column. CLICK HERE to see it.

Here's the scoop on the fancy hybrid heaters. All the ones I've seen are just water heaters that have a heat pump that helps heat the water.

Realize to run the heat pump, you're using electricity.

Realize heat pumps are complex machines.

Realize a normal electric water heater is as complex as your toaster.

Complex machines break down and require EXPENSIVE PARTS and service.

Don't be fooled by the claims of amazing energy savings on these hybrid heaters.

REMEMBER, you only START TO SAVE MONEY on something you've bought that saves energy AFTER you've paid yourself back the EXTRA MONEY you spent on the fancy energy-saving device.

How much money a day do you think you spend to heat your hot water? Could it be even $1?

I show you how to calculate it in the tankless water heater column above.

So let's say you save a nickel - 5 cents - each day with the fancy hybrid water heater?

If the heater costs you - just a wild guess - $200 more than a normal electric heater, it takes you 4,000 days to roughly break even.

That's almost eleven years.

GULP!

Don't be fooled by savvy salesmen or wizardry conjured up by sophisticated marketing managers and graphic artists.

Always DO THE MATH.

Stain Solver SALE NEWS

The spring Stain Solver Sale is in full swing.

You can get a 10% discount AND FREE SHIPPING to the lower 48 US states using this promo code:

Spring1710

But the sale will only be for TWO MORE DAYS.

HURRY AND ORDER NOW. The promo code is good for any order over $20.

CLICK HERE to order Stain Solver.

DIY Room Addition - Are You CRAZY?

I know you're ambitious. I know you want to release that inner warrior builder inside of you.

You're thinking of building your own room addition, aren't you?

We need to have a little talk....

CLICK HERE and accept my Tough Love.

That's enough for today.

REMEMBER, go order STAIN SOLVER NOW.

Tim Carter
Founder - www.AsktheBuilder.com

Do It Right, Not Over!

Painting Floors Really Works Well

Painting Floors Ideas and TIPS

  • Painting floors is easy, cheap and it's fun
  • Durable finishes are easy to create - used in retail stores!
  • Special floor paints and clear coatings are needed - LINKS BELOW
  • Use stencils and borders for greatest flair and WOW factor
  • CLICK HERE to Get Tim's FREE & FUNNY Newsletter!

DEAR TIM: We discovered a plumbing leak as we were getting ready to install a new laminate floor. The money for the flooring is now in the plumber's bank account.

Since we have no money left for new flooring, is there a way to successfully paint the exposed plywood floor? How do you fill the depressions and cracks in the floor?

Is it necessary to prime the wood before painting? Mark A., Hickory, NC

DEAR MARK: Are you sitting down?

Painting Floors Works!

The answer is, "Yes!" It is not only possible to paint floors, the paint job just might end up better looking than the original laminate floor you intended to use.

There's no real magic in painting a floor. You simply have to follow a few simple steps and use the right products to achieve durable and long-lasting results.

CLICK HERE to get FREE & FAST BIDS from local painters who can paint your floors.

Smooth Floors Look Best

Just about any flooring surface that is in good shape can be painted. Concrete, wood, ceramic tile, sheet vinyl, vinyl tile, etc. can all be painted with ease.

The only surface that may have problems would be an older basement concrete floor that is below grade or one that is in contact with a very wet soil. Water that seeps into concrete can sometimes cause a painted finish to peel.

But many modern concrete floors installed since the 1970s have a vapor barrier under the slab. This moisture barrier often stops the water vapor allowing the paint to stick tenaciously to the concrete.

painting floor

You are looking at a wood cabinet back in the upper left corner of this picture. The white and red parts of the photo are painted flooring! Look at the shine. Would you believe me if I told you this was in a retail center, not a home? Imagine how much foot traffic that floor gets in one month.

Paint in Public Places

You probably walk on painted floors all the time and don't realize it. You may even watch a sports game or two where the athletes are scuffing painted floors.

Many upscale clothing stores and restaurants have painted floors.

Basketball players run up and down painted floors. These floors take enormous abuse.

Clear Coat For Best Surface

Most paints will not yield a surface hard enough to resist years of foot traffic. That said, there are some special paints that have been made for many decades that you can walk on. If you've ever visited old mansions or homes with covered porches built in the late 1800s, you've seen these paints.

Exterior porch paints have been formulated with great success for years. Here's a fantastic one:

urethane porch paint

Here's a great urethane-fortified paint. That's why on the label it says it's for porches and floors! It's tough enough to walk on! CLICK THE IMAGE NOW TO ORDER IT.

Clear Water-Based Urethane

You achieve durability and long-term good looks by coating the painted surface with three coats of clear urethane. Most people take for granted the hardness and durability of clear urethanes. For example, hardwood floors that are not coated with urethane can begin to look dingy and miserable in a short amount of time.

Polyurethane

SECRET TIP is to coat the drywall BEFORE finishing with this amazing urethane product. It WILL STOP water from penetrating into the paper of the drywall. CLICK IMAGE TO ORDER IT NOW. Always be sure to order the exact sheen you want. There's a big difference between satin and high-gloss!

The thin coats of smooth urethane protect hardwood floors from dirt and other contaminants. It serves the same purpose over any painted surface. Visit any indoor basketball floor and you'll quickly become a believer. Lines, logos and all sorts of things are painted on these floors. The paint looks good because of the invisible layers of urethane that are on top of the paint.

CLICK HERE to get FREE & FAST BIDS from local painters who can paint your floors.

Deep Clean First

Oxygen Bleach

Stain Solver is MADE in the USA with USA ingredients that are food-grade quality. CLICK THE IMAGE to order some NOW.

Painting floors begins just as any other painting project. The surface to be painted should be clean, dry, dust-free and as smooth as possible. Consider using Stain Solver, a certified organic oxygen bleach to deep clean the floor.

Stain Solver is non-toxic, it's got no odor and it will remove grease and other stubborn stains.

Large depressions and cracks in the wood flooring need to be filled with a product that dries hard. Do not use caulk or lightweight spackling compounds as floor repair materials.

There are any number of excellent plastic-type wood fillers that dry exceptionally hard. Certain floor leveling compounds that are mixed with water often dry very hard. Test these materials by walking on them after they dry. If they survive the walk test now, they will look good once painted.

Prime If Required

Bare wood floors should be primed with special primer/sealer paints. These products work well to hide the wood grain that otherwise might show through the finish paint.

Hardwood floors that have a varnish or urethane finish must be sanded before a primer is applied. Concrete floors may need a special masonry primer. Check the label of the finish paint you choose.

Use Compatible Primer

Typically a paint manufacturer provides a list of compatible primers that work well with specific finish coat paint products. Oil paints work best for floor painting. The oil resins have a tendency to adhere better than water-based paints. They also tend to cure and harden faster.

Faux Finish For Friends

You can dazzle your friends and neighbors if you incorporate some faux finishes into the painted floor. There are an infinite amount of possibilities.

Stenciling, borders, pinstripping, etc. can all add accent touches to the floor. I've seen some gorgeous stenciling work done on steps and floors.

Look at these amazing stencils to get an idea of what's possible.

wall stencil

There are HUNDREDS of different stencils you can use on floors. This is one on a wall, but imagine this one in the middle of a room! CLICK THE IMAGE TO BUY IT OR LOOK AT OTHER STENCILS.

Borders Around Area Rugs

If you intend to have an area rug on top of the floor, you might consider creating a border that frames the rug equally on all sides. It is best to practice your faux finish technique on a piece of plywood. Once you feel you have the look, then begin to work on your floor.

border stencil

This is just one of MANY different border stencils you can use to outline area rugs or furniture. You can create a border around the entire room. Use your imagination. CLICK THE IMAGE NOW TO BUY THIS AMAZING STENCIL OR TO SEE OTHERS.

Paint Must Cure

Once the finish paint has dried two or three days, apply three coats of water-based urethane. The water based urethanes typically do not yellow over time. Be sure to look for the words "non-yellowing" on the urethane label.

The key to keeping the floor looking good for a long period of time is to apply a single maintenance coat of urethane every two years.

CLICK HERE to get FREE & FAST BIDS from local painters who can paint your floors.

Column 431