Tunnel Under Sidewalks and Driveways

Tunneling Tips for Sidewalks and Driveways

Editor's Note: Trisha, from Hartford, WI, asked on the Happenings Radio Show about filing a void under her sidewalk. Read about it in the September 13, 2020 Newsletter.

DEAR TIM: I'm installing some low-voltage lighting in the planting beds in front of my home. But a sidewalk is blocking me from running the cable from bed to bed.

I don't want to have to break apart the concrete or saw cut a small groove through it. Is there an easy way to go under the sidewalk with disturbing it? Surely you had to do this once or twice as a builder and can share your secret tools and tricks. Mike S, Kalamazoo, MI

DEAR MIKE: How right you are. I can't think of the number of times I had to extend a drain pipe, cable, irrigation line, gas line, etc. under a driveway, sidewalk or retaining wall without disturbing the finished surface material.

Sometimes, the task was easy; other times it was a nightmare. But you're correct in thinking, I learned some creative solutions to the different challenges.

CLICK HERE to get FREE & FAST BIDS from local handymen that can create a tunnel for you.

Giant Pushed Pipe

My first inspiration for creating invisible pathways came from my fantastic backhoe operator Jimmy Rolfes, Sr. We had to extend a pipe under a six-foot-wide sidewalk and digging a tunnel by hand with a duckbill shovel gave me a headache just thinking about it much less from doing it.

Jimmy showed up at the job site with a large 16-foot-long six-inch diameter steel pipe that had a coned-shaped metal end. He dug a two-foot deep trench perpendicular to the sidewalk and laid the pipe into the trench with the pointed end towards the sidewalk.

He positioned his backhoe and used the hydraulic power of the machine to push the pipe under the sidewalk. The entire operation took about five minutes.

Sleeve It

After he pulled the long pipe back out with a chain, a perfect 6-inch-diameter hole was there under the sidewalk. I immediately installed a 4-inch PVC pipe that extended on either side of the sidewalk about 6 inches.

This sleeve would allow someone in the future to get more cables under the sidewalk. I marked the location of the sleeve on the edge of the sidewalk with a grinder cut.

Smaller Secret

You don't need this type of machine or tool to solve your problem, but the point is, there are creative ways to tunnel under the surface. I learned another fantastic trick from a fellow plumber that might work for you.

We had to extend a new 4-inch diameter sewer line from an existing house to a new detached garage / pool house that was seven feet away. There was a sidewalk between the house and the new room addition that could not be disturbed.

We drilled a six-inch diameter hole through the concrete foundation of the house so a 4-inch PVC pipe could be inserted and tilted at a slight upward angle for drainage purposes.

4-Inch PVC Hypodermic Needle

This plumber used a reciprocating saw to cut a chisel point on a scrap piece of 4-inch PVC pipe. The tip of the pipe looked like a giant hypodermic needle.

tunneling under sidewalk

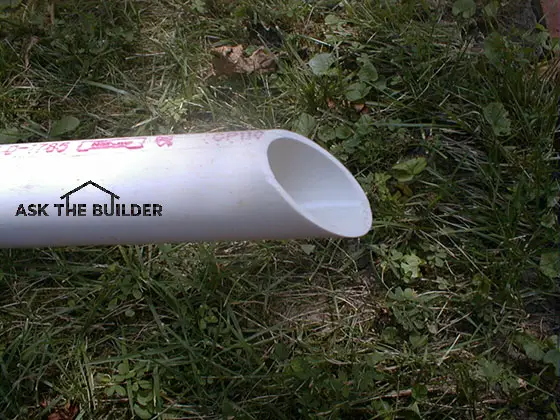
This is what the end of the PVC pipe looked liked before we started to tap it in the ground under the sidewalk. It worked GREAT. © 2017 Tim Carter

We inserted the pipe into the hole and tapped a block of wood fitted against the end of the pipe with a sledge hammer until it pierced into the clay soil about 4 inches.

Using a large pipe wrench we rotated the pipe so that the chisel point end cut out a soil plug. We pulled the pipe back into the basement, removed the soil from the inside and repeated the operation.

Within an hour, we had a perfect pathway created that passed from the existing basement under the footer of the new building.

CLICK HERE to get FREE & FAST BIDS from local handymen that can create a tunnel for you.

1 1/2-Inch PVC Works

You can do this exact same thing to create your pathway, but use a smaller one and one-half inch diameter PVC pipe. You'll have to hand dig a trench as my backhoe operator did so that the pipe you are using is parallel with the top surface of the sidewalk.

If your soil is rocky, you'll probably have to use a steel pipe with the chisel cut instead of the more-fragile plastic piping.

PVC Tunnel Tool Video

Watch this video showing how to use a small-diameter PVC pipe to create one of these magic tunnels.

Use Water

Another ingenious method that's somewhat messy, yet effective, is cutting a pathway using a pressure washer. If your wand has a 0 degree tip, you'll be in business.

A 0 degree tip creates a powerful narrow stream of water not much wider than a pipe cleaner. You'll have to dig a similar trench perpendicular to the sidewalk so you can get the wand parallel with the top surface of the sidewalk.

pressure washer

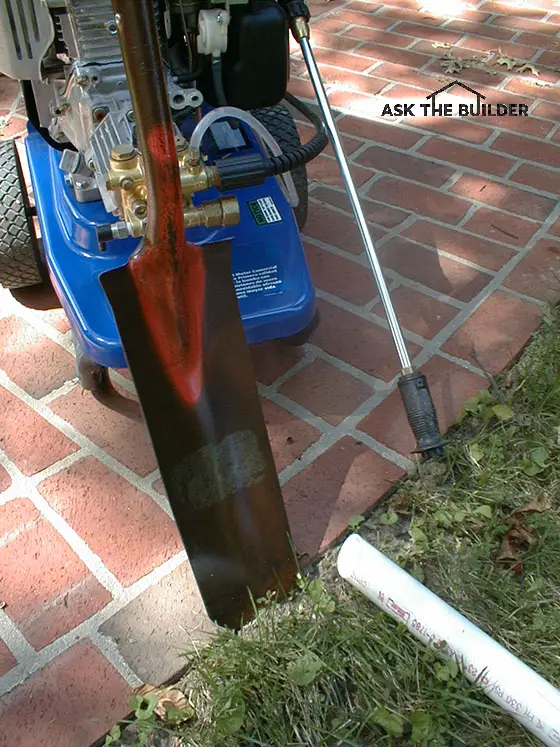
Here's a pressure washer and the wand has a 0-degree tip. You also can see the business end of a duck-billed trenching shovel. © 2017 Tim Carter

Protect Your Eyes

Wear goggles as the high-pressure stream of water will blast out mud, small stones, etc. back towards you as you point the wand directly into the dirt. This method is very effective and depending upon your soil type, you can create a pathway in a matter of minutes.

Stop the spray every few minutes to inspect the size of the pathway you are creating. A 2-inch diameter pathway one foot under the sidewalk should not create any type of structural problem for the sidewalk.

Sleeve It Same Time

If you use a pressure washer, you can actually use a pipe to help control the size of the tunnel. As you start to cut the soil with the water insert a pipe that is a little longer than the sidewalk is wide.

Slide the pressure washing wand into the pipe and start to tap the pipe under the sidewalk as the water cuts the channel. As you remove mud and rocks, tap the end of the pipe with a sledge hammer to drive the pipe. Do this every two inches or so. Protect the end of the pipe with a block of wood to prevent cracking it with the sledge hammer.

If the end of the pipe is always in contact with the soil as the water blasts away, you'll only remove as much soil as the outer diameter of the pipe that is surrounding the wand. Leave the pipe in place once the pathway is created to eliminate settlement problems.

Always Sleeve It

Once your tunnel is created, always install some sort of PVC sleeve. You'll never regret doing this in case you need to run another cable or irrigation line at a future time. Be sure to mark where the sleeve is.

If you want to minimize or eliminate any settlement problems, fill the cavity with sand after the electric cable is installed. Pour sand into the hole and use water from a garden hose to help move it under the sidewalk.

Hand Dig

You can dig pathways by hand with a special duck-billed shovel. These tools have 16-inch long narrow blades that will create a 6 or 7-inch diameter hole.

But the limit of the digging is limited to about half the length of the shovel. It's also very hard to drive the shovel into soil when you're on your knees or twisted like a pretzel in a larger trench.

PVC Needles The Best

The chisel-point pipe method works very well if your soil is primarily clay or a sandy clay. The twisting motion of the pipe cuts a crisp soil plug each time. Use a smaller diameter pipe shoved into the pointed pipe to remove the soil plug.

CLICK HERE to get FREE & FAST BIDS from local handymen that can create a tunnel for you.

Column 524

Bathroom Exhaust Fans

bathroom exhaust fan attic

The off-white, overweight flying saucer is really a quiet bathroom exhaust fan. You can see the flexible insulated exhaust pipe that prevents condensation. The humid bath air goes out the roof. © 2017 Tim Carter

Bathroom Exhaust Fan TIPS

DEAR TIM: I have several inexpensive builder-grade exhaust fans in my home. They're noisy, and I don't feel they do a good job of getting rid of the moist air produced while showering.

Is it possible to get high-performance ventilation with little or no noise? I'd like a bathroom exhaust fan with a light.  How about a fan that has a light and bluetooth speakers?

Can you tell me how to install a bathroom fan so I do not cause any damage to my home? Faith F., Mt. Crawford, VA

DEAR FAITH: Bathroom fans are a critical part of a home-ventilation system. A bathroom exhaust fan, improperly installed, can create all sorts of hidden damage to a home.

All too often, installers just let the moist air escape into an attic space. This moist air can condense on the cooler surfaces in the attic. This liquid water on the wood surfaces creates mold and can lead to serious wood rot.

CLICK HERE to get FREE & FAST BIDS from local bathroom exhaust-fan contractors.

Great Fans

The good news for you is that the exact fan you are looking for is available. It's been around for years, but many builders choose to install cheaper fans to try to make their houses more affordable.

The trouble is, I've discovered many consumers would gladly pay a slight up-charge if they were given the option of having great ventilation and less noise while in the bathroom. It's my hope that builders start to learn to offer home buyers more choices.

But I feel that day may never come, as builders will argue that more choices equate to more problems for them.

Up In The Attic

I've had fantastic luck installing bathroom exhaust fans that are actually located in the attic space. They resemble central vacuum systems inasmuch as the fan motor is located perhaps 8 or 10 feet away from the bathroom. Most builder-grade fan motors are just inches away from the bathroom ceiling. This is one reason why they're so noisy. Refer to the photograph at the top of the column.

Flexible Insulated Pipe

These remote bathroom exhaust fans have insulated flexible duct pipe that extends from the fan motor to small exhaust inlet boxes that are attached to the framing members in your bathroom ceiling. The box extends up into your attic, and all you see on the bathroom ceiling is a sleek round inlet cover.

The powerful fans can slurp up massive amounts of moist humid air that rises to the ceilings as you shower. This air is ducted through the roof of your home in a special roof vent cap that is easy to install.

Vent Through Roof

I've found that it is often best to vent fans and dryers through the roof. I'd only recommend this in areas that get very little snow in the winter. If you live where snow can be heavy in the winter, then vent your bath fan out a side wall well away from a roof overhang.

IMPORTANT TIP: NEVER vent a bath fan into an attic space or under a roof overhang. Both of these situations will produce vast amounts of black mold in the attic.

CLICK HERE to get FREE & FAST BIDS from local bathroom exhaust-fan contractors.

Roof Bath Fan Flashing Video

Watch the video just below to see how easy it is to install the correct vent-cap flashing on a roof. Have no fear - if done right you will have no roof leaks.

Insulate Exhaust Pipe

The flexible insulated ducting that extends from the roof to the remote attic exhaust fan, and then to your bathroom ceiling, does two important jobs:

  • Suppresses noise from the fan
  • Prevents condensation from forming inside the flexible piping

False Fan Leaks

Many people complain about water that drips down from their bathroom fan in the winter. They think they have a roof leak.

If it were a roof leak, the water would drip all year every time it rained.

If you have a winter-only leak like this, then it's not a roof leak but condensate water that forms inside of uninsulated exhaust piping and flows down the piping into the bathroom.

LED Lights and Fans

The bathroom exhaust fans I use come with or without lights. The ones with lights use brilliant compact halogen or LED bulbs that fit into the center of the small circular vent covers.

exhaust fan setup

Here's a typical Fantech bath exhaust fan setup. The odd cone-shaped metal thing is the fan. The two boxes that have the round white covers are place up in the ceiling joists of the bathrooms. All you see are the sleek round white covers. They come with and without lights! I LOVED these in my last house. CLICK THE IMAGE TO BUY the SET NOW.

Two Outlets Per Bath

I always place two of these inlets with lights in each bathroom, one immediately adjacent to the shower area and the other toward the center of the bathroom. These lights produce good overall lighting for the average bathroom.

You'll need additional lighting above or on the sides of any mirror.

Bluetooth Music Exhaust Fans

How would you like to listen to your favorite music while in the shower or otherwise occupied in your bathroom? While the whisper-quiet fan is vacuuming air out of the bath, music plays from great speakers under the decorative trim.

It's all done with the magic of bluetooth radio waves. CLICK HERE to get the Broan Bluetooth fan I've got in my own basement bathroom.

underside of the rough fan housing

This is the underside of the rough fan housing. It looks ugly. See that odd squat U-shaped thing at the bottom? Those are two powerful stereo speakers. You'll love this fan. CLICK THE IMAGE NOW TO ORDER ONE.

Read Instructions

To avoid damage to your home while installing a bathroom fan, always follow the written instructions that come with the fan. If you're not comfortable working with high-voltage electric wire so it will pass inspection, then hire a competent electrician to connect the fan.

The most important aspect is to duct the air from the bathroom to the exterior of the house. You should do this through the roof so long as you don't get lots of snow on your roof.

Never Soffits

Avoid the temptation of venting your fan through the horizontal soffit that can be found in many roof overhangs. All too often the moist air billows up under the soffit and is sucked into the attic. If this happens, mildew and wood rot up in the hidden spaces of your attic is a certainty.

Down-the-Road Defects

Problems with bathroom exhaust fans can happen years later. The connections between the flexible duct pipe, the fan, inlet boxes and the roof vent cap must be permanent. Never rely on duct tape to secure these connections.

The high heat and humidity in attics can cause duct tape to fail. It is better to use metal band clamps that are nearly identical to traditional automotive radiator hose clamps. These inexpensive clamps can be found at hardware stores, ductwork shops and some home centers.

Once the band clamp is connected, then use tape as directed by the fan manufacturer.

If you use solid galvanized pipe to duct your fan, then use self-tapping screws to connect the sections of pipe.

No Kinks

Be sure there are no kinks in the flexible duct pipe. Also be sure to install a makeup air duct in your home that allows an equal amount of fresh air to enter your home for every bit of air the exhaust fan is expelling.

If you don't have this critical makeup air, you could cause "backdrafting" to occur. This means poisonous gases are drawn into your home through furnace or water heater exhaust pipes.

CLICK HERE to get FREE & FAST BIDS from local bathroom exhaust-fan contractors.

Sandra emailed me and asked an interesting question about her bathroom exhaust fan. CLICK HERE to read her question and the answer.

Column 665

January 29, 2017 AsktheBuilder Newsletter

This afternoon I'm going on a hike with my youngest daughter Kelly. We're doing a fairly easy hike up to the top of Rattlesnake Mountain just north of Squam Lake.

It's really more like a big hill. It should be a good time and my guess is it will be crowded as it's a fairly popular low-impact hike and the WX today is perfect for a winter hike.

Serious hikers chortle at this challenge because it's like going to hiking kindergarten. We shall see.

I've done the much harder mountain just across the street at the end of a harsh winter.

CLICK HERE to read all about my adventure that day up to the top of Mt. Major. The vista was stunning once up there. GREAT PHOTOS in that story.

Something New

If you're a new subscriber in the past few days, three weeks ago I embarked on a year-long project. In reality, I feel it's going to run about 18 months.

I'm going back to each old article of mine and doing the following:

  • creating top tips bullet list
  • adding new photos
  • adding new fresh content
  • adding photos / links to best products
  • adding photos / links to best tools

Last night, I had an idea I want to try out to encourage you to look at each revised column.

Let's try it now. Let me know if you like the teasers you see below and if they persuaded you to peer at all the goodness I've created for you

Install a New Front Door - You Can Do It

You might think it's beyond your skill set to install a new front door. Don't sell yourself short. CLICK HERE.

Foundation Soil Grade Tips - Higher Please!

Many modern homes have the top of the foundation walls too close to the soil. What do you think is the minimum height a foundation wall should stick up out of the ground? GREAT original hand drawing by me here! CLICK TO SEE IT.

Best Cast / Poured Concrete Wall Thickness

Did you know you can order your foundation walls a different thickness? How do you know what is the best thing to do? CLICK HERE and discover new information.

STOP Crawlspace Dankness and Smell

Do you have a nasty crawlspace that is damp, dingy and yucky? Do you think those vents in the foundation really work?
CLICK HERE and discover what you can do to make your crawlspace nice and bright.

Block or Poured Concrete Foundation - Best One?

Do you think it's possible for a concrete block foundation to be better than a cast, or poured, concrete foundation? Are you laughing at me? CLICK HERE smarty pants.

Secret Excess Grout Removal Trick

You did a DIY tile job and messed up the grout leaving too much on the tile. Can you get it off? How? Is there some magic solution, (not acid!!!) that you can put on the grout and grout haze? CLICK HERE and be amazed.

Vent For Washing Machine Drain

I know you don't have your master plumbing license like I do, but you feel compelled to install a washing machine drain. Well, go look at my awesome full-color rough-in diagram so you don't have sewer gas choking you to death. CLICK HERE NOW.

Connect a New Foundation to an Old One

What's the magic method we builders use to connect a new room addition foundation to an existing foundation? GREAT VIDEOS here. CLICK HERE now to tickle your gray matter.

Bathroom Remodel Task Sequence - Don't Goof Up!

You'd be surprised how many people do different tasks out of order. When do you do what to save time and money? Well, CLICK HERE and see if you got them right.

Mold and Mildew on Lumber - How to Remove Safely

You're building a new home or room addition and the lumber's getting wet. You see black mold and mildew. Should you torch the place and start over? No. CLICK HERE to see what I'd do.

Tape Measure Lines - NEW Friendly Tape!

Have you struggled with all those darn tiny lines on a tape measure? What about the mystery black diamond!!!!???? GREAT VIDEO HERE. CLICK HERE for best tape.

Removing Ceramic Tile Without Tactical Nukes

What do you think is the best way to remove ceramic floor or wall tile? CLICK HERE to see if you should start your own demolition company.

Stair Trim Secret Ninja Tricks - DON'T SHARE THESE!!!!!

Have you ever tried to install that cool molding on top of stair stringers only to throw your angle finder into the closest tree like a tomahawk? CLICK HERE to become a master carpenter in ten minutes!

Best Brick Water Repellents

If you own a brick veneer house, you need to CLICK HERE NOW. Period.

Column and Beam Construction 101

How many beams are in your home? More than you'd ever imagine. How are the sizes determined? Can you get rid of all those HORRIBLE steel columns in your basement? CLICK HERE and discover the depths of your structural ignorance. Dr. Caster made me say that. Blame him. CLICK HERE to read about the great and mysterious Dr. Caster.

Brick Walls Leak - What Else is New?????

I'll bet you thought your brick home was waterproof. BWAHAHAHAHAHAHAAHAHAHAHAHAA.

Stop reading fables about the three little pigs. CLICK HERE instead to see what you need to do RIGHT NOW!

Paint Videos

Three days ago, Tristan and I taped two great videos about two paint products I'll bet you don't know about.

One of them is a spray paint that outperforms the top two brands you're familiar with. Let me tell you, advertising works. You probably feel the one big brand is awesome.

BWAHAHAHAHAHAHAHAAHA

Wait until you see the actual TEST PANELS I had in my hands from the TEST LAB!!!

When you see my video and you see the actual lab test panels, you'll NEVER AGAIN BUY that one big brand.

I'll be SHOCKED if you don't run out and immediately buy a can or two of the paint I used in the video.

I'm also going to show you a fantastic interior wall paint that's a dream to work with and it costs MUCH LESS than all the national brands.

I'm waiting for the company to approve the videos. Once they do, you're going to see them.

If all goes well, I'm going to have an exclusive coupon or promo code for you to save some sweet moola.

Next Sunday - Door Eye Candy

Next Sunday is a big day. You're going to see some spectacular door eye candy. Be on the lookout for that newsletter.

WOW!!!!!!!!

Have a great next few days. I'll have hike photos for you next newsletter.

Du kan köra, men du kan inte aldrig dölja.

Tim Carter
Founder - www.AsktheBuilder.com

Do It Right, Not Over!

How to Modify Wood and Attic Trusses

roof truss

Here I am alongside a truss being used over a giant garage. This truss has a special elevated bottom chord. Photo credit: Todd Fratzel

Modify Wood and Attic Trusses TIPS

Mike, from Cleveland, Ohio, wrote to me:

Tim, great reading your tips. I've got a question, I would like to convert the attic above my garage into a living space. Access is not an issue as it's also in front of another room upstairs that I can put a door in the wall.

There's plenty of room to make a 12 x 12 room with 10-foot ceiling at its peak.

Common Trusses

Unfortunately, my home builder had framed out the attic using a common truss system utilizing 2x4's (see attached picture of exact type, although my roof is much steeper, and no middle non bearing wall below).

roof truss

This is a graphic Mike supplied to me. I don't know if he drew it, but I sort of doubt it. Image credit: Unknown skilled person

There's enough space to switch the floor joists that are 2x4s with 2x10s or 8s, and/or sistering them. The main issue I have what to do about the truss itself (2x4 webs, 2x4 chords, etc.). From what I imagine larger rafters would need to be in place of those 2x4 top chords.

Is this possible, and how costly would a project like this be? (just the structural engineering and framing aspect to allow for live loads and support the roof). I'm trying to decide if it's all worth it."

Changing Trusses

You can modify the trusses, but it's an enormous amount of work. Also, if you decide to do this, you MUST work hand-in-hand with a licensed structural engineer that's familiar with wood trusses.

CLICK HERE to get FREE & FAST BIDS from local structural engineers who can help you modify your trusses.

Huge Challenges

Here's one challenge. If you feel you'll be sliding new larger common rafters up inside the attic alongside the existing trusses, you're dreaming.

You'll have shingle nails in your way that extend through the roof sheathing. You'll also be dealing with a low heel height on the existing trusses.

Heel Height

Most common trusses have a miserable heel height of just over four inches.

The heel height is the vertical distance up the truss face where it passes over the OUTER EDGE of the building line or supporting wall. This is typically where the face of the exterior wall sheathing is.

CLICK HERE to get FREE & FAST BIDS from local structural engineers who can help you modify your trusses.

Wood Truss Videos

Watch these two videos to see very unique things truss engineers can do to create higher ceilings and large overhangs.


Attic Trusses

The sad fact is your builder could have installed attic trusses over this garage for just slightly more than what the existing trusses cost. Attic trusses have a rectangular shape inside each truss.

If the roof slope is steeper than 9 inches in 12 inches of run, it doesn't take much width to end up with a nice room 12 feet wide with an 8-foot ceiling. I have this above my own garage.

Look at this photo of the space created by attic trusses at my home. You can't see the floor, but the window sill is just about 32 inches up off the floor. The flat ceiling that connects the two sloped parts of the truss is just out of the photo frame.

man cave

This is the end wall of the attic above my garage. The space is 12-feet wide and ceiling height is 8 feet. I didn't build this house, but the architect did everyone a favor by making the vast space above the 40-foot-long garage out of attic trusses. I took part of this giant room and made a cozy man cave ham-radio shack. © 2017 Tim Carter

Demo Roof

You may find it easier, as crazy as this sounds, to rip off the existing roof and start over. I guarantee you it would be FASTER.

You'd be able to use regular 2x10 or 2x12 rafters and create a gigantic room where now exists useless space.

If you have limited manpower, you'd do this in sections. I'd just rip off about six feet of existing roof at a time, set the new rafters, sheath them and cover them with tar paper.

You'd have a small gap between the new and old roof you'd need to weatherproof in case rain was in the forecast.

It would help TREMENDOUSLY if you increased the new roof pitch so the new roof ridge  board would rest on top of your existing trussed roof.

CLICK HERE to get FREE & FAST BIDS from local structural engineers who can help you modify your trusses.

Continental Glacier Soils

The following photo was taken in 1986 on or about June 24th.

The location of the photo was 3166 N. Farmcrest Drive, Amberley Village, Ohio.

You can clearly see two distinct soil profiles in the photo.

The light-brown clay soil that's about four feet thick was produced by the Wisconsin Continental glacier that was starting to recede back to the North Pole about 12,000 to 15,000 years ago.

Beneath it is a much darker soil that was created by the Illinoian Continental glacier that was in Cincinnati, Ohio about 600,000 years ago.

Continental Glacier Soils

You can see the two distinct glacial soils above the footing on the far wall. © 2017 Tim Carter - ALL RIGHTS RESERVED - DO NOT COPY or PIRATE this photo without permission.

You don't often get to see deep soil profile photos like this that have so much contrast.

I built the house at this location and I got my geology degree from the University of Cincinnati in 1974.

How to Garage Shelving Ideas

Garage Shelves

Garage shelving ideas: These are clever garage shelves loaded with countless wares! Thin plywood is supported by electrical cable staples of all things! © 2017 Tim Carter

"Yes, small shelves can go in between wall studs in a garage. You can stack small items, boxes of nails, aerosol cans, boxes of garden fertilizer, and many other things on these tiny shelves."

How To Garage Shelving Ideas

DEAR TIM: I need some creative garage shelving ideas. I’ve got a limited budget, bare stud walls with no insulation and I’ve accumulated countless small boxes of nails, screws, spray paint cans, boxes of fertilizer, etc.

Please save yourself the trouble telling me about all the fancy cabinets, shelving units, etc. I just don’t have the money. All I can afford is $30 at the most. Wave your magic wand so the clutter disappears off my garage floor! Mona G., Lost Creek, KY

DEAR MONA: I’ve just summoned my fellow New Hampshire wizards and we’re about to cast a protective spell on you, your garage clutter and all of your terrestrial allies.

In all seriousness, I’ve got great news for you. All of the things you need for a simple solution are aligned. This is indeed your lucky day.

CLICK HERE to get FREE & FAST BIDS from local handymen that can build these shelves in one day for you!

Can Garage Shelves Go Between Wall Studs?

Yes, small shelves can go in between wall studs in a garage. You can stack small items, boxes of nails, aerosol cans, boxes of garden fertilizer, and many other things on these tiny shelves.

Allow me to share a story with you. I’ve got a great friend who lives in southern California. I visit him on a fairly regular basis. He and his wife have a wonderful detached garage that’s just like yours. But what I'm about to share would work even if your garage walls were covered with drywall!

My friend's garage has a durable cement stucco outer covering, but the inside is just bare 2x4 walls. He’s accumulated all the things you’ve described and much more over the sixty-plus years he’s lived in this home.

Where is Wasted Space in a Garage?

There's wasted space over the hoods of cars. There's also wasted space along walls.

Several times my friend asked me about ways to try to tame the clutter and I mentioned putting up a shelf that overhung the hoods of the cars. Many garages have a vast amount of wasted space in the air and this shelf was perfect for his larger items.

But he had all sorts of small things covering the floor of the garage making it nearly impossible to find anything. I’ve have the same problem in my own garage.

What Can You Store in the Wall Stud Cavities?

You can store just about anything on thin shelves in wall stud cavities.

Two months ago, I visited him and he took me out to the garage. The floor was clean. I could see concrete everywhere! All of his cans, spray bottles, boxes of plant fertilizer, boxes of nails and screws, bottles of motor oil, paint roller covers, brushes, you-name-it were all organized nicely tucked inside the wall stud spaces!

What Material Should I Use For the Shelves?

He and his industrious wife had purchased one sheet of 1/4-inch plywood and had it ripped into 4-inch-wide strips. This yielded, are you sitting down, an astonishing 88 linear feet of shelving!

All he had to do was use a simple hand saw to cut the shelves to the width of the space in between the vertical wall studs. They maximized the storage space by doing their best to organize things that were related to one another and the same height.

Doing this allowed them to put as many shelves as possible in one wall cavity in between two wall studs.

CLICK HERE to get FREE & FAST BIDS from local handymen that can build these shelves in one day for you!

What are the Best Tiny Shelf Supports?

Electrical cable staples are perhaps the best shelf supports for these tiny shelves.

As if that weren’t clever enough, he and his wife came up with a simple, yet strong, way to support each shelf. They used electrical cable staples as tiny shelf cleats. It took just four, two to each side, to support each shelf.

cable staples

Simple cable staples like this will hold a tremendous amount of weight. CLICK THE IMAGE TO ORDER THEM NOW.

For shelves that would support fairly light-weight items, I told him he could have used small 6-penny finish nails. These are very inexpensive.

How Do You Install the Tiny Garage Shelves?

You don’t have to have a fancy tool to get the shelves level in both directions. A common torpedo level is all you need to get the shelf level side-to-side.

torpedo level

I own this torpedo level. It's my FAVORITE one. It's very accurate and it comes with magnets so it stores on metal peg board or two nails I drive into a stud. CLICK THE IMAGE NOW TO ORDER IT.

You can use a shelf panel that’s got a nice square cut on it to create the level line that becomes your guide for the cable staples or finish nails.

Close Up Garage Shelving

All you do is determine the height you want the shelf, press the shelf flat up against the side of a wall stud and trace a pencil line along the short edge of the shelf. Assuming the walls of the garage are plumb, this will automagically create a 90-degree level shelf.

Should I Tilt Some Shelves Backwards?

Yes, you want to tilt some shelves backwards so there's less of a chance the items will fall.

My friend decided some shelves that held liquids shouldn’t be level. He wanted a slight backwards tilt so the bottles and cans would lean back towards the wall. This is easy to do by just putting one cable staple above the pencil line and the other one below.

How Do I Install the Small Garage Shelves Over Drywall?

Guess what? Even if you had told me your garage walls were insulated and drywalled you can still do this! You’d have to spend a little more money to buy some 2x4s, but that money might be in your car cup holders or you’ll discover it when you burrow down into your couch cushions.

My garage is drywalled and as soon as it warms up I’m going to build a simple wall out of 2x4s. I’ll then use a few simple L brackets to secure the bare wall to the studs behind the drywall. Then I just have to do what I described above to organize all my small things.

Many garages have a foundation ledge that sticks up above the concrete floor and it’s the perfect spot to rest this bare wall. I can’t wait to get started here at my own home!

CLICK HERE to get FREE & FAST BIDS from local handymen that can build these shelves in one day for you!

Column 1181

Hot Water Recirculating Loop – How to Install

Hot Water Recirculating Loop TIPS

Gravity - It's Magic

When water is heated, it gets lighter. It wants to float to the top of cooler water.

Cool water is heavy and wants to fall. If you have a loop that projects upwards, the cool water wants to fall down the loop while the hot water goes up. Gravity fuels the motion.

Complete The Loop

It works in this fashion in your house. You already have half of a gravity loop in place. This is your hot water piping distribution system which begins at your water heater and ends at the farthest fixture which requires hot water.

If you were to install copper piping leading back from the farthest point and from other high points in the existing system, you'd have a loop. This return loop pipe connects into the bottom of the water heater.

You remove the drain valve and install a 3/4-inch nipple, a ball valve, a tee and a new boiler drain so you can drain the heater.

It's that simple.

CLICK HERE to get FREE & FAST BIDS from local plumbers who can install a hot water recirc system!

Slow Flow

The flow of water through the loop is very slow. It doesn't need to be fast.

The only thing that's important is hot water is near each fixture when you need hot water.

Without a loop there's no movement, so any movement is better than none!

Pumps for Slabs

If you live in a house on a slab or where a majority of the hot water lines drop below the water heater, you need to use a recirculating water pump. If you purchase a Grundfos recirculating pump like the one just below, you don't need to add any extra piping!

See that funny stubby U-shaped fitting under the pump? It connects between the hot and cold-water shut-off valves at the farthest sink away from the heater.

The pump uses the cold-water line to send water back to the water heater! Ingenious!

recirculating pump

This is a reliable recirculating pump you can install on top of your water heater. The weird threaded fitting goes under the sink that's farthest away from the pump. CLICK THE IMAGE NOW TO ORDER THIS PUMP.

Pump Location

These pumps are often located near the water heater, however, they can be anywhere in the loop. The pumps circulate water at low pressure and low speeds.

Once again, there's no need to have lots of water moving through the loop. It is just important that the water is hot near the fixtures.

If you install one of these pumps, remember that you need to install unions on either side of the pump.

Unions are special threaded fittings that contain an inner flared surface or flat surfaces with special washers that allow you to break into the piping system and reconnect without soldering.

Water meters are always installed using unions. Look at yours and you'll see what I mean.

Insulation

Once you decide to install a gravity recirculating loop, you need to be concerned with energy loss. A gravity loop will work fantastically without insulation. In fact, it works best without it!

But, this can also cause your water heater to cycle on and off more often. Remember, you are bleeding heat from the heater when the loop contains hot water.

Type of Insulation

There are numerous ways to insulate the pipe. Many insulating materials are made exclusively for water piping. They fit snugly over different sizes of pipe.

Some insulation, like the foam types, must be installed as you install the pipe, not after the loop is constructed. The foam slides over the pipe sections.

When you select your insulation material, ask how and when it should be installed.

CLICK HERE to get FREE & FAST BIDS from local plumbers who can install a hot water recirc system!

Hold Off Framing

Piping installation methods must also be altered. Some people attach water piping to the sides of floor joists. You can't do this with an insulated loop system. The pipe must stand away from floor joists so that the insulation is not crushed. Special inexpensive pipe hangers allow you to do this easily.

Save Energy

All of the hot water lines that lead from the heater must be insulated. They need to be insulated up to where the return loop lines connect and slightly beyond.

The return loop also needs to be  insulated except for a short distance before the loop connects to the bottom of the water heater. If you insulate the entire system too well, it may not work!

Remember, the water has to cool at some point for the loop to start its gentle movement. I suggest that you leave the final 15 feet of return loop uninsulated.

Water Heater Heat Traps

Modern water heaters have small rubber flapper check valves in the top of the heater. These need to be removed if you want a gravity loop to work. The check valves are mandated to preserve energy in non-insulated piping scenarios.

If you don't remove these flappers, the water can't move through the loop.

Cozy Up 

Houses that don't have a recirculating loop system have hot water pipes that branch off a main line and stretch to each fixture. An ideal loop system would have the loop run as close as practical to each fixture.

The closer the loop is to the fixture, the faster you'll get hot water when you open a faucet.

Air Locks - BIG PROBLEMS!!

As you construct your loop system, you must be concerned with air traps. What are these?

Think about the drain traps under your sinks. Imagine if you did this upside down with a water line in a loop system.

Air naturally bubbles out of pressurized water. Normally it makes it to the top-most fixture in your plumbing system.

If you, or your plumber, inadvertently creates a trap, the water will not move through the loop.

Mystery Air

Air can get into a plumbing system in any number of ways:

  • water main break
  • repair process in your own home
  • dissolved air within water

If you create a trap, the air will collect in the trap and BLOCK movement of water within the return loop. This happens because the air will not move down to the water heater.

Air is not a problem in the regular water piping system. The rapid movement of water through the pipes when you turn a faucet on pushes the air out of the way. Remember, water moves sloooowly through a gravity loop.

Check Valve

Just before the loop enters the bottom of the hot water heater you might need to install a simple check valve. These are one-way valves.

This valve will prohibit in-rushing cold water from the bottom of the hot water heater from flowing backwards through the loop when you open a hot water faucet somewhere within the system.

Check valves are not always necessary. Some systems need them because of friction loss and other obstructions that make it easier for the hot water to flow backwards through the loop rather than the correct direction - from the top of the heater!

Drill A Hole

These valves can be installed after the loop is completed. You can install this valve in the vertical - or horizontal - loop pipe just before it enters the water heater.

The valve should be within 5 feet of the water heater and it needs a 1/8-inch hole drilled in the flapper of the valve.

You might want to try installing the loop first without one and see what happens. If you begin to get cold water at a faucet when you should get hot, you know you need a check valve.

Final Connection

As the loop returns to the water heater it connects at the low point of the heater. This is always the location of the heater drain valve. This valve is simply screwed into the heater.

Attach a wrench to the valve and turn counterclockwise. It will come out.

Install an insulated nipple in place of the valve. This will minimize corrosion possibilities.

Then as soon as possible install a tee fitting with female threads at the tee. If you use the right one, the drain valve will screw right back into the tee. The other end of the fitting allows you to connect the loop to the heater.

Install a ball valve on the loop side of the tee so if you want to drain the water heater you can shut off the ball valve preventing all the water in the loop from coming out of the boiler drain

Shut-Off Valves

While on the subject of valves, let's talk about the shut off valves on top of water heaters. I've seen some aggressive homeowners install a shut off valve on both the hot and cold water line.

They thought this would help in the event they need to switch out the heater. Well it does help. It also creates a potential BOMB.

BOMB In Your Home

If some idiot turns off both valves (happens everyday somewhere), and the pressure relief valve malfunctions or was never installed, and the heater thermostat malfunctions, the heater will explode. It's happened more than once.

Only install a valve on the COLD water line, never on the hot line.

CLICK HERE to get FREE & FAST BIDS from local plumbers who can install a hot water recirc system!

Column B413

Brush Marks on Trim – How to Prevent

brush marks

Sanding a painted surface is easy with handy palm or hand-held sander. © 2017 Tim Carter

Brush Mark Prevention TIPS

DEAR TIM: My son was visiting me and decided to do a good deed. With the help of my wife, he painted our front door. The color is a magnificent bright red but the finish has many brush strokes.

Up close, the door looks horrible. What's the best way to refinish the door? Can I simply sand the high spots or must I strip the paint from the door? My son and wife used a disposable brush.

Was that the problem? How can I avoid brush strokes in a newly painted finish? Renard I., Rochester, NY

DEAR RENARD: Ugh! I've seen my fair share of painted surfaces that look good except for the defect you describe. Other defects such as unfilled holes, un-sanded peeling-paint edges, un-caulked cracks, etc. can also ruin an otherwise great paint job.

Professional painters and those that sell paint sundry items constantly preach the mantra of using the best tools when painting, as well as doing all necessary preparation before paint is applied.

CLICK HERE to get FREE & FAST BIDS from local painters who'll redo your front door.

Your wife and son had the best of intentions, but possibly underestimated the required steps to achieve professional results.

Previous Poor Work

The actual technique of applying the paint may not have been a problem. It's entirely possible the previous coat of paint had the ugly brush marks and this new coat of paint could not hide them.

Gloss Paint Unforgiving

If your son used a high-gloss paint, this could be part of the problem. Let's assume the previous coat of paint was flat or an eggshell sheen and had brush strokes.

Flat or eggshell paints tend to do a great job of disguising surface imperfections, even some brush marks.

Gloss paint is the exact opposite. They amplify the smallest surface imperfections.

Gloss paints reflect much of the light rays that strike the surface of the painted object. The light rays bounce off at different angles when they strike imperfections, like a combed brush stroke.

This is why the brush marks stand out. You can see the tiny shadow lines from the light rays bouncing off at different angles.

You can see this in glossy car finishes when a car door or hood has the slightest ding or dent in it.

Start Smooth

Certain paints have more body to them and some can hide subtle surface defects by bridging over them. Even if such a paint was used, I'd never depend upon it to cure an obvious surface defect.

If the previous painter created the problem, the surface should have been sanded to remove the brush marks before the next coat of paint is applied.

Paint Needs To Cure

At this point the best thing to do is to wait until the new paint hardens, or cures, enough so it can be sanded. This curing process can take anywhere from ten to thirty days. In certain situations it may take longer.

Some paints may not cure for up t0 sixty days. The hotter it is the faster paint cures. If you try to sand uncured paint, it will rapidly clog the sandpaper.

Sheets Of Paint

Attempting to sand a paint finish less than five days old can lead to disastrous results as the film can actually tear apart. If you're so impatient that you can't wait, then chemical stripping is the path you must take.

Personally, I'd only strip the door as a last resort. Paint stripping can be a messy task to say the very least.

Sand To Smooth

I'd start sanding using a hand-held power sander that has an orbital sanding pattern. These power sanders do an excellent job of removing surface defects when equipped with the right paper.

Try using 120-grit aluminum-oxide sandpaper for the first sanding. Aluminum oxide is the light-brown sandpaper you see at paint stores or home centers. It's self-sharpening and affordable.

sandpaper

Here's an assorted pack of aluminum oxide sandpaper that will do a great job on soft wood. CLICK THE IMAGE TO ORDER IT NOW.

Look For Dust

You'll know the paint is hard enough to sand if the sander begins to produce dust from the paint film. If you don't see any dust and the paper has started to clog with paint, STOP.

Wait five to seven days and try to sand again.

CLICK HERE to get FREE & FAST BIDS from local painters who'll redo your front door.

Smooth Like Glass

Once you're able to successfully sand, the surface of the door should be very smooth to the touch after you run the sander over it several times. Before you begin to sand the offensive brush strokes, run your hand across them.

You should be able to feel the uneven surface unless you have very thick calluses on your fingertips. After sanding with 120 grit paper, you should be able to feel a much smoother surface.

Don't hesitate to change the sandpaper on a frequent basis. Fresh paper cuts faster.

Paint Horizontal

Once the door surface is smooth and dust-free, it is time to repaint. If you desire as smooth a finish as possible, I would absolutely remove the door from its hinges and paint the door while it is laying flat on two sawhorses or portable work stands.

This allows gravity to help flatten the paint after you apply it. Painting the door flat eliminates the possibility of runs.

Secret Paint Conditioner

The pros use a paint additive to get silky smooth finishes. This is one of their best-kept trade secrets. I've had stunning results using Floetrol. It comes for both latex and oil paint. CLICK HERE to get Floetrol for latex paint.

Floetrol latex paint conditioner bottle

This is a fantastic time-tested paint additive. It tames paint and makes it lay FLAT. CLICK THE IMAGE TO ORDER IT NOW.

The paint conditioners reduce the surface tension of the paint allowing the paint to spread out evenly under the force of gravity. When you combine a paint conditioner with laying the door flat, you'll get superior results.

Great Brushes

Be sure to use the most expensive brush you can buy and match it to the type of finish paint you choose to use.

China bristle is often preferred for oil paint and a polyester brush is usually the weapon of choice for latex based paints. A professional-grade brush will yield incredible results.

Purdy polyester brush

Here's a great Purdy polyester brush for latex paint. If you care for it, it will last for years. I have some Purdy brushes that are 20 years old. CLICK THE IMAGE TO ORDER NOW.

Let Dry

Once the paint is dry, you can put it back on the hinges making sure to remove any weatherstripping from the door jamb. If the uncured paint touches the weatherstripping, it can peel away from the door the next time you open it.

Leave the weatherstripping off the door jamb for about ten days.

CLICK HERE to get FREE & FAST BIDS from local painters who'll redo your front door.

Column 478

Chinese Drywall Causes

drywall

End view of drywall with factory label removed. © 2017 Roger R Henthorn

Chinese Drywall ALERT

SEVERE ISSUE!

The first thing everyone wants to know is, "What's causing the problem? What's in the drywall that's causing health deterioration and the corrosion of metal in homes?"

Fly Ash From Power Plants

The answer is simple: fly ash in the drywall from Chinese power plants. Fly ash is that part of the rock - coal is rock - that simply won't burn.

High-Sulfur Coal

The Chinese use poor quality high-sulfur coal to make electricity. This coal may contain other harmful chemical elements that, once mixed with gypsum in drywall, create toxic gas that's causing the issues in American homes.

Understand the fly ash is a waste by-product from the power plants that normally would be thrown away or put into a landfill.

Fly Ash Filler

However, for years fly ash has been used as a FILLER in both drywall and concrete.

Here is the USA, we use low-sulfur coal in our power plants. The resulting fly ash does not contain the high concentrations of sulfur and other possible elements that are contributing to both health issues of occupants who live in houses with the tainted drywall.

Corrosion Severe

The sulfur in the drywall is creating an offgas - hydrogen sulfide.

This gas reacts with metal objects causing corrosion. It targets:

  • electrical wiring
  • coils on air conditioners
  • copper plumbing
  • metal ductwork
  • joist hangers and structural connectors

It's interesting to note that many newer drywall manufacturing plants are built very close to coal-fired power plants so they have a cheap and readily available supply of fly ash.

We are currently researching ways to determine if you have Chinese Drywall and might have associated corrosion. We are posting additional information as we find it.

The U.S. Department of Housing and Urban Development has issued a press release titled HUD and CPSC Issue Guidance on Repairing Homes With Problem Drywall. This release  is an interim remediation guidance to help homeowners struggling to rid their properties of problem drywall linked to corrosion of metal in their homes such as electrical components.

drywall

Factory label on end of drywall. © 2017 Roger R Henthorn

A report from the Consumer Product Safety Commission (CPSC) provides some guidance for preliminary identification on Problem Drywall. Their report Interim Guidance - Identification of Homes with Corrosion from Problem Drywall can be read by clicking on the title. This report is in PDF format.

The CPSC report refers a guide issued by the state of Florida. Information on that report is shown below.

The state of Florida has posted a Self-Assessment Guide for signs that a home may be affected by drywall Associated Corrosion. The link to their site is http://doh.state.fl.us/environment/community/indoor-air/inspections.html

USAToday has an article relating to damages awarded to families for homes ruined by sulfur-emitting Chinese drywall. Click here to read the article titled "Judge awards families $2.6M over tainted Chinese drywall."

Check back later for updates. An update was provided in the April 11, 2010 and the  April 6, 2010 AsktheBuilder Newsletter

Brick Leaks

Brick Leaks

Can you see what I see? There's no visible flashing behind the brick, I don't see a water membrane covering the wood framing behind the brick! What's more, do you see any weep holes? I sure don't. © 2017 Tim Carter

Brick Leaks TIPS

DEAR TIM: Every time a wind-blown rain saturates our brick veneer home water streams into our home. I've noticed that the wood floors in our living room are warping as well.

The brick and mortar appear fine. What's causing the leaks? How should the brick have been installed? What, if anything, can be done to stop the water penetration? Brenda F., Brockton, MA


DEAR BRENDA: I hate to tell you this, but you've got some very serious problems. If they're not corrected, serious structural failure will be in your future.

I'm quite confident that if I did a post mortem examination of your brick walls, I would find serious workmanship errors.

CLICK HERE to get FREE & FAST BIDS from local painters that can spray on special silane-siloxane water repellents.

Brick Leaks Lots

Virtually every brick wall will allow water to penetrate. The water has three possible paths. It can enter directly through the brick, the mortar, and/or the contact zone between the brick and mortar.

Vertical Head Joints Worst

The primary path of water into brick walls is the contact zone between brick and mortar and mortar joints that are not filled completely.

Your wall leaks, I'll wager, are most likely originating at the vertical joints between many of the brick. Bricklayers call these head joints.

Because of the way bricklayers butter the one side of a brick, these head joints are susceptible to leaking. One side of every brick has got this weakness.

The bricklayers often cut away the bed, or horizontal, joint mortar as they set the brick to the string line. This mortar has already lost some of its valuable moisture from laying on the previous course.

The bricklayer then takes this scraped mortar and puts it on the end of the brick he just laid. He does it at an angle and only a small amount of the mortar contacts the side face of the brick. The mortar makes a less-than-desirable bond with the brick.

Mythical Mortar

The quality, type, and moisture content of the mortar is a critical factor in preventing brick veneer wall leaks. The mortar for a brick veneer house needs to have a high lime and low cement content.

Do you recall the great line written by J.R.R. Tolkien in his book The Fellowship of the Ring? It was said by the character Galadriel, 

And some things that should not have been forgotten were lost. History became legend. Legend became myth. And for two and a half thousand years, the ring passed out of all knowledge.

This applies directly to hydrated lime. It's rapidly becoming a myth in the building industry. Older brick buildings, those built prior to 1900, almost exclusively used hydrated lime mixed with sand instead of Portland cement.

hydrated lime

This is excellent hydrated lime. It's a fine white powder and it's going to look great on your home. CLICK THE IMAGE TO ORDER SOME RIGHT NOW.

The lime in the mortar, through the years, can actually heal tiny cracks that might develop between the brick and mortar. Hydrated lime is an amazing material to mix with sand to make mortar.

Mortar that is too wet or has too much cement can shrink as it dries. This shrinkage can produce tiny cracks that allow water to easily penetrate the wall.

Solid Masonry Construction

Older brick houses usually were never a brick veneer. Often the brick walls were two, three and sometimes four brick thick bonded with lower-strength, high-lime content mortar.

The inner courses of brick were very soft and absorbent. Rainwater would collect within the wall and then be released to the atmosphere once the storm passed.

Brick Veneer - Hidden Waterfalls

Modern single-thickness brick veneer walls deliver the wind-driven rain within a matter of minutes to the wood frame system just on the other side of the brick. This water needs to be collected and transported immediately to the exterior of the house.

CLICK HERE to get FREE & FAST BIDS from local painters that can spray on special silane-siloxane water repellents.

Flashings

This is accomplished by installing flashing materials at the base of the brick wall, above all doors and windows, and below all window and door sills. The flashing must be continuous and needs to be made from a material that allows joints to be permanently sealed.

High-quality brick-veneer flashings can be made from modified asphalt and high-quality polyethylene and copper/asphalt combinations. Do not use the low quality "garbage bag" or PVC type plastic. It's useless.

Cover All Wood

The exterior of your wood-framed walls should also have been covered with a water-resistant membrane. Overlapping horizontal pieces of time tested tar paper will work.

However, there are many air and moisture barriers that will do as good a job or better at preventing the leaking water from contacting your wood framing. These moisture barriers must be installed so they lap over the wall flashings.

Weep Holes

Weep holes at the bottom of all walls and at the top of windows and doors need to be no less than 4 feet on center. Two-feet on center is preferable.

The cavity behind the lowest courses of brick needs to be free and clear of mortar droppings. This allows leaking water to easily escape through the weep holes.

Mortar Catch

An ingenious saw-toothed plastic netting can accomplish this task easily. It fits behind the first few courses of brick.

Silane-Siloxane Water Repellents

Your leaks may be able to be stopped with the application of high-quality water repellents. These materials contain special chemicals called silanes, siloxanes, or a blend of the two. CLICK HERE to get a fantastic one that will do a great job.

silane - siloxane water repellent

This is a magnificent silane - siloxane water repellent that soaks into concrete. CLICK THIS IMAGE NOW TO ORDER IT.

Examine your brick walls. Look for tiny hairline cracks in the vertical joints. Remove and install new mortar if you find obvious water entry points. After the joints dry, apply the water repellents according to the manufacturer's instructions.

Leaf Blower Secret

A second application may be necessary and it usually needs to be applied within minutes of the first coat. It helps to use a backpack leaf blower operated by a helper while you apply the water repellents.

The blower drives the repellent deep into the brick and mortar. The blower blasts the wall immediately after you apply the liquid.

If this does not solve your leak problem, I'm afraid that your only solution might be to re-install the brickwork properly.

CLICK HERE to get FREE & FAST BIDS from local painters that can spray on special silane-siloxane water repellents.

Column 198