Tim Carter samples Emily Saldana's first-place award-winning bread. It's the same recipe she used in the Pennsylvania 2015 Farm Show. Tim also munches on her mouth-watering chocolate-chip cookies. You pronounce Emily's name: Sal DON nya not like I did, SalDANa.
Trex RainEscape Overview Video
Tim Carter describes what Trex RainEscape is.
This was what my photo in the August 13, 2016 Newsletter showed. Well, while under construction!
This is not a how-to-install-it video. Go to Trex RainEscape for detailed installation videos. This product protects that area below your deck by channeling water away from that area. LOOK AT PHOTO BELOW to see why snow and ice will not harm it.
Click here for Trex RainEscape Products on Amazon.com
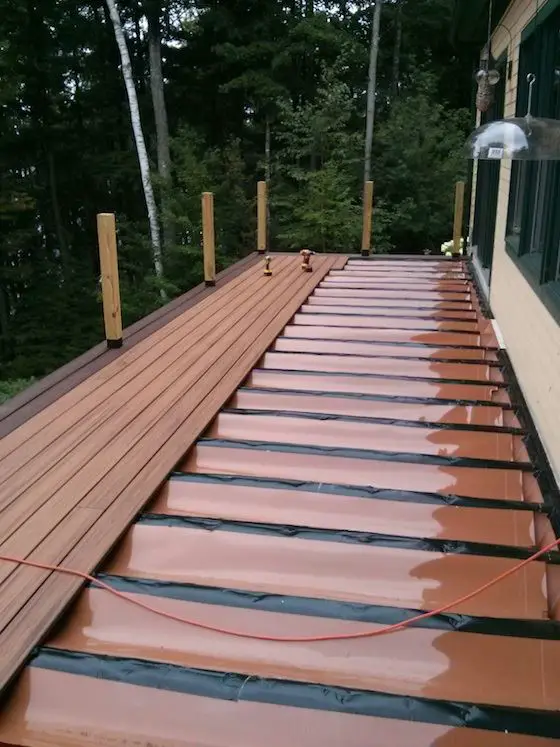
The Trex Transcend decking is being installed. Just as I say in the video, the Trex RainEscape sits BELOW the decking. Snow and ice don't collect on it, they sit on top of the decking. Photo credit: Tim Carter

You can see the white gutters I used to collect the water from the Trex Rain-Escape funnels. There are two MIRROR-IMAGE gutters and you can see in this photo where the two diagonal under-deck braces meet where the two long sections of gutter meet. Look closely and you'll see how the gutter goes to the end of the deck and there's a short section of gutter about 8 feet long at a 90-degree angle. You can just see the downspout in white at the corner where it cuts into the vertical downspout from the house roof. The brownish-orange troughs are Trex Rain-Escape keeping the lower deck dry each time it rains.© 2017 Tim Carter
Trex Protect Joist Tape Video
Trex Protect Joist Tape
Tim Carter shows what Trex Protect Joist Tape is and how to install it to keep the nails and decks on your deck so they don't come loose. If you can fog a mirror, you can install this great product.
CLICK HERE to purchase the special tape Tim used on his own deck joists.
Mulch Against Foundation
DEAR TIM: I recently moved into a neglected house. While working on the landscaping in the front yard, I discovered that the top of the foundation was below grade. Two courses of brick on top of the foundation were covered by a mixture of dirt and mulch. What’s your opinion about how much mulch one can put up against a foundation? There are no leaks in the basement at this time, but this just doesn’t see right to me. My lot from the house to the street seems flat to me. What can I do? What should have been done when the house was built? Laura E., Sterling Heights, MI
DEAR LAURA: Your problem is but another example of how hard-earned knowledge accumulated over decades by older builders transforms from history to legend and then finally to myth. This same exact progression was mentioned early in the Lord of the Rings book by J.R.R. Tolkien when he was speaking about how the magic ring came to be forgotten for two and a half-thousand years.
All one has to do is walk through older neighborhoods in just about every major city east of the Mississippi river to see how builders of old knew all about why the top of a foundation should never be near the soil line or grade. Look at houses that were built in the late 1800’s or early 1900‘s.
You’ll quickly notice that the top of the foundations of these homes almost always sat a good 30 inches or more above the grade. The houses had wood basement windows and the bottom of the basement window sill was about 6 inches above the level of the surrounding soil.
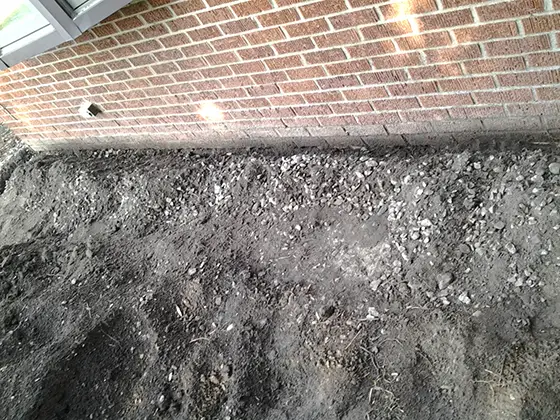
You can see the two stained rows of brick that were covered by mulch and soil. Photo credit: Laura Elsee
This method of construction allowed light into basements and helped preserve the wood that was used to build the house. The wood framing was far away from splashing water and creeping damp. Creeping damp is simply the phenomenon of water being pulled up through masonry construction against the tug of gravity by water’s capillary attraction.
For some odd reason, builders tend to ignore or forget what the builders before them discovered. Some of this happens because many builders, and people in general, take their knowledge with them to the grave. They don’t take the time to write down what they’ve learned over thirty or forty years. It’s not important to them for whatever reason.
If you look at the building code, realize it’s not only a collection of minimum building standards but it’s a moving target as it’s in a state of near constant change. Codes from not too long ago said that you need at least 6 inches of foundation showing above the grade. What’s more, you need at least 6 inches of fall in the soil in the first 10 feet of horizontal distance away from the house. Remember, this is a minimum standard.
I used to make my foundations, when possible, about 18 inches higher than the surrounding grade. Using the dirt I dug from the basement, I then was able to make a long gentle slope away from the foundation so that the ground around the house appeared level, or nearly so. The builder who built my wife’s childhood home did an excellent job of this. This house sits about 70 feet from the curb of the street and the front yard looks dead level.
Guess what? It has about 24 inches of fall over that distance! I know because I checked it one day using a very accurate builder’s level transit. Your builder should have done the same and it’s possible you have quite a bit of fall now, but your eyes are playing a trick on you. Get access to a laser level or transit and check to see how much fall you really have from the top of your foundation to the city sidewalk or street curb.
If you can’t get your hands on one of these precision instruments, you can use a standard 4-foot level and some wood stakes of increasing length with a flat top. Using these things and a four-pound hammer, you can start to determine how much fall your front yard has from your house to the street.
Place one end of the level on the top of the foundation. Drive a stake in the ground at the other end of the level so that when the level rests on it, the bubble in the level is centered between the two lines on the vial. Now move the end of the level that was on the foundation to the stake. Drive a new slightly longer stake into the ground for the other end of the level to rest on.
Repeat this procedure using longer and longer stakes until you reach the street curb. If you did everything right, the height of the last stake sticking out of the ground closest to the road tells you how much your lot has fallen away from the house as you get closer to the roadway. My guess is you’ll be shocked at how much fall there is.
The other thing to watch for is creating a depressed area between your home and any sidewalk that leads from a driveway to your front door. All too often I see ponds in between these sidewalks and the house because the sidewalk acts as a dam not allowing surface water to drain away.
The best way to prevent all these issues is to keep the top of the foundation at least 18 inches above grade. You can even go up as much as 24 inches. Creative planning then can make it so there are minimal steps to get up into the home.
As for as how much mulch one should put up against a house foundation, I say use the minimal amount. Keep in mind that during dry spells the mulch can be flammable and cause a house fire if it somehow ignites.
Column 1155
July 26, 2016 AsktheBuilder Newsletter
Yes, I'm alive! You may have been one who recently emailed me wondering why I've gone dark. It's been at least a month since I've sent out a newsletter.
If you're a new subscriber, this is not a typical newsletter. So hang in there.
A week ago, I got back from a ten-day trip to Cincinnati, OH. I went there for my 50th grade school reunion. It was an epic time meeting up with some friends I've not seen for decades.
Here's a photo of us standing on the steps of the church in just about the same relative positions as we did back 50 years before.

CLICK HERE to see a larger photo and the original graduation photo of all of us. Everyone is pretty much in the same row, but the spacing is off a little bit.
I'm wearing the bright blue polo shirt that helps make my hair look more blonde than it is. That's my story and I'm sticking to it.
The Journey
I decided to drive to and from the reunion. It's close to 1,000 miles from central New Hampshire to Cincinnati, Ohio.
I love driving long distances as it gives me time to think. What's more, I try to take different roads to see different things. US 30 across southern Pennsylvania is a stunning roadway.
I'm an amateur radio operator and our community is helping the National Park Service celebrate its 100th anniversary with the National Parks on the Air event.
I decided to try to *activate* eight locations in the ten days. Believe it or not, I was successful. CLICK HERE to read a story that explains *activating* a site.
The one that meant the most to me on a personal level was the Flight 93 National Memorial. Ever since 9-11, I've wanted to go pay my respects to the forty patriots who gave the ultimate sacrifice in the ongoing battle we have with the radical Islamic terrorists.

Here's a selfie photo I took the first time I visited this hallowed ground two weeks ago today.
I taped a video while I was there and I hope to have it ready for you in the next issue of the newsletter.
Suffice it to say I was quite emotional when standing on the Memorial Plaza just a few hundred feet from the impact crater now marked by a giant boulder of the native bedrock.
I urge you to go visit this solemn site in some of the most gorgeous rural farmland I've ever seen in my life.
What I Learned
My ten-day trip reinforced things I've known for a long time.
Family is by far the most important thing. If you've got strong family bonds, then you know this to be fact.
Friends are second. I made a special effort to connect with some other close friends while in Cincinnati. It's impossible to see all of my Cincinnati friends each trip back because there are simply too many.
I had a delightful time reconnecting with Nick and Mary Beth Motz. I met Nick about thirty-three years ago when he was in high school at St. Xavier. I was doing my first of many projects for his mom and dad, Matt and Ginny.
I was able to spend a great lunch with my dear friend Tom Yunger. Tom now owns the Clifton Skyline Chili. Tom and I worked many a day and late night together.
The memories we talked about where so thick we had to brush them away from the front of our faces. Remember that great line from the Field of Dreams movie?
Everything else after family and friends is a distant THIRD.
If family and friends are not the focus of what you do each day, I suggest you consider changing what you do. When you make family and friends the center of your life, your personal happiness machine will be running on all eight cylinders.
CLICK HERE to read about two new friends I made while on this trip.
The Deck Project
I'm just about eight hours away from installing the first NEW piece of decking on my massive deck project.
Here's an update photo of what *some* of the three decks looked like this past Sunday.
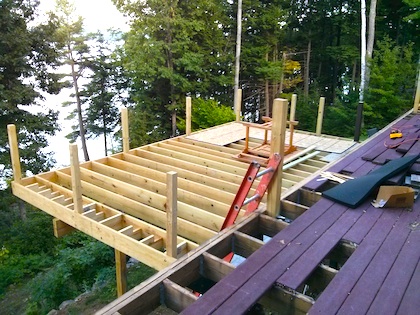
The new deck you see in the photo is pretty big. It's 24 feet wide and extends out from the existing deck 16 feet. It's 3 feet lower than the upper deck. The upper deck is a whopping 13 feet off the ground below.
When you stand at the end of the new deck, you feel like you can jump right into the lake because you can't really see any ground between you and the water as you look out to the lake.
It's a stunning effect and one that WILL SELL the house when we do decide to move.
I have two existing decks off the back of the house, both are 64 feet wide and extend from the house but 10 feet.
A deck 10-feet wide is pretty much useless. The minimum width for a deck with a table and chairs on it needs to be 12 feet.
The decking you see in the lower right corner is generation one Trex that's in fantastic shape after sixteen years of HARSH New Hampshire sun, snow and ice.
I'm replacing all the existing decking and railings with the magnificent Trex Transcend product line.
Composite decking has come a very long way and it's finally a product that delivers on its promises.
CLICK HERE and poke around at the Trex site to see why Kathy and I went with Trex. We're doing a two-toned deck using Lava Rock as the border and Tiki Torch as the main area of decking boards.
Wait until you see the railing and the post caps with the soft low-voltage lighting at dusk!!!!
Tomorrow I should begin to put on the decking on the new deck you see in the above photo.
I guarantee you that you'll be WOWED.
I wanted to add that I SOLD all my old deck railings and all the older Trex decking on Craigslist. In fact, I could have sold five times the amount of Trex decking had I had it!
New Columns for You
Here are a few new columns you should read:
Blacktop Driveway Sealer Legends and Myths
Brick Weep Holes - IMPORTANT!!!!
Deck Screws vs. Nails - Don't Use Nails!!!
Many new videos of what's going on with the deck project are in your future.
I'll be back soon.
Tim Carter
Founder - www.AsktheBuilder.com
Do It Right, Not Over!
Blacktop Driveway Sealing
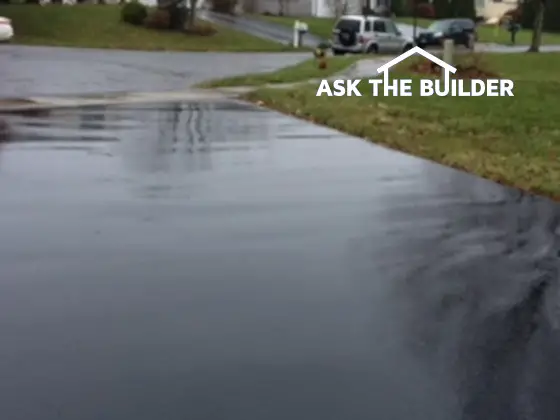
Seal blacktop driveway or not? This is what blacktop looks like just after it's sealed. It looks like glossy black paint. Copyright 2018 Tim Carter
"Years ago, I fell under the spell of what many blacktop sealer manufacturers said about the necessity of sealing blacktop driveways. Much of what they said made some sense, but there was always a nagging thought or two in my head that conflicted with what I was being told."
Seal Blacktop Driveway Checklist
- Never seal a new blacktop driveway
- Blacktop roads are never sealed
- Use the cheapest sealer made if you seal annually
- Blacktop will last for decades if installed right
- CLICK HERE to Get Tim's FREE Newsletter!
DEAR TIM: Can you settle a friendly argument? My wife insists that our blacktop driveway gets sealed.
She listens to a local weekend home improvement radio show and tends to think everything the show host says is true. The show host tells callers about how important it is to seal blacktop, but one of his long-time sponsors is a blacktop sealer manufacturer.
The cynic inside me says he says he does this because he’s getting money from the sponsor. What’s your stance on blacktop sealers and what would you do if you had a blacktop driveway? Stuart T., Hamilton, OH
DEAR STUART: I can speak to all your points. For twelve years, I used to do a two-hour call-in home improvement show on a few commercial radio stations. When I negotiated my contract, I reserved the right to edit the wording of commercials I was asked to read.
It didn’t take long for the advertising salespeople to grow frustrated with me because I’d routinely change the wording in the commercial copy.
I did so because the salespeople made unsubstantiated claims about both products and services. Soon they stopped selling ads for my show. My integrity was all I had and I refused to say things that weren’t true.
Are Blacktop Sealers Necessary?
Blacktop sealers may not be necessary if you look around at all the blacktop you see.
Years ago, I fell under the spell of what many blacktop sealer manufacturers said about the necessity of sealing blacktop driveways. Much of what they said made some sense, but there was always a nagging thought or two in my head that conflicted with what I was being told.
Why Aren't Blacktop Roads Sealed?
First and foremost I thought long and hard about blacktop roads in my city. They were never sealed.
The asphalt cement used at the plant that makes blacktop for the city roadways was undoubtedly the same used to make residential driveways. Asphalt cement is the binder, or glue, that holds together the sand and stones that make up a blacktop drive, road or parking lot.
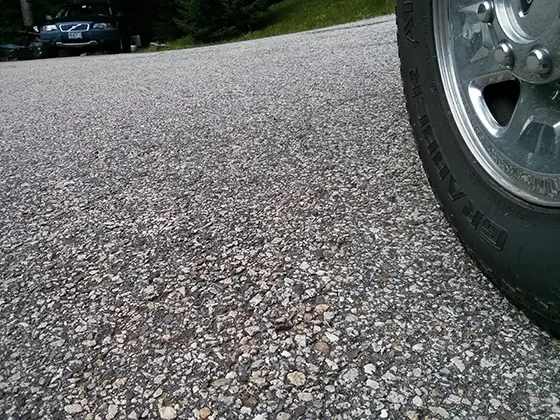
This blacktop driveway is twenty years old and has never been sealed. It’s in very good condition. Photo credit: Tim Carter
Some cities and towns apply an asphalt rejuvenator that claims to extend the life of the asphalt. I'm not so sure these products really help significantly extend the life of the pavement based on years of looking at blacktop and asphalt that's not sealed.
The roads in my city got the same rainfall, the same snow and ice, and the same harsh ultraviolet (UV) light as my neighbors’ blacktop driveways. It was not uncommon for secondary side streets in my neighborhood to go twenty, or more, years before being repaved. That’s a very important fact you shouldn’t ignore.
What Is Blacktop?
Blacktop is a flexible pavement made from a combination of small stones or rock, sand and liquid asphalt cement. It pays to look at an asphalt surface that's not been sealed to see all three of these components.
I then started to look very closely at the average blacktop road and driveway. When you study them, you quickly realize that well over ninety percent of the surface is not asphalt.
What you see are small stones and sand. The asphalt cement just shows up as a thin line in between the stones and sand. Remember, sand is just very small pieces of stone. The stones and sand in blacktop are immune to UV damage from the sun.
Does Sunlight Hurt Asphalt?
Sunlight does hurt asphalt. A certain percentage of ultraviolet light from the sun contains active photons.
I did research about asphalt for my Roofing Ripoff book. It turns out that the sun’s UV rays blast apart asphalt molecules making it more susceptible to oxidizing. When asphalt molecules oxidize and cross-link with one another, it becomes more brittle.
As asphalt becomes more brittle, it loses its ability to hold onto things such as the sand and stones in asphalt roads and driveways. Keep in mind that this oxidation only happens at the very top of the asphalt that’s exposed to the sunlight and it can take years and years for larger stones to become dislodged.
What About Your Blacktop Drive, Tim?
My current home has a blacktop driveway. I live in New Hampshire where winters are brutal with abundant snow, ice, and harsh conditions.
My driveway is twenty years old, it’s never been sealed and a vast portion of the driveway is in excellent condition. The only bad portions are where the gravel base was not installed correctly and there are a few small areas that are beginning to deteriorate.
Can Sealing a Drive Create Problems?
Yes, sealing a driveway can cause secondary problems. The drive may look good for a short time, but now you've created a periodic maintenance situation.
If you decide to seal a blacktop driveway you open up a Pandora’s box of problems in my opinion. The sealer is made up almost exclusively of asphalt. The UV rays will attack this thin coating and it will begin to harden and fail. If you don’t take off your shoes when you come into your home, you’ll track the asphalt indoors discoloring vinyl flooring and carpets.
Once the sealer starts to wear off, your driveway starts to look bad. Your neighbors may think less of you because of the appearance of the driveway. You’re forced into an endless cycle of sealing your driveway, even though the driveway itself is in excellent condition.
Do Sealers Fill Blacktop Cracks?
Yes, a sealer will fill tiny cracks in blacktop.
The sealer manufacturers talk about the ability of the sealers to fill small cracks so water doesn’t infiltrate and cause greater damage.
My driveway has only a few cracks after twenty years because the gravel base under the blacktop was put in correctly. I’ve filled the cracks that have appeared using a strong epoxy that comes in a caulk tube. I press small stones and broadcast clean sand into the fresh epoxy so the crack matches the texture and color of my existing blacktop.
Why is New Blacktop Black?
When a blacktop driveway is new, it’s black as a moonless night because the asphalt cement has coated all of the sand and stones in the mix.
Over time, this very thin coating wears off and you start to see the color of the stones and sand. Don’t discount this distinctive look.
So long as the asphalt cement used at the blacktop plant was high quality, your driveway will not fall apart in a few years without sealer. If it does start to crack and crumble, it’s not a lack of sealer, it’s an indication the gravel base was not installed correctly.
Related Column: Asphalt Driveway Sealers
Column 1154
Brick Weep Holes

Brick weep holes like the round black hole serves a very important purpose and should never be filled. Copyright 2018 Tim Carter
"Brick walls leak water. They’ve always leaked water. Builders and masons from hundreds of years ago knew this and..."
Brick Weep Holes Tips
- Water gets behind brick walls
- Weep holes allow water to exit the wall
- Mortar can clog weep holes
- Flashings must be installed too
DEAR TIM: I live in a brick townhouse. In the back there is a patio door leading to a concrete deck. The patio door sits on top of some brick work.
We are planning to go from carpet to laminate floors. I'm trying to make sure the patio door is all sealed up keeping out any and all moisture. I've noticed what seem to be round weep holes along the very bottom of the brickwork.
I would like to plug them up with some mortar to keep the moisture level down. Will this do any harm? What purpose do the weep holes serve? Todd J., Newport News, VA
Related Links
Brick Veneer Water Leak Locations
Brick Veneer Sealants - Magic in a Bottle
Never Plug Up Brick Weep Holes!
DEAR TODD: Whatever you do, do not fill those round brick weep holes. They’re an integral part of the drainage system to keep water from building up behind the brick. This water, if allowed to contact any untreated lumber, will cause serious wood rot, mold and eventually structural issues with your home.
Allow me to explain the dynamics of brick walls, brick veneer and rain and you’ll be able to do a fantastic job of protecting that new laminate floor as well as everything else behind the brick.
Do Brick Walls Leak?
Brick walls leak water. They’ve always leaked water. Builders and masons from hundreds of years ago knew this and designed brick buildings using best practices to ensure their buildings did not fall apart.
Sadly, lots of this information for years was handed down by word of mouth. To add insult to injury, not all brick masons of today are not required to learn all the past history about brick construction. If they had a better understanding of what’s going on, they’d be able to do a better job of preventing water infiltration.
Where Does the Water Enter the Brick?
Most water enters brick walls along the interface where the mortar touches the brick. You may not see the ultra-fine line or pathway, but it exists. On row-lock brick like you see under your door threshold the problem is even more severe because the mortar joints are facing the sky. Rainfall has no problems getting into a brick wall at these locations.
Does Wind Force Water Behind Brick Walls?
The pressure of the wind is forcing the water into the brick wall through the cracks like you’d pound a nail into a piece of wood. Each successive rain drop that hits the wall pushes against the water that just hit seconds ago.
This, in combination with the wind pressure, allows water to stream into the wall. This water needs to be captured and redirected so it doesn’t come in contact with any of the wood framing in a brick veneer house.
Why Don't Old Brick Buildings Leak?
Old brick buildings don't leak because they had multiple layers of brick.
Years ago in solid masonry buildings, the masons and builders dealt with this water in a different way. They used harder brick to construct the outer face of the walls but the brick used for the inner second or third course was a softer brick that readily absorbed water.
You can usually spot these brick because they’re an orange color and not a deep earth-tone color.
These soft bricks would absorb the water from the storm and the next day they’d send the water back out to the air via capillary attraction and vapor pressure. As the sun beat on the wall and the breeze blew over it after the storm, the water stored inside the inner brick would come out faster than rats abandoning a sinking ship.
What are Brick Flashings?
A brick flashing is a material that captures water and re-directs it to the exterior of the wall.
In modern brick veneer construction, it’s imperative this water is captured by flashings and waterproof membranes and then redirected to the exterior of the brick wall. One of the components of this system are the round weep holes you see at the bottom of the brick.
There are all sorts of modern products available now that channel the water back to the outside of a brick wall, but it’s impossible to retrofit them into an existing brick veneer wall.
Can Spray Sealants Stop Brick Leaks?
Spray-on sealants can stop some brick leaks. Sealants are not the magic silver bullet, but they may stop much of the water.
Your best bet to protect your home is to apply a clear silane-siloxane water repellent that has enough solids in it to help plug the tiny cracks that allow water to enter at the brick/mortar interface.
What is the Best Way to Apply the Brick Sealer?
The best way to apply a brick sealer is to use a leaf blower.
When spraying these products on a brick wall it really helps to have a helper who’s operating a backpack leaf blower. This person directs the air flow to the area being sprayed with the sealer. The high wind pressure created by the blower forces the water repellent deep into the brick wall to help create a strong barrier against water infiltration.
What are the Best Practices When Building With Brick?
The best practices for building with brick are published by the Brick Industry Association.
If you’re building a new home with brick veneer, then you’ll want to read many of the Technical Notes from the Brick Industry Association. These are easy to understand and have great illustrations. They show all the places where you need very important flashings to collect the water.
Do Flashings Go Under Window and Door Sills?
Flashings must be installed under all window and door sills.
Masons often install brick on edge in these locations and the mortar joints point to the sky. The sad thing is in many of the brick houses I’ve inspected this flashing is missing.
Is it Important to Keep a Water Pathway Open?
It’s also important to make sure the pathway from behind the wall to the front of the weep holes is wide open. All too often mortar falls behind the back of the brick veneer and makes it very hard for water to easily enter the weep holes.
There are products and methods to ensure this doesn’t happen, but many bricklayers and builders don’t use the products and problems happen as the house is subjected to pounding rain. MortarNet® is one product that works to prevent mortar from clogging flashings and weep holes.
Column 1153
Deck Flashing Material
DEAR TIM: I read your column each week. Your last one talked about deck screws vs. nails, but I need to know about the different choices I have when it comes to deck flashing materials. What are my choices and can you discuss the pros and cons of each and any new and exciting materials? Also, what would you use on your own home if given the choice? I’ve seen on other websites that some of the modern caulks with lifetime warranties are just fine. Debb D., Santa Rosa, CA
DEAR DEBB: Let’s crush the caulk myth right away. I’m a big fan of caulk for many jobs around a house, but relying on them to flash a deck to a house is the last thing I’d choose. I’m beginning to wonder if some of the caulk manufacturers who offer lifetime warranties are using the warranty more as a marketing gimmick rather than a statement about the product’s ability to perform for decades without failure.
Based on what I’ve seen in my short time on this planet and what the sun’s powerful and unrelenting ultraviolet (UV) light can do to metal, I’d say that no caulk is going to last and last. UV light is so powerful it causes durable materials to fall apart and disintegrate. This is why paint chalks, deck coatings fail, zinc coatings disappear from metal roofs and wood fibers fall apart when exposed to sunlight. Imagine what UV rays can do to soft and pliable caulk over time.
Before I discuss the different materials you can use for deck flashing, I feel you need to understand the importance of flashing and how it works. Flashings are transitional materials. They connect one thing to something else always with the sole purpose of preventing water infiltration. The flashing itself needs to be waterproof and permanent. They should last as long or longer than the adjacent materials.
In the case of decks, a flashing is often required where deck lumber contacts the side of a house. The flashing’s job is to prevent water from entering behind the exterior cladding material of the home. If water gets behind brick or stone veneer, wood or vinyl siding or any other exterior surface, it can leak into your home causing wood rot and mold and mildew nightmares.
There are many materials available to you for flashing a deck to a home, but always keep in mind the power of the UV rays in case any of the flashing material is exposed to direct sunlight. Choose wisely.
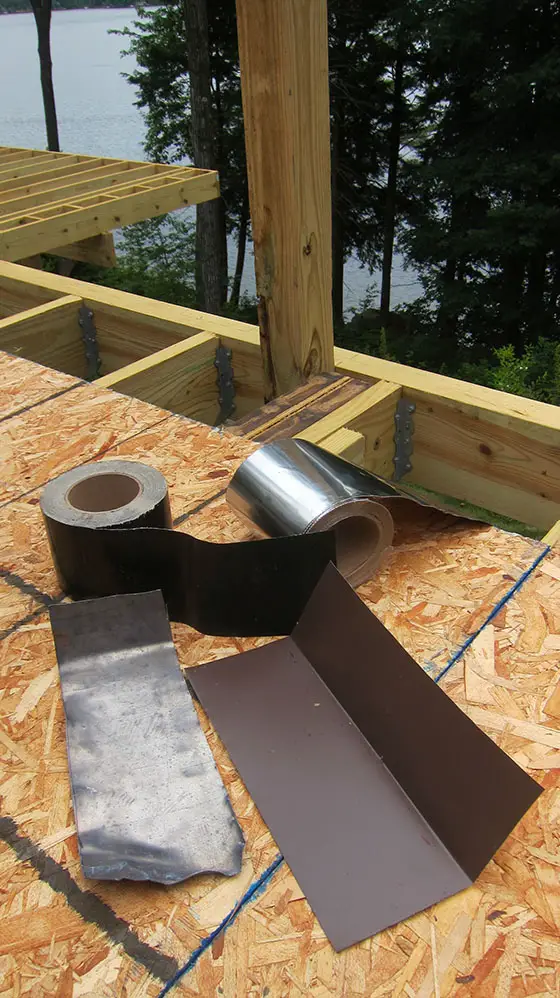
These are a few choices when it comes to deck flashing materials. Technology is improving all the time. Photo Credit: Tim Carter
Aluminum coil stock is a readily available flashing material, it’s affordable and somewhat easy to work with. It’s biggest drawback is that it is not too easy to make waterproof lap joints. Without a permanent sealant or watertight mechanical connection, capillary attraction can easily draw water behind the flashing causing a leak. You can’t solder or weld aluminum with ease. I’m not confident about using any sealant to bond two pieces of aluminum together for decades.
Thin sheet lead is a viable and affordable option. You can purchase it online with no issues in all types of sizes and thicknesses. I prefer to use lead that’s 1/32nd of an inch thick. Lead is waterproof and can last hundreds of years exposed to sunlight. Because lead is malleable, it’s easy to bend. This means you can make just about any shape flashing often using your bare hands and no equipment. Iou can solder it together if necessary or you can bend and hammer it to make interlocking flat seams that are highly resistant to water intrusion.
The market is flooded with all sorts of flashing membrane tapes not much different than a large roll of duct tape. My issue with these adhesive membrane tapes is their long-term durability. Some of them are not very resistant to puncturing. If the flashing, or part of it, is exposed to the UV rays of the sun, how long will it take before the flashing fails?
Perhaps the most exciting product I’ve seen lately is ultra-thin 304 stainless steel flashing that’s about as thin as a piece of paper. You can purchase this with a butyl adhesive already applied. It comes in rolls of various widths and you can bend the flashing to fit any shape. Stainless steel is extremely durable and highly resistant to tearing or puncturing. It’s a perfect material for a flashing because it will never rust. It’s the only metal flashing to use along the ocean where saltwater spray and mist causes rapid corrosion of other metals.
The butyl adhesive holds tenaciously to just about any clean and dry surface. If you want to slide the flashing up behind a piece of siding, you just leave the paper backing on that portion of the flashing so the adhesive doesn’t cause installation frustration. This newer thin stainless steel on a roll a remarkable material.
Keep in mind that you can purchase the best flashing and still have problems with leaks. It’s important for you to understand how flashings work and how they need to be fabricated and layered into and over the things they’re in contact with to make for a waterproof detail.
The best way to think about flashings is to study how simple wood siding or asphalt shingles work to keep water out of houses. They work in conjunction with gravity and each successive row overlaps the row below. It’s much like how the feathers on a bird work to keep them dry.
Column 1152
Deck Screws vs. Nails
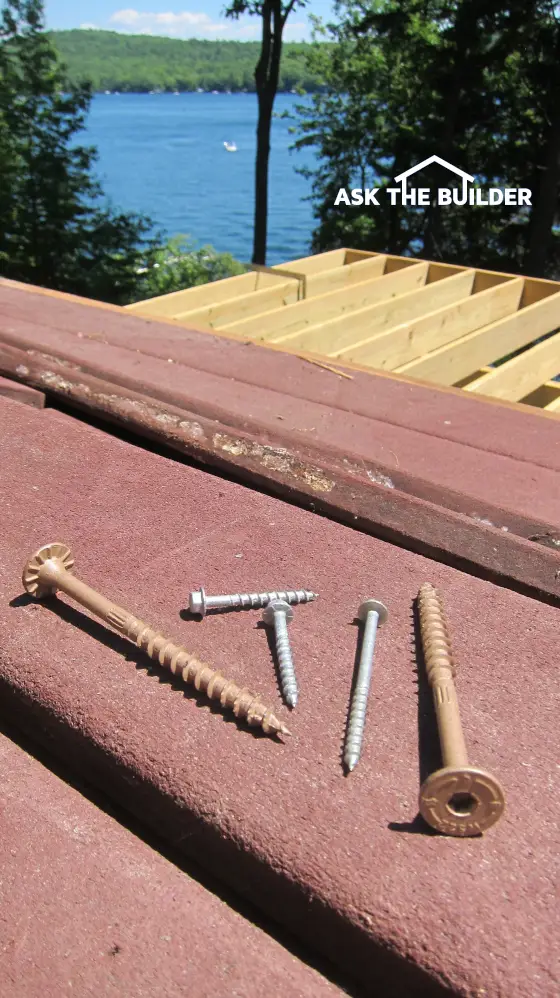
Here are just a few of the many different fasteners you can use to construct a deck. Screws, by far, are your best choice. Photo Credit: Tim Carter
Deck Screws vs Nails
DEAR TIM: Recently a deck collapsed near where I live and people got seriously injured. The report blamed the failure on the use of nails that had corroded and couldn’t hold the weight. Could this be right? Every deck I know of has been built with nails and they seem to be fine. What is the current thinking on using nails and more importantly, what would you do if you were building a new deck? Would you use nails or some other fastener, like a screw? Brad G., Lexington, KY
DEAR BRAD: Decks collapse all the time here in the USA. I can clearly remember a major deck collapse in Cincinnati, Ohio decades ago while a large group of people assembled on a deck to watch a giant fireworks display. I'm quite sure there are quite a large number of decks that collapse here in the USA that never make the news. If you want to know how many it is, you'd have to dig into private data that insurance companies maintain.
My thinking on this subject has changed over the years because I’ve been able to see what happens to decks over time. Years ago as a young carpenter / builder, I thought nails were fine. After all, we used nails to frame houses and houses have stood for hundreds of years being nailed together. Now I’m of the frame of mind that nails are an inferior fastener when building a deck that gets wet on a regular basis.
There’s a big difference between a house and a deck. Decks get wet and dry out. The framing lumber in houses, for the most part, stays dry for the entire useful life of the building. The wet-dry cycling that decks go through causes nails to lose their holding power.
Wood is a hygroscopic material. This means it changes size when it gets wet. When wood gets wet, it swells. When it dries out it shrinks. This back and forth movement causes internal stresses in the wood that cause cracks to develop. It’s not much different than what happens when you bend an aluminum pop top tab back and forth on a beverage can. Do it back and forth enough times and you crack the metal in two.
At first, the cracks are microscopic. After enough wet-dry cycles you may start to see tiny checking cracks. The next time it rains, this crack allows the water to get deeper into the wood. When this happens, there’s even more stress and the cracks begin to get wider and wider.
When you pound a nail into wood, you create stress around the nail and it can easily crack. You can see this happen in real time if you nail near the edge of a piece of lumber. It helps to blunt the end of a nail if you want to minimize splitting, but much of the stress that causes the crack is still there waiting to be released.
Once cracks start to open up around the shaft of a nail and water enters and causes the crack to widen, the holding power of the nail is significantly reduced. This past month I’ve been rebuilding a large deck on my own home and have come across nails in joist hangers that I’ve been able to pull out of the wood with my bare hands. That’s scary.
A side issue is the chemistry that’s at play with wood decks. Commonly available treated lumber contains copper. Nails are made from iron. When you introduce water to these two elements that are in intimate contact with one another, a chemical reaction begins. The iron sacrifices itself and starts to corrode.
In the case of galvanized nails, the zinc coating on the nail is sacrificed over time. Once the zinc is gone, the chemical reaction continues at an accelerated rate attacking the iron in the fastener. I had a beam on my own deck fall without warning because the nails holding it had lost enough mass. They no longer could win the battle against gravity.
This is why it’s imperative to use double hot-dipped galvanized fasteners so this corrosion does not happen. Just because a nail or fastener says galvanized on the box, don’t interpret this to mean that it’s hot-dipped galvanized. There are some galvanizing processes that apply an ultra-thin coating of zinc on the nails that can disappear in just a few years.
Then there’s the issue of end grain. If you pound a nail into the end of a piece of lumber, it has minimal holding power. If you could look at the end of a log with a microscope, it would resemble a giant bundle of tiny cocktail drinking straws. It doesn’t take much common sense to understand a nail driven into the end of a tube wouldn’t hold well at all, even a ring-shanked nail that has more surface area on the nail shaft to produce greater holding power.
Several years ago, I attended a full-day training seminar that concentrated on threaded fasteners for deck construction. I discovered that coarse-threaded screws have far greater holding power than nails. The screws hold well over time in wood that develops cracks caused by the wet-dry cycling.
You can purchase giant timber screws to connect pieces of lumber to make beams. Structural screws can be used to install joist hangers and other metal brackets that help hold two pieces of lumber together. If you use an affordable cordless impact driver, you can drive these fasteners as fast as you might hammer a nail by hand.
The screws will cost you more money when building a deck. But the small extra cost is worth it when a serious injury or death might occur if you decide to forgo their use. If you decide to use the screws, be sure they’re approved for use with the new treated lumber that’s now in the marketplace. If you use a fastener that has the wrong coating on it, it won’t take long for it to start to corrode and fail.
Column 1151
July 1, 2016 AsktheBuilder Newsletter
Happy July 1st!
Holy Cucumber, summer is marching along here, and I'm deep into a massive deck reconstruction and addition project here at my own home.
You're going to be hearing LOTS about this moving forward. I taped a very cool video about a week ago showing amazing heavy-duty timber screws made by Simpson Strong-Tie.
I used these to provide the necessary structural support so the horizontal ledger board at the house would not fall straight down.
The IDIOT builder and carpenters that built my massive deck, it's 64 feet long and projects 10 feet out from the house, use electroplated galvanized nails from a nail gun to fasten the ledger board to the house.
Electroplated galvanizing is pretty much worthless.
For the record, I didn't build the house I'm living in. The builder is still in business here in central New Hampshire and I'll not name him, but I'll share his initials: AG
How Dangerous Are They?
So how dangerous are these electroplated galvanized nails?
VERY.
Two days ago, I almost got seriously injured because a beam those carpenters and builder installed fell to the ground without any warning.
I happened to have a ladder against the beam trying to work on it to make it safer.
One issue is the height of this deck. It's a whopping 13 feet above the ground below. That's pretty high up.
Fortunately, the extension ladder I was using was extended just enough that when the beam fell, my ladder tilted forward and the tips of the ladder caught the next joist by just 1.5 inches.
Had that not happened, I would have most likely done a face plant and the result would have been very ugly.
The beam failed because the nails they used had corroded. The corrosion was happening out of sight where the nails were in contact with the wood deep in the lumber.
High School Chemistry
Here's what you need to know about treated lumber, water and fasteners.
Treated lumber has copper in it. Newer treated lumber has quite a bit of copper in it.
When you mix steel, copper and water, you start a chemical reaction called electrolysis.
The steel sacrifices itself in this reaction and begins to corrode.
Some of the nails that were put in just fifteen years ago had lost fifty percent of their volume.
One has to wonder how many decks out there have these inferior nails in them.
The nails are everywhere on my existing deck and I've been spending over a week adding critical missing structural connectors, new special fasteners and correcting countless other mistakes.
Screws - NOT Nails!
I have the good fortune to know some of the top people in the deck-building industry.
Jim Mailey and Steve Noon are two of them. These are two pros that work for Simpson Strong-Tie.
Let's STOP right here and now.
I'm not getting paid a penny to promote Simpson. I'm doing it to try to make you and your family SAFER.
Last week, Steve visited my home and was stunned to see how poorly the deck was built here at my home.
Both he and Jim talked about the importance of using structural screws, NOT nails, when assembling many, if not all, of the parts of a deck.
The reason is simple. Over time, nails can lose their grip in the wood because of the constant expansion and contraction that deck lumber goes through as it gets wet and then dries.
I put this to the test. I started to remove some of the joist hanger nails used to build my deck. They came out of the wood with little effort.
Be sure you use structural screws that have the PROPER anti-corrosion coating on them when you build your new deck.
Not all screws are RATED FOR STRUCTURAL USE. There are different grades of steel!!!!!!
Just get Simpson Strong-Tie screws and you'll be in good shape.
The Stuck Vanity Top
Dana contacted me two days ago.
She put in a new vanity and top in her bathroom and thought she was doing the plumber a favor by installing the preformed top to the vanity using silicone caulk.
The plumber complained he couldn't install the new faucet because the space was too tight. They make special basin wrenches for this purpose and maybe he didn't have one, but I digress.
Dana wanted to know how in the world to get the top off the vanity base so the plumber could connect the faucet to the top. Just so you know, this is the best way to do the job in a new install. If you can install the faucet on the sink before the top goes in, do so.
I suggested that she try a thin hacksaw blade to try to cut through the silicone caulk. It's not going to be an easy task and once she gets two of the four sides freed up, she might be able to lift the top up.
Almost LAST CALL for Stain Solver SALE
A week ago, I announced our 4th of July Stain Solver SALE. It ENDS in just three days.
Use this promo code NOW to get 10% off and FREE SHIPPING.
10ATB
This sale is ONLY on our three largest sizes:
- 9 pounds
- 18 pounds
- 50 pounds
CLICK HERE NOW to order the best Certified organic oxygen bleach Made in the USA with USA ingredients.
That's enough for an early Friday morning.
Tim Carter
Founder - www.AsktheBuilder.com
Do It Right, Not Over!