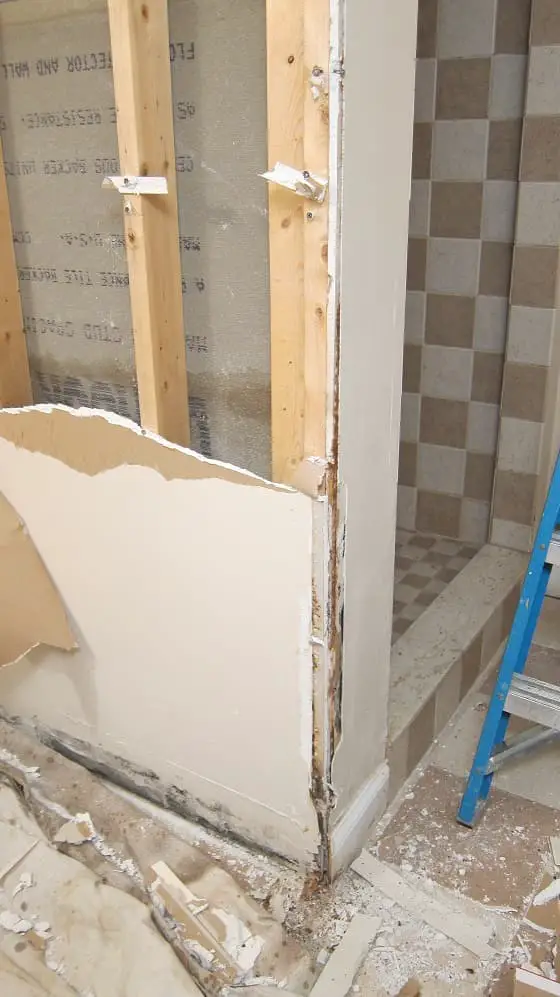
Tim Carter demonstrates a method to easily remove tile on a wall between two other walls covered with tile.
Bath Remodel AsktheBuilder Wall Tile Removal Part 1 Video
Tim Carter, in this continuing bath remodel video series, demonstrates how to remove wall tile.
This series of videos were featured in Tim's April 5, 2016 AsktheBuilder Newsletter - New Bath Remodel Videos.
AsktheBuilder Hall of Shame
This AsktheBuilder Hall of Shame page was created on April 3, 2016, by a blistering email I received from (name removed) who lives in Evergreen, Colorado.
It was presented to my newsletter list on April 5, 2016. Based on the wise and respectful comments below, I've decided to delete the blistering email but leave up the comments you may have left. I promised in my newsletter I would publish the comments.
I'm sure you can get a handle on what the email might have said by reading the comments.
April 3, 2016 AsktheBuilder Newsletter
If you're a new subscriber in the past few days, weeks or months, every now and then I have a FUN game for you to play.
What I've discovered is that you LOVE to see NEW PRODUCTS but you want to have fun while doing it.
Well, I GUARANTEE you that you'll discover something new today, especially when you watch the VIDEO of me doing a super easy install of the LE Johnson Wall Mount Door hardware.
CLICK HERE now and have a blast!
I'm pretty certain I'm going to offer up five secret prizes for this game.
What is the prize?
Let's just say it involves my autograph and it's personalized to you and it involves a NEW BOOK coming out soon!
To be able to WIN one of the autographed copies, you MUST CLICK HERE and play the game!!!
I'll be back on Tuesday with a HUGE amount of new videos for you about the bath remodel. I'm installing the new shower drain plumbing in the concrete floor today.
Wait until you see how I made sure I didn't puncture the radiant heating pipes in the floor!!!!
Tim Carter
Founder - www.AsktheBuilder.com
Do It Right, Not Over!
April 1, 2016 AsktheBuilder Newsletter
You know, I was so tempted to have some fun today.
For example, I thought it might be a good idea to tell you to just rely on caulk when building shower seats and forget about using waterproof membranes.
Then I pondered telling you to forget about that heavy cement board and just go for the drywall that has the water-resistant fiberglass covering when building a tile shower.
And then, what about grout? Surely you know that grout is WATERPROOF, right?
BWHAHAHAHAHAAHAHA
April Fools!!!!
Sadly, all the things I mentioned above are happening each day and poor souls like you SUFFER because of wretched building practices perpetrated by people disguised as craftsmen.
Grout is NOT waterproof.
Here's another real fact - no foolin' here:
Each day it's becoming HARDER AND HARDER to locate real pros to do work.
That's why it pays you back in spades if you just spend 30 minutes or so using my Search Engine to find out how I'd do the work at your home if you hired me.
CLICK HERE now to search for anything at AsktheBuilder.com. Including red dragon tattoos!
It does you no good to come to me for help AFTER the contractor has already made you another victim.
The Weekly Mystery Link
There seems to be some confusion and trepidation about CLICKING the Mystery Link colored button. You'll see it just below.
I try to put in a Mystery Link in each issue as a SURPRISE TIP for you. Don't feel bad things will happen if you click it.
READ the message in the button and react to the challenge. Try it now. If you suffer any harm, mental or otherwise, email me back for a private message.
| . |
| CLICK HERE for the MYSTERY LINK! Do you know this secret tip about how to save yourself $300(minimum) from a sewer cleaning company? |
| . |
Complaint - "Where's the Tips?"
You may find this hard to believe, but I got a complaint from Hans about the newsletter I set out on Tuesday.
He said there were no tips in it and that the newsletter was all about me trying to sell stuff.
I responded back to Hans with one of my shock and awe email replies. It must have worked. I didn't hear back from him.
If you feel like Hans and want a shock-and-awe email reply of your very own, you know what to do.....
Big Fun Game on Sunday
On Sunday, I've got a new game for you. This one is going to be scads of fun.
Part of the game is going to have you watch a new video I just uploaded this morning. Here's a clue about what it's about:

I'm convinced you're going to love this game. You'll need to watch the video all the way to the end to get one of answers correct in the game.
If you're unable to watch videos for any reason, you'll still be able to play the game. I realize some people have slow dial-up connections and can't see video.
I want ALL to play and have fun.
Be SURE to open the Sunday edition.
Turbine Vents and HOT Attics
Felicia Baker asked a question at the website a few days ago.
Her attic gets blazing hot in the summer and she wanted to know if putting in a few extra turbine vents would solve the problem.
I told her that today, right here, I'd provide her the answer.
If you want a much cooler attic this coming summer, NOW is the time to start to do the work.
I need you to read the following past columns to get an understanding of what's in play and WHAT is REALLY HAPPENING up in your attic.
Please take the time to READ THESE. Hans, if you're still here, each one of the following columns has about four tips in it. Keep track for me buddy. Let me know if I disappoint you.
Turbine Vents 101 - How they Work
Why Solar Fans are Pretty Much USELESS
The Secret to Moving VAST Amounts of Air
Don't Have Air Conditioning? Then INSTALL This MONSTER

Spring Deck Cleaning
Are you about to clean your wood or composite deck? Maybe you have a patio covered with algae and mildew.
In about two weeks I'm going to have a huge SALE on my Stain Solver.
Stain Solver is a company Kathy and I started about 22 years ago and it's a Certified organic oxygen bleach.
All the ingredients are Made in the USA. Most of my competitors get their ingredients from offshore.
Stain Solver can clean just about anything that's water washable.
Go spend about ten minutes looking at the Before and After photos here to convince you it works.
Here's one of my all-time FAVORITE Before / After Stain Solver photos. CLICK HERE. Wait until you read the story sent by the mom. WOWZA!
NOTE TO HANS: Dude, I'm sorry about this shame-filled promotion to sell one of my products that helps tens of thousands of customers each year save MILLIONS of dollars.
Yes, instead of throwing things away and buying new, Stain Solver allows folks like you to save money.
I know you think of yourself Hans, so don't you want to save your money?
NOTE TO SELF: Try to tone down the passive-aggressive tone. 😉
Okay, have a great weekend.
Oh, the bath remodel is going great. I should have maybe ten or more videos for you on Sunday.
WOO HOO!
Tim Carter
Founder - www.AsktheBuilder.com
Do It Right, Not Over!
Johnson Wall Mount Door Hardware Installation Video
Tim Carter demonstrates the entire process of installing LE Johnson Wall Mount door hardware. You only need a few tools and the average homeowner can do the job.
It helps if you can read the simple plans provided by the clever LE Johnson engineers who designed the wall mount hardware.
It's key to make sure the doors hang plumb so if the doors are going to be sliding past baseboard on the lower parts of the wall, the hardware brackets need to be mounted to a piece of wood that's the same thickness as the baseboard.
Be sure the board is securely fastened to the center of the wall studs. Do not depend on wall anchors to hold up the hardware and the weight of the doors.
Tim featured this video in his April 10, 2016 AsktheBuilder Newsletter.
March 29, 2016 AsktheBuilder Newsletter
Two different things happened over the past two days that are the inspiration for this newsletter.
I need you to hang in there and absorb this important story.
Seventeen years ago, I was one of a few founding members of a very secret Internet entrepreneur mastermind group.
This group exchanged ideas via email and we eventually met face-to-face in Las Vegas in 2002.
At that conference one of the very energetic members got up and gave a talk. He started out saying, "Imagine walking through a shopping mall and seeing a vending machine that said on it:
Insert 25 cents and Get $1.00
I'm sure you'd shake your head thinking it was a scam, but you have a quarter in your pocket and you think, 'What the heck.' You insert the quarter.
Immediately out through a slot comes a new $1 bill.
It's a real one, not counterfeit.
What would you do next?
I don't know about you, but I'd go get as many quarters as possible and start putting them into the machine."
What does this have to do with you?
Per Ekegerd had a problem with a leak in his roof. He sent me this photo along with some others over the weekend.
I looked at his photos and immediately knew what was causing the leak.
He was confident he had figured out the cause and wanted me to confirm it and approve of his solution.
His proposed fix was not going to work long term.
I emailed him back telling him we had to talk about it on the phone. I've offered a personalized one-on-one problem-solving phone consult service for at least fifteen or more years.
I even offer a service where I'll fly to your house and consult for a day. I've done it before, with the furthest I've traveled being the island of Antigua.
Anyway, Per saw the value of talking to me and ordered a phone consult early on Easter Morning.
As crazy as this sounds, I was in my office working on Easter as no one else was up. Per said, "I see you answered my question about the consult, so you can call me right now if you want."
I did. I called him early on Easter morning, we chatted, and I sent him about four or five links to different pages and videos on my website showing him how easy it was to permanently stop the leak.
Fortunately for him, he can get up on the roof safely and he's going to do the work himself. I saved him at least $500 in a pro coming out.
Per inserted the "quarter" and he got back the "dollar".
I bring this to your attention for just ONE REASON.
It's NOT FOR ME TO GET MORE BUSINESS doing phone consults.
It's to try to save you hundreds or thousands of dollars should you be faced with a problem that you do not know how to solve.
If you take a chance and HOPE a contractor is giving you solid advice and he's WRONG, then what happens?
How much money might you lose to correct the problem?
I GUARANTEE you it will be far more than $50 in all cases.
I forgot to add. My phone consults come with a no-hassle complete money-back guarantee. If you feel at the end of the call I didn't save you money, just say so and the call is FREE.
Ninety minutes from right now - as I type these words, I'll be on the phone with Dave in Laramie, Wyoming. I'll show him how to solve his perplexing roof framing problem with this pergola in progress.
CLICK HERE to insert your "quarter" so you can save HUNDREDS or THOUSANDS of dollars.
| . |
| CLICK HERE for MYSTERY LINK! What would you do if you had to repair a CRACK in CONCRETE? |
| . |
Simple Plumbing Tips
This past weekend I noticed my kitchen sink was draining slow. That's not good.
Once again, it was early in the day and I took apart the horizontal tubular drain pipe from the one sink basin that feeds water down to the p-trap.
OMG! It was really clogged. That's not good because it means that further down the pipe there could be problems.
It was a combination of food debris and caked-on grease on the sides of the PVC pipe.
I cleaned the pipe, checked the p-trap - it was partially clogged - and put it all back together.
The sink still drained slow. UGH!
Rather than take everything apart, I decided to try one thing that often works.
I got a clean toilet plunger and I filled one of the sinks in the double-bowl sink halfway up with water.
I then put a drain strainer in the empty sink and held it down tight with my hand. Then I removed the strainer from the water-filled sink and got it out of the way.
I then started to plunge the sink. All sorts of crap came back up in the sink. I kept plunging and the water started to drain a little faster, but not all that great.
The reason I held the one strainer down in the empty sink is because I wanted the pressure from the plunger to be directed down into the pipes. If you just leave that drain hole open in a double-bowl sink, the pressure comes up through the sink and nothing happens in the drain pipes.
The same is true in vanity sinks. When you plunge those, you need to cover and seal the overflow hole at the top rim of the sink.
I knew the pipes beyond the p-trap had to be grease coated and partially clogged. I immediately got several large pots of water boiling.
I then poured these into the sink somewhat slowly and it did a pretty good job. The sinks are now draining much faster.
Here's how to PREVENT kitchen sink drain pipe clogs:
- Don't put grease down the sink. Remove grease from pots and pans with paper towels and throw these away.
- Keep sink strainers in place to capture large food particles and throw this in the garbage.
- When rinsing food and waste run clear water down the drain for at least 20 seconds to FLUSH the waste through the p-trap and down the horizontal drain pipe past the p-trap.
- Every week, pour at least two gallons of boiling water down your kitchen sink.
Soggy Lawns and Yards
How to DRY Them Out
Emily lives on the island of Tasmania in Australia. She reached out with a big problem at her new home.
The builder GOOFED up with the grading around her house and now she's got a wet yard situation.
Did you know I'm a college-trained geologist with a special interest in hydrogeology - the study of groundwater?
I've SOLVED thousands of WET YARD situations over the years with my simple linear french drain.
READ what I told Emily and be SURE to look at the incredible DVD I produced about how to transform your WET yard into a miniature Atacama Desert!
Seriously, CLICK HERE to read the column. I guarantee you'll discover something new.
That's enough for today. I need to get ready for the call with David, then the rest of the day I'm taping more videos for you about the bathroom remodel job here.
Tim Carter
Founder - www.AsktheBuilder.com
Do It Right, Not Over!
Soggy Lawn Drainage
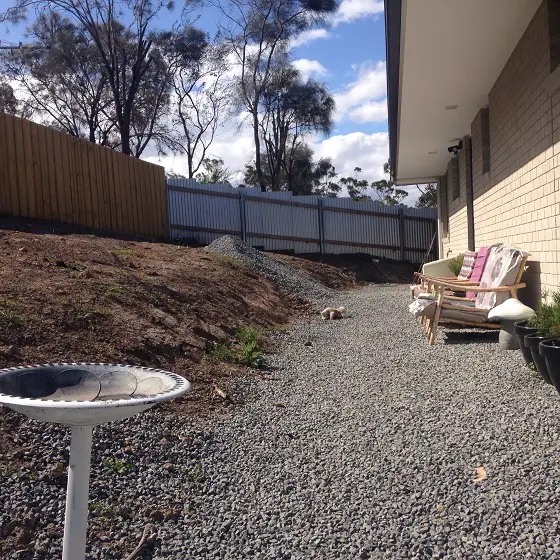
Soggy Lawn Drainage | This new home has a severe drainage issue and the builder needs to correct it. Photo Credit: Emily Zajane
DEAR TIM: I read your column down under on the other side of the world. We just moved into our new brick two-story home and I’ve got a problem with soggy lawn drainage. As you can see in my photo, the ground on one side of the house is higher than the first floor of the home and rain is causing issues.
Only one drain was installed and it doesn’t seem to be doing a good job. How should the ground around the house be shaped so that heavy rainfall never causes a leak into my home? What would you have done had you built my home? Emily Z., Hobart, Tasmania Australia
DEAR EMILY: It’s an honor to be recognized from such a great distance! Even though you’re down under and live in the southern-most part of Australia, gravity works the same as in all the places I worked here north of the equator! That means it’s going to be easy to solve your problem.
Based on your excellent photo, I can see exactly where the builder made a few mistakes, all of which will be fairly easy to correct. The biggest issue is going to be who pays for the required work and my guess is it’s going to be you. I say this without having access to your plans, specifications and contract. It’s quite possible the plans show a different final grade, ground slope and retaining walls and he’s just not put them in yet.
Here in the USA for many years our building codes have addressed the grade, or ground slope, around a finished house. It’s a minimum standard and you need to realize you can do much better. The code stated that if you measure out from the house at a 90-degree angle the dirt 10 feet away from the house needs to be 6 inches lower than the dirt immediately adjacent to the house.
What’s more, the code stated that there needs to be at least 6 inches of foundation extending above the ground next to the house to prevent overland water from flowing over the top of the foundation or slab. I’ve seen countless houses where this 6-inch requirement is violated and the distance is much less than 6 inches. Remember, 6 inches is a minimum standard and it’s best to have more, at least 9 or 12 inches in my opinion.
Based on your photo, I feel that more dirt needs to be removed from around your house. The flat area with the gravel seems to have some slope, but it’s hard to tell if it has enough. It also seems like there’s only about 7 feet of area that’s flat next to the house. I’d suggest you have more.
What I’d recommend is that you consider installing a low retaining wall that’s about 3 feet high that runs roughly parallel with the wall of the house in the photograph. This wall should be about 16 feet away from your home. It would allow you to have a very nice raised planting flower bed next to the fences that surround your home. This may work well for raising vegetables depending upon the compass orientation of your home.
You’ll be able to slope the ground away from the house and the retaining wall creating a slight low spot in the somewhat flat area between the house and the wall. This ground must also slope to the low spot of your property so water flowing down from the higher land beyond the fences will then continue on its journey to the ocean.
Remember, before your home was built, water drained across the lot trying to get to a local stream and river so it can be transported back to the ocean. This happens in most places around the world except for land that’s below sea level!
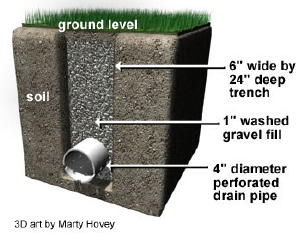
Cross-section of a Linear French Drain. Tim created a Streaming Video showing step-by-step how to install the trench drain he talks about in this column. CLICK HERE to order it now.
Once the land has the proper slope and grading is complete, you can ensure you’ll never have a soggy yard if you install a Linear French drain in the flat area where the sloping ground has been shaped to create a shallow swale for the overland water to flow. This trench drain only needs to be 6 inches wide and about 2 feet deep. This trench needs to extend to a low part of your land beyond and downslope from your home.
The trench contains a perforated 4-inch pipe and it’s surrounded by the exact same gravel I see in your photo. You want gravel pieces that are the size of grapes or walnuts. No sand should be in the gravel. Water in the soil flows down rapidly through gravel like this and into the pipe. This underground system allows your yard to dry out rapidly after it rains.
The bottom of the trench can have a slight slope of about one eighth inch per foot of horizontal run. If your lot has a steeper slope, and many do, the bottom of the trench, once past your home, will eventually daylight. This means the trench becomes more shallow because the bottom of the trench is not parallel with the top of the ground. You want this to happen so the water flows out of the pipe across your yard.
If you do all the things I suggest, I guarantee you’ll have a dry yard for as long as you own your home. You’ll also gain some nice flat land to play games outdoors and have some fun. The work that needs to be done is not that hard, but it will be made much easier if you have a professional do it that has lots of experience with final grading.
This column was SO GOOD that I shared with the 31,000 subscribers who read my March 29, 2016 AsktheBuilder Newsletter.
Column 1137

Do your own DIY install of a Linear French Drain with Tim Carter's time-tested methods and materials! CLICK IMAGE TO ORDER NOW!
March 26, 2016 AsktheBuilder Newsletter
It's been almost two weeks since I've reached out to you. A childhood friend of mine, who matured into a fantastic painter I used on many of my jobs, had to be sent back to Heaven early.
The travel to and from the funeral services ate up six days with me arriving back home this past Monday.
I tried to catch up the past four days, but I didn't make as much headway as I wanted.
There's much to share.
Happy Easter to you and your family! I'll be hunting delicious foil-wrapped dark chocolate eggs tomorrow morning after getting back from mass. Kathy gets them from Aglamesis Ice Cream and Candy Shop in Cincinnati.

My Defective Asphalt Shingles Book
I'm hoping that it's ready for you by the middle of April. I've had the book finished for over a month, but I can't publish it.
The holdup has been the approval of a provisional patent. I need to have the US Patent Office give me the time stamp on my patent application before I release the book.
While writing the book, I discovered something no one else in the world had noticed before.
The GOOD NEWS is that you'll benefit tremendously from this discovery!!!! I go into great detail in the book about it so you'll get all the information there.
The results of the survey I did two weeks ago were astonishing! If you were one who wants a simple PDF file of the book, you'll get it from me!
The book will be available in library-quality paperback with gorgeous high-resolution color photos. It will also be available as an Amazon Kindle book.
Remember, you don't have to own a Kindle to read it. You can download FREE Kindle reader software for tablets, your computer, etc.
I also plan to release an audio version, but that's going to happen after all the other versions are finished. A very tiny percentage wanted an audio version.
I want to do a special call out of a dear friend of mine I've known for nearly 40 years - Marty Hovey.
Marty is a super-talented graphic designer that's helped me with many things at AsktheBuilder.com since day one.
He's involved with this book project now and yesterday I asked him to modify a plumb-bob graphic he made years ago for an earlier version of the website.
This graphic will appear at the end of every chapter in the book.
My Plumb Bob Press company is the publisher of the book and I felt it was time to create a graphic that combined ancient know-how with modern laser-level technology.
In fact, I told Kathy yesterday that I'll bet many young carpenters / builders and homeowners have not even seen a plumb bob. I always have one in my tool belt because it's such an accurate tool.
The following copyrighted image is what I drew and sent to Marty. He transformed my concept into a wonderful finished product. Wait until you see it inside the book in full color.
Marty's image will me MUCH SMALLER in the book, so don't be fooled by its size below.
If you want to hire Marty to do work for you, let me know and I'll connect you. I can't say enough good things about Marty. Thanks Marty for all you've done.
CLICK HERE to see one of Marty's spectacular graphics. It's at the bottom of the page.
That 3D trench-drain graphic has been pirated COUNTLESS times on the Internet. I could spend all day everyday playing whack-a-pirate trying to get the images off all the websites that have STOLEN IT!


| . |
| CLICK HERE for the MYSTERY LINK - Do you think you know everything about how to properly fill holes in stained wood? CLICK and behold some magic! |
| . |
Upcoming Product Reviews
Here's a list of products I'm currently testing and will have reviews for you soon:
- BioennoPower Lithium Iron Phosphate batteries
- BioennoPower Solar Panel Charger!!!
- Bosch Hand-held Chipping Hammer
- Milwaukee Hand-held Chipping Hammer
- Ames Pick and Grubbing Mattock
- PC Products Super Glue - It looks *Amazing*!!!!
New Q & A Columns for You!
Here's some content that's been added to the website you probably don't know about!
Granny Pod House / Remote Man Cave / Remote Woman Oasis!
That's enough for today.
Be patient about the Asphalt Shingles Book. When you see it, you'll be BLOWN AWAY.
Tim Carter
Founder - www.AsktheBuilder.com
Do It Right, Not Over!
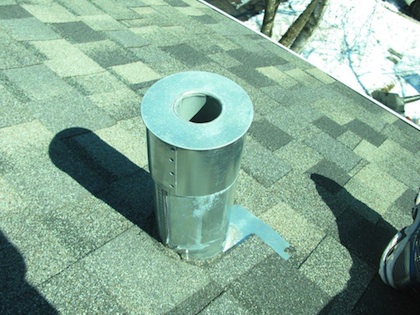
Bath Remodel Cost
DEAR TIM: I read your helpful column each week in our local paper and your last column was about installing a bath vent fan. I want to remodel our dingy bath, but I need to get a handle on what the project will cost before I start. My wife doesn’t want me to tackle the job myself even though we have a second bathroom we can use during the project. What’s the best way to determine a price if I do the work myself? What’s the best way to get the firm price if I have to hire a pro? Paul D., Fairfax, VA
DEAR PAUL: First, thanks for being a loyal reader! I’m sure my editor at the paper loves to know my column is helping you and others. I’ll bet you and your wife are excited about your upcoming bath remodel. My past customers loved seeing their old bathrooms transformed into a personal oasis in just a matter of a week or two. I hope you can do your job that fast to keep family stress to a minimum.
You’re approaching the job the right way by not starting until you know the exact price. The good news is it’s not as hard as you might think to compute the price, especially if you’re not having to pay for any labor. If you do win your wife’s confidence and she gives you the green light to do the job yourself, then you just need to create a detailed material list.
Demolition is but one of the costs you need to consider when you do a bath remodel project. Photo Credit: Tim Carter
To do this, all you need to do is stop and break down the job into its components. Here’s a list I feel will be of great help. A typical bathroom remodel would have these different tasks: demolition, rough carpentry, rough plumbing, rough electric, ventilation, insulation, drywall, flooring, finish carpentry & fixtures, finish plumbing, painting, finish electric and punch list.
Your job is to look at each of those categories and make a secondary list of all the materials or supplies that are required to complete each category. Let’s take just one of them and I’ll try to help, even though I don’t have your plans in front of me.
Let’s look at the finish carpentry task. You are probably going to need the following items: new baseboard trim, new trim around the bathroom door, towel bars, medicine cabinet or mirror, toilet paper holder, robe door hooks, hand-towel wall hooks, window trim, screws, nails, anchors, etc. Each job is different, so you need to think it through what your job will require.
Take a few hours and create a similar list for each and every task. Whatever you do, don’t guess at prices. If you’ve not yet looked at the price of new plumbing fixtures, especially high-quality ones, be prepared for sticker shock.
I’ll also offer up a tip for you. I would not even consider starting the job until you have all the materials on site. I’m not talking about basic materials like drywall and paint and other sundries, but all your plumbing fixtures, faucets, cabinets, sinks, countertops, light fixtures, etc.
You may need to look at these things to get accurate dimensions so you don’t make mistakes. One common mistake made by rookies is the placement of electrical boxes on the wall where the mirror will be. I’ve seen many a homeowner have to move a box because the light fixture they selected interfered with the mirror or medicine cabinet door. All of these conflicts need to be resolved early in the job.
If you decide to use a professional for the job, all you have to do is develop precise plans and specifications before you even call a contractor on the phone for a bid. It’s extremely important to have a list of each and every item you plan to have in your new bathroom.
This means you need to pick out all the plumbing fixtures, the vanity, the top, all faucets, any and all wall fixtures, flooring and all trim. You need exact model numbers, finishes and colors.
Here’s but one example of why this is important. The cost for the electrician for your job could be two wildly different numbers. Imagine if you decide to add all sorts of new lighting, change the location of the ventilation fan, add towel warming bars, etc. versus just installing new light fixtures in their current location.
When you have everything selected, the contractor and all sub-contractors know what they have to do to put those things in. They can compute the correct amount of time. If you make the grave mistake of working off of allowances, then your job costs will spin out of control with expensive change orders. Change orders are the fastest way to blow a construction budget.
Be sure you protect yourself when working with the contractor when it comes to money. Do not give any money to the contractor in advance unless he must purchase special-order items for your job. If that needs to happen, you can always purchase them yourself and have them in your garage for the contractor when he arrives. The contractor should have charge accounts at local suppliers for all stock items.
Remember, the contractor doesn’t pay his employees, sub-contractors, etc. in advance, so there’s no reason he needs money from you before the job starts. Simply agree on a payment schedule tied to work that’s completed to your satisfaction. You may write the contractor two checks a week if the job is going fast, but always make sure you have enough money to finish the job in case the contractor disappears.
Column 1136