Tim Carter explains several tips to help when removing concrete around a basement shower drain.
Concrete Block Door Opening
Concrete Block Door Opening | These concrete block will be removed to transform the pass through to a door opening. Photo Credit: Jeff Selvidio
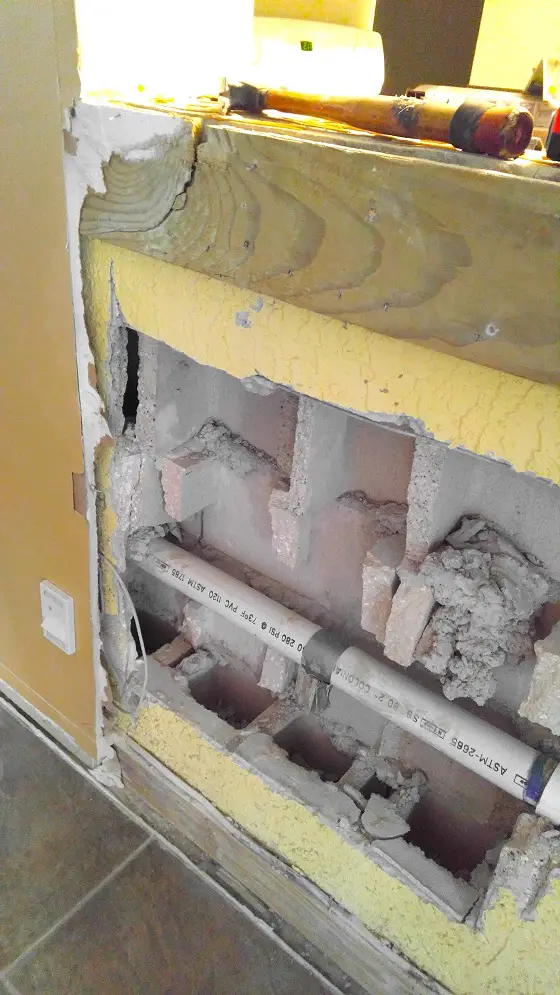
DEAR TIM: I live in a very common home here in Florida. Most are built from concrete block. Twenty years ago, a room addition was added to the home and the rear exterior concrete block wall became an interior wall. A window was removed to create a pass through to the room addition. Now we want to transform the concrete block under this pass through to a real door opening. Can you help me figure out how to finish the uneven inside cores of the concrete block? I want to be able to attach drywall to the opening. I don’t know where to begin. Jeff S., Largo, FL
DEAR JEFF: I’ve had to do exactly what you plan to do on a few occasions. It’s a nasty dusty job. What’s more, it requires a certain level of skill to achieve your goal. There are any number of ways to get your desired result of a finished drywall arch.
One way is to face the concrete block opening with treated 2 x 10 material. This lumber should be within one eighth of an inch of what the width of the concrete block wall is now when you add the thickness of the concrete block and the two pieces of furring strip material that’s nailed to the concrete block.
It’s quite difficult to anchor this 2 x 10 to the cores of the concrete block wall. Many contractors might tell you that you need to embed anchor bolts in concrete that’s poured to fill the irregular cores that will be exposed after you removed the block under the pass through opening. It’s not easy to pour this concrete and set the anchor bolts.
I think the best way for a serious DIY person like you is to just create the rough wood opening using pieces of treated 3/4-inch treated plywood. I would be very tempted to make u-shaped forms out of the 3/4-inch plywood that wrap around the concrete block and extend back on the walls about one foot.
The pieces of plywood that cover the sides of the block would then be glued and nailed to the concrete block wall. You’d have to cut back any existing furring strips that are on the concrete block so the wide strips of plywood would fit tightly against the concrete block.
By using one-foot-wide strips, this give you plenty of area to nail and glue the wood so you don’t risk getting a poor attachment if you just tried to place fasteners near where you cut away the concrete block.
The piece of plywood that covers the irregular block cores that were cut away is attached to the two side pieces of plywood with some screws and construction adhesive.
I’d space the screws about 4 inches apart. Use galvanized coarse-threaded screws that are at least 1 and 5/8-inch long. I’d carefully drill pilot holes in the plywood making sure the screws entered the side pieces of plywood exactly in the center of the 3/4 width so the screws hold very well.
You may discover that it’s best to create these u-shaped forms only 2-feet high at a time and stack them on top of one another as you work your way to the top of the opening. The original block layers may not have the wall perfectly plumb or in the same plane and one giant U-shaped form may be very hard to align if it’s one piece about seven feet tall!
I’d try to use traditional cut nails to attach the one-foot pieces of plywood to the concrete block. Be sure to nail into the horizontal mortar joints that are between the layers of block. Wear safety glasses and use a 20-ounce, or heavier, hammer. You’ll discover the cut nails do an excellent job of penetrating the mortar and will bite well creating a long-lasting attachment.
Beware using masonry screws. If you over-tighten them, which is easy to do, they lose their grip. This rarely happens when you drive a cut nail into a mortar joint.
To avoid issues with the treated plywood, I’d be sure to purchase a piece that’s as flat as possible. Get it home and out of the sun as fast as possible. If you allow it to sit in the sun, the plywood may warp and twist.
Try to bring it inside where it can start to acclimate to the inside temperature and humidity in your home. You want the wood to shrink and adjust to the inside environment so it places minimal stress on the fasteners and glue as you start to assemble it. I would allow it to acclimate for about four days before I’d start cutting it into the pieces you’ll use to create your u-shaped forms.
I mentioned this column in my April 19, 2016 AsktheBuilder Newsletter.
Column 1140
DIY Shed AsktheBuilder Flat Blocking for Floor Joists Video
Tim Carter discusses what you need to think about before you install flat 2 x 4 blocking in between floor joists when using plywood that's NOT tongue and groove.
For more DIY Shed building tips and information and to purchase the actual plans for the shed in this video, click the following links:
SHED PLANNING: https://www.askthebuilder.com/how-to-plan-a-shed
SHEDS for STORAGE: https://www.askthebuilder.com/storage-sheds
GARDEN SHEDS: https://www.askthebuilder.com/garden-sheds
SHED RAMPS: https://www.askthebuilder.com/shed-ramps/
ACTUAL SHED PLANS: http://go.askthebuilder.com/plans
DIY Shed AsktheBuilder Floor Joists Complete Wide Shot Video
Tim Carter stands on top of the completed floor joists showing progress on the job.
For more DIY Shed building tips and information and to purchase the actual plans for the shed in this video, click the following links:
SHED PLANNING: https://www.askthebuilder.com/how-to-plan-a-shed
SHEDS for STORAGE: https://www.askthebuilder.com/storage-sheds
GARDEN SHEDS: https://www.askthebuilder.com/garden-sheds
SHED RAMPS: https://www.askthebuilder.com/shed-ramps/
ACTUAL SHED PLANS: http://go.askthebuilder.com/plans
DIY Shed AsktheBuilder Joist Hanger Nails and Screws Video
Tim Carter shows the special nails and screws you use to install joist hangers. NEVER use roofing nails! Roofing nails are not structural fasteners.
For more DIY Shed building tips and information and to purchase the actual plans for the shed in this video, click the following links:
SHED PLANNING: https://www.askthebuilder.com/how-to-plan-a-shed
SHEDS for STORAGE: https://www.askthebuilder.com/storage-sheds
GARDEN SHEDS: https://www.askthebuilder.com/garden-sheds
SHED RAMPS: https://www.askthebuilder.com/shed-ramps/
ACTUAL SHED PLANS: http://go.askthebuilder.com/plans
DIY Shed AsktheBuilder Joist Hanger Secret Tips Video
Tim Carter shares a few secret tips about installing joist hangers.
These tips help you get the top of the joists flush with the top of a beam, allow you to deal with cupped joists and a secret tip about cutting the correct length of the joist.
For more DIY Shed building tips and information and to purchase the actual plans for the shed in this video, click the following links:
SHED PLANNING: https://www.askthebuilder.com/how-to-plan-a-shed
SHEDS for STORAGE: https://www.askthebuilder.com/storage-sheds
GARDEN SHEDS: https://www.askthebuilder.com/garden-sheds
SHED RAMPS: https://www.askthebuilder.com/shed-ramps/
ACTUAL SHED PLANS: http://go.askthebuilder.com/plans
DIY Shed AsktheBuilder Floor Joist Layout Video
Tim Carter, demonstrates how to get the floor joist layout perfect for 16-inch on center floor joists.
The first joist away from the edge is the critical one. Once you have this one spaced correctly, then all the others are 16 inches on center from that one.
For more DIY Shed building tips and information and to purchase the actual plans for the shed in this video, click the following links:
SHED PLANNING: https://www.askthebuilder.com/how-to-plan-a-shed
SHEDS for STORAGE: https://www.askthebuilder.com/storage-sheds
GARDEN SHEDS: https://www.askthebuilder.com/garden-sheds
SHED RAMPS: https://www.askthebuilder.com/shed-ramps/
ACTUAL SHED PLANS: http://go.askthebuilder.com/plans
DIY Shed AsktheBuilder Deck Corner Brackets Video
Tim Carter shows how to use a deck corner bracket to reinforce a corner when connecting deck joists with a band board. The same is true for a suspended wood floor system.
For more DIY Shed building tips and information and to purchase the actual plans for the shed in this video, click the following links:
SHED PLANNING: https://www.askthebuilder.com/how-to-plan-a-shed
SHEDS for STORAGE: https://www.askthebuilder.com/storage-sheds
GARDEN SHEDS: https://www.askthebuilder.com/garden-sheds
SHED RAMPS: https://www.askthebuilder.com/shed-ramps/
ACTUAL SHED PLANS: http://go.askthebuilder.com/plans
DIY Shed AsktheBuilder How to Straighten a Beam Video
Tim Carter demonstrates how to use an offset string to get a wood beam perfectly straight.
For more DIY Shed building tips and information and the actual plans for the shed in this video, click the following links:
SHED PLANNING: https://www.askthebuilder.com/how-to-plan-a-shed
SHEDS for STORAGE: https://www.askthebuilder.com/storage-sheds
GARDEN SHEDS: https://www.askthebuilder.com/garden-sheds
SHED RAMPS: https://www.askthebuilder.com/shed-ramps/
ACTUAL SHED PLANS: http://go.askthebuilder.com/plans
Bathroom Remodel Sequence
DEAR TIM: Last week you talked about a removing a shower floor in a project you’re doing. I have a big bathroom remodel project I’m about to start but I’ve never done one before. I don’t know when to do what and am worried about wasting time, materials and causing damage to finished surfaces. Is there a universal bathroom remodel sequence so I know when I should be doing what work? I’m sure you’ve done lots of remodels and any other tips you can share would be appreciated. Madelyn J., Morgan Hill, CA
DEAR MADELYN: Yes, I lost count of the bathroom remodels I’ve done over the years. Back in the day when I was deep into remodeling for paying customers, I can remember quite a few of the jobs. I was talking to my son the other day and told him that we could completely gut a bathroom to the stud walls and have it back in service in 12 days or less when everything went as planned.
You’re correct in thinking there’s a recommended sequence of events that needs to happen in a precise order. This ensures a bathroom remodel project moves ahead as fast as possible yet no one contractor has to endure a hardship because of the work put in place by another trade or subcontractor. This applies even to DIY folks like you who don’t need any additional aggravation while you’re trying to do the work at nights and on the weekends.
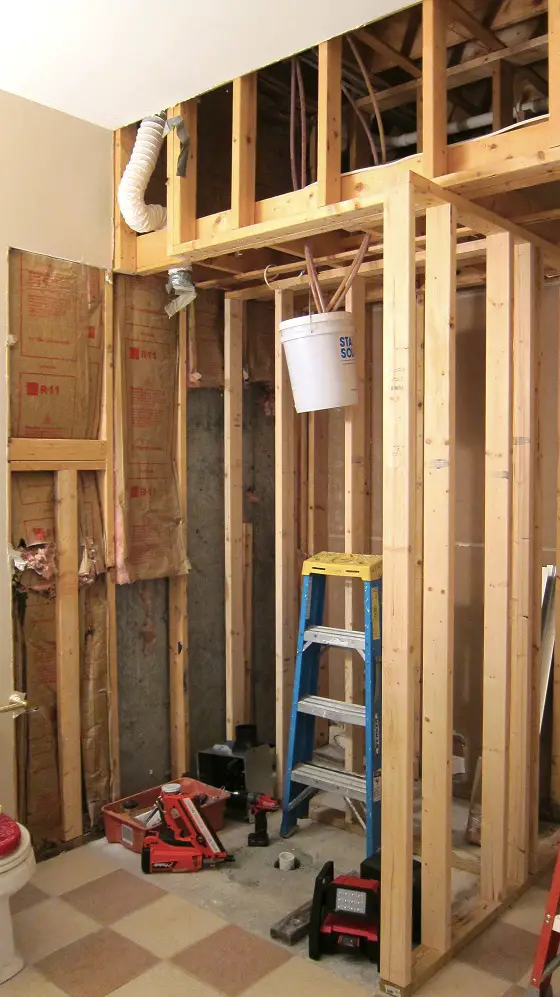
This bathroom is undergoing a major remodel. Each step must be done at the right time to minimize cost and get the job done fast. Photo Credit: Tim Carter
I often feel the best way to think of a bathroom remodel is to think about the sequence when one builds a new home. With almost every remodel, you need to do demolition work. That’s the first phase as you need to remove all the things that are going to be replaced. This phase is nasty work and I recommend you get this behind you as fast as possible.
Once you’ve gutted the bathroom, it’s time to make any repairs to the wood subfloor that may have happened by water leakage. It’s also time to do any other wall or ceiling framing where you use wood or metal studs. Get all of this wood framing complete before you do anything else.
Be sure you have all of the diagrams of all the plumbing fixtures, medicine cabinets, light fixtures, towel bars, etc. so you put the wood studs and blocking in the correct location. I’ve seen many a rough carpenter put a wall stud directly in the way of where a tub and shower faucet is going to be. Don’t make that same mistake.
The next phase of work is your heating and air conditioning. This work should be coordinated with the plumber as well. If your home has forced-air heating and cooling there may be ductwork changes. It’s always much harder to work with large objects, such as 6-inch metal ductwork, than with small things like 1/2-inch water supply lines.
For this reason, the plumber and electrician need to yield to the HVAC installer. However, the plumber also has very tight constraints as certain large pipes can only go in one place. This is why the plumber and HVAC man should meet at the job site and discuss what they need to accomplish so they don’t get in each other’s way.
Once the heating and cooling rough-in work is complete, it’s time to bring in the electrician. It’s very easy for an electrician to place his flexible wire where it needs to be. Some cities require the wires to be in metal conduit, but even this is easier to install than a 3-inch PVC toilet drain or a 1.5-inch sink drain pipe!
Be sure your light fixtures don’t interfere with any mirrors, opening medicine cabinet doors, etc. I’ve seen electricians install wall sconce boxes way too close to mirrors. All of this has to be thought out long before the electrician shows up to work and nail in boxes.
After the electric is complete and you’ve passed all your mechanical inspections, you need to make sure your bath fans are vented properly with metal pipe. Don’t make the mistake and use that wretched flexible pipe that looks like a plastic-covered slinky toy.
With all this work done, it’s time to insulate, install a great high-performance vapor barrier on any exterior walls and then drywall. The finished floor happens next followed by any finish carpentry trim work. You’d then will probably paint the walls and ceiling and then install the toilet, vanity, countertops and faucet.
In certain instances, I often decide to paint the walls and ceiling before I do the finished floor. It all depends on the job. The last thing you want is to spill paint on finished floor and believe me, accidents can and do happen.
I feel the biggest tip I can offer up is to plan, do more planning and go over the plan a third time. You need to make sure everything is going to work and there are no conflicts with fixtures. If time is of the essence and you don’t want delays, then get all finished fixtures at the job site and open them up. Be sure everything is perfect and there’s no concealed damage.
Column 1139