How to Clean a Wooden Picnic Table

wooden picnic table cleaning and sealing

How to Clean a Wooden Picnic Table - I cleaned this weathered picnic table using oxygen bleach. A gray semi-transparent sealer will protect it for maybe three years. Copyright 2026 Tim Carter

How to Clean a Wooden Picnic Table - Oxygen Bleach

Two weeks ago I was cleaning the top and bench seats of one of ten picnic tables that can be found on the beach here in my HOA. I live on the shore of Lake Winnisquam in central New Hampshire, and the tables are exposed to harsh sunshine from sunrise until late afternoon. The ultraviolet (UV) rays from the sun punish the treated-lumber tables.

All of the tables were in sad shape. I had gone to the beach a week before with my granddaughter to swim. One of the HOA board members introduced himself to me, and we began a discussion about many of my observations about the community.

I was sitting on one of the tables and said, “Here’s another example of my frustration. The management company we’re paying to take care of the HOA’s assets is making mistake after mistake in my opinion. They’re either ignoring the tables, or they don’t know how to properly care for them so they last for decades. It seems they just treat many things around here like disposable razor blades instead of trying to preserve things with periodic maintenance.”

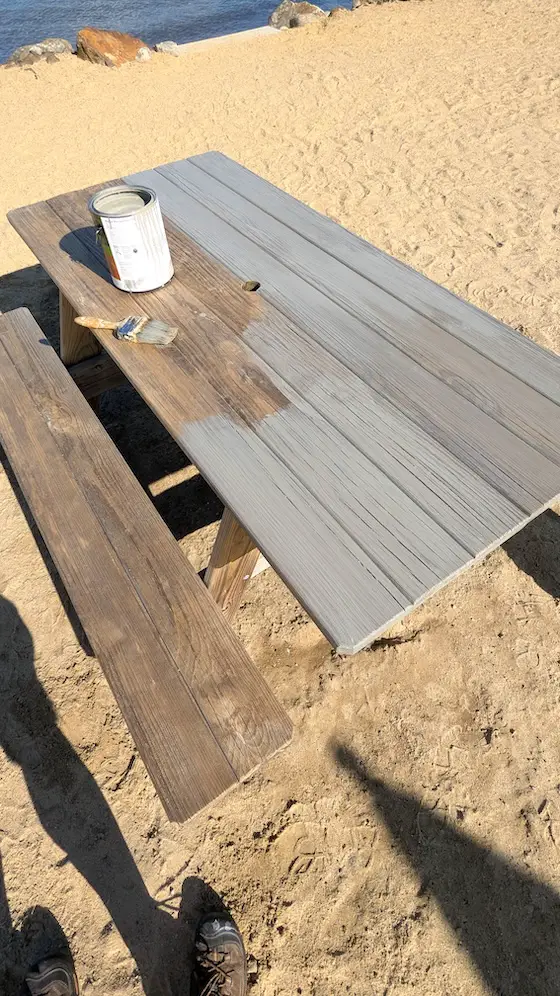
I talked about the common misconception that treated lumber requires no care. I looked down at the table, and the wood was battleship gray, cracked, and mildew was present everywhere. “I can assure you that treated lumber requires constant care, or otherwise it will end up looking like a 50-year-old fishing pier,” I replied.

dirty picnic table

This is what the picnic table looked like before cleaning it with oxygen bleach. Copyright 2026 Tim Carter

I then offered to do an experiment for the board. “How about I clean the top and benches of just one table, and then seal the wood with a gray pigmented sealer? Those horizontal surfaces are in the worst shape. The carriage structure underneath is in great shape. It’s just a lighter shade of gray caused by the sun’s UV rays.”

Oxygen Bleach is Best

The board member shared my offer with the other board members. They thought the idea of free labor couldn't be beat. A week later, the board president dropped off a gallon of wood sealer I had selected. I provided the wood cleaner at my own expense.

I’ve cleaned exterior wood for decades. It’s been my experience that I get the best results working in the shade. This allows the water-based cleaner to work on and in the wood with minimal evaporation. I never pressure wash exterior wood to get rid of old stain and UV-damaged wood fibers.

Pressure Washers are the Worst

Pressure washing is very destructive to wood. The high-pressure stream erodes the lighter-colored soft spring wood that’s found between the dark grain bands of summer-wood. I prefer to use a special oxygen bleach powder that I’ve made for decades. You mix this powder with warm water, and stir it until it’s dissolved. Once dissolved, you can place this solution in a garden hand-pump sprayer to apply to any horizontal or vertical wood with ease.

I allow the oxygen bleach solution to bubble and fizz for about ten or fifteen minutes. I’ll add more solution if the wood is in such bad shape that the initial spray soaks into the wood. You want the solution to puddle on the wood so it deep cleans it.
picnic table being cleaned

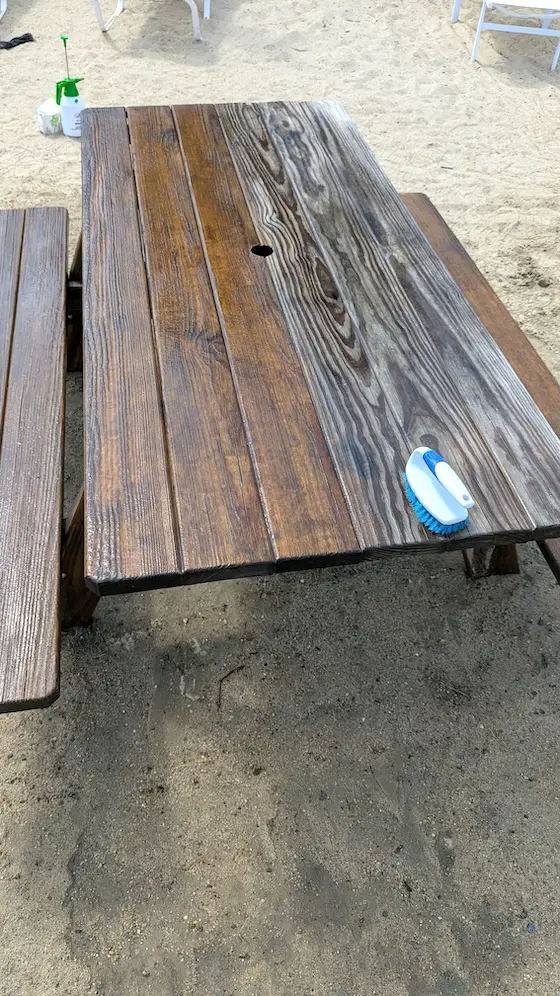
The left side of the table is clean. Note the rich brown wood color. Oxygen bleach is the BEST cleaner. Copyright 2026 Tim Carter

I scrub the wood with a standard nylon scrub brush once the dwell time period is up. I’ve found adding a little bit of clean water while scrubbing produces the best result with minimal labor. Within minutes, the attractive natural brown wood color of the wood reappears. I rinse the wood with a generous amount of clear water to remove all the old sealer, dirt, and sun-damaged wood fibers.

Some people and websites say to use chlorine bleach as the cleaner. This is the worst possible advice. Chlorine bleach, or sodium hypochlorite, is so aggressive it will destroy the natural color of the wood. It also breaks down the lignin that holds the wood fibers together. Chlorine bleach can also kill any nearby vegetation or expensive landscaping.

I picked the perfect day for the experiment. A moderate breeze was blowing off the lake. This dried the clean wood in less than 90 minutes. Normally I’d wait twenty-four hours before I’d seal the wood. I like the wood to be completely dry so the water-based sealer soaks in as deep as possible.

clean picnic table

The top and bench seats are clean. The table is just about dry and ready for sealer. Copyright 2026 Tim Carter

I went home to retrieve the sealer and took a break, drinking a large glass of iced lemon-lime water. There was plenty of time before dinner, allowing me to apply the sealer to the table. I also knew no other HOA members would be down at the beach at that late hour.

I used a gray pigmented water-based sealer. The pigments act like sunscreen, blocking the UV rays from reaching the wood. The gray color was a close match to the gray-colored wood of the table undercarriage.

A wide 3-inch brush allowed me to get the sealer into the cracks. The table was in such bad shape that the first coat soaked into the wood immediately. Minutes after finishing one board, I went back and applied a second coat.

The finished product looked great. The HOA board members were very happy with the test result. The week after Labor Day, a handful of volunteers and I will do a blitzkrieg job of cleaning and sealing the other nine tables so they’re ready for next season.

clean and sealed picnic table

This is the table after the sealer was applied. What a big difference! Copyright 2026 Tim Carter

Column 1677

Septic System and Leach Field

septic system leach field

This is a very unique septic system installation. You can drive a car on top of the leach field! Copyright 2026 Tim Carter

Septic System and Leach Field

I’m willing to bet you an Aglamesis two-step hot-fudge sundae made with mocha-chip ice cream that you give very little thought to the many holes you use each day in your home. I’m talking about the holes at the bottom of your tub, shower, vanity sink, kitchen sink, toilet, and washing machine drain.

The things you put in all those fixtures just disappear into the holes, and you don’t give them a second thought. The truth is, you should care. I have to admit that for many years I didn’t care what I was putting into my house sewer. I felt the city sewer department would take care of things.

Your home may be connected to a city sewer. That was my reality for fifty-five years in the different homes I occupied in Cincinnati, Ohio. That all changed when I moved to rural central New Hampshire eighteen years ago. My new residence was connected to a septic system on my own lot.

Septic tanks are mysterious and magical. While you may never have seen the inside of one of these dank chambers, you have enough life experience to know how they work. Think about animal waste you’ve seen in lawns. Think about a compost pile you may use to recycle food waste from your kitchen.

A septic system in almost all cases consists of two components: the tank and the leach field. The sewer line from your home connects to one end of the septic tank. Inside the tank, there may be different chambers or baffles that work to help separate and break down the waste you inject or flush into the tank.

Let’s go back to the animal waste you may see on a hike or in someone’s lawn. The waste starts to decompose almost immediately. In hot, dry weather, it doesn’t take long for it to lose moisture. Insects work on it, and soon the feces has broken down to almost nothing. Within a short time, it completely disappears.

The same thing happens in a septic tank. While disgusting, you can see what happens inside a septic tank by just observing what happens in your own toilet. All you have to do is not flush a bowel movement. Come back to the toilet in a few hours, and you’ll notice the still water in the bowl has changed color while your body waste is starting to fall apart on its own in the bowl.

It’s important to realize that you should just put body waste, low-grade toilet paper and a minimum of small food waste into a septic tank. Never allow paint, other chemicals, grease, etc. into a septic system. The bacteria in your waste and the food will do an excellent job of breaking down the waste in the tank if you follow those rules.

When the septic tank is filled, each time you allow water and waste to enter the tank, an equal amount of treated wastewater leaves the tank through another pipe. This liquid contains microscopic dissolved waste. It travels into a buried distribution box. This box is about the size of a piece of luggage.

The distribution box divides the wastewater up and sends it into two, three, or four other pipes that extend out into the leach field. The pipes in the leach field are perforated. The wastewater slowly seeps through the holes down into a thick bed of sand under the pipes.

Bacteria and organisms in the sand and soil beneath the leach field consume the microscopic waste that’s in the water. It’s simply amazing when you think about it, but it’s no different than what happens to that bear scat you might have seen while on a hike in a state or national park.

Septic systems cost many thousands of dollars to install. This is why you want to treat one with the utmost respect and care. Should you send all the wrong things into your septic system, they’ll end up in the leach field. The leach field can’t handle car oil, extreme amounts of grease, latex paint, chemicals, etc. You’ll end up having to dig up and rebuild the leach field.

You should do the same thing if connected to a city sewer. Don’t succumb to the marketing claims of flushable wipes. These can clog your sewer pipes. They cause massive headaches for city sewers and the sewer plant pumps.

I recorded a video about seven years ago showing what really happens when you flush these wipes down a toilet. I urge you to watch it. Doing so might save you thousands of dollars. You can view just below:

Column 1676

New Home Products List

attic roof rafters

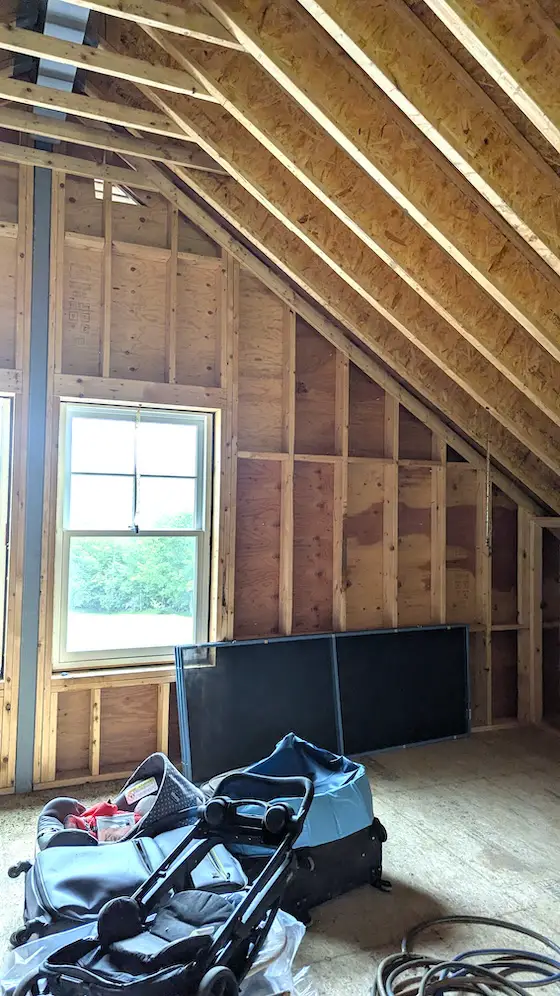
This massive garage attic is going to be finished into a studio apartment. The contractor needs to know all of the products you intend to use to ensure his bid is correct. Copyright 2026 Tim Carter

New Home Products List - Over 100 Things to Select

You can get a new home product list here. 

A few days ago I drove through Franconia Notch on the west side of the White Mountains of New Hampshire. I was on my way to do an in-person consult for a retired gentleman. I left an hour early to treat myself to a full stack of blueberry pancakes drenched in real maple syrup. It turns out this man’s house was just a few miles from Polly’s Pancakes, a treasured New Hampshire restaurant with a rich heritage of delicious breakfast comfort food. I wasn’t disappointed!

The purpose of the consult was two-fold. The homeowner was concerned about cracks that had appeared in 10-foot-tall 6x6 vertical wood deck posts. He was relieved when I shared that the cracks did not affect the structural integrity of the deck.

The posts were just squared-off sections of the actual tree trunk. Think of a tree trunk as a mass of very tiny cocktail straws packed tightly together. Imagine if the post had been created by stacking four separate 2x6s next to one another. The strength would be identical even though the four 2x6s are not glued or screwed together. If these 6x6s had been horizontal beams supporting significant concentrated loads, he would have had a serious structural issue.

The cracks were normal shrinkage cracks. I recommended that he fill them to prevent future water infiltration. Water entering the cracks would just make them worse over time. I suggested he fill them with a high-quality wood epoxy that I’ve used for years. The epoxy will do a marvelous job of filling the crack and staying put.

Summer is the driest part of the year in New Hampshire. The cracks are their widest at this point. I recommended he fill the cracks now so rain can’t get into the wood and cause the wood to swell. Wood is hygroscopic and swells and shrinks in response to its moisture content. I have a video on my AsktheBuilder.com showing how I used this magic epoxy to fill cracks in a decorative roof wood beam.

Watch this video to see how to mix and apply this wood epoxy to exterior wood.

Go here to watch the video: https://go.askthebuilder.com/woodrot

Don’t forget to type the word go followed by a period before askthebuilder.com.

The homeowner then walked me back to a large garden shed. He wanted my opinion on how it was built. Everything was perfect. In fact, besides the shed I built for myself twelve years ago, it was the best one I’ve ever seen. All the framing members were stacked on top of one another, and the carpenter had even installed metal connectors to ensure the roof rafters would not get pulled up and off the walls in a windstorm.

The man wanted my opinion because he was thinking about using this same contractor to finish off a huge unfinished space above his massive garage. The finished space could be rented out, or a future caregiver could live there. I told the homeowner the contractor could be counted on to do a great job.

The last thing the homeowner did was hand me a three-page proposal put together by the contractor. It described what he intended to do to finish the space. My job was to read the proposal and report to the homeowner if it was safe to sign it.

I read the proposal and felt there were too many things left to chance. Nowhere in the document had any materials or products been described or mentioned. I feel an oversight like this is what leads to cost overruns, arguments, and missed deadlines. Understand there had yet to be a plan drawn up as to what the space would look like once complete.

I suggested to the homeowner that he start to take the time right now to select each and every finish item that would be used in the project. For example, think of all the finish items in just the bathroom! What kind of towel bar? How many? Where exactly will they be so solid blocking can be put in the walls?

What kind of toilet would go in? What brand and model? Would it be a low-quality one from a home center, or a high-quality brand name you can count on? What about the shower and vanity faucets? What type of shower stall will go in? Your contractor needs to know all of these things, and more, so he can order them on time and bid the correct amount to install them. This avoids delays, possible change orders, and arguments.

Here’s a story from my past to drive home why this is important. Years ago, I built a room addition for a client. I bid on installing a standard tubular lockset in the exterior door. This standard knob is a stock item at most stores. It could be installed in about 20 minutes. I sent the customer to a specialty hardware store to pick out the lockset.

She didn’t come back with one. She instead purchased a special-order mortise-type lockset. The lockset would take a month to arrive. A mortise lockset requires hours of time to install if you don’t own a special tool to create the deep and precise rectangular mortise in the edge of the door. The homeowner refused to pay me for all the extra time it took to install it.

I decided to create a helpful spreadsheet of most everything you need to select when you decide to build a home, a room addition, or remodel a kitchen or bath. You can purchase this very thorough checklist from me for only $9.95. It forces you to make all selections early in the planning process. Go here to get it:

http://go.askthebuilder.com/products

Column 1675

Subway Tile Backsplash Kitchen

subway tile backsplash kitchen

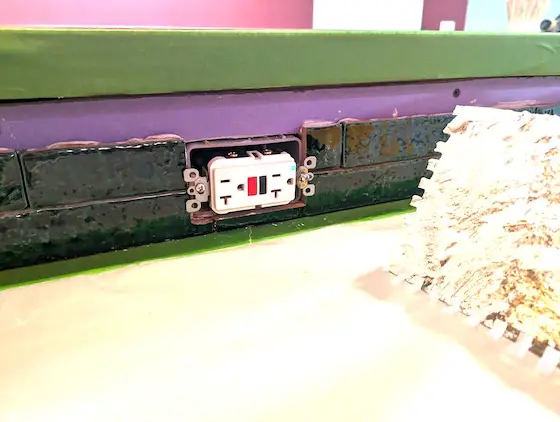
Stunning crackled subway tile is being installed for this speakeasy backsplash nested between two solid walnut countertops. The expensive walnut is protected with painter's tape and plastic. Copyright 2026 Tim Carter

Subway Tile Backsplash Kitchen - Harder Than You Think

I’ve had the enormous pleasure over the past months to pass down hard-earned knowledge to my son about many aspects of construction. He and I are working together to finish the basement in his new home that he purchased four years ago. Ask my sweet wife and she’ll tell you that it’s always been my dream to help my kids build or improve their homes.

Last weekend it was time to install a small amount of gorgeous green crackled subway tile in his speakeasy. This 6-inch-high ribbon of tile is sandwiched between two solid walnut countertops. You might think this is a ho-hum job that requires minimal skill. I’d wager you’d be wrong.

I knew months ago we’d be installing this unique, long, rectangular tile. My decades of tile installation experience guided me when I framed the 41-inch-tall wall that created the foundation for the bar. This wall had to be both level and perfectly straight. The bottom and top 2x4 wood plates that I used were selected with care. Not only were both perfectly straight, I made sure they were cut from the center of the tree so they’d stay straight. The vertical studs were also perfect.

Ceramic tile, while quite strong in compression, is very weak in tension. Tension is a force that causes things to pull apart or stretch. Install tile over a low spot or a hump and when you press on it, you’ll cause it to want to stretch. This results in a cracked tile. I’ve done autopsies on cracked floor tile on consult jobs. Each time you lift the tile you can see where the adhesive never made contact. There was the slightest hollow spot under the tile. As soon as you walk on this tile or put a concentrated load on it, the tile cracks.

It’s rare to apply much pressure to a backsplash, but I didn’t want to take any chances. Nor should you. Take the time to make sure any surface you apply tile to has no humps or low spots in it.

I had two choices when it came to adhesive. I could use organic mastic or thinset. Organic mastic is premixed and has the consistency of peanut butter. It’s not a bad adhesive, but I think thinset has distinct advantages.

Thinset is a blend of Portland cement, fine silica sand, and sometimes a few additives. It comes dry and you mix it with water to the consistency of a delicious applesauce. The thinset transforms to a solid as the water reacts with the Portland cement. The growing microscopic crystals of cement create a tenacious bond between the tile and whatever you apply the tile to. The thinset is so sticky, it will adhere to smooth metal like epoxy. You’ll discover this when you don’t clean your trowels and tools after using them to spread the thinset! Don’t allow thinset wash water to drain into plumbing. Do all washing outdoors.

I made sure the back of the tile and the half-height bar wall were dust free. Dust will interfere with the bond of both organic mastic and thinset. It only takes minutes to brush the dust from the wall. The high-quality tile was dust free out of the box. This is not always the case, so make sure your tile is clean.

I only mix enough thinset that I can use in an hour. I’ll use ice-cold water if it’s a hot day. I’ll even refrigerate the dry thinset the night before to do all I can to keep the mix cool or cold. This retards the chemical reaction that transforms the plastic thinset into a solid. Should you find your thinset getting hard in the bucket, do not re-temper it with more water. Discard the thinset and mix up new. The added water will weaken the thinset and remixing it breaks millions of crystal bonds that won’t reform.

You’ll probably need to make L-shaped cuts in a tile or two. These cuts are required to get tile to fit around electric outlet and switch boxes. I use a diamond wet saw to make my cuts. You can use a dry-diamond blade on a hand-held grinder tool, but it creates clouds of dust. Do this cutting outdoors and wear a high-quality mask to prevent ingesting any dust that very likely contains silica.

You’ll discover an assistant is very useful. This person can be cutting tiles while you install them. Mix smaller amounts of thinset if you’re working solo. You’ll be stunned how much time you spend measuring and cutting the tiles as opposed to installing them.

I prefer to use a 1/4 by 1/4-inch square notched trowel to apply the thinset to the back of the tiles or the wall surface. I had to apply the thinset to each tile one at a time because the backsplash was just 6 inches tall. There simply wasn’t enough room to use the trowel in this narrow channel.

I hold the trowel at a 45-degree angle as I remove the excess thinset. It’s vital you make sure the thinset is under the tile where a tile abuts an electric box. This is especially true were the metal ears of the outlet or switch rest on top of the tile. You need to be sure there’s not a hollow spot under the tile at these locations. Should you over tighten the screws that hold the switch or outlet in place, the tile may crack without support beneath it.

Grouting the tile requires vast amounts of skill. Many DIYrs ruin a tile job because they think they know how to grout. I have a detailed 4-part video series on my website that shows you exactly what to do. You can watch all of them here: https://www.askthebuilder.com/grout-floor-tile-video-series/

Column 1674

Plumbing Access Cover

hole in ceramic tile wall copper water lines

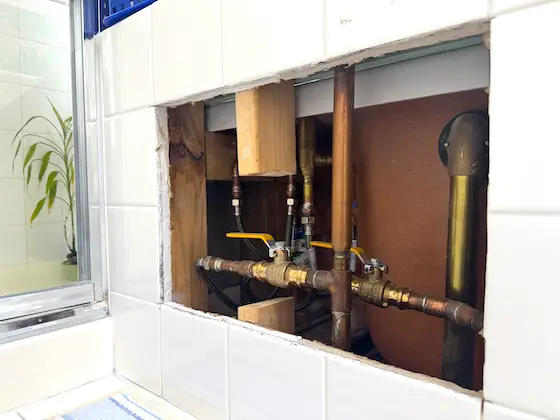
This short wall is next to a tub. A plumber cut out the tile to install a new faucet. The homeowner requested my help to design a decorative plumbing access cover. Copyright 2026 Tim Carter

Plumbing Access Cover - Be Creative & Get a Woman's Input

I had the most interesting thing happen to me in the past few days. I made a great new friend with a doctor who hired me to solve a vexing problem in his wife’s bathroom. Within hours of first making contact with this retired Chicago cardiologist, I felt as if we were best friends from college days. This doctor is a regular reader of my column in the Chicago Tribune.

This is a two-part column. The first part is about how I made his wife very happy. The second part is about you and how you might start to do what this good doctor did.

Years ago, the doctor and his wife built an addition on their home. They had enough space to do something that I feel many would love. They created his and hers bathrooms. The wife’s bathroom has a wonderful soaking tub, complete with massaging jet sprays.

The builder and plumber, however, made a common error. They didn’t provide an access panel allowing one to switch out the tub faucet and tub drain assembly. These are hidden inside a short wall about 30 inches tall covered with white ceramic tile.

Architects of old went to great lengths to provide access panels. I grew up in a house where the clever architect put the access panel for our vanity sink in a small hall closet. The access panel for the tub and shower was in a bedroom closet. Access panels have already transformed from history to legend. Years from now they may be mythical.

The tub faucet needed to be replaced. A plumber exercised great care and cut out a rectangle of tile in the center of the short wall. He salvaged the tile in case it was to be reinstalled.

The plumber also installed two new shutoff valves in this low wall. The valves and hole needed to be covered up. The issue the doctor faced was how to do this so that his wife would be pleased with the outcome. I knew I could achieve the goal. I wanted the doctor’s wife to smile each time she looked at this tile wall, not grimace.

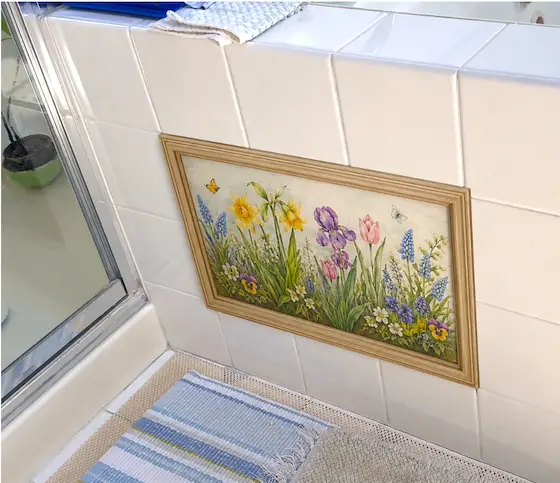
My solution was simple. I asked the doctor about the things his wife liked, including colors, hobbies, etc. He replied, “…she likes flowers and plants.” Bingo. I decided the best way to cover the gaping hole in the wall is with a painting of spring flowers and plants - flowers that happened to be her favorite ones.

You’ve heard me rail against artificial intelligence (AI) in past columns. There are some instances where I find it useful, and this was one. I used a photograph the doctor sent to me of the opening in the wall and asked ChatGPT to cover the hole with a framed painting of spring flowers and plants. The doctor’s wife loved my idea after looking at the image the AI engine created.

plumbing access cover

I used ChatGPT to create this image of the plumbing access cover. My prompt was, "Cover the hole in the tile with a framed painting containing a mixture of spring flowers."

The painting would be mounted to the tile using a French cleat. A handyman can install the cleat on the painting and inside the opening in about an hour. It’s a very simple job.

Expert Service Problem - You Could be Getting Ripped Off

The doctor had read a very interesting article in the New York Times about expert service problems. He sent me a copy of the article before I shared my solution with him on our phone call.

I’d venture to say you’ve been in a compromised spot a time or two. You have an issue at your home or condo and call one, two, or three contractors to get bids. Can you see what the problem is before I go any further?

The experts, or contractors, are now the ones providing you with a solution that may or may not be in your best interests. After all, do you know if the inside of your furnace is really dirty? Is it necessary to have it cleaned? Do you know the real difference between the types of asphalt roofing shingles? Is one really better than another, or are you paying extra money for very little extra benefit?

Your best protection comes from a person who doesn’t have a dog in the fight. This person might also bring to the table innovative solutions to problems, as I did for the doctor. The doctor’s plumber and handyman knew they had to create an access panel, but they fell far short when it was time to tackle the job with a tasteful solution that would satisfy the doctor’s wife.

The doctor and I had a very interesting back-and-forth email exchange about the article. He shared with me, “You combine excellent technical knowledge and experience with a good aesthetic sense…You are an antidote to the expert service problem. Additionally, as you often point out in your columns, the experts are often not so expert.”

Earlier, I shared with the fine doctor that all too often homeowners reach out to me to extract them from horrible situations where they had depended on experts. I said, “It’s such a shame that homeowners don’t do what you did. You knew you were facing an issue and decided to get expert advice about the access panel before a contractor created an ugly one your wife would hate.”

CLICK HERE to have me solve your problems.

My advice to you: Stop and get great advice from someone who doesn’t have a dog in the fight. It’s the best money you’ll spend on your next project. I guarantee it.

Column 1673

Honey Do List Examples

clogged dishwasher spray arm

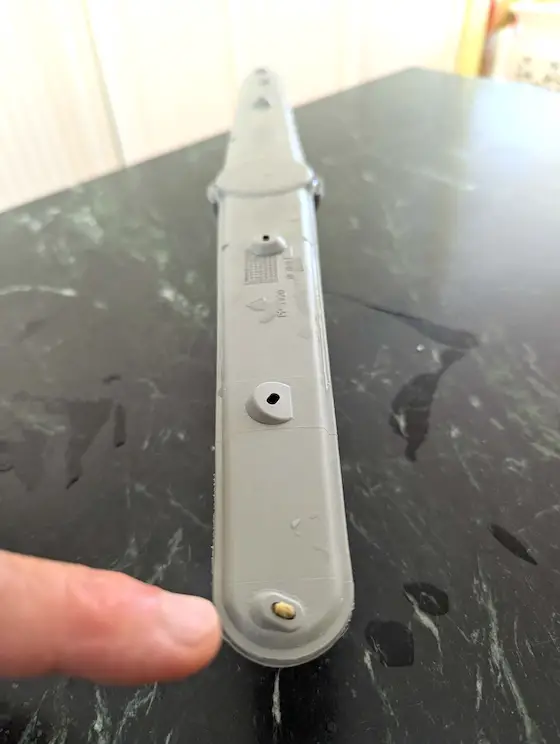
When was the last time you checked your upper and lower dishwasher spray arms for blockages? Mine had a lemon seed blocking one of the ports. Copyright 2026 Tim Carter

Honey Do List Examples - There are So Many!

The honey-do list at my home never seems to get smaller. Each time I complete a task, another one or two gets added to the list. Just last week I had to replace two ceiling light fixtures in a bathroom. The electronics in them went bad, and they started to blink on and off. My wife was not too happy about this unwanted light show.

You can do many, many of the things in your home that require periodic maintenance. You’ll end up saving thousands of dollars over time. You’ll also build your confidence to tackle projects that currently intimidate you. Remember, I’m a phone call away to coach you through hundreds of repairs.

Clogged Dishwasher Spray Arm

Let’s start with your dishwasher. Have you noticed dishes aren’t getting as clean as they once did? I had this happen to me last month. A rookie might have this happen if they don’t put the dishes in the machine correctly. I washed dishes professionally many, many moons ago, so I knew my problem was in one or both of the spinning spray arms.

These plastic arms come out with ease. You may have to pinch latches that are on the sides of the central shaft. I could see a blockage right away in the lower arm. A lemon seed was blocking the port at the end of the arm. There was other debris blocking two ports on the upper spray arm. I used a dental hygienist pick to pry out the seed and debris. Mine has a hooked end that snared the debris with ease.

While I was at it, I cleaned out the primary and secondary filters in the bottom of the dishwasher. The fine-mesh one can get clogged with grease. Your glassware starts to look cloudy when this happens. An appliance repair person or plumber might have charged $250 to do what I did in ten minutes.

Oil Garage Door Parts

When was the last time you oiled your garage door rollers? A garage door is the largest mechanical device in most homes. They’re heavy. Garages can be dirty and dusty places. The bearings in the rollers can take a beating. Squirting oil from a can or spraying from an aerosol can takes just minutes.

Be sure to place a piece of scrap cardboard under the metal track the rollers ride in. Close the door immediately after you oil the rollers. This forces any excess oil to drip onto the pieces of cardboard where the track touches the concrete. If you oil the rollers and open the door, the oil can drip all over the floor, on your car, or in your hair if you have any.

Oil Door Hinges

While you have that small can of oil out, it’s a great idea to oil the hinges of your most-used doors. I feel it’s best to do this by tapping the hinge pin up just 1/4 inch. The tip of the oil can can then reach the pin shaft. You just need one or two small drops for each hinge pin. Be sure to put another piece of cardboard to catch drips that may show up hours later. Place the cardboard under the lowest hinge and leave it there overnight. Tap the hinge pin back down after you’re finished.

Clean Dryer Vent - Prevent FIRES!

How about your dryer vent? When was the last time you checked to make sure your dryer vent pipe is not clogged with lint? You do remove the lint from the filter after each load, right? I found out friends of mine don’t do this. The husband said to his wife, “Honey, sometimes there’s enough lint in the filter to make a blanket!”

Many fire department captains will tell you that dryer fires are more common than you’d ever imagine. This task may only take you twenty minutes, and it could be life-saving at the same time.

Blow Dust from Smoke & CO Detectors

Did you know your smoke and carbon monoxide detectors can develop a pesky habit of false alarms? This is common when the sensor gets a coating of fine dust on it. This happened to my son and daughter in the middle of the night not too long ago.

My son has a battery-powered hand-held leaf blower. I told him to aim the nozzle about a foot from the detectors and blast them with air. He did this, and the false alarms stopped like a car with brand-new brakes.

When was the last time you removed the sediment and lime buildup from your faucet aerators? It’s easy to unscrew these from the end of your kitchen and lavatory faucets. Be sure the rubber or plastic washer comes out when you do this. Sometimes they stay nested in the end of the faucet.

Carefully clean the aerator. You may have to disassemble it to get all the sediment out. Lime and hard-water deposits can be removed by soaking all the parts in warm white vinegar for a few hours. You can get exceptional results using a 30-percent solution of concentrated white vinegar. This can be found at most home centers. This vinegar kills weeds in hours if you want to start working on your outdoor list!

Column 1672

Lose Money Building a House

new home framing no roof yet

Building a house like this may seem simple. Even a simple bathroom or kitchen remodeling job can be complex, causing you to pull out your hair and have all your marbles fall out. CLICK HERE to set up a phone call with me so that doesn't happen. Copyright 2026 Tim Carter

Lose Money and Your Marbles Building a House

I started writing this syndicated column in October of 1993. My goal back then, and still is, to do whatever possible to save you money and maintain your sanity while navigating a large or small project like building a new home or even a small five-day bathroom remodeling job.

The following true story should tattoo on your brain the importance of having all your ducks in a row before you even think about calling up contractors for bids or, God forbid, you sign a contract!

One morning, just about two years ago, my phone rang. I created a custom ringtone that sounds out in Morse code the word CALL. A man who lived two thousand miles away needed help with a foundation drain issue. He was in the early stages of building a new home up in the Front Range of the Rocky Mountains.

He discovered I was a drainage expert, and I was able to solve his problem in just ten minutes. This man was so impressed he called me back and asked if I could be his sounding board as he advanced deeper into the project. I agreed.

My first request was for him to send me the plans and specifications for the house. “I’ve got some plans, but there are no written specifications,” he said. He emailed me the plans that night. He also sent a set of photos. I gasped as I studied them.

I soon discovered this man was rebuilding an existing home. He and his wife had demolished a home, but they decided to build on top of the existing foundation, thinking they’d save money. This foundation had a massive top-to-bottom crack in it. The top of the foundation was 5 inches out of level.

The plans he sent were incomplete. They were missing a large laundry list of details and dimensions. I would consider them to be just a small step above what I would define as preliminary plans.

I then discovered he had hired a plumber and paid him $9,000.00 in advance to install the pipes below the new basement slab. This task would have required one day of labor for two men. Even if you charged out $80 per man per hour, the labor cost would have been less than $1,500 in 2026 dollars.

The material cost was about $750.00, if that. To add insult to injury, the plumber installed a 3-inch pipe as the main building drain instead of a 4-inch pipe. The plumbing code in that state allowed this, but it’s a significant violation of best plumbing practices.

The homeowner was already deep underwater with the plumber. If the plumber decides not to show up again, the homeowner will lose over $6,500.00

The house is finally under roof and just about ready for interior drywall after all this time. Along the way, I’ve had to help this man out of a morass more times than I can remember. Several weeks ago, he was asking for advice about whether or not to install a vapor and air barrier in a vaulted ceiling in his living room.

I once again reminded him, as I had done no less than ten times, that this should have been decided back when the plans were being drawn. A detail should have been drawn showing how the roof was to be constructed in this area. Any products that might be used should have been in the written specifications.

By this time, he was filled to the brim with frustration and texted me, “You really like rubbing my nose in that. Did the best I could with the resources in my market. I have found zero people that could get to that level of specifics. Fired 2 GCs. You are one of a kind, Tim. There is no one else in North America, I believe, that knows as much as you do about this entire process. I really do appreciate what you were able to do for us. This endeavor is the worst decision of my life.”

I can assure you that this man would have never texted me the above had he taken my advice two years ago. I begged him at that time to stop the project. I told him we needed far better plans and some written specifications. I even sent him a set of boilerplate specifications I had written years before that he could use. His building experience would have been far less stressful and filled with many happy days.

He decided to barge ahead into the chaos and mayhem vortex I knew was waiting for him.

My advice to you before you start any project that takes more than three days is to develop a plan. Think things through. Develop a written list of exactly what you want. Use online photos of things you like to communicate what you want your finished project to look like.

Don’t hope things will work out. Should you do this, you’ll be making the worst decision of your life. If you need my help, I’m just a phone call away. CLICK HERE to set up a phone call with me.

Column 1671

DIY Fails

unfinished garage room addition

This room addition was started a few years ago and never completed. There are many possible reasons why this may have happened. Copyright 2026 Tim Carter

DIY Failures - How to Avoid Yours

Are you thinking of rolling up your sleeves so you can complete a large DIY project? I’m talking about one that may require hundreds, or thousands, of hours of labor. Before you do, I urge you to think about the size of the elephant you’re trying to eat. Yes, you can eat an elephant, but it’s best to do it one bite at a time, and the meal may last a few years if you’re not prepared.

I’ve done what you’re thinking about doing. I can assure you it requires extraordinary amounts of diligence, discipline, and determination to complete a long-term DIY project. The rewards are almost hard to measure. You can look at your completed job and feel enormous pride. This only happens if you finish the job, and the last 20 percent of work can often consume 80 percent of the overall time you spend. Your mental exhaustion often precedes your physical limitations.

I feel a few stories of what I’ve done, plus DIY projects I’ve watched from a distance, might be of great help to you. My first big DIY job was bringing back to life a 3-bedroom FHA-repossessed house I bought at auction for $8,000.

My $8,000 House

I was twenty-three years old. Energy flowed out of my body like sweat on a blistering hot day. It seemed to me that I never got tired. I borrowed enough money allowing me to hire several helpers for three months.

I was able to get the house live-in ready in four months. I was working on the job 60 to 70 hours a week. I often worked on it seven days a week. Once my wife and I moved in, there were a few small odds and ends to do, but I got all those done in short order. I sold the house a year later for a handsome profit.

2865 Minto Ave Cincinnati

This is the first house I owned! It's 2865 Minto Avenue in East Hyde Park, Cincinnati, Ohio. It's still in marvelous shape. I remember dumping all the plaster from the second-floor rooms into a chute we had made that went into Tony Albanese's 1-ton dump truck in the driveway.

I then bought a five-bedroom house that needed lots of work. It took months of full-time labor to get it move-in ready. After that, I did all sorts of improvements to enhance the exterior. My lovely wife wanted a fish pond, a retaining wall with a privacy fence, and a brick patio set on a concrete base. These projects unfolded over a period of five years.

Each of these outdoor projects took hundreds of hours of work. I did these in the evenings and weekends when I wasn’t out working for paying customers. My first child was still a few years away, so my wife and I were able to work on these things together with no newborn or toddler underfoot.

6270 Robison Road 45213 house

This is the second home I owned. It's at 6270 Robison Road, Pleasant Ridge, Cincinnati, Ohio. Look at that front porch. You can't really tell from the photo, but the center section of railing is curved! The owner before me had taken all the railings down but fortunately had saved them in an old wood shed in the backyard. The brick sidewalk I installed is still there.

Your first takeaway should be that a big project is going to consume your free time like you might eat a delicious piece of pumpkin pie. How much time can you really devote to a DIY project each week for months on end? Will you have a helper or two? If not, how are you going to do things that require a second set of hands?

What about tools? I happened to have many of the tools I needed because I used them in my work for paying customers. You can rent many tools now that I never had. The issue is you need to be very productive when you rent them. If not, you’ll soon pay in rental fees what you could have spent for a new or used tool. Keep in mind that you can now sell a used tool with ease using any number of online websites that host marketplaces. It might make more sense to purchase a tool, care for it, then sell it once you’re done with it.

Be honest about your age, health, and stamina. I can assure you that I get just as tired now as I did when I was 22, but I only get done about 25% of what I did all those years ago. How is your balance? Have you lost your nerve working 8, 15, or 30 feet off the ground? I can tell you I used to mimic Spiderman walking up on steep roofs. Those days are long gone. The fear of falling has replaced my youthful bravado.

Think about your learning curve. I was lucky. Each day at work, I was surrounded by subcontractors who had mastered a craft. I was able to glean from them, through sight and conversation, the secret tips and tricks for getting pro results. I doubt you have this luxury.

You do have thousands of free online videos you can watch, as well as ones provided by the manufacturers of many products. Be sure to watch those before you even start a project. This will give you a feeling of what you’re up against.

What will happen if you can’t finish the project? I know of a homeowner who’s been without a working kitchen for over fifteen years. My guess is you’re starting the DIY project because you don’t have the money to hire a pro. If so, how will you pay to have a pro step in should you not be able to complete the project?

Keep in mind you can talk to me about what it takes to make your DIY dream come true. I’m just a phone call away. CLICK HERE to have me call you. That said, keep in mind my moniker. Talk to any of my kids, and they’ll say, “Oh, you mean the dream crusher? Yeah, he’ll set you straight.” Sitting around the kitchen table, I’d ask them very simple questions about things they wanted to do. I’d always help them, but I’d share all the things they hadn’t yet thought of. As adults, they now appreciate it, but back then I had an abundant supply of wet blankets to throw over grandiose ideas.

Column 1670

Invest in Home Improvement Advice

tile floor grout missing

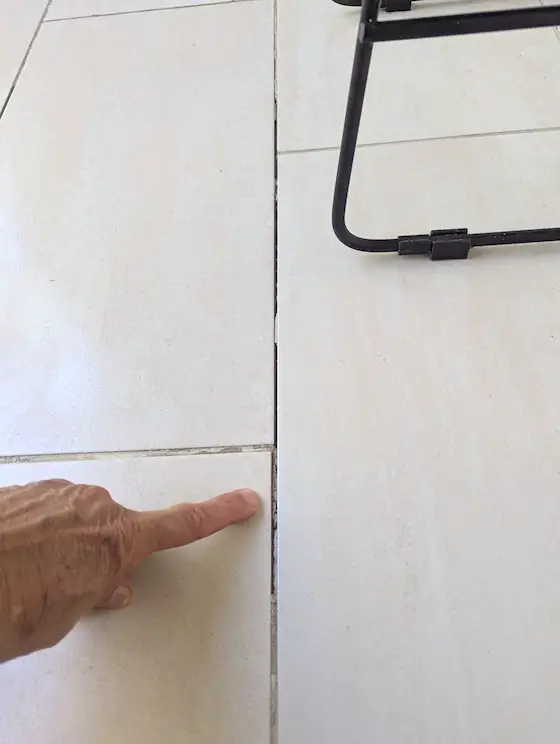
The grout between these floor tiles is crumbling and falling out. The wrong grout was used. I could have prevented this had the homeowner scheduled a 15-minute phone call with me. It will cost thousands of dollars to remove all the grout in the entire house. Copyright 2026 Tim Carter

Home Improvement Advice - Talk to Tim Carter

Author's Note: Be sure to read the scathing email I received from a reader about this column. It's below.

I saved a single mom $15,000 a few days ago. She and I were both overjoyed as you might imagine. I can’t begin to describe how fulfilling it is to see the bright-eyed look on a customer’s face when I share good news like this.

This young woman purchased a house north of the White Mountains in New Hampshire. Her grandparents had built it. It’s a stunning vintage house built in the early 1960s complete with large open spaces, trapezoid windows, and a rich, warm, wood interior.

Two of the large trapezoid windows in her daughter’s bedroom have an operating awning window beneath them. The issue is the hand-crank hardware on one was missing and the other one has a partially stripped gear. There were decades-old notes with yellowed adhesive tape saying, “Do NOT Open Windows”. The young mom wanted the windows to open so the cool, fresh, night air would keep the bedroom comfortable for her young daughter.

Before talking with me, this young mom reached out to a window contractor to remedy the issue. The contractor came highly recommended from a friend in the small town. I’m not sure if the contractor sent out a wet-behind-the-ears salesman or he was dishonest. Instead of sharing that the existing windows could be fixed, he proposed removing the high-quality windows only to replace them with stark vinyl windows that would not match the existing windows.

Fortunately, this single mom had me stop by to consult with her about the windows, new mini-split AC units, her unsafe deck railing, and a litany of other honey-do-list items. She was about to sign a contract for the windows. What an expensive mistake that would have been.

This single mom happens to be a friend of another single woman who lives on the East Coast. She’s a primary schoolteacher who plans to retire to a 100+ acre parcel of ground in central Kentucky. This woman hired me two years ago to help guide her through the process of designing and building her dream retirement home.

Last spring this woman paid me to fly to the rolling farmland to help select the best place for the home, calculate the cost of the 1/3-mile gravel driveway, and do the calculations to ensure she’ll have plenty of water volume and pressure.

I do short video or phone consults like this each week, but all too often they’re conversations where I’m trying to extricate a homeowner from a bad situation. In each case, had the homeowner talked to me before signing the contract, he would have saved thousands of dollars. Here are a few examples.

An older woman who lives in the Midwest, wrote to me just days ago, “My basement ceiling under my front steps is leaking when it rains. I've already had the whole front siding and door frame replaced and sealed and I was promised that was the problem. I spent $4,700 and I still have water coming in.”

She sent me a picture of the front of her home. It’s a very common design with an unprotected front door. There’s no porch roof to protect the door from a moderate wind-driven rain.

I would have asked her quite a few questions on the phone. Her answers would allow me to correctly diagnose the issue. I would have loved to know how long she had noticed the leak. I’d like to know the compass direction the front of the house faces. There are no less than five other questions I’d ask.

As crazy as this sounds, I responded to her email letting her know that it would require a short 15-minute call to drill down to a solution. I even shared that the call would be no charge if she felt my advice wasn’t helpful. She rejected the idea of doing a call even though she thought when emailing me that I could be of help.

Days before, a gentleman from the great state of Texas wrote to me, “I have a remodel project. Building a pier & beam floor. My thoughts are this: Install 3/4" tongue & groove plywood on pressure treated 2x6 floor joists. Next put down either 3/4" plywood, then flooring. Where should I put a moisture or vapor barrier (if any) during this process?”

Can you imagine what the cost would be to install new flooring and even new plywood subflooring if he doesn’t do this job right? Not knowing the size of the project, I can assure you it would be no less than $5,000, maybe even $10,000.

Once again, I shared with him that I had a list of questions to ask in order to give him the best advice so his flooring doesn’t rot out from water vapor in the crawlspace. He never responded to my reply choosing, I assume, to get free advice from someone who might not have 50+ years of experience that I have under my belt on top of the three weeks of food I carry with me at all times.

My advice to you is to always talk with someone who doesn’t have a dog in the fight before you make a big investment in materials and/or labor. I’ve been told by many that I’m the only home improvement columnist and website owner that’s just a phone call away. I want to help save you $15,000, or more, so don’t hesitate to invest a tiny sum of money to get expert advice.

SCATHING EMAIL:

This was from Regina. I've not edited or corrected all the grammar and punctuation errors.

"Hi although I enjoy reading your column I am extremely irritated that you ALWAYS refer to women as single moms or single-alluding an air of superiority to your gender and and a savior to all “single” women needing home improvement help. As a highly educated-by choice single mom I could figure out, fix and or pay for someone to solve a homeowner issue. My daughter is a married Mom and RN. Her husband a CPA. She is the one that fixes all the problems in their home and actually remodeled down to the studs her huge kitchen by herself-electrical, plumbing, taking out an outside door, reframing, installing cabinets and the entire design. And guess what she paid for it too!! So I implore you to stop acting like you are a savior to all the single ladies and moms. I find it backward, offensive and rude!"

Column 1669