Rust Stains in Toilet
Wait until you see the after photo below.
Rust Stains in Toilet - Remove with Ease
Do you remember that day in high school chemistry class when you grumbled under your breath saying something like, “This is NUTS. When will I ever use this information in my lifetime?” Well, get out a fork and plate and start eating your giant piece of humble pie as you apologize to your wise chemistry teacher. That knowledge you rejected has cost you hundreds, and possibly, thousands of dollars.
I admit I was one who said that loud enough that I was rewarded an afternoon in detention for disrespect. It was only years later that I came to appreciate how simple chemistry surrounds you and me each day in so many things. Harnessing this knowledge allows you to solve many problems around your house yourself saving you huge sums of money.
For example, who would ever think that copper ions bond with asphalt molecules preventing them from cross linking? When this happens, roof shingles age much slower and last decades longer than they should. I was the first person in the world to discover this chemistry magic back when I was writing my Roofing Ripoff exposé book.
Did you ever think that high school chemistry would allow you to get rust out of clothing, off of concrete, remove it from vinyl siding, remove tough rust stains from vinyl swimming pool liners? How about removing harsh tannin stains from the bottom of boats? How about removing rust stains in a toilet? I didn’t think so.
A simple and fairly safe acid allows all this magic to happen. You just use affordable oxalic acid. Decades ago when I first started Ask the Builder I became aware of oxalic acid. I was doing research about the best way to clean redwood before the Internet was mainstream. I reached out to the California Redwood Association. They sent me a wonderful pamphlet that explained the step-by-step method to make dingy dark redwood look new again using an oxalic acid solution.

This is a re-sealable bag of oxalic acid crystals. Go HERE to get it delivered to your home NOW.
Not too many years after this I jumped down the oxalic-acid rabbit hole once more. A reader, not unlike you, had written to me about removing rust from concrete. Not knowing the best answer since I didn’t pay much attention in high school or college chemistry class, I asked a chemist friend of mine and he immediately said, “Oh, that’s easy. Use oxalic acid.” I shared the advice and heard back from the reader that it worked well.
But years went by before I would try it for myself. Just days ago I had my first hands-on experience with oxalic acid. It turns out I’m imperfect like you might be. My lovely wife reminds me of this on a regular basis. I forgot to change a large filter that captures dissolved iron in our well water. The filter should have been changed many months before.
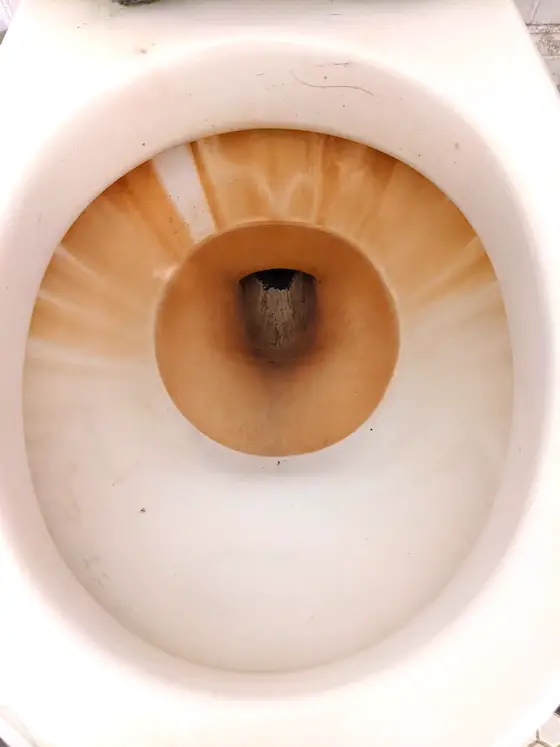
Slowly the toilet that gets most used in our house started to get nasty rust stains in the bowl. This rust disease then spread to our white china apron kitchen sink. A week later a second toilet bowl began to develop a slight orange cast. I reached out to the company that installed the water softener and purification system.
The first question the representative asked was, “When did you last change the filter?” Ruh roh! I cringed when I saw the condition of the filter. Once I had the water system working properly again, it was time to tackle cleaning the china surfaces. Yes, I immediately set up an automatic calendar reminder so every three months I get a morning reminder to change the filter.
I ordered a two-pound bag of oxalic acid crystals. Once it arrived and I opened it, it looked almost identical to confectioner’s sugar. After reading the warnings and instructions, moments later I had dumped a tablespoon of the white powder into the toilet bowl that had the least amount of staining.
I used the toilet brush to lightly swish the water around so the oxalic acid would dissolve. It did so in seconds in the room-temperature water. Within minutes the light orange stains started to fade. I used the brush to spread some of the acid solution up onto the sides of the toilet bowl where two vertical stains extended down from the bowl rim holes.
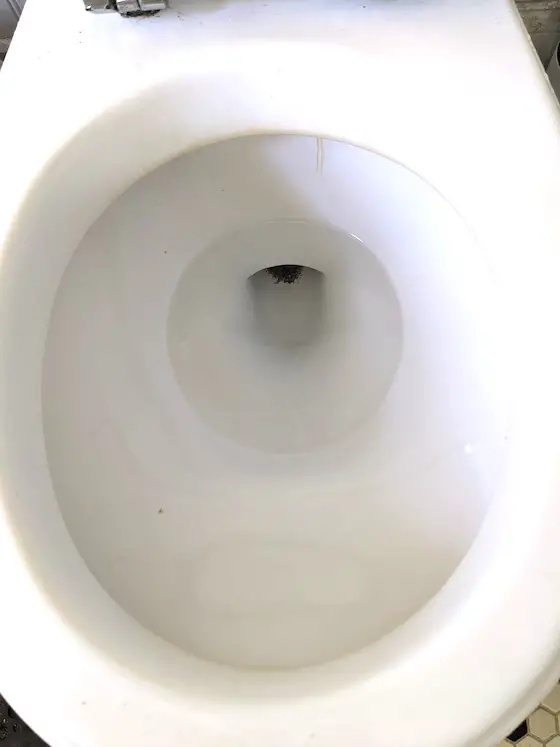
It took just 20 minutes of soaking and swishing with a toilet brush to get these results. There's just one tiny vertical stain I have to remove by soaking a small sliver of paper towel in some oxalic acid solution. I'll then press it on the stain and let it work for several hours.
After a few more minutes the bowl looked like new. The transformation was almost unbelievable. Since we have curious cats, I made sure I never left the toilet unattended during this process. If you have pets and need to let the oxalic acid sit for a longer time, be sure you put the toilet seat down and close the door to the bathroom. Put a warning sign on the closed lid warning other humans that an acid solution is in the bowl.
After this victory, I decided to go out to the garage to see if the oxalic acid would remove harsh rust stains left on the concrete floor from the bottom of my snowblower.
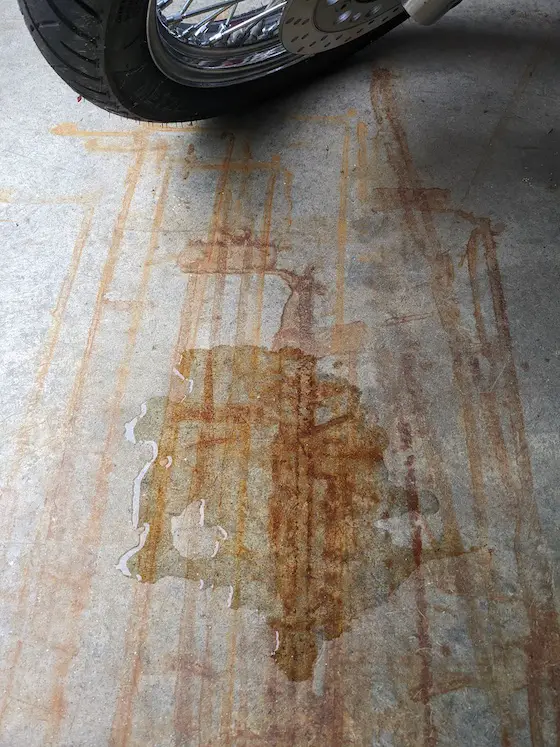
This is the oxalic acid solution just after I poured it onto the rust stains. I left it sit for a few hours.
I decided to boost the strength of the solution adding two tablespoons of the oxalic acid powder into six ounces of water. I put the plastic cup of water in the microwave to heat it up before adding the acid. I remembered from chemistry class that the heated water would allow the powder to dissolve faster. I wasn’t disappointed.
I took a before photo of the rust stains before I started. I then poured the acid solution onto the center of the worst area of rust to create a puddle. I wanted to be able to see the original rust stain on either side of the test area once this experiment was complete. Keep in mind I didn’t scrub or do anything but pour the solution onto the concrete.
I allowed the acid to work for hours and later when I went out to use the grill to cook, I rinsed off the acid solution that remained with clear water and squeegeed it off. The next day a large amount of the rust was gone and the concrete looked much brighter. I know I can remove all the rust with a little more effort and my concrete floor will look like new!
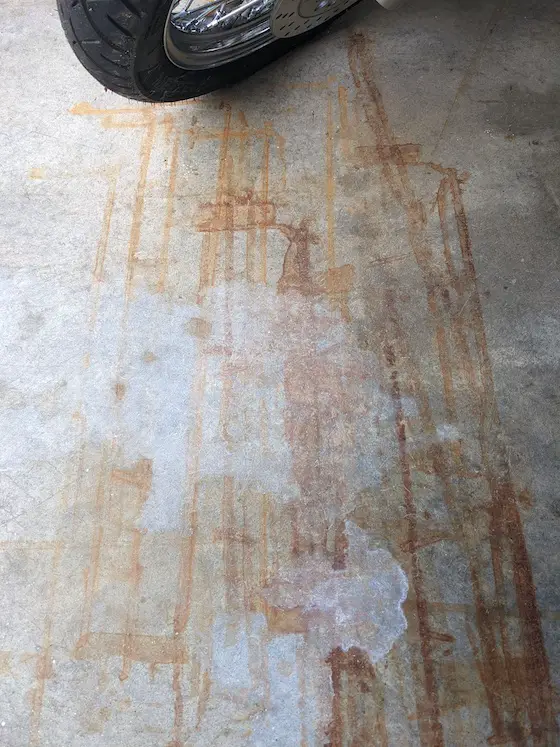
You can see how the rust stain is almost gone after one treatment. The rust soaks into the cement paste making it harder to remove than off the glass glaze of porcelain china. A few more treatments and the rust will be gone and the concrete will be lighter.
Column 1473
Matching Wood Stain
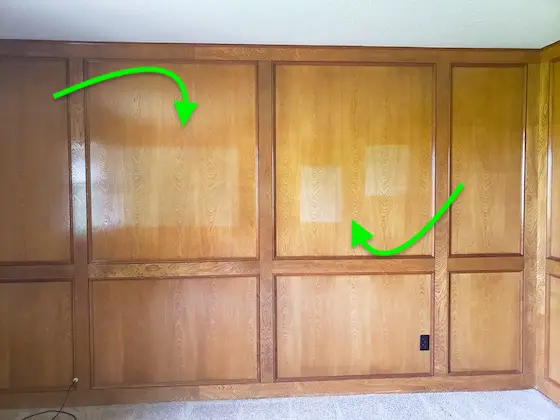
Matching Wood Stain | The arrows point to places on the paneling lighter than other areas. Diplomas, photos, and certificates created the light spots. (C) 2022 Tim Carter
Matching Wood Stain - Add Pigment to the Urethane
This past week I helped two 70-year-old newlyweds solve a vexing problem in a home they purchased. In just fifteen minutes using my transcribed phone call service, I saved them perhaps $5,000.00. I shared a time-tested way they could match the stain on a wood-paneled room. You see, framed pictures, diplomas, and certificates had created lighter areas on the wood that revealed themselves once the original owner moved out.
Change the Color of Stained Wood
Not only can you match the stain color of most wood, but you can also use my method to change the color of light-colored wood that you now want darker. Let's get started.
Some wood species, like cherry, are photoreactive. Some clear wood finishes, especially oil-based ones, also change color in response to sunlight or even artificial light. Oil-based urethanes and varnishes are known to yellow over time. You can see that yellowing in the above photo. Furniture must have been placed along the one wall and the framed photos and plaques prevented sunlight from hitting the clear finish.
Sunlight is the worst as some of the invisible ultraviolet (UV) rays contain destructive photons that crash into furniture, carpets, wood paneling, etc. wreaking havoc on a microscopic level.
This is why the original copies of the US Constitution and Declaration of Independence are in a dimly lit hall in the National Archives Building in Washington DC. No doubt the clear protective glass that covers them also has some sort of special coating to prevent photons from reaching the ink and paper. Without this protection, the photons would fade the ink rendering the priceless and magical documents useless.
Fortunately, I had firsthand experience making those light-colored areas on the paneling disappear like a coin in a close-up magician’s hands. Many years ago while completing a very difficult remodeling job for my only customer-from-hell, my painters hadn’t perfectly matched the new wood trip in a giant room addition I had built. The trim was missing a slight amount of red pigment and the owner insisted I strip all the trim and solid-wood doors and start over.
Add Pigment to Clear Finishes
Knowing there was another way, I slept on it. In the middle of the night a voice in a dream said, “Silly, all you have to do is add some red pigment to the clear urethane. It’s no different than putting a transparent piece of colored film in front of a camera lens to change the color of what the eye is seeing.”
I woke up, went to the paint store, and had a quart of urethane tinted with a small amount of red pigment. My guardian angel must have been helping the employee while he squirted in the few drops of colored liquid because it turned out to be the perfect amount. What luck to get it the first time!
When I put a coat of this colored urethane on the woodwork, as well as a scrap we had stained, it was a perfect match. The customer was incensed that I had thwarted her attempt to inflict financial pain on me. The bottom line is we went to binding arbitration and I lost $60,000.00. This was back in 1991 when that was a vast sum of money. I lost simply because my attorney had failed to submit all my evidence by a hard deadline.
The Easy Steps to Change Stained Color
Here’s what I shared with Mary Ann. Step one is to carefully clean the existing wood paneling. I recommended using a mild liquid dish soap and water. It’s mission-critical that the sponge is just damp and that no water runs down the paneling to get behind any pieces of wood trim. The excess water can cause swelling and irreparable damage to the paneling.
Once the paneling is clean, I then suggested that she very lightly sand the light areas on the paneling with extra or super-fine sandpaper to just scuff up the existing clear coating. This would allow the new tinted urethane to get a better grip on the surface.
Mary Ann has a huge advantage that I didn’t have all those years ago. She can take a high-resolution photo of the wall with her phone and show the paint store manager the conundrum. I told her to only deal with the paint-store manager as she/he would have the best chance of getting a match the first time.
Since Mary Ann doesn’t have a scrap of trim like I had to experiment with, I told her that she should just put a single drop of the tinted urethane on the wall. See how close the color is. If it’s way off, take a photo to show the paint store employee so the next matching attempt will hopefully get it right. Once the photo is taken, then wipe off the tinted urethane.
Secret Weapon - Furniture Stores
In the event the paint store is unable to get a perfect match, I told Mary Ann she could solve the problem by bringing in a pro. She lives in a suburb of Tulsa, Oklahoma fortunately. This means there’s at least one, perhaps two, high-end furniture stores that sell the finest furniture one can buy.
These stores employ expert wood-repair craftsmen. If not employees, these talented people are individual jobbers. They routinely repair scratched, gouged, or damaged furniture. I’ve had to use these talented people to make repairs on custom wood built-in cabinets in the past. They possess powerful skills as well as a magic toolkit that allows them to fill in scratches and match stain colors and wood grain to restore finishes to like-new condition.
It would be child’s play for an expert like this to match the lighter areas on the wall paneling. Once again, you find these people when you visit the furniture store and chat up the manager or owner. Bring with you your photos that show what needs to be fixed. I’d also like to see your before and after photos. Be sure to send them to me via the Ask Tim page at my AsktheBuilder.com website!
Column 1472
How Tall Should a Wall Be?
Tim Carter shows how to calculate the wall height so stairs inside the shed are perfect. (C) 2022 Tim Carter
How Tall Should a Wall Be? It Makes a Difference
Did you know the safest and most comfortable steps to go up or down have 7.5-inch risers and 10-inch treads?
Knowing this, how tall should a wall be in a house with a staircase? How do you calculate wall height?
Make some room in your tiny gray cells for this little-know information:
Summer’s End John Prine
Summer's End by John Prine

Watch the video below. Listen closely to the lyrics.
I had the good fortune fifty years ago to see John Prine in concert. It was a small venue in Cincinnati.
I'm not quite sure people understood at the time how talented he was. In my opinion, he was in the same class as Bob Dylan.
That said, it turns out John had the ability over time to create amazing new songs late in his career. Bob didn't.
Here's one of my favorite songs and it's one I listen to each Labor Day.
After you listen to the song, watch the video just below it by the folks John hired to create the stunning music video.
Sewage Ejection Pump
Sewage Ejection Pump - It's a Septic Tank Inside Your Home
A sewage ejection pump is normally found in a sealed sump pit inside your home. Solid and liquid human body waste flow into the sump.
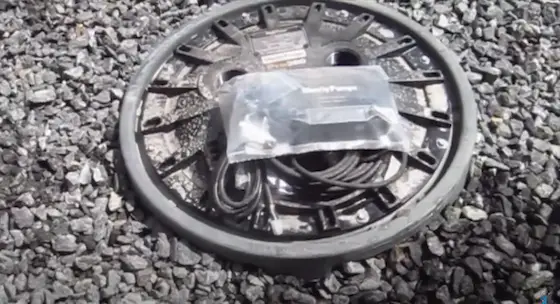
Brown nasty water lives under this lid. It's the last thing you want in your basement or lower level.
They're disgusting. The sewage must be pumped up to some pipe where it then flows by gravity to an exterior septic tank or a city sewer.
The sewage ejection pumps get clogged or fail always at some point. Can you imagine the mess IN YOUR HOME that is created when it's time to replace one of these pumps?
How Do You Prevent Having a Sewage Ejection Pump?
It's easy. You simply purchase a building lot where you can use gravity to drain the lowest plumbing pipes in your home out to a septic tank or city sewer.
I offer phone coaching to share with you how to make sure you'll purchase the correct building lot. Go here to set up a phone or video call.
Slide and Negative Scanners
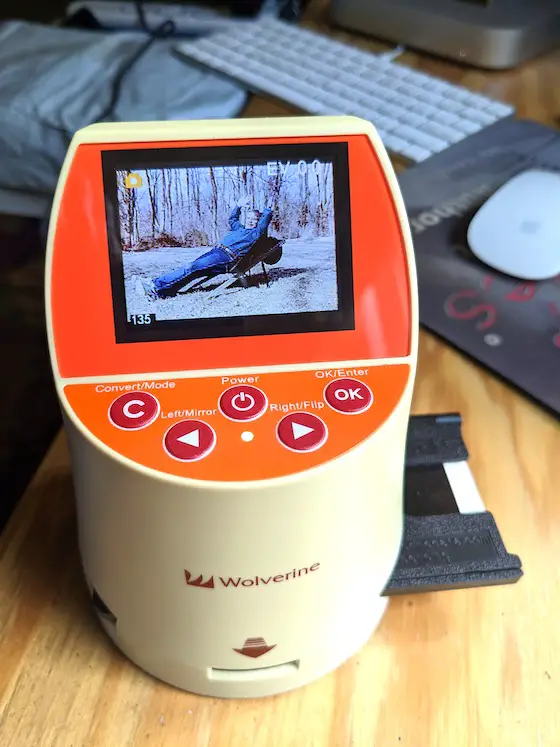
Color Slide Scanner | This is an older slide scanner perhaps 2015 vintage. It works really well! Keep reading to see which scanner I'd BUY TODAY.
Color Slide and Color and B&W Negative Scanners
In August of 2022, I started a massive project of scanning at least 2,000 color slides and well over 10,000 color and black and white 35mm negatives.
Years before I had purchased an affordable miniature scanner, but I had let it languish. It was a Wolverine F2D Mighty.
Look below for the scanner I would BUY NOW if I had to get a new one.
You can see all the scanners that interest me right now here.
Slides and Scanner Bed Must Be Dust-Free
I got it back out to scan about 400 of my slides from a 1972 geology field trip to the Southwest USA. The first few scans were horrible as there was all sorts of black spots on the digital image.
I looked at the slides and there was some dust on them. I got out my trusty hand-squeeze air brush for cleaning camera lenses and took care of the slides. I re-scanned them and the black nasty spots were still there. I used a flashlight to look inside the scanner and there was the problem. The glass scanning bed was covered with dust and debris. I had left the scanner out in my office uncovered for a few years. What an idiot!
My tiny scanner did a marvelous job. Here's the exact scan from one of my slides. It's me at age 20 out in New Mexico.
How Fast is the Scanner?
Once you press the C (convert) button, it takes about two seconds to scan the slide on my Wolverine scanner. Newer scanners might be faster. You then press another button to SAVE it and the digital file is sent to the SD card you insert into the back of the scanner. Once again, new scanners may be a single push of one button to complete the scan and save it as a digital file either internally or on a removable SD card.
How Many Slides Can You Scan?
You can scan an unlimited amount of slides. The only limiting factor is the capacity of the SD card you use. Most scanners have an upper limit as to the storage capacity of the SD card. Suffice it to say I can scan hundreds of my slides on the one SD card.
Where Do you Store the Digital Images?
I store my digital images on a separate hard drive and up in the cloud on my Google Drive.
How Do You Organize the Digital Images?
I decided to have nested file folders. My structure depends highly on years, then events within that year. Here's an example:
Carter Family Photos
1967
Summer School
Hike to Subway Tunnel
1968
Date Nights
Birthday Party
Mass Rumble Events
1969
Woodstock Rock Festival Rain-Soaked Photos
Halloween
Thanksgiving
Is it Easy to Scan?
Yes, it's easy. The most important thing is to insert the slide or negative with the shiny surface of the slide/negative UP. The slide and scanner bed MUST BE dust-free.
How Do You Clean Dirty Slides and Negatives?
Dirty slides and negatives can be carefully cleaned with water, a small amount of mild liquid dish soap, and a SOFT artist's brush to remove hard-to-remove dust or debris. Dry them very carefully with almost no pressure using a clean very soft cotton cloth. Do not let them air dry as water spots can form. Arrange a phone consult call with me if you have detailed questions about the best method I use to clean the slides and negatives. Remember, I have YEARS of darkroom experience working with processing film and prints.
What Scanner Would You Buy Now?
Here are several scanners you should look at:

Here's the Kodak Slide-N-Scan scanner. It's got a huge screen much bigger than my Wolverine.

Here's another one with a BIG screen. I recommend always having a big screen. My Wolverine screen is SMALL.
GO HERE to see ALL of the Slide and Negative Scanners. Be sure to READ the reviews before purchasing.
Septic Tank Installation

Septic Tank Installation | This is an elevated leach field ABOVE a septic tank. The sewage effluent is pumped up to this small sandy area and enters the gray distribution box at the far end of the sand. Do you think you could install all this correctly? I think you can with my phone coaching. Go here to set up a phone call with me.
Septic Tank Installation - It Can Be DIY with Coaching
Septic tank installation is not too hard to do. It starts with a septic design which must be done by a professional.
What Size Tank Should I Have?
The size of a septic tank is usually determined by the number of bathrooms in a home. The reasoning is more bedrooms means more full-time occupants who will be sending sewage into the tank.
What About the Leach Field?
The design and size of the leach field is critical. Unless you have lots of time and muscle or slave labor, you'll need a machine to help you install the hundreds of tons of sand that's required.
Watch these videos to see what's involved in installing a septic tank and its leach field:
The next video in the series will be uploaded as soon as the workers on the job site get the pipes installed from the house to the tank and from the tank to the leach field.
Haughty Professor Bill
Haughty Professor Bill Plays Checkers Instead of Chess
As you might suspect, I get lots of email from all sorts of people.
It's a kaleidoscope of humanity and I find it fascinating.
On Monday, August 22, 2022 I received the following email from Professor Bill who lives in Tulsa, OK:
Thank you, Tim Carter, for yet another very helpful column. Might you email me the brand name of the wood preservative that lasts for up to four years? If you'd rather I wouldn't, I'd not quote you on the matter.
All best,
Bill Last Name Redacted by Tim Carter to Shield the Guilty
Professor Bill had just read a recent column of mine where I shared why exterior wood rejects sealants and paint.
I responded within hours sending back:
Prof. Bill,
It's right here: Deck Stain Test Results
My response didn't sit too well with Professor Bill.
After my simple suggestion simmered for a few days, he dished up a whopping serving of passive aggression:
Mr. Carter,
Might I pay you the high compliment of total candor? Your unwillingness to tell me the brand of the wood preservative that lasts up to four years unless I pay you $20 strikes me as dirty pool. I already pay the Tulsa World to read your column -- thinking that your motive is to inform, not to exploit, your readers.
Am hoping you will rethink your stance in this matter.
Wishing you well,
Bill
I took a deep breath after reading the above retort. I thought back to what my oldest daughter told me about twelve years ago. She said, "Dad, I've read some of your replies to your followers. You have to learn to LOVE them more. You're bad at loving your followers."
Well, it's hard to love people who don't respect one's knowledge and work. It's damned hard to love someone who talks down to me. It's almost impossible to love hypocrites.
After my daughter's words drifted away like a dandelion seed in the wind, I remembered the last moments in the one scene from Jurassic Park. You know, when the waiter leaves the check at the outdoor table:
After re-reading Professor Bill's email that my mother would have appreciated, I responded:
Bill,
When the Tulsa World publishes a book review, do you expect the author of the book and/or the book publisher to give you a copy for free because you pay for the review in the paper?
When the Tulsa World publishes a movie review, do you expect to get to see the movie for free?
Why can't I have access to ALL that the Tulsa World publishes? Why do I have to pay for premium content? Look here.
Why do you hold me to a different standard?
CHECKMATE
Days have passed and not a peep out of Professor Bill.
Don't EVER BE LIKE Professor Bill. Not EVER. Don't play checkers if your opponent is a grand master at 3D chess.
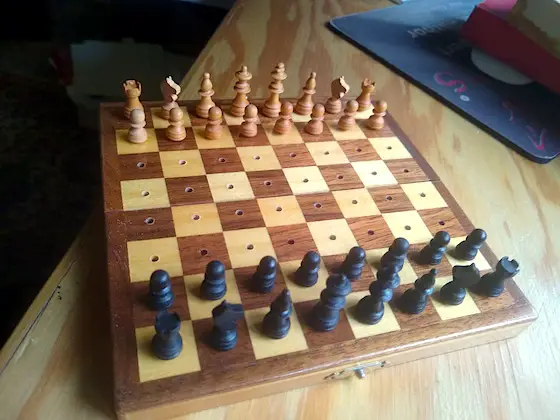
Travel Chess Set | This is a rare wooden-peg travel chess set with inlaid wood squares. Buy one if you can find one. CLICK or TAP HERE to start your search.
Cincinnati April 3 1974 F5 Tornado
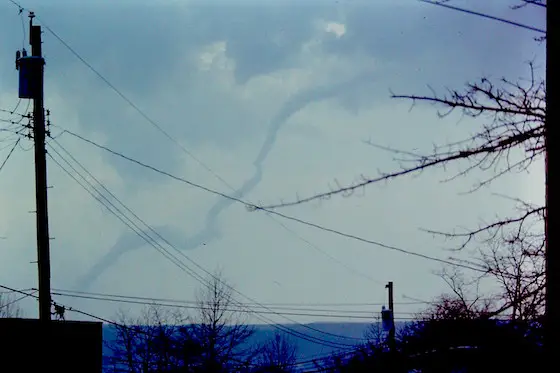
F5 Tornado Cincinnati Ohio April 3, 1974 | Here's the beast. I had never seen anything like this in my life. I was speechless and somewhat frightened. I was 21 years old. Copyright 1974 Tim Carter ALL RIGHTS RESERVED - DO NOT REPRODUCE without permission
F5 Cincinnati April 3, 1974 Tornado - Stunning to Behold
On April 3, 1974 I witnessed the F5 tornado start to break up and go back up into the sky. I was standing in the middle of Riddle View Lane in Clifton Heights.
This tornado touched ground at about 5:30 PM just north of Rising Sun, Indiana. It then crossed over the mighty Ohio River into northern Kentucky. It then re-crossed the Ohio River targeting Sayler Park, the far-western Cincinnati suburb along the Ohio River.

The magenta line represents the line of sight I had from the center of Riddle View Lane to the base of the tornado in the photo above as it was departing the suburb of White Oak, Cincinnati. The red arrows indicate the rough path of the tornado after it crossed the Ohio River. (C) 2022 Google Maps
After pulverizing the floating restaurant on a barge my father-in-law built, and countless houses and businesses in Sayler Park, the swirling tornado then clawed its way up out of the river valley ravaging Bridgetown, Mack, Dent, and Delhi, Ohio.
This tornado was just one of many in the historic Super Tornado Outbreak that spanned April 3-4, 1974.
By the time it got to White Oak, it started to dissipate. This is when it came into view on my street, as seen in the above photograph. Here are a few other photos of the beast that moments before killed three people and injured 210 others.

April 3, 1974 F5 Cincinnati Tornado | I captured this photograph standing in front of my childhood home. There was no sound just a surreal spiral dance in the sky. Copyright 1974 Tim Carter ALL RIGHTS RESERVED - DO NOT REPRODUCE without permission

The tornado lost its appetite for killing and maiming and is going back up into its lair. Copyright 1974 Tim Carter ALL RIGHTS RESERVED - DO NOT REPRODUCE without permission