DEAR TIM: It's 3:00 AM and I'm wondering how I'm going to resolve an issue in a few hours with a tile installer. First, the shading and color of all the tiles doesn't match. In the photo I sent, the one I circled is what the tile at the showroom looked like. Many others have large brown patches of color in them I don't like. Did the installer bring second-hand tile to the job? The installer also didn't use plastic spacers when installing the tile. He's coming to grout in four hours. What should I tell him to do? Sleepless in Laval. Sandy M., Laval, Quebec - CA
DEAR SANDY: I've had many a sleepless night thinking about jobs myself. Usually for me my insomnia has me pondering the best way to solve a challenge that's one or two days in the future. Unfortunately, I get many an email like yours from distraught homeowners that need a life preserver or a shock from a virtual AED because they're in critical condition because of a mistake by a contractor or an out-of-control job.
I'm pretty sad to say that the color issue with the tile is not the fault of the installer. That problem is split between you and the tile store management. In my opinion, sixty-five percent of the blame is that of the tile store and the other thirty-five percent is on your shoulders.
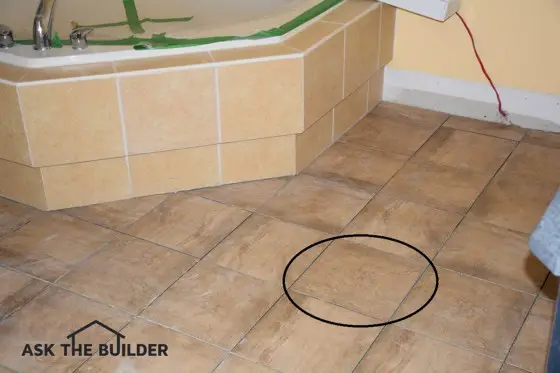
Many of the floor tiles in this photo don’t match the circled one. The homeowner thought they’d all match. Photo Credit: Sandy Mayor
Your complaint is pretty common based on the email I've received over the years. One would think that tile store employees, managers and store owners would have heard thousands of these complaints. To solve the problem, as you place your order and tell them that's the tile you want, they should bring out a box from the warehouse and show you that the tile comes in various shades, patterns, etc. With this new information, you can then reconsider your choice if you don't like the difference in each tile.
You probably should have asked for and paid for a full tile that you loved before you left the tile store. It's your job to bring that tile home and set it aside. When the installer shows up with the tile, you then should open all the boxes of tile, pull out as many as you wish to check, and see if they match exactly the tile you brought home. If they don't and you're unhappy that's the time to get replacements, not after they've been set in thinset on the floor or wall.
As for your current tile, I must tell you that I don't feel the tile are defective. Many tiles are made on purpose with the random color veining and pattern shift. My guess is the tile manufacturers are trying to mimic Mother Nature.
Often floor tile is made to simulate, to a degree, natural stone. Mother Nature rarely makes natural stone completely homogeneous. You may find some fine-grained granite where the matrix of small mineral crystals are nearly identical, but I doubt it. There will always be variations to some degree.
This being the case, it usually makes for a more interesting floor when each tile has some sort of variation in shading and pattern. When viewed as a whole, the floor tends to look very good. The photo you sent me looks marvelous. Once the tile is grouted, I feel it's going to get many a compliment from visitors to your home.
As for the tiny plastic spacers, I used to use them on my jobs, but I abandoned their use when I discovered that they can sometimes cause more trouble than the problem they're trying to solve.
Not all floor tile are exactly the same size. If this is the case with the tile you have, then if a box or two are over or undersized and you're butting the tiles up against one another using the spacers, the grout lines will start to become wavy and not be straight.
When I install floor tile, I always took a few random pieces from different boxes, measured them and laid them out on the floor dry. I would create a square that was perhaps four tiles on a side. I adjusted the spacing between the tiles so the grout lines were the size I wanted, were straight and they looked fantastic.
I would then measure the outer dimensions of the square and then chalk lines on the floor creating these big boxes. The floor would look much like a blank crossword puzzle with all the chalk lines.
When I started to install the tile, I'd put the edge of each tile on the lines I created. The grout lines would be uniform and straight throughout the entire floor. If you choose to do what I did, then exercise caution when spreading the thinset or mastic so you don't erase or eliminate the chalked lines.
As for what to tell the installer, my advice is to let him proceed with the job. I feel the tile looks wonderful and once grouted, it will look even better. If you're so upset that you feel you just can't look at the tile each day without it putting you in a bad mood, then start over and get the correct tile that will make you smile each time you look at it.
If you go this route, be prepared to pay for all the extra costs, tile and the time and effort the installer will put into it. Think of this as a tuition payment to the College of Hard Knocks.
Column 1115