Bathroom Plumbing Vent Diagram

Shane Nelson is doing some plumbing work in Centre, Alabama.

He's a pretty good artist and drew a diagram of his proposed bathroom plumbing vents and drain pipes. Look at it after his question.

Here's what he wrote to me:

"I am enclosing my garage and installing a bathroom in the process. Is the vent for the toilet as pictured in the attachment allowed?

This would be the easiest for the install but wanted to make sure it was legal and wouldn't cause any issues.

Also, if installed this way, the vent will be a wet vent for the sink unlike the drawing.

Thanks for your help."

Here's Shane's drawing. Read my answer for what's going on. Graphic credit: Shane

Here's Shane's drawing. Read my answer for what's going on. Graphic credit: Shane

Here's my reply:

Shane, I've been a master plumber for over 35 years. I love doing plumbing drain and vent piping.

Let's talk about the drain piping connections before we discuss vents.

First and foremost all of the connections you've drawn are "tee" fittings. A tee has the intersecting pipe connect at a 90-degree angle.

That's a huge no-no. When a branch line connects to a main drain line, the fitting should always be a wye. If you use a tee fitting, the waste water crashes against the side of the pipe and some can go the direction of the vent pipe.

Plus, a drain-cleaning snake can drill right through the side of the pipe or end up going up the vent instead of down the drain.

A wye is a fitting where the intersecting pipe connects at a gentle 45-degree angle so the waste water is persuaded to head downstream as well and any flexible metal drain-cleaning snakes.

You can make the 90-degree bend you wish by adding an additional 45-degree fitting.

The toilet flange should connect to a 90-degree fitting that connects directly to the drain line as you show. Within 3 feet of the flange, you put a 3 x 1 1/2-inch wye fitting where the wye is rolled slightly so the 1 1/2 part is rotated up about 20 degrees.

You connect a 45-degree fitting to this and this vent pipe heads back to that wall and eventually connects to the other vent pipes.

You can also wet vent the toilet with the vanity drain. This is very common.

In this case you use a 3 x 3 wye in the manner I just described. The 3-inch pipe continues back to the wall, turns up the wall and you then install a 3 x 1 1/2-inch tee.

The tee fitting connects to the branch arm draining the vanity.

You can install a 3 x 2 bushing in the top of the tee and this 2-inch pipe vents both the toilet and the vanity.

August 30, 2015 AsktheBuilder Newsletter

In the past few days, we just celebrated the tenth anniversary of Hurricane Katrina that pummeled New Orleans and points east and north.

Eighteen months after it struck, I visited the exact spot the eye of the hurricane made landfall.

Then I saw two stories about hikers needing help after getting injured or lost in the wilderness.

What do these stories have to do with you and home improvement?

It's all about the ultimate DIY.

Self-reliance.

If you want to survive in just about any situation, you need to have skills to be self-reliant.

The first story I read was about a young boy who saved his father. Both were out on a backpacking camping / hiking adventure. The father got severely injured when a boulder the size of a refrigerator tumbled and struck him.

Skills the boy learned as a Boy Scout played a large part of the happy ending to the story.

But it took three days to get help.

The second story was about a 62-year-old woman who got separated from a group she was hiking with in California's Sierra Nevada mountains.

She was wandering for nine days.

What would you say if I told you that the boy and the woman could have had help on the way in less than an hour using a radio and antenna that fits inside a small plastic box you could put two bagels in?

The total price of everything you need to get help costs less than $400.00.

If you want a challenge and like to build things from a kit, you can get all you need for less than $200.00.

I own tiny radios I can use to get help. One of my hobbies is amateur radio. You can get a license and discover how to save yourself or family in a disaster or while lost in the wilderness in 30 days or less.

I'm serious. It's all about attitude.

CLICK HERE to read any number of stories where I use this setup to communicate with others here in the USA and across the world. Look at the article titles in the right column.

Yes, I know all about satellite phones. No need to tell me about them. Wait until you see what they cost and the charges per minute assuming you know exactly who to call when you need help.

The bottom line is when just about any disaster strikes, you'll be on your own. You need to figure out on your own how you'll get help or survive.

.
CLICK HERE to Discover Long-Lasting Concrete Secrets
.


Cleaning Vinyl Siding

Two days ago, Mike asked me if it was safe to use my Stain Solver Certified Organic Oxygen Bleach to clean his algae and mold-covered vinyl siding.

My answer was: "Heck Yes!"

Stain Solver cleans algae, mold and mildew from any exterior surface.

Kathy and I own Stain Solver. It's a product we developed nearly twenty-two years ago!

CLICK HERE to see some unbelievable Before and After photos.

Scroll down the page and when you see a photo in the left column that interests you, CLICK IT.

Wet Basement or Damp Garage?

Do you have water leaking into your basement, crawlspace or garage?

CLICK HERE to read a new column that explains what the problem might be and HOW TO SOLVE IT.

That's enough for now.

I need to get ready for church and then I'm up on the roof the rest of the day.

Tim Carter
Founder - www.AsktheBuilder.com

Do It Right, Not Over!

Damp Garage Solution

garage tucked into a hillside

Damp Garage Solution | This garage tucked into a hillside is suffering from dampness and water infiltration. The solution is easy but will take work. Photo Credit: Howard Lee

DEAR TIM: My garage is at the bottom of a hill and is tucked into the soil on three sides. I do get some water leakage through the concrete block walls in the spring and during heavy rains. The asphalt floor is always damp despite running a dehumidifier all summer.

Do you have any solution short of digging out the floor and starting over properly with a waterproof membrane? What could have been done when the garage was built to prevent all the water problems? Howard L., Toronto - Ontario, Canada

DEAR HOWARD: Your garage is like millions of other structures around the world that are built into sloping ground. Builders have been dealing with water issues in these structures for hundreds of years. I was lucky and majored in geology when I was in college. One of my classes was hydro-geology, the study of ground water. The knowledge I gained in those classes allowed me to build houses and garages that were always bone dry.

Let's first talk about what's going on in the soil. Without studying a soil map for your area, I'm going to assume your soil has a high clay content because the land your garage is on has experienced four periods of continental glaciation up there in eastern Canada in the past 2 million years. All that ice was created and melted long before man was around. Isn't that fascinating?

The deeper you dig into the ground, the more compact the clay is. Water has a very difficult time passing through it so rain and snowmelt that enters the soil tends to pass through the soil downslope along the top of the clay. Most of the water moves through the air spaces in the top soil.

Before your garage was built, the water higher up on the hill just continued down the hill until it connected to a small spring or brook. Your garage is acting like a dam and water prefers to take the path of least resistance. Cracks in the concrete block walls or between the block walls and the floor are easy entry points for the water.

Here's what your builder should have done to create a dry garage. This same advice can be used for any structure built into a hill. The portion of the concrete block walls below the soil line should have been waterproofed. There are many different products and methods to waterproof a foundation wall. I used a rubberized asphalt spray and stiff insulation boards on the last house I built and it is still keeping the basement dry.

A perforated drain pipe should have been placed alongside or on top of the footing that supports your concrete block walls. This pipe should have extended around the back and along the two sides of your garage. The pipe should have then extended past the front of the garage with the trench having a minimal slope.

Because the hillside is fairly steep, within about ten or fifteen feet, the ends of this pipe on both sides of the ground would surface out of the ground. Any water entering the pipe underground would readily flow out of the ends of the pipe exposed to daylight and then go back into the top soil to continue its journey to Lake Ontario and then to the St. Lawrence River.

This pipe should have then been covered with washed rounded gravel the size of golf balls or walnuts. The gravel should have extended up to within 4 inches of the top of where the final grade would be where you have grass growing. Water passing through the soil discovers this gravel, immediately drops down through it to the perforated drain pipe and then exits to daylight never having a chance to enter the garage.

To stop water vapor from coming up through the garage floor, the builder should have put down a plastic vapor retarder or barrier under the concrete or asphalt floor. This plastic sheeting is a common product available at any building supply store.

If you want to permanently solve your water issues you need to dig along the sides of your garage and do all I outlined above. It's not necessary to put the perforated pipe all the way down to the top of the foundation footing at this point. I'd probably only extend it to 1 foot below the top of the soil at the two front corners of the garage.

You'll have to use a pressure washer to clean all clay and soil from the concrete block walls once you expose them. Allow them to dry and apply the best waterproofing compound that's available to you. If you choose to hire a company understand that hot asphalt that's sprayed on the walls is just damp proofing. Standard hot liquid asphalt is not a waterproofing material. It will do a great job of keeping dampness from the soil from entering the concrete block, but it will not bridge cracks to stop liquid water.

To stop water vapor from coming up through the garage floor I feel the best way is to install a thin concrete overlay over your existing floor. You need to put down the 6-mil vapor barrier first and then pour 1 inch of concrete over your existing floor.

This concrete needs to contain very small pea gravel no larger than 3/8-inch diameter. The mix is like any other concrete, but if you're doing it yourself I'd probably do a ratio of 3 parts gravel, 2 parts medium sand and 1.5 parts Portland cement. The extra amount of cement will give you a very strong mix that will resist the freezing weather you have up there where you live.

This popular column was mentioned in Tim's August 30, 2015 Newsletter.

Column 1106

August 23, 2015 AsktheBuilder Newsletter

Welcome if you're a new subscriber! See the AsktheBuilder.com word just above your name?

Each week that's a secret link to a past column or video that can help make your wildest home improvement dreams come true. Go click it now. ( <== The link is right here for the online Newsletter.)

The subject line of your email was pretty dire, wasn't it?

I'm talking about how the end of summer is near. You know that's the case when pre-season NFL football games are being played.

This means you and I need to get cracking and finish outdoor projects.

I can hear you now, "Tim, I live in sunny south Florida, Phoenix, or Indonesia where it's always summer."

Well, that's good for you but some of us will be dealing with snowblowers in just three months or less!

As for me, the push is on this coming week to make great progress on the last part of the huge re-roofing job at my own home.

It's turning into a career instead of a summer job. I'm installing a drop-dead gorgeous single-width synthetic slate made by DaVinci Roofscapes.

CLICK HERE to see the amazing products they have. It's a roofing material that will last generations.

New Garage Door Opener

Yesterday, I spent the better part of four hours installing a new Chamberlain garage door opener that's WiFi enabled and has a whisper-quiet belt drive.

It's a very nice opener and it took a while to install because it's ten inches shorter than the existing Chamberlain opener I had.

I wasn't expecting that curve ball and it caused me to have to cut new longer angle irons that support the opener from my garage ceiling.

I also then had to break out my ham-radio soldering iron and solder. Because the opener was shorter, I had to add on 1-foot pieces of low voltage wire to the existing wires that connect to the wall control and the sensors at the bottom of the track.

I prefer to solder wires in this situation rather than twist the wires and use wire nuts.

I also discovered the 2 x 10 that the previous owner or garage-door installer put up on the wall above the door needed to be screwed to the wall.

The IDIOT that installed this block of wood just used two NAILS. This block of wood is very important and must be solid. The long metal arm of the opener connects to this block and you don't want it to move.

I can use my Nexus 4 smart phone to monitor the opener from anywhere on the planet. This means if I need to close or open the door and I'm 2,589 miles away and my phone can connect to the Interweb, I can operate the door.

As Kip sang in his wedding song in the classic movie Napoleon Dynamite, "I love technology!"

CLICK HERE to discover more about this great opener.

Video Product Reviews

In a previous newsletter, I put in the headline something about my Disclosure Policy at my website with respect to product reviews, but I didn't talk about it.

CLICK HERE now to read my Disclosure Policy.

Once you get back, I'll fill you in.

Okay, what did you think of that? My guess is you've never seen one like it.

Here's what you need to know, especially if you're a public relations manager, marketing manager or have anything to do with selling a product or service.

In the past nine months, there's been a major tectonic shift in the marketplace. It's huge.

I've been approached by several major manufacturers about doing PAID video reviews.

Why would they do this?

Just do a BING.com search and you'll discover all sorts of reports about the huge growing trend of mobile video consumption. CLICK HERE to read a few.

Here's the bottom line that you need to know with respect to AsktheBuilder.com and video reviews.

I'm in the process now of negotiating with several companies about doing quite a few paid video reviews.

It's the future.

Companies are looking for *Influencers* - that's the fancy name they're attaching to media folk like me - who have decades of hands-on field experience and understand how to connect using video with their audience.

CLICK HERE to watch one of these videos. This is one about a product I LOVE and use.

Here's my PROMISE to you:

I'm only going to do paid video reviews for outstanding products. PERIOD.

As I said in my Disclosure Policy, at the end of the day I only have one thing:

My integrity.

I don't want to sully it in any way and I don't want to lose your trust.

What do you think of this emerging trend about paid video reviews?

How do you feel about my Disclosure Policy?

New Q & As for You

Here are a few new tips for you.

STOP Brick Wall Leaks With Great Products

Patio Slopes Towards House

Tile over BAD Concrete? You Bet You Can with Magic!

Patio Gravel Base and COMPACTION SECRETS

That's enough for today.

This is a big week for me on the roof.

Tim Carter
Founder - www.AsktheBuilder.com

Do It Right, Not Over!

Mobile Video Consumption Trends

It's August of 2015.

Each day more and more people are watching and consuming video on their mobile phones and tablets.

I'm one.

Over the past six months, I've watched countless videos on my Nexus 4 smart phone. More on this story in Tim's August 23, 2015 AsktheBuilder Newsletter.

Here's a short list of articles about this growing trend.

If you're a marketing manager, you better be hyper-focused on this data.

Your job or end-of-year bonus could depend on it.

Media Platform Latest Stats on Mobile Video

Market Wired Ooyala Study

Reelse Mobile Video Study


Tile Over Bad Concrete

You can see the top layer of the concrete stuck to the bottom of the tile. This just adds another step to the process. Photo credit: Eric Sokolowski

You can see the top layer of the concrete stuck to the bottom of the tile. This just adds another step to the process. Photo credit: Eric Sokolowski

Eric M. Sokolowski and his wife, I think, have trouble in Tukwila, Washington.

They have to tile over bad concrete and are stuck on what to do.

Here's Eric's full report:

"Hi Tim,

We want to replace the kitchen/foyer tile in our 1993 condo. We already knew the subfloor was some type of soft concrete that we are unfamiliar with we did a test removal of a tile under the oven.

What we discovered was disturbing.  The subfloor appears to be breaking apart and comes off along with the thinset and tile.

We are wondering what the prospects are for being able to remove and replace the outdated ceramic tile or what workarounds may we consider in completing this project."

You knew I'd have an answer, right? I always do. 🙂

Eric, you'll be able to install new tile.

The first thing to do is to check the integrity of the concrete after you remove the tile. Just take a hammer and a cold chisel and see if the rest of the concrete that's in place is sound.

I don't want you to beat on the slab, you just want to see if you can remove more concrete with minimal effort. If so, you need to remove any and all rotten concrete.

Once you have this done, you've got two options.

Install a thin layer of self-leveling floor material like this one from Proflex.

ProFlex

Install a thin sand/cement overlay. CLICK HERE to read several of my past columns about concrete overlays and how to do them.

I can tell you I'd opt for the self-leveling underlayment because they work and they're so much easier to do than a thin overlay. Since you're working with tile as the finished floor, it's imperative you get the floor in the same plane and that's hard for a rookie to do with a thin concrete or sand/cement overlay.

When you get the sacks of the pourable self-leveling material, TEST it first in a small area. You need to understand how to work with the material to get it to flow. Be sure the bad concrete is dust-free and it may be a good idea - assuming the underlayment instructions permit it - to dampen the old concrete. The damp concrete may help increase the bond.

The water could also create problems! So READ the instructions carefully.


Patio Gravel Base

Tan has  been busy tamping in Toronto, Canada.

He's building a brick patio.

Let him fill you in:

"Hi Tim!

I'm going guild a brick patio in my backyard. I just covered the ground with garden fabric, dumped gravel on top and I compacted it.

Should I put stone dust, compact  and lay bricks over it right away or I need to wait for a few months?"

Here's my answer:

Tan, you're good to go and can finish the job now.

I say this assuming a few things.

First, if you had to do any regrading of the soil, I assume you compacted it before going to the next step.

You didn't need to use garden fabric as I feel that was a waste of money. If your intention was to have it stop weeds, the weeds will grow in the tiny spaces between the brick after you're all finished.

When you added the gravel, I also assume you put it in about 4 inches thick and compacted it with a vibrating plate compactor machine.

If you hand tamped it, then you probably should have only worked 2 inches at a time.

Adding water during the compaction process really helps if there are sand-sized particles in the gravel.

The same applies for the stone dust. Adding water during that installation process really allows the particles to interlock.

Patio Slopes Toward House

Sandra Schumacher lives up in the land of billions of barrels of oil better known as Bismarck, North Dakota.

She's got a problem with here patio because it slopes towards her house.

Allow her to explain.

"We have a 10 x 12 concrete patio that has sloped toward the house causing leakage during rainstorms.

Could we pour a new concrete patio over the top with the proper slope (and enlarging to 14 x 12) or is it best to tear out the existing patio and start fresh?"

Here's my answer:

Sandra, you can do an overlay and not take out the existing patio.

If you go this route here's what I'd make sure of:

  • the surface of the patio next to the house must be at least 6 inches down from the bottom of the first row of siding or whatever is the exterior covering of the house
  • the new patio concrete must be a minimum of 4 inches thick and contain 1/2-inch steel reinforcing bars set on 2-foot centers going both directions - failure to do this will produce a crack where the larger patio extends over the existing one

Be sure to READ all of my past concrete installation columns so you don't have a premature failure of the product. CLICK HERE to read them.

Podcast 3

CLICK this image and listen to the first story - Vic has a gorgeous patio on the back of his house. One part of the patio has sunken down. I've got the fix.

Brick Wall Leaking

DEAR TIM: My wife and I moved into a new condominium building in March 2009. When it rains and there's heavy wind, we get water leaking through the brick. A gentle rain shower with the rain falling straight down causes no problems. What is causing the problem? There are many older brick buildings on the street that are well over 100 years old and none of them leak. Is there anything that can be done that will stop the leaks or do the exterior walls have to be completely rebuilt? Stanley P., Brooklyn, NY

DEAR STANLEY: What a darn shame you're experiencing this common problem. Not too many years ago, I used to do quite a bit of expert witness work in construction-defect cases. I was the lead witness in a huge case in the Midwest against a very large builder. He built many brick-veneer homes and every one of them had leakage similar to what you describe. My testimony about what was going on and how to fix it carried the day for the homeowners.

Here's a fact that's been known for hundreds of years: Brick walls leak. The leaks happen in the contact zone between the mortar and the brick. To the naked eye that may seem like a waterproof joint, but it's not. Often there are hairline cracks at these contact zones.

The vertical, or head, joints between two brick are the primary entry points for the water because modern bricklayers don't always completely fill this space with mortar. Even if they did, the first layer of brick you see on the outside of your condo would leak.

Two or three hundred years ago, this leakage issue was known. The builders who experienced leakage solved the problem by modifying how they built solid masonry buildings. They used different brick and they used a lime mortar different from today's high-strength mortars. The lime mortar has a unique self-healing property where it can grow new crystals when a hairline crack develops. It's too bad most masons don't use this lime mortar in modern construction.

This new mid-rise condo building experiences leaks through the brick walls during rainstorms. The cause is poor workmanship. Photo Credit: Stanley Pikovsky

This new mid-rise condo building experiences leaks through the brick walls during rainstorms. The cause is poor workmanship. Photo Credit: Stanley Pikovsky

Your new condominium building and the older solid masonry buildings in your neighborhood may look the same on the outside, but that's where it stops. The older brick buildings on your street have exterior walls that contain a minimum of two layers of brick. Some buildings have exterior walls that have three layers of brick.

The builders of old discovered that the brick you see on the outside needs to be a hard brick that resists weathering. These brick are fired in the kilns for a longer time and at a hotter temperature. Some brick like this are so hard they can resist Mother Nature's punishment for hundreds of years.

But the brick masons discovered they needed a softer brick that soaks up water. This was the brick they placed behind the one you see on the outside of the old buildings. These softer brick sucked up the rain water and then allowed it to evaporate back to the exterior of the building just after the rainstorm ended.

The dynamic of the rain water leakage is simple. Think about hammering a nail into wood. You tap the nail with the hammer and each hammer blow drives the nail deeper into the wood.

When a violent rainstorm hits your building, the first drop of water crashes against the brick and some water enters. The next droplet of rain along with the force of the wind pushes the first water droplet deeper into the wall. As the rainstorm continues along with the wind, soon you have a minor waterfall happening on the backside of the first layer of brick. This is the water that's leaking into your condo.

This leakage has been well documented by many building scientists for decades. The Brick Institute of America (BIA) has technical notes and bulletins that talk about this leakage and how to prevent it when building. Your building architect and builder should have followed the advice given by the BIA. These technical bulletins have been available for free for decades and can now be accessed easily from the BIA website.

A small company in Indiana has been working on solutions to this poor workmanship problem for decades. I met and know the owner of this company. He's written several industry white papers about brick veneer leakage. The name of the company is Saver Systems.

Your condo association can purchase two products from this company that may solve the problem. They require expert workmanship when applying them to get the best results.

masonry-water-repellentThe first product is a silane-siloxane clear water repellent. This product is sprayed on the entire exterior wall. It's very important that a second worker operates a powerful leaf blower to drive the water repellent deep into the wall. This blower acts like the wind during a rainstorm and drives the water repellent deep into the wall.

The second product that's needed is a clear crack and joint sealant. This is carefully brushed onto the mortar joints and it must cover the entire mortar joint but not carry over too much onto the brick. If this sealant gets on the brick, a white haze can develop over time. An experienced applicator can carefully apply the sealant so it just touches up against the brick sealing the invisible hairline cracks between the mortar and the brick.

masonry-crack-sealantRealize that this fix is not guaranteed because the workmanship, materials used in your condominium building and/or the actual design may be so bad that these two products can't overcome the deficiencies. I'd do a test on one part of your building and see what happens. If it's successful, then treat all the brick walls.

Column 1105

The above product links are affiliate links. I get a tiny commission if you purchase these from Amazon.

August 16, 2015 AsktheBuilder Newsletter

Are you a new subscriber?

Welcome! See that link just to the right, this one? CLICK IT.

Each week that's a secret link to a past column that may make your wildest dreams come true.

What a summer it's been so far. I'm in a state of shock that it's already the middle of August. Labor Day is just around the corner.

Tim as Train Conductor

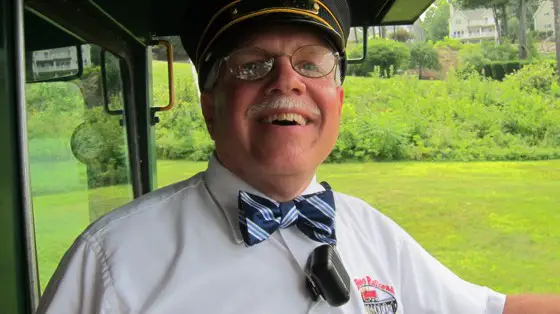
Me wearing my magic bow tie and Conductor's hat.
Believe me when I say the tie and hat have powerful magic. Most women boarding the train want a photo of me kissing them on the cheek.
Yes, it's a real bow tie I tied.

I've been working on the train for three days a week this season. It's been loads of fun. This is a dream once-in-a-lifetime part-time job. It's my second season.

Two days, I'm the train conductor. The other day each week, I'm a fireman.

On our train, a fireman is the ground man doing all the switching of cars. I love doing this and we do it six times each day. It's thrilling to be next to the throbbing locomotive as I bring it in for a hitch.

But the real excitement happens when I jump down in between the car and the locomotive to lace up the air lines.

Yes, don't worry all you engineers out there, I've got three-step protection when I go in between to lace them up.

When we travel north on our tracks, the fireman becomes an extra set of eyes on the left side of the train for the engineer.

The long snout of the locomotive blocks the engineer's vision on one side of the train, so I'm watching for people on the tracks and vehicles at crossings.

Just last week, we almost plowed into a pickup truck. The driver slammed on his brakes at the last moment.

I was just about to reach behind me for the dump air valve to put the train into an emergency stop, but the truck driver decided he'd screech to a halt just three feet from the passing locomotive.

I'm sharing this story for a reason.

Trains ALWAYS WIN.

You will ALWAYS LOSE.

Our tiny train of just a switching locomotive and five cars weighs in at about 400 tons.

Even though we're only traveling at 12 mph on average, 400 tons against the 2-3 tons of your car is no match.

Please, please, please always STOP, LOOK and LISTEN at railroad crossings. The listen part is for the 19-B required horn blast trains must do at public roads.

It's the Morse code letter Q. Two long blasts, a short blast then a long blast.

I'll finish with this. This past Wednesday, I had to deliver a can of gasoline to our track crew on a nearby side street.

A young couple who were renting a nearby house for a week was out for a walk, saw my uniform and said, "Do trains really come on this track?"

"You bet they do," I said.

I went on to tell them that at any time day or night a train or locomotive could be on this placid train line along the gorgeous Lake Waukewan.

Speaking of which, here's a photo I snapped last weekend of a sunset near the railroad tracks looking across Lake Waukewan.

How lucky I was to witness this magnificent gift.

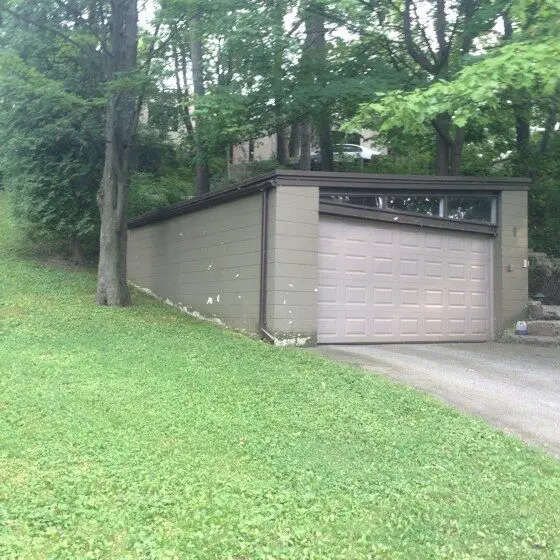
Garage Design - Same Mistakes Day after Day

A new house is being built at the end of my road.

The rough carpenters finished framing the roof this past week and the two-car garage faces the street.

As Kathy and I went to church today I mumbled to her, "I wonder if those homeowners realize they'll not be able to open up their car doors inside the garage."

When I saw the foundation for the garage being poured two weeks ago I spotted the common problem.

The distance from the outside corner of the foundation to where the garage door opening started was only 2 feet.

The catatonic builder and architect who drew the plans for the house I live in made the same mistake. I see it happen 99 percent of the time in garages all across the land.

Why does this mistake keep happening? It's insane.

I wrote a column years ago about the Dream Garage.

CLICK HERE to read what your garage should be like when you go to build again or perhaps build a detached garage.

Gas Detector - Pay Attention

I've got a wand-type gas detector that I need to test, but the roof job is putting everything like that in the back seat.

However, this is important enough that you need to know about this NOW.

I'm talking about the Brasscraft Gas Detection Wand.

This detector works on all sorts of gases, not just natural gas. CLICK HERE to read about what it can do.

I read the reviews about it at Amazon.com. Some are good and some are bad.

That's pretty normal as I know it's impossible to satisfy everyone.

But here's what you need to know about gases and some of the reviews.

Some gases are HEAVIER than the air we breathe.

Propane happens to be one.

If you're trying to detect a propane leak, holding the wand ABOVE the pipe or fitting may not produce a hit!

Realize when you're using a gas wand detector like this go above, under and along the sides of joints as you test them.

It's possible the bad reviews were a result of operator error and not the fault of the tool.

New Q & As for You!

I've been busy..... I had a few hot days and it was just impossible to get up on my roof.

Barb and Grouting her Sunroom Floor - Too Much?

Putting a Deck on a Patio in Plantation - Not So Fast James!!!

Caulking Secret for Stair Trim

&%^$#*@ Shed Door Not Square!

Rouge Grout on Cabinets - How to Remove SECRET!

Brick Mortar Clean-Up - BE CAREFUL!!

That's enough for this hot and HUMID day here in NH!

Tim Carter
Founder - www.AsktheBuilder.com

Do It Right, Not Over!