How to Remove Foundation Waterproofing

Dianna Morrow has a common problem.

She's building a new home in Hardy, VA.

Here's what she sent:

"The waterproofing spray on my foundation was applied with lots of overspray above grade.

The builder has tried grinding it off, painting over it and some other coating that cracked terribly.

What options to cover/correct this do you suggest?"

What a mess! Someone didn't follow the chalk lines or they were snapped in the wrong places. Photo credit: Dianna Morrow

What a mess! Someone didn't follow the chalk lines or they were snapped in the wrong places. Photo credit: Dianna Morrow

Here's my answer:

Dianna, it's time to rent an old-fashioned sand blaster.

That will remove the mess.

How to Accomplish the Stress-Free Kitchen Remodel

My friend Jim, who lives in Cleveland, OH, contacted me six months ago. He and his wife were about to sign a contract with a remodeler to do a major kitchen remodel job. He signed the contract within 36 hours of emailing me and the contractor started the job two weeks later.

Jim and his wife are still doing dishes in his bathtub and the social fabric at their house has a tear in it bigger than the gash in the hull of the Titanic when it broke in two over 100 years ago.

What went wrong? How can you avoid the nightmare that Jim's now living in real time each day? It's so easy.

Degree of Difficulty: Two Hammers out of Five.

Step One: Any remodeling job is just like building a house. You have to start with a sound foundation. The basis for a kitchen remodel job are the detailed plans and specifications you have drawn for the job. Specifications are written instructions that normally don't fit on the plans. They explain quality standards and exactly what materials are used where.

Step Two: Understand I'm not talking about a simple plan you draw up on Google SketchUp in 30 minutes using assumptions about your kitchen. I'm talking about a highly accurate blueprint plan that's drawn 1/2-inch per foot in scale. It's accurate to within an eighth of an inch in the measurements. The plan also has accurate elevations of each wall of the kitchen once complete.

An elevation is a two-dimensional drawing of what the kitchen cabinets and countertops would look like if you stood facing the finished product. This drawing shows exact locations of electrical outlets and even the handles on the cabinets and drawers.

Step Three: You must select every single item that's going to be in your finished kitchen before you bid the job. Don't fall into the Allowance trap. Allowances are death on a stick. They are financial booby traps and slick salesmen use them to pitch you a lowball price for a job. When you list every single item, appliance, fixture, etc. on the plans and in the specifications, the contractor can't make a successful argument for more money to do something AFTER the contract has been signed. He had access to what you wanted in the bidding stage since you put it on the plans and in the specifications.

Step Four: If you're ordering custom cabinets where stain colors are critical, then place the order and get the cabinets delivered to your home before you start the job. Inspect the cabinets to ensure they're accurate in size and the finish is exactly what you want. Jim's waiting for his third set of cabinets as I type this. Yes, two times before they've been wrong.

Step Five: Before you sign the contract, have the contractor give you a schedule of the work. It can be simple just showing at the end of each week what will be complete. I used to do this on all my jobs and rarely did I get behind schedule.

Step Six: Think about the real amount of time it might take to do tasks. For example, a plumber may have no trouble installing a new sink drain line in a day, but it's doubtful a drywall contractor can hang, finish and sand an entire kitchen in just three days. It is possible to fast-track a drywall job and use special fast-drying joint compounds, but rarely does a contractor do this. A typical drywall job may last five days.

Step Seven: Don't fall into the Where's-the-Contractor trap. Too many people pay the contractor too much money early in the job and then you wonder why he's not showing up. Money is the only leverage you have with the contractor. You rarely pay for things in advance in the real world. Why would you even consider doing it with a contractor?

Step Eight: The good contractors have charge accounts with all their suppliers. They don't pay the suppliers in advance for materials except a deposit on special order items. They don't pay their employees in advance. They don't pay their subcontractors in advance. So for them to ask for money in advance for things they don't pay for in advance is not logical.

Step Nine: Get an itemized quote from your contractor for each phase of the job. Agree on payments that align with this breakdown as each phase of the work is complete and to your satisfaction. It's not unreasonable for you to write a check at the end of each week so long as work is progressing and you always have slightly more money remaining than there is work to do at your home.

Summary: The key to a stress-free kitchen remodel lies in a fantastic set of plans that are so good the contractor doesn't ever have to ask you a question about anything. Get as many materials as possible to the job site before you demo out your old kitchen. See about setting up a temporary kitchen with your old cabinets in your garage so you're not using your tub as a sink!

Column HT044

Change Mortar Color

Maryann Mosca had an unfortunate loss in her life and now she's trying to finish a stone job and needs to change the mortar color.

She lives in Branchburg, NJ.

Here's what she sent me:

"Let me start by saying my husband was a carpenter and put on a 2nd floor and front porch on our house. He passed away suddenly and unexpectedly last December, and  I am trying to finish what he started.

On the porch, he started the stonework, putting the wiring on. I since then, put up the scratch coat and the stone. I'm now grouting it.

You can see the different colored mortar. Photo Credit: Maryann

You can see the different colored mortar. Photo Credit: Maryann Mosca

I chose to dye the grout, and although I'm measuring the amount of dye, water and mortar, this last batch I mixed, it dried 3 shades darker. I don't know how to change the color.

The porch is about 50 ft long. I have about two more batches to make and  'm done. It's about 1/2 bag of mortar a batch. How do I change to grout color without chipping it out?

Please help! I don't have anyone to help me."

Here's my answer:

Maryann, I'm sorry for your loss.

The good news is that for years liquid stains have been available to darken floor tile grout. They really work well.

I went to Amazon and they have pages of them. CLICK HERE to see them.

Be CAREFUL and read the reviews. You want a stain that's just like wood stain. Some grout stains are PAINT.

Do NOT use a stain that's more like a paint and creates a film over the mortar. TEST any product you buy on a small test panel you build.

The stain needs to be VERY LIQUID and seep deeply into the mortar.

Your biggest issue will be applying in very carefully with a tiny brush so you don't get any on the stone.

June 16, 2015 AsktheBuilder Newsletter

Are you a new subscriber? Welcome!

Each week, the link to my site just above your name is a MYSTERY link. CLICK the link and it will take you to a special page deep in my site where you'll discover something new.

This week's clue: circles in Santa Fe

This coming weekend I'll work on the scenic train. I'm a real conductor and tens of thousands of motorcycle riders are gathered here for the infamous Laconia Bike Week.

There are so many motorcycles up here at the Weirs Beach area, the roads are closed to cars and trucks.

The locals who want to gawk at the meat market and bikes take our train - it acts as a fast shuttle - from our Meredith station to the Weirs.

The train is so busy that we need a conductor for each car. The weather forecast is perfect so it could be record ridership.

I'll have on my brightest bow tie and will be sporting a new red dragon tattoo on my left arm. I do the tattoo each year to sort of fit in as part of the group. Yeah, it's lame but it sure looks real.

Do you want to see a photo of the tattoo?

The regular daily schedule of the train starts in just ten days. If you come up to NH for a visit, contact me so I can give you a FREE ride on the train on a day I'm working.


.
CLICK HERE to SEE all past Newsletters!
.


WORX Cordless 56V Lawn Mower Review

I had a chance to test a cordless electric lawn mower here at my house.

How many hammers out of 5 do you think I gave it?

CLICK HERE to see if you were right.

Bathroom Exhaust Fan MISTAKE

Where does your bath fan exhaust?

Do you live where the temperature drops below 65 F?

You better CLICK HERE right now to see if your bath fan is exhausting the correct way from your home.

.
CLICK HERE for a WALK THROUGH CHECKLIST!
.


Plumbing Vent Pipe Flashing INSTALL Video

Have you ever seen the plumbing pipes that stick up out of your roof?

My guess is you probably have a piece-of-crap flashing around it.

I'll admit now I installed these so-so flashings for years BECAUSE a better one was not available.

YOU MUST WATCH MY VIDEO to see how the flashing on my roof FAILED after just 10-12 years.

Is your flashing ready to fail? Is it about to let water POUR INTO your home?

Guess what? You can now get a SUPERB plumbing vent pipe flashing that will last and last.

WATCH my NEW video showing it and how I installed it on my roof.

What do you think of my Australian Outback hat? It's a REAL one from Australia. Works great to keep the sun off my face.

Upcoming Series on Asphalt Shingle FAILURES

I wanted to let you know that I'm in the process of writing a series of articles about recent asphalt shingle FAILURES.

Why?

Your roof may have failed prematurely and guess who's 40-year-guarantee roof FAILED in 12 years?

Mine.

In all my years of dealing with asphalt shingles, I've never seen shingles fail like mine. There are shingles failing all over the USA.

Are yours?

Are your shingles losing lots of ceramic granules? Are they cupping and curling? Are your architectural shingles delaminating?

SEND ME PHOTOS and tell me your story.

I received an email yesterday from the Asphalt Roofing Manufacturing Association and they're REFUSING to cooperate with my story.

Let me tell you when you get an email reply like that, it's not good.

They told me to contact their members separately.

I'm doing just that. Moments ago, I received a fairly snarky reply from a PR person from a MAJOR manufacturer. I hope they work with me and I'm not forced to publish what she sent me. Oh my!

Years ago, I was told I was the first INDEPENDENT writer to jump into and expose the EIFS wood-rot issue.

Perhaps I'm going to be the first to expose what's really going on with asphalt shingles.

As Kenny Chesney said in his hit song:

"Only time will tell, but it ain't talkin'."

STAY TUNED for my upcoming reports. This may turn into a paid product.

Is Your AC Not Keeping You Cool?

Did you know that air conditioning units are like shoes?

CLICK HERE to see why and HOW TO STAY COOL in summer heat.

How To COOL Your HOT Attic

A few years ago, there were all these gimmick fans hitting the market making absurd claims about how to cool your attic.

Do you want to know the TRUTH BASED IN SCIENCE about how to cool your attic?

I thought so.

CLICK HERE and READ the entire column of mine.

That's enough for now.

Next time, you get to read about Bernadette from London. She was polite enough to thank me for answering her question. You're welcome, Bernadette!

Tim Carter
Founder - www.AsktheBuilder.com

Do It Right, Not Over!

Garden Wall Repair

Bernadette Snoussi lives in London, England.

She's got a problem with an older decorative garden wall that's in need of repair.

Here's her description, but I think the wonderful photo she sent does a superb job of telling the tale:

"Hi.

Could you please tell me whether it's possible to apply new concrete plinths over the top of the existing damaged ones on this little boundary wall (to avoid further damage when removing broken one)  and if so, would they be applied with concrete or some other form of adhesive?"

Bernadette is talking about repairing the missing chunk of concrete cap. Photo credit: Bernadette Snoussi

Bernadette is talking about repairing the missing chunk of concrete cap. Photo credit: Bernadette Snoussi

Here's my reply:

Bernadette, you sent a wonderful photo. It really helps me understand what you're up against.

First, you can repair this by adding concrete to replace what's missing. Be sure the stones in the concrete are NO LARGER than 12 mm in diameter for this smaller, thinner pour.

The hardest part will be building the formwork required. You'll need a flat piece of wood to prevent the concrete from falling into the semi-circle below. The sides of the form should overlap the existing cap at least  4 inches on each side to ensure the replacement concrete is in the same plane.

Pay attention to any slight sloping of the sides and use clamps to ensure the side forms do not move while you're pouring and working with the new concrete.

I'd use a hammer drill and drill into the sides of the existing concrete to install some steel pins. Be sure this steel is primed with a great metal primer and you put on two finish coats of paint on the steel. These pins are inserted into the existing cap and will help lock the new repair with the old. The steel only needs to be about 6 mm in diameter and 100 mm long. Insert the pins about 50 mm into the existing concrete.

Here's your biggest decision to make:

The replacement piece of concrete will look like a scar on your face. It's going to be ugly.

Do you want to hide it? If so, you can then stucco the entire cap along the length of the wall. The issue with this is that the mellow aging, moss, and character of the cap will disappear.

You may be able to get the patch to blend in very well if you read ALL of my past columns about tuck pointing brick and matching mortar. The secret is using the same sand and aggregate in the concrete that the original masons used.

Ninety days after the repair is made, you then do an acid washing of just your repair area to remove the cement paste from your new sand and aggregate.

Worx 56V Cordless Electric Mower Review

Yesterday, I had a great opportunity to test the WORX 56V MaxLithium 19-inch Electric Lawn Mower.

It was a sunny weekend, the temperature was quite comfortable and my grass needed to be cut.

I admit I had preconceived ideas about how the experience would go based on a different electric mower I reviewed about four years ago.

Back then, I was not impressed with cordless lawn mowers.

Guess what?

Times have changed!

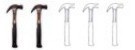
Ask the Builder Rating:
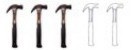
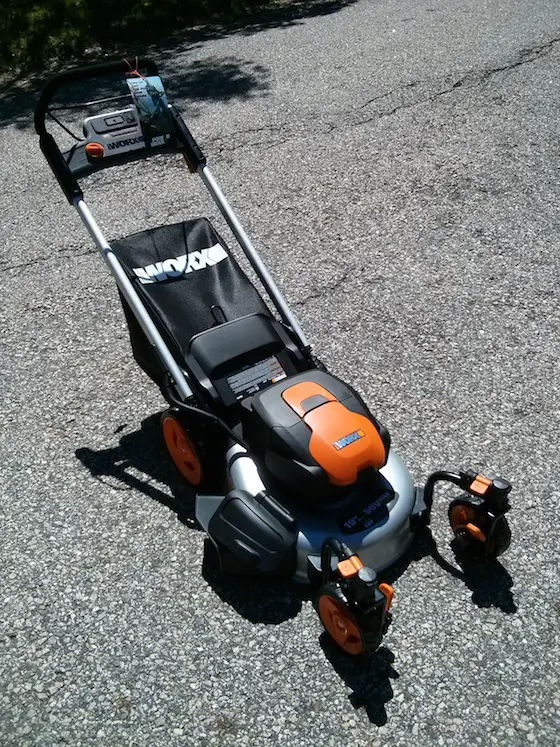
 hammer-3-5


Worx 56V Cordless Electric Mower

The Packaging

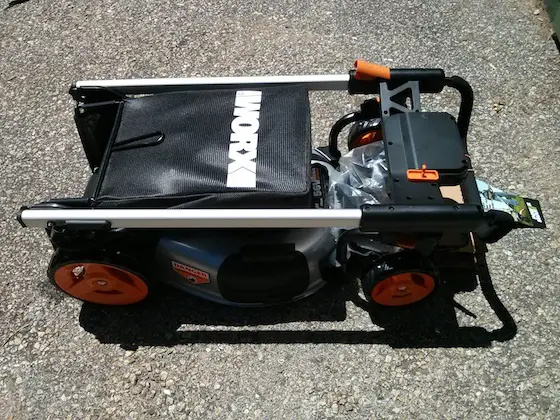
The engineers who designed the box the mower came in did a great job. The packing was minimal but did a superb job of protecting the mower and all the accessories. All I did was cut the two corners at one end of the box with a razor knife, lower that flap to the garage floor and the mower rolled out of the box. Don't be a fool and try to lift the mower out of the box.

Worx 56V Cordless Electric Mower box

The handle of the mower is folded over and all you have to do is press a simple button on one side of the handle and it lifts to the upright position. In seconds I was ready to cut - or thought so hoping the batteries might come from the factory with a teaser charge.

Worx 56V Cordless Electric Mowerfolded up

They didn't. The batteries needed a full charge.
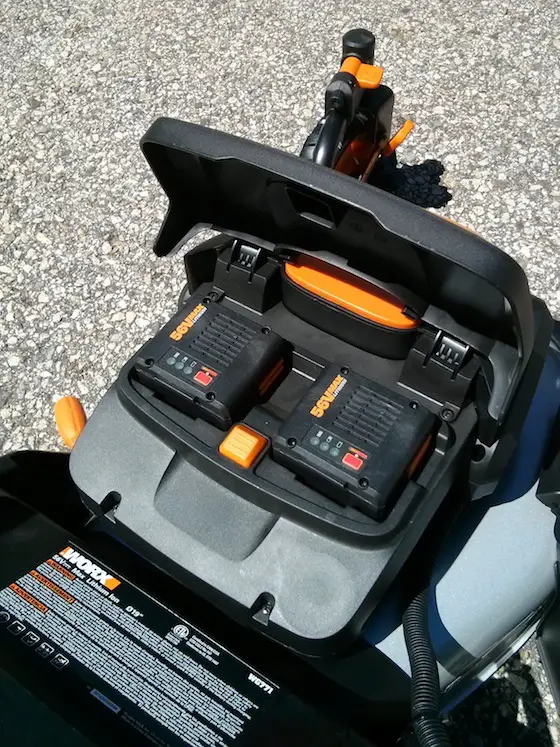
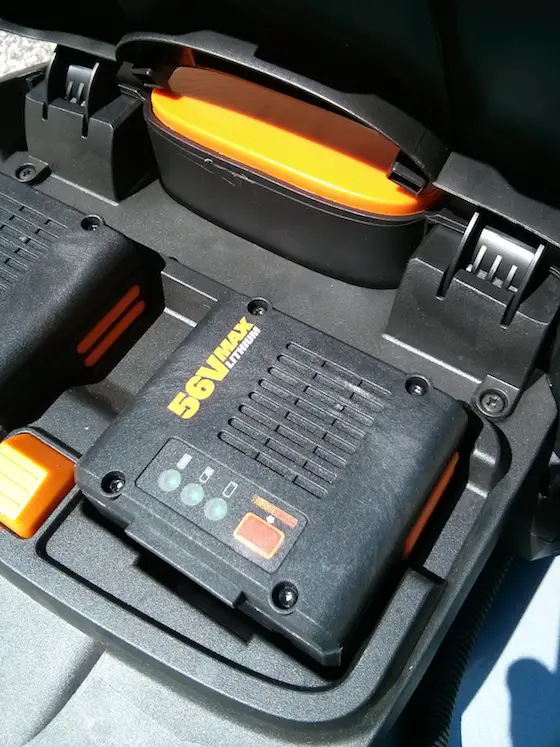
The Batteries

The specs by WORX say the mower comes with two 56-volt lithium-ion batteries that are connected in parallel to achieve a longer run time at 56 volts.

Each battery, per the owner's manual, requires two hours of charging time. The charger only can accommodate one battery at a time, so you'll be investing four, five, eight or ???? hours to get your mower ready to cut. If you set a timer on your smart phone to alert you to when the two hours is up on the first charge, you can minimize your charge time.

Worx 56V Cordless Electric Mower batteries

If you don't do this, then when you finally remember the first battery is charged and you put in the second one, you're two hours away from cutting your grass.

The batteries come with a power-level indicator on each one. Pressing the red button on the battery tells you how much invisible juice is left inside the pack. Flip open the storage bay door on the top of the mower to access the beefy batteries.

Worx 56V Cordless Electric Mower battery close

The Weight

I was pleasantly surprised at how light the mower was. I have a hilly lot and thought it would be very hard to push the mower up my drive to cut the grass on my septic tank leach field. It didn't require a great amount of effort to push the mower up 25 feet of 20-degree grade.

If you have a level lot, you'll think you're pushing around a play mower a toddler might use to cut grass. Yes, it's that light and/or the wheels have superb bearings or both!

Maneuvering the mower around and making turns was a breeze. The caster wheels up front make a huge difference compared to the fixed-axle wheels on most mowers.

Height Adjustment

It's easy to adjust the height of cut on each wheel. I set mine at 4 inches and it was perfect for the cut I prefer on my lawn.

Cutting Time and Area

The amount of time and area you can cut depends on how thick, wet and high your grass is and how fast you can walk or run. My grass was about 7 inches tall, so 3 inches needed to be cut off. Realize that my grass here in New Hampshire is as fine as baby hair and it's very sparse. It's not a great lawn by any means. Get the image out of your head now that I was plowing through thick dense grass that would bog down a mower. That's not the kind of lawn I have.

It was dry as a bone so that helped cutting as well. I walked moderately fast but didn't run at all. I'd say I was moving about as fast as the normal person might cut their grass without being unsafe and without being a  5K runner.

The mower comes with two settings: Turbo and Eco. I had it on the Turbo setting which no doubt sucks more power from the batteries.

When you switch between the two settings, you can hear pitch of the spinning blade change, but I wouldn't say it's a huge difference in RPMs.

The WORX webpage says you can cut up to 9,400 square feet of lawn with one full charge of both batteries. My guess is they did that calculation with the Eco setting and with an Olympic runner behind the machine.

Worx 56V Cordless Electric Mower

This was taken from the WORX website. Image credit: WORX

There's a blue LED indicator up high on the handle that tells you the amount of power left in the batteries. After cutting only 2,000 square feet of lawn my indicator light went from solid 25% to flashing blue. This told me that at any moment the mower might stop. 

Based on this observation either the 9,400 square feet estimate is pie-in-the-sky, my indicator meter is not working right and/or my batteries are not working properly. Next time I cut the grass I'll do it on the Eco setting and cut the exact same area and see where the battery level is at. Watch for that update.

My mower was still operating at full speed acting like it had plenty of power, but lithium-ion batteries are like that. They operate pretty much at full power and when close to being completely discharged, they fall off the cliff.

If you graph the power curve it looks like an Olympic high diver going off a 50-foot platform.

I may have only had minutes of cutting time left when I parked the mower in the garage. I'll never know as it was time to go in and shower for dinner.

Suggestions to WORX:

1. Provide a dual charger so both batteries can charge at the same time.

2. Produce a great EASY Quick-Start guide. Make sure in the guide you tell people that it takes the mower a full second before the motor starts up after you do steps one and two. Many will think the mower is BROKEN because it doesn't respond IMMEDIATELY to the safety bail handle being pulled back.

3. Have a sticker on the mower under the battery storage door AND on the charger for BEST PRACTICES with respect to care of the batteries. In other words, it is best to store the mower with fully charged batteries? What about over the winter? Should the batteries be stored for six months in a low-charge state? This may be buried deep in the Owner's Manual, but realize most people hate to read those books.

4. The LED battery indicator on the handle was impossible to read because of my height. Maybe a taller person can see it, but the horizontal handle my hands were on blocked my vision. Maybe this should be on the top of the mower? You're always looking down at the mower as you cut, so the indicator could be put at a 30-degree angle facing right back at the operator.

5. Consider having different colored LEDS. Blue for 100% charge, green for 75%, yellow for 50%, red for 25%, blinking red for "Get me back to the charger NOW!"

FINAL ASSESSMENT:

This was a fun mower to operate. It was easy to use. You don't have to be strong to operate it. It's not noisy, but you do hear the spinning blade.

Don't be fooled by the zero emissions claim if you're really interested in all the fuzzy eco-friendly buzz that's going on in this day and age. Believe me I love the outdoors and hike and do outdoor radio all the time.

Realize that smoke, fumes, or gas of some sort was emitted into the atmosphere and heat was probably dissipated in nearby water at the power plant where the electricity was created you used to charge your batteries. Think of it as a not-in-my-backyard pre-emission. You'll only emit perspiration when you operate this mower and quite possibly a smile.

Because the LED meter told me I had a small amount of power left after only completing about 21 percent of what the WORX marketing department says I could cut, that's why I'm only giving it three hammers out of five.

As I said, I could have bum batteries, the meter could be defective or I'm horrible at doing square-footage calculations. I think it's safe to say I know how to do accurate multiplication after a successful estimating and building career of twenty-plus years.

Do the math at your house, see how much grass you need to cut and if you're in the 3,000 to 5,000 square-foot range, this may be the mower for you.

CLICK HERE NOW to BUY the mower.


This mower's review was featured in the June 16, 2015 AsktheBuilder Newsletter.

Bath Exhaust Soffit Vent

DEAR TIM: I'm replacing my bath exhaust fan. The old fan was vented through the soffit. I don't believe I have an attic as there seems to be no access to the space. My roof is sloped but my bath ceiling is flat. What's the best way to exhaust the fan out through the soffit? If I close off some of the continuous vent strip to prevent exhaust from entering the vents, how much should I do? I'm worried about damaging my house and I live in northern New Hampshire where it gets very cold. What would you do if you were me? Bob D., Dixville Notch, NH

DEAR BOB: You should be very concerned about damaging your house. I feel I can speak to your concerns because I also live in New Hampshire and know all about cold weather. Some of your answers go back to your high school physics class, if you can recall some of those memories.

Let's talk about the science of what's going on and allow me to relate to you some of my own observations. Here are three things we know are facts:

  • hot air rises
  • water vapor will condense on cool or cold surfaces
  • water will fuel wood rot by providing wood-eating fungi with much-needed moisture

It's hard to see air as it's invisible. But in cold weather, we get to see the foggy water vapor that turns to miniature clouds when we exhale our breath or we see water vapor escaping from a chimney, dryer vent, soffit vent, auto or truck exhaust pipe, etc.

You never see the white water vapor go down in cold conditions. You may try to force it down, but it always starts to float up much like air bubbles rise up in water. The past few years in the cold winters that you and I experienced, my propane boiler belched out clouds of water vapor through a side wall vent near the ground. Ten feet above this vent is a roof overhang that gets coated with frost as the water vapor condenses on the cold painted wood soffit and fascia boards.

I maintain that much of the water vapor that comes out of your bath exhaust soffit vent will float along the bottom of the soffit until it finds a way to float up through openings in your continuous soffit vents. This water vapor will start to condense on the ice-cold roof framing members and your roof sheathing. You will not see this happening in your attic space that exists above the flat ceiling of your bathroom.

I've been in attics that are coated with frost from humidity that makes its way up into attic spaces. With great ventilation you normally don't have any frost as the cold dry air moving through the attic space picks up this moisture and carries it away into the atmosphere.

roof-vent-flashing

If you decide to vent your bath exhaust through the roof using solid PVC pipe, be sure to use a high-quality flashing like this one to prevent leaks. Photo Credit: Tim Carter

You may luck out and not have a problem, but I would never ever knowingly inject vast amounts of water vapor into my attic or above a vaulted ceiling and then hope all would be well. Hope is the emotion of last resort. You hope for things when you can't control the outcome. You can control where the water vapor from your bath goes.

I would exhaust my bath fans, if given the opportunity, through the roof. We have the technology to do this easily and effectively. Being a master plumber I'd just treat bath exhaust like I do my plumbing vent pipes. I'd connect bath fans to schedule 40 PVC pipe and send the exhaust up through the roof. Once the pipe exits the roof, use a gentle sweep 90-degree angle followed by a 45-degree bend to prevent rain water from entering the exhaust pipe. Be sure the end of the pipe is at least 20 inches above the roof so it's never blocked by deep snow.

It's vital the exhaust pipe be wrapped with at least three inches of foam insulation. If you have just the PVC pipe exposed in the attic, it will get cold and the water vapor in the pipe will condense and run back down the pipe eventually leaking into the bathroom through the exhaust fan.

When you go to put the PVC pipe through your roof, you want to make sure you use a great flashing. The last place you want a leak is in your roof. Not all roof flashings are made the same and some have components that fail in short order. I recently replaced a plumbing vent pipe flashing that had failed after just twelve years or so.

I happen to like using the roof flashings that are made with a high-grade silicone boot that doesn't become brittle like the less-expensive rubber boots found on common vent-pipe flashings. Remember, if you decide to vent your fan out the roof as I propose, it's the same exact procedure that a plumber and roofer use to take care of a plumbing vent pipe.

Some people are terrified to cut a hole in their roof to put in a flashing like this. You'd be stunned at how easy it is to do. I decided to tape a video showing step-by-step how it's done and how to create a leak-proof installation. WATCH MY VIDEO about installing the special high-quality flashing and consider exhausting your bath through your roof:


Column 1096

Plumbing Vent Flashing Video

Tim Carter shows a failed plumbing vent flashing, a high-quality replacement flashing, and he provides step-by-step installation instructions.

Just below the video is a LINK to PURCHASE this high-quality flashing. Or CLICK or TAP HERE now to order one.

Here is a picture of the Lifetime Tool & Building Products' plumbing vent flashing. This is the one installed in the above video.


roof-vent-flashing

If you decide to vent your bath exhaust through the roof using solid PVC pipe, be sure to use a high-quality flashing like this one to prevent leaks. Photo Credit: Tim Carter


CLICK HERE to buy it.

June 12, 2015 AsktheBuilder Weekend eBlast

What happens in nine days? Think.

If you're in the Northern Hemisphere, it's the summer solstice. If you're down under, the winter solstice.

For me, it's sort of a glum day. The amount of daylight after June 21st, gets less and less each day until we get to the other side of the sun.

I always look forward to the winter solstice and the summer solstice saddens me.

What's this mean for you? If you're working outdoors on an extended project and just on weekends that requires sunlight, you better start working faster.

Mystery Link!

Two weeks ago, I started a new feature where the link above at the top of the newsletter - in this case it's the word AsktheBuilder.com just before Weekend Warrior - links you to a secret column on the website.

Today's clue: Do you dream? How many mistakes do you think I could find at your home inside your garage?

Answers: Go up to the top and CLICK the link! You'll be stunned.

WARRIOR Video

At the end of my street where it hits the road that takes me to town, some loggers just cleared a lot where a new home is being built.

Have you ever had the pleasure of seeing the FIRST thing a builder does when he starts the average home?

I didn't think so! CLICK HERE to watch a video that I guarantee will amaze you.

Charlene's Teak Table

Late yesterday, I received an email from Charlene with two attached photos.

Charlene purchased some of my Certified Organic Stain Solver to clean mold, mildew and algae from her outdoor teak table.

Stain Solver is a product Kathy and I developed about twenty years ago and we sell it everyday.

It's a Certified Organic oxygen bleach product that cleans ANYTHING water washable.

It's color and fabric safe.

Charlene only made one small mistake. She hosed off the table before applying the Stain Solver solution.

It's always best to apply Stain Solver to a deck, a table, a patio, clothes, furniture, carpet, etc. when they are DRY.

This way the Stain Solver solution can soak in deeper for better cleaning. When you wet something first, the water molecules take up the vacant space in the item's structure and the Stain Solver has to try to work hard to move that water out of the way.

Look at Charlene's Before and After photos below. The After photo is the teak table WET. There's NO sealer or stain on it!

Isn't that amazing?

teak table
teak table

.
CLICK HERE to ORDER Stain Solver NOW!
.


More Tips for You!

CLICK HERE for Dream Garage Illustrations.

CLICK HERE to see how to REALLY POLISH BRASS.

CLICK HERE for a Time Tested Water Barrier that WORKS.

That's enough for today.

I'll be back to you on this Sunday.

I asked for some flashy bow ties that I'll use when I'm working on the train as a conductor.

What? You didn't know I was a train conductor? I had an early season Dinner Train this past Wednesday. The season starts in earnest in just two weeks!

CLICK HERE to see me in one of my real bow ties that I tie!

Tim Carter
Founder - www.AsktheBuilder.com

Do It Right, Not Over!

June 7, 2015 AsktheBuilder Weekend Newsletter

"John, I've got extra hammers. Come on up and see how it's done."

"Tim, if I need roofing work done I just call 1-800-ROOFER." (that is not a real number)

"You mean call 1-800-GetAGreatRoofer."

"Tim, you're my hero!"

John has said that to me before because he marvels at me doing lots of work around my house.

The above was part of a brief conversation I had with my next door neighbor earlier in the week as I was up working on part of my roof that faces his house.

John's not a DIYer. He hires people to do all the work around his house. There's nothing wrong with that as it helps the economy.

But the part of the story you're missing is that just before John moved in about four years ago he hired a roofer to put on new shingles.

This past winter he had SEVERE ice dam leaks that caused all sorts of damage to the inside of his home.

To his credit he didn't know who I was before he moved in and hired that roofer. If he had known about my past history and asked for some advice, he probably wouldn't have hired the roofer that he dialed up.

My roof is not going to leak because I know what I'm doing and I'm using the best materials I know of to complete the job, even down to the nails.

Yes, there's a HUGE DIFFERENCE in roofing nails.

If you want to know how to do your roof the way I'm doing mine, in case you're going to hire someone, then GET MY ROOFING DVD NOW.

It's on SALE NOW $15 off the normal price and FREE SHIPPING.

I'm taping the videos for it during this job and I hope to have it ready to ship by the end of July.

NOTE: the DVD is not yet produced. This is a PRE-PRODUCTION PROMOTION.

I believe John and his wife think I'm nuts for climbing around my roof tearing it apart and putting on the gorgeous DaVinci Single-Width Synthetic Slate.

The truth is, I'm having a blast. I love working with my hands and I KNOW I'll NEVER HAVE ICE DAM LEAKS - or any other leak for that matter.

Mystery Link Clue!

Remember, each week the text link at the TOP of the newsletter - see the word AsktheBuilder.com above with the date next to it - is a MYSTERY link to a great old column.

Here's a clue for you: What do you see when you take a black and white photo of a rainbow?

Go back up and CLICK the link to discover the answer.

.
CLICK HERE and Get Great DIY Answers and More
.


Santa Fe Advance 2 Dehumidifier

I had the great good fortune to work with the folks at Santa Fe who make a fantastic dehumidifier.

Did you know that many of the dehumidifiers that you see at the home centers are lightweights?

Did you know that there's a HUGE DIFFERENCE between dehumidifiers?

That shouldn't be a surprise to you.

Watch my NEW VIDEO about the Santa Fe Advance 2 dehumidifier.

Paslode Compact Nailer

Looking for a superb tool for Fathers Day?

I don't know a man who wouldn't love to have a Paslode Compact Pneumatic 30-degree Framing Strip Nailer.

Even John - my neighbor - would love this tool!

This tool only weighs 5.9 pounds. That's very light compared to traditional framing nailers.

Paslode gets it. When was the last time you bought something and were not able to use it RIGHT AWAY because you were missing something?

Well in this case, you need NAILS to use the tool.

Paslode includes two strips of nails in the box, as well as safety glasses so you can use the tool within 60 seconds of opening it up.

Good form Paslode! Said in my best Captain Hook voice.

If you've never used a framing nailer before, I want to WARN YOU NOW.

Once you use one, you'll probably NEVER again hammer a 16d nail by hand again. You simply can't believe how productive you'll be using a pneumatic nailer.

The nails also have a special glue on them to increase holding power.

CLICK HERE now to discover more about this great tool.

NEW TOOL ALERT - READ THIS!!!

Speaking of GREAT FATHER'S DAY GIFTS - and this one is VERY AFFORDABLE, you MUST WATCH my new video about the:

Klein Tools Voltage Tester Pen!

CLICK HERE TO WATCH IT!

Subscriber Question About Roof

Jim Fiste is a subscriber to this newsletter. He saw a photo I posted last issue about the progress on my roof.

Here's what he sent in:

"It looks like you installed Grace Ice & Water Shield on the main body of your roof. I thought that a roof had to "breathe" and not to install ice & water shield except at valleys, above the gutters and at side walls.

I've heard where Ice & Water Shield was used on an entire roof and within several years all the wood roof sheathing had to be replaced because of rot. Comments?"

Jim, if that story's true, you only heard half of it. The wrong half.

Wood is hygroscopic. It does react to different levels of humidity. It will soak up water vapor AND it will RELEASE it readily.

What about the underside of the sheathing? That part that's exposed to great air flow from the soffit and attic ventilation? That's where it "breathes".

The Grace Ice & Water Shield I'm using WILL PREVENT all liquid water from ever touching my wood sheathing. Any water vapor UNDER the sheathing will readily exhaust to the outside.

The key to ANY ROOF is to have fantastic ventilation.

Here's a photo of what I did yesterday. Yes, those are precise miter cuts of the roofing against the center line of the metal valley flashing.

Wait until you see the photo of the other side of the valley complete. WOWZAA will it look nice....

NEW Stain Solver Gamma Seal Lid!

Watch this wacky video I taped about the NEW gamma seal lid on my 50-pound size of Stain Solver.

You ask, "What's a gamma seal lid, Tim?"

WATCH AND SEE!

New Q & As for You!

Jam Pans to Copper Sinks

Tub Valve Location

That's enough for now.

I need to get back up on the roof!

Tim Carter
Founder - www.AsktheBuilder.com

Do It Right, Not Over!