DEAR TIM: I've got a lawn mower, a snowblower and a garden tiller with small gasoline engines. I'm about to purchase a log splitter with one. I don't want any issues and want to avoid any damage to the new engine and the existing ones. I've heard that the current gasoline with ethanol in it is really bad for small engines. Are the stabilizer products really good? What is wrong with the ethanol? Are there alternative fuels that are small-engine friendly? What would you do to preserve and protect your small gasoline engines? Steve G., Monument, CO
DEAR STEVE: If we were playing small engine poker, I'd call your small engine machines and raise you a power washer! Yes, I've got a wide assortment of gasoline-powered equipment too. Small engines used to be the bane of my existence with hard-starting issues, but those days are long gone now that I know the truth about ethanol-based gasoline. Recent survey results have shown that most consumers place a very high value on ease of starting and ease of maintenance with small engines.
The fuel you put in the engines is one of the most important things that controls ease of starting. What you've heard about ethanol in gasoline is true. Small engine repair shops love ethanol because it provides them with a steady stream of business. But if you get one of these shop owners to open up with you, they'll tell you they probably don't use that gasoline in their own small engines.
Ethanol attracts water. Water enters your fuel system in the air that enters the fuel tank as the gasoline is burned by the engine. The water is drawn into the gasoline making for a chemical mix that accelerates corrosion of metal parts in the engine.
When the fuel level is low in the tank, the water can condense on the cool surfaces of the tank. This water then runs down and gets into the gasoline. If enough water collects in the tank, it can get drawn into the engine where it can cause the engine to run poorly.
Ethanol acts as a solvent in older engines and can dissolve old gum and varnish deposits from the gas tank and fuel lines. These deposits can then clog the very small orifices in the carburetor. If this happens, your good day goes bad very fast as your small engine will not start no matter how many curse words you hurl at it.
Gasoline can also oxidize or rust just like iron or steel. When gasoline oxidizes, you don't get orange flakes of rust, you instead get gum and varnish in the gasoline that causes clogs.
The reason you don't have trouble with ethanol in most cars is because you tend to get new gasoline on a regular basis as you drive your car each day or every other day. Ethanol-containing gasoline can deteriorate in just 30 days.
Most of the fuel stabilizer products do a great job of protecting small engines. These additives are primarily anti-oxidants. They grab oxygen that's in the gasoline preventing it from turning into gum and varnish.
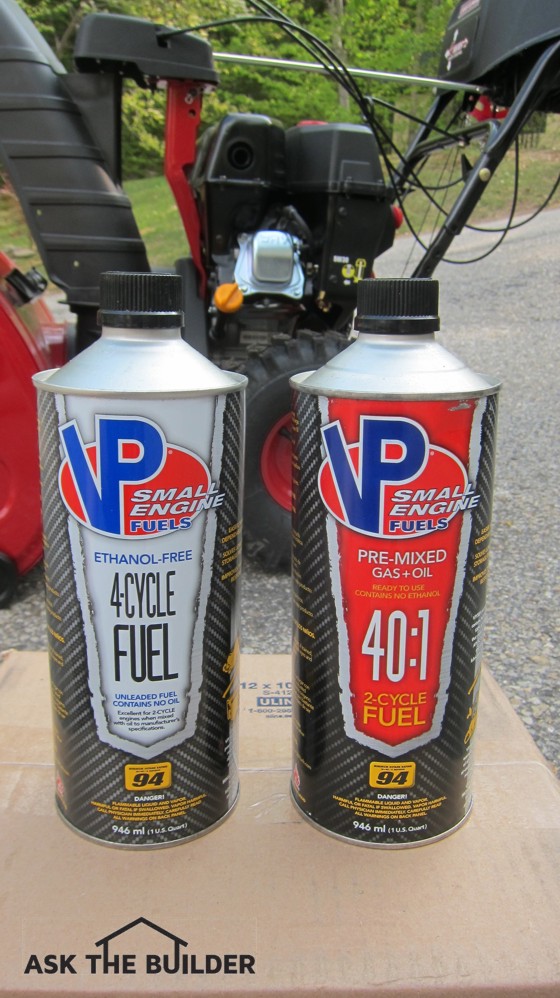
This is but one ethanol-free product that helps small engines run much better and avoid problems. Photo credit: Tim Carter
Really good stabilizers work not only in the liquid gasoline but in the air or vapor that's on top of the gasoline in the partially filled gas tank that most people have. Look for stabilizer products that say they offer vapor technology to treat the air and vapor that's floating above the gasoline in the tank. Remember, this air contains water.
Very few people take the time to fill a small engine gas tank after each use. Doing this minimizes the amount of available oxygen that can cause issues. When you decide to fill your small engine tank, always fill it to about 95 percent of the way so the gasoline won't expand and leak out if the garage, shed or patio gets hot from the sun.
If you have a can of older gasoline in your garage from the winter, summer or fall, just put it into whatever car or truck that's driven the most. It will mix with the fresh gasoline and will not hurt your car if you get it filled up once the tank is near empty.
If you're using a fuel stabilizer for the first time and have untreated gas in your small engine, start up the engine and allow it to run for about three minutes. This allows treated fuel to be drawn up into the fuel lines and carburetor. You want stabilized gasoline to extend from the gas tank all the way up to the intake valve so you get no corrosion happening while the engine is in storage.
The good news is you can purchase gasoline for your small engines that doesn't contain ethanol. Most people are unaware of this resource. Many businesses that sell machines with small gasoline engines stock cans of ethanol-free gasoline that already has the stabilizer chemicals in it. You can even get these fuels for two-cycle engines with the two-cycle oil already added as well as the stabilizer.
Another resource, and it costs FAR LESS than the ethanol-free gasoline in the small cans, is your local airport that has small aircraft that fly in and out on a regular basis. You'll almost always find a FBO, or fixed-base operator, at these small to medium-sized airports.
Airplanes that use gasoline have 4-cycle engines that will not tolerate ethanol, so the aviation gasoline sold at these airports is free of the problem-causing ingredient. The cost for this aviation gasoline is probably only $2 more per gallon than what you pay at the pump for the poison-filled ethanol gas you put into your car.
The best aviation gas to get for your small engine would be a low-lead one with an octane rating of 100 or slightly less. This works great with small engines with carburetors. It's not a good idea to use this high-octane aviation fuel on any small engine that might be equipped with fuel injectors.
At this price, you may only spend an extra ten or fifteen cents to cut your grass with a fuel that's perfect for small engines. I say this assuming you have a smaller typical residential lot with 1/4 acre of grass or less.
If you take an approved fuel can, these businesses will almost always sell you the sweet nectar your small engine will devour. The octane of this gasoline is higher and your small engine will think it's eating a piece of double chocolate cake with mocha icing. You know how that puts a smile on your face, so imagine how happy your small engine will be!
You should add the stabilizer to this ethanol-free aviation gasoline should you decide to use it.
You may also locate other places that happen to sell gasoline that doesn't contain ethanol. There is one small gas station about 30 miles from my house that sells this gasoline. There is a web site called pure-gas.org that has a list of over 10,000 locations, broken down by states or provinces, that sell pure, ethanol-free gas.
Author's NOTE: I want to thank the great folks at Briggs & Stratton and Tom Bingham, senior director of marketing at Gold Eagle for technical information that's contained in the above column.
Column 1092