Chip Seal Your Driveway

chip seal road surface

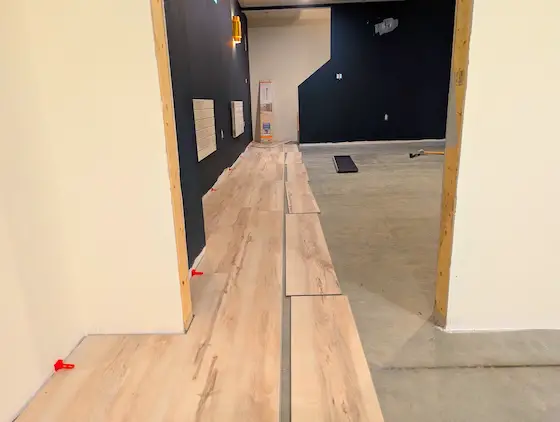
This rural road near my house was just coated with small stone chips embedded in a thin layer of asphalt cement. You can do the same thing on your driveway. Copyright 2025 Tim Carter

Chip Seal Your Driveway - Make it Colorful

What would you say if I told you your driveway doesn’t need to be boring blacktop or ho-hum gray concrete? Can you envision a red, orange, green, or light khaki color driveway? Would you like a driveway that provides maximum traction should you have to deal with snow and ice? I used to have a driveway like this and loved it. I’m talking about a chip seal or tar and chip surface.

A rural road in my New Hampshire town was repaved last week using the chip seal method. The contractor sprayed about one-half gallon of hot liquid asphalt per square yard on the old road surface. A special spreading machine then carefully dropped about 25 pounds of small stone chips per square yard onto the hot, gooey asphalt cement. A large roller then compacted the chips into the liquid tar.

A paving contractor in Cincinnati, Ohio, used to specialize in this paving alternative. They purchased stunning medium-brown flint chips scooped from the Wisconsin River in central Wisconsin. This stone looks similar to butterscotch candy you might use when baking cookies. The stones were tumbled in the riverbed, and the rough edges were nice and smooth.

I used this material and paving method for my own driveway. People walking past my house would always stop and look at it. I’d answer questions about it if I happened to be outdoors doing yard work. I loved being the spokesman for this unique and colorful pavement. You can watch a video of my tar and chip driveway on my www.AsktheBuilder.com website.

You can embed any stones you like in the liquid asphalt. You may live close to a gravel pit that has unique colored stones. Granites and marbles come in a vast variety of colors. A stunning red granite can be found on Mt. Desert Island in Maine. Imagine if a local quarry had a pile of small chips of this granite!

The chip seal method of paving is time-tested. It was the way many miles of roads were paved in the early 1900s. Thousands of miles of secondary roads are still paved this way today. Chip seal is quite common out West, where the distances from blacktop mixing plants are too far away from where the material will be used. Chip seal contractors just have to keep the liquid asphalt hot in special heated tanker trucks. This is easy to do.

Modern blacktop paving differs from chip seal in a few ways. Your blacktop driveway material is a mixture of small stones, sand, and the same asphalt cement. It’s blended together in a giant rotating drum. The sand and stones get completely coated with the asphalt cement, which, when cooled down, binds the aggregates together.

No sand is used in a chip seal pavement. The chip seal stones don’t get completely coated with the asphalt cement, allowing the color of the chips to be on display. The underside of the stones is bonded to the sticky asphalt cement. The bond is permanent. Snow, ice, and snowplows can’t easily pluck the stones from the asphalt.

The chip seal surface is not for everyone. I’d not recommend it if you play basketball on your driveway. The surface is not as smooth as concrete or blacktop. Chip seal is also unforgiving when it comes to toddlers’ skinned knees.

Your best bet at locating chip seal contractors is to call all the blacktop companies in your area. They’re the ones who deal with asphalt cement on a daily basis. The question is whether or not they have the truck that sprays the asphalt and the stone-spreading machine.

Let’s say you don’t want the chip seal surface, but you do want a colored driveway. Blacktop sealers are available in a variety of colors. These sealers are used by companies that maintain tennis and pickleball courts. There’s no reason why you can’t use these same bright colors on your driveway.

Your dingy, plain-vanilla concrete drive can be transformed to a stunning art piece by installing a thin cement stucco coating. You can add countless dry-shake pigments to the stucco just as stamped concrete contractors colorize regular concrete.

If you really want a challenge, you can do intricate stucco patterns on your driveway, much like terrazzo contractors create murals using different colored marble chips and the dry-shake pigments in the cement.

There are many videos on YouTube showing how to colorize concrete or stucco. I urge you to watch them. Experiment using cheap concrete paving blocks you can buy at a home center. Once you’ve perfected your technique, then advance to coating your driveway. I’d love to see photos of your completed project.

Column 1623

DIY LVP Flooring Install

LVP flooring on concrete

The staggered pieces of LVP will be snapped into position in less than 30 seconds per piece. If you can fog a mirror, you can install LVP. Copyright 2025 Tim Carter

Save Thousands of Dollars Installing LVP

I found myself driving through the breathtaking sheer granite walls of Franconia Notch in New Hampshire last Sunday. Cannon Mountain was on my left, and Mt. Lafayette was on my right. I was on my way to the quaint community of Sugar Hill to conduct an in-person consultation for a single mother.

The young woman was considering purchasing a house owned by two of her aunts. My job was to develop a list of must-do and should-do projects. I was then tasked with determining the labor and material costs required to complete each item on the two lists.

The cost of labor was astronomical. My estimates were on the high side because I wanted the woman to hire the contractors who would do each thing right the first time. I shared with her a story about another single woman I helped out of a bind just months before.

This other woman decided to sell her condominium. She had luxury vinyl plank (LVP) flooring installed throughout the condo two years prior. The installers were jobbers who worked for one of the big-box retailers. They forgot, or were not prepared, to install small pieces of decorative trim where the LVP met up against pieces of woodwork.

The young woman was manic about hiding these small gaps. I had her purchase and paint the small wood trim. I installed the trim in minutes, packed up my tools, and left without accepting any money. She, instead, treated my lovely wife and me to dinner.

Fast forward to my son’s house. I’ve shared in past columns about how I’m helping him finish about 1,200 square feet of basement in his new home. We’ve speculated on how much money I’ve saved him in labor costs. The number is now approaching $100,000.00.

A few days ago, we started installing his LVP flooring. We selected this material for several reasons. LVP is the perfect material to use in basements because it’s waterproof. The material is also eye-catching. Most people who see it will think it’s real wood.

You may want a new LVP floor in your home, but you’re holding back because the labor estimates have taken your breath away. I’m here to tell you that if you can fog a mirror and comb or brush your hair, you can successfully install LVP. The best part is that you need only simple tools to do the job in most cases.

The flooring surface below the LVP must be in the same plane. This means there should be minimal or no low spots or humps. The pieces of LVP interlock.  These tongue-and-groove connection joints can fail over time if the LVP flexes as you walk back and forth across a hollow spot under the LVP.

Your first task is to use a long, straight edge to locate any dips or low spots. Use floor-leveling compound to carefully fill in these areas. This is time well spent, and you’ll discover the LVP will install with ease once the subfloor is even.

The LVP is so easy to install that the instructions can be followed by a child in mid-school. The product I used instructed me to start in the corner of a room, working left to right. The first two rows of the material are installed simultaneously in a staggered fashion. This ensures the pieces interlock, allowing the rest of the flooring to install with ease.

LVP is plastic. Plastics have a high coefficient of expansion and contraction. The LVP is a floating floor, and it will expand if subjected to significant temperature differences. Sunlight hitting an LVP floor will make it grow like a weed. The instructions clearly state that you must leave a 1/4-inch gap around all edges of the flooring to allow for this movement. The floor will buckle and bubble if you don’t provide this gap.

You need a rubber mallet to install the type of LVP my son and I used. Be sure to purchase one with white rubber, not black. The white mallet will not mar the flooring. The mallet is used to lock the ends of each plank to the piece you just installed moments before. You’ll also use the mallet to tap a square-edge piece of wood that ensures the long edges of each plank are tight to the previous row.

I found that it only took me about thirty seconds to install a plank. I would kneel on the flooring I just installed so I could interlock the planks by pulling on them instead of pushing them in place. You’ll discover that great lighting is important. It’s mission-critical that you install each piece tightly. There must be no gap between the planks.

The LVP my son and I installed had the underlayment built into each plank. This made the installation go that much faster. We also made sure the concrete floor was perfectly clean. We had vacuumed it and then wet-mopped the concrete. It was so clean you could eat off it. Grit, small pieces of drywall compound, or slivers of wood can cause great frustration if they interfere with the installation.

There are many videos, some created by the LVP manufacturers, that show how simple it is to install this material. Watch a few of them if I’ve not yet convinced you how easy it is to save thousands of dollars!

Column 1622

Roof Framing Primer

common roof framing 17/12 pitch

This is a steep 17:12 pitch roof I built in 1991. It has a unique structural component up at the peak to ensure the roof doesn’t collapse. Copyright 2025 Tim Carter ALL RIGHTS RESERVED

Roof Framing Primer - The Bones Under Your Roof's Shingles

My guess is you give very little thought to the roof over your head, other than worrying about if it will develop a leak. It’s safe to say you don’t lose a minute’s sleep thinking your roof will collapse. You can thank great carpenters, structural engineers, architects, and to a large extent the modern building code, for the peaceful slumber you experience!

The bones of your roof can be many different materials. Most modern homes today employ roof trusses made in a factory. These are engineering marvels as almost all of them are made using just regular 2x4 dimensional lumber. Carpenters three generations ago would have probably said that was impossible to do as they were used to common-framed roofs using 2x6s, 2x8s, and even much larger pieces of wood.

I was fortunate in my early building career to do lots of remodeling and room additions. I found myself working on housing stock in Cincinnati, Ohio, that was built in the early 1900s. I spent many a day in the dark attics looking at how the carpenters of old framed roofs. I was lucky enough to even see some carpenters' signatures on the roof’s ridge board! I still sign and date much of the work I do.

The average roof structure is just a triangle. You’d be stunned how strong one is when you connect the three pieces of wood together correctly. The sloped sides of the triangle that create your roof need to support a vast amount of weight. The weight might be heavy slate or tile roofing, three layers of asphalt shingles, or all of that and 18 inches of snow and ice.

Gravity is tugging at the sloped part of your roof. It is constantly pulling the sloped parts down. Without the all-important horizontal base of the triangle that creates your attic floor or ceiling below, the center of the roof would sag down like an old swayback horse. The outside walls that the ends of the roof rafters sit on would tilt out. In short order, the entire roof would collapse. The horizontal base of the triangle prevents this collapse.

This horizontal part of the triangle doesn’t always have to be at the bottom of the triangle. We call it a rafter tie when it is at the bottom. This is because the horizontal timber ties together the two rafters into one structural element.

You can slide that horizontal member up the rafters to the middle or even higher. Once they get up near the peak of the roof, that horizontal member is called a collar tie. I think you can see how it got that name as people wear ties high up on their shirt collars.

Years ago, I needed more complex jobs to keep my interest up in building. An architect I did lots of work for sent me plans for a very complex room addition. It was so large, it was actually building a house onto a house. It had the most interesting roof I had ever thought of building.

The original house was built in the 1920s. It had a very steep roof with a 17:12 pitch. This means it rises up 17 inches for every 12 inches of horizontal run. Many traditional church roofs are this pitch.

The homeowner wanted vaulted ceilings in several of the spaces. This meant the horizontal member that prevents the roof from spreading out had to be up very high. The structural engineer designed gusset plates made out of 3/4-inch plywood that had to be nailed to each side of the set of rafters that met at a point up on the roof. There was no ridge board.

Not being an engineer, I never thought it would work. It was critical the gusset plates were nailed a specific way. I followed the structural plan, and the roof was extremely strong. It’s still standing to this day.

There was also another specific structural aspect to this job. In another part of the room addition, there were large 2x12 rafter ties that created a traditional triangle. However, the engineer insisted that the rafter ties be connected to the ends of the rafters using 1-inch through bolts not nails.

I knew from experience the holes had to be 1-inch in diameter. You can’t have any slop, and the bolts had to be hammered through the holes. The engineer showed up one day for an unannounced inspection to ensure I had drilled the holes the correct way.

I get frequent emails from homeowners who want to cut into their roof trusses. I always tell them, “No, don’t do it.” In rare instances, you can modify a pre-engineered truss, but you must have a structural engineer create a drawing. Be sure you follow all instructions with respect to how the wood pieces are connected to one another.

Common roof framing is a true skill, and each day there are fewer carpenters who have mastered it. I love building common-framed roofs using a framing square and large traditional dimensional lumber.

The math is quite simple. My favorite roofs to frame are hip roofs, and those with valleys. It’s a great feeling to do the compound cut for a jack rafter and see it fit so tight that you can’t slide a piece of paper between it and the hip or valley rafters!

Column 1621

Ask the Builder June 29, 2025 Newsletter

Dear Tim,

Are you a new subscriber?
I offer you my protection against all forms of household harm with each issue of this newsletter.
The following quotes are meant to inspire you. One or two may help pry open your mind to things you might be ignoring:
Ask the Builder Axioms
"Truth is like poetry - and most people hate poetry." 
(Uttered by Ryan Gosling's character in The Big Short movie.)
"A tiger hunts best when hungry." 
(Dr. Daniel A. Whalen - When he declined my request for a much-needed loan.)
"What gets us into trouble is not what we don't know. It's what we know for sure that just ain't so.." (Mark Twain)

"You look for treasure in the wrong place, Mr. Lovett. Only life is priceless... and making each day count."

(Old Rose - Titanic 1999 Movie CLICK HERE to watch)


"...Best start putting first things first. 'Cause when the hourglass runs out of sand, you can't flip it over and start again. Take every breath God gives you for what it's worth." (Kenny Chesney - Don't Blink CLICK HERE to listen)


"Is...is there a Heaven? 'Oh yeah...it's the place dreams come true.'...maybe this is Heaven." (Ray and John Kinsella conversation - Field of Dreams CLICK HERE to watch)


animated gif stick man digging


The Past Three Weeks


Three weeks ago Kathy and I received a frantic phone call from my youngest daughter. She was 3,000 miles away in southern California.


A week later, she and her 8-month-old baby were safe in our New Hampshire home. In that span of time, I had flown to CA, arranged for long-distance movers to get her stuff back to NH, and also arranged to have her car transported.


However, two days before flying back to NH, she discovered she didn't have all the required paperwork to get her cat onto the airplane. The logistics of shipping Yeti back were far too difficult to pull off in the tiny amount of time we had left.


I became Yeti's unpaid chauffeur driving both of us back to New Hampshire. Luckily, the transport company had not yet shown up, so I was able to cancel the contract.


I decided that I wanted to get back as fast as possible. I was charged with driving an average of 600 miles each day to get back to NH. I'd always wanted to drive coast-to-coast solo, but not in such a short span of time.


I was so tired from all that happened the previous six days, I only made it to Flagstaff, AZ the first day. I was hoping for Albuquerque, NM, but that would have been another five blistering hours of driving.


Only one sightseeing stop could be fit into my tight schedule. It's been on my bucket list for over 50 years. The treat only cost me 20 minutes. Yeti and I were headed east out of Flag at 7 AM sharp the second day. The corner I was headed to was just 50 minutes east of Flagstaff just off I-40.


A stranger, at 7:58 AM, was kind enough to capture this image of me at the iconic corner. Winslow, AZ is a very small hamlet in the middle of nowhere on historic Route 66. Believe it or not, a girl in a flatbed Ford slowed down to take a look at me!


tim carter in winslow az


I made it to Amarillo, TX late in the afternoon of the second day. I passed thousands of wretched windmills. I should have traveled 1,200 miles by then, but had only put 1,088 miles on the steel belts. I wasn't that far off my goal. It's pretty much a wasteland east of Amarillo, thus it made sense to stop there.


The third day I ended up in Springfield, MO. I was over halfway with 1,628 miles traveled in just over 60 hours.  The great Mississippi River and the amazing Gateway Arch was still three hours away!


Yeti and I hit the hay at 6 PM on that Thursday night. I woke up at 2:30 AM. Yeti and I had a committee meeting. I said, "Listen, we're getting the heck out of here. You and I will be in Erie, PA tonight ready to receive our Road Warrior merit badge at a dinner ceremony. Don't try to hold me back." Yeti didn't put up a fight.


It was pitch black and raining when we took off at 3 AM. Fourteen hours later with 878 miles added to the digital odometer, we were in Erie. I felt as if I had been put through an old washing machine roller press.


old washing machine rollers


I've done the drive from Erie, PA to my New Hampshire house no less than thirty-five times in the past seventeen years. I knew I had one last grueling ten-hour drive facing me the next morning.


Yeti and I pulled down my driveway about 4:30 PM after five days on the road.


I then proceeded to work seven days a week for two weeks solid helping my daughter and lovely granddaughter settle in.


That's why I've been absent from your inbox.


Decluttering - My 2025 Mantra


I've been putting off decluttering my house. It's an easy thing to do.


Moving my daughter and granddaughter back jump started the decluttering process.


If you've not done it, you should. It's LIBERATING.


I believe I'll be getting a certificate from my town dump in July. It will say I'm the resident that used the dump and Free Room the most in the past thirty days. Heck, I might end up in the running for an annual award this year.


Some things are too valuable to give away. Those things I'm selling on Facebook (FB) Marketplace.


Six years ago, I had great success selling things in the FacistBook Marketplace. I went dark and signed off of FB the second or third week of January, 2021.


I logged on days ago to start listing things for sale. My computer screen looked like a spinning Las Vegas slot machine. Countless past notifications were showing up on my monitor.


One of them contained some very sad news. The oldest daughter of my first girlfriend had reached out six months ago letting me know her mom was sent back to Heaven.


I met my first girlfriend in summer school after our freshman year of high school. She needed a deeper understanding of Algebra and I longed for a richer Latin I experience. I was attracted to this quiet and shy brunette with long hair.


Each morning after classes ended, we started chit chatting at the bus stop as we waited for the orange and yellow route 31 bus. This is exactly what the bus looked like, although it was a diesel and not electric as you see in this photo.


cincinnati #21 bus


This young lass got off this bus just a mile down the road at Peebles Corner. She transferred to the #4 bus that would take her to the top of her street. I'd ride the #31 another three miles and transfer to a bus that would take me north on Clifton Avenue.


After several weeks, we discovered we were born on the same day less than a mile from one another. I popped out at Deaconess hospital 90 minutes before she got slapped on the bum at Good Sam. Those two hospitals are less than a mile from one another on Clifton Avenue.


I could go on and on, but suffice it to say we stayed in touch all these years exchanging birthday and Christmas cards. Our common birthday was the super glue that maintained our wonderful friendship.


I sent her a Christmas card last December, but didn't get one back. I feared the worst. She passed away on November 5, 2024. RIP Mary Gene!


I thought of calling Mary Gene last summer to see how she was. I had a feeling based on the birthday card she sent that all wasn't well.


But I didn't call. I thought I'd wait for another day...


While it's not a perfect quote for the situation, it's pretty close. Look at this and see how it relates to your life and your loved ones:


"It was like coming this close to your dreams ... and then watch them brush past you like a stranger in the crowd. At the time, you don't think much of it. You know, we just don't recognize the most significant moments of our lives while they're happening. Back then I thought, 'Well, there'll be other days.' I didn't realize that that was the only day."


Moonlight Graham from the Field of Dreams movie


A Hard Reset


Those two major events over the past three weeks have caused me to do a hard reset. Add to that, I lost another great friend my age this past March.


I'm talking a HARD RESET.


It's now time to put first things first as Kenny Chesney said in his hit song, Don't Blink.


How about you? Are you putting first things first?


If not, you might want to reconsider.


One last comment: If you need my personalized one-on-one services to get you out of a building or remodeling bind, I recommend you set up a consult VERY SOON.


There's NO GUARANTEE moving forward that you'll be able to add a phone consult or ??? to the shopping cart.


If you've put off ordering my digital library, now is the time to pull the trigger.


You NEED TO UNDERSTAND that once I decide to stop publishing this newsletter or suspend Ask the Builder activities, you'll NEVER BE ABLE TO PURCHASE MY DIGITAL LIBRARY in the future. It will VAPORIZE in the ether. Give it a SERIOUS LOOK now. It's priced so you save over $1,200.00. That's NOT A TYPO.


I intend to keep going. I'll continue to publish this Ask the Builder newsletter and write my column, but it's now a MUCH LOWER priority.


If I lose much more interest, it's hard to say what might happen.


Ask the Builder COMPLAINT Hotline


If you have any complaints about anything you see in this newsletter, feel free to call me. Jenny, my new assistant, will take down your information if I'm busy working inside my submarine. Call 603-867-5309.

Property Disclosure Form Dangers

fancy chimney acadia national park

The top of a chimney is too high up for most. You might never have what it takes to go up that high to inspect it. Copyright 2025 Tim Carter

Property Disclosure Form Dangers - You Better Tell the Truth

It all started with a chimney of all things. Last week a woman, who lives in a quaint small New Hampshire town just fifty miles north of me, hired me. She wanted me to review a house inspection report. She had put in an offer on a cozy little home.

CLICK HERE to hire me to help you with a problem.

This column should resonate with you no matter who you are. You may reside in your own home, live in a condominium, or even in an apartment. Many teaching moments presented themselves as this consult unfolded. Technology allows me to do these consults long distance helping folks like you. Many hire me for two reasons: I’m an expert, and I don’t have a dog in the fight.

I was aghast when I viewed the house inspection report. Little did the woman know, but she had the good fortune to hire one of the best inspectors out there. He was ASHI certified. ASHI is an acronym for the American Society of Home Inspectors. In my opinion, it’s the best certification you can have.

The inspection report had more red ink notations in the summary than I’ve ever seen before. There were at least four pages at the top end of the report with red-flag warnings. The most significant one concerned the chimney that projected above the steep roof. It had a large crack in it.

Before hiring me, the woman had obtained a quote from a local mason to repair the chimney. His bid had some decent detail in it, but he didn’t mention two very important items that most masons fail to do when building chimneys.

The Brick Industry Association (BIA) is, in my opinion, the best source of information concerning how chimneys should be built. They have an excellent series of Technical Notes on their website. One is devoted to residential chimneys.

A top flashing and a 3-inch overhang are the two items almost all masons forget to install. Water ruins chimneys. The flashing prevents water from soaking down into the rubble and the overhang causes most water to fall away from the chimney.

The estimate to rebuild the chimney was north of $15,000. Electrical issues discovered by the inspector added an additional $7,000 of work. A slew of miscellaneous other pesky defects added yet another $15,000 to the needed repairs.

It’s important to realize I was a real estate broker in the state of Ohio for over twenty years. I got my license just after getting out of college. I knew it would help me in my fledgling house-flipping business in the 1970s. I also took all sorts of extra night classes in real estate and was one of the first Graduates of the Real Estate Industry getting a coveted GRI lapel pin.

What does all of this have to do with you? If you’re thinking of selling your home, defects in your home can make it less attractive. These same defects can put you in a not-so-good place when it comes to negotiations. Just three years ago we emerged from a seller’s market where buyers ignored defects.

Now, with higher interest rates, we’re in a buyer’s market. Sellers must present their best face and have few or no defects to get the best offers. Mortgage brokers are also starting to pay more attention and look for houses with fewer defects.

Let’s say you’re the seller in this situation. You decide to reject the woman’s counteroffer. You go fishing trying to find another buyer who might not have such a great inspector. This puts you in a very precarious position if you don’t fill out a new property disclosure form (PDF). The ASHI inspector has now made you aware of defects that you know about.

If you fail to fill out a new PDF, and don’t alert future buyers as to the defects, you may be subject to a lawsuit down the road. If you’re the listing realtor, you will be sucked into the suit like a child sucks on a soda straw.

Yes, the overriding principle in real estate is Caveat emptor - “let the buyer beware”, but I can assure you that if a future buyer discovers you were not telling the truth, you’ll have a very hard time in a courtroom.

Your takeaway should be this. Don’t put off repairs to your home. Attend to things as they need work. Don’t try to disguise major issues in your home. Assume an ASHI inspector will show up and discover your deception.

Are you thinking of buying a home? Then you might want to get a copy of an inspection checklist I developed that helps you identify major defects in homes you might miss as you walk through a home for sale. My checklist might allow you to kick a house to the curb before you spend hundreds of dollars on an ASHI inspector.

You can purchase the checklist here.

Column 1620

Multi-Tool – The Magic Tool

dewalt multi tool 12v

This a multi-tool. They operate just like a barber’s clippers employing rapid side-to-side motion allowing you to cut just about anything around your home. Copyright 2025 Tim Carter

Multi-Tool - It's a Versatile Must-Have Tool

I found myself entranced by a video several weeks ago. Shoyan, a master carpenter who lives in Japan, chronicled the construction of a simple residential house that was a mix of Japanese construction methods and Western amenities.

I was in awe of Shoyan’s skills and attention to detail. He employed precision you might see a master cabinetmaker use to build a fine piece of furniture. Shoyan used power tools, but he never hesitated to pull out his razor-sharp wood chisels or a hand plane to get a piece of lumber to do exactly what he wanted. You can watch Shoyan in a video on my www.AsktheBuilder.com website.

I thought about you after the video ended. The average homeowner will never build a home with their own hands as did Shoyan. You, though, often are charged with doing minor repairs and projects around your home. The more of these you accomplish with a great result, the more your confidence soars. My late father-in-law had a saying about this, “Nothing builds success like success.”

I’m often asked about power tools by my newsletter subscribers. Drills, saws of all types, drill/drivers, routers, and portable table saws are at the top of the list. One tool, however, doesn’t seem to garner much interest even though I feel it’s one of my personal go-to tools each week.

The Power Multi-Tool

I’m talking about the power multi-tool. A power multi-tool is used to cut things. The head of the tool vibrates side-to-side just like the clippers a barber uses to cut hair. Any number of blades can be attached in seconds to the tool.

You can cut glass, plastic, wood, drywall, metal, etc. using a multi-tool. Precision cuts like those made by Shoyan are possible. Hand-eye coordination is required as well as a small amount of practice.

You might rush out and buy one of these magic small power tools once you discover how I used mine on a recent project. Fiber optic cable Internet service became available at my home months ago.

The most secure and fastest Internet you can have, in my opinion, is wired cable within your home. WiFi signals can leak outside your home and be sniffed. I once saw a troubling sniffing demonstration at a conference.

It was impossible for me to install ethernet cables in my existing home, so I was forced to use WiFi. I was faced with getting the fiber optic cable from a far corner of the garage to the entrance hall of my home. With some ingenuity and 50+ years of remodeling experience, I was able to create an alcove above the coat closet in the hall.

The first step was to use my multi-tool to make a small surgical cut in the drywall above the closet. This small 4-inch by 4-inch hole allowed me to confirm I could slide a 10-foot-long conduit from that point across a mudroom ceiling and then into the garage ceiling.

I then went into the garage and used the tool with a fine-toothed blade to carefully cut a larger hole in the drywall. I only let the tool penetrate the drywall as I had no idea if wires or pipes were just above the drywall. I put some blue painter’s tape on the blade to show me when to stop plunging the blade into the drywall.

The tool did a superb job of cutting the plastic electrical conduit. There were minimal burrs I had to deal with because I used the very fine-toothed blade.

I decided to build a box to create the alcove. I had some scrap pieces of 3/4-inch A/C fir plywood that would be perfect. The A side was very smooth much like drywall. The multi-tool was then used to cut precise holes in the back wall of the box. One hole was for the electric box for the 120-volt outlet, and the other hole was for a one-gang electric box the conduit that would house the fiber optic cable.

The multi-tool cut through the thick plywood like a warm knife through butter. There was no need to drill a pilot hole with a drill. I didn’t have to use a jigsaw that would create all sorts of nasty splinters. The multi-tool created a hole that looked like it was cut with a sharp razor knife.

You’ll be able to find an affordable power multi-tool with no issues. There are many different brands. Keep in mind the more money you spend, the better the tool will be in almost all cases. The most expensive multi-tools have strong parts and great motors that can last a lifetime with normal care.

Column 1619

Oxygen Bleach Recipe

Oxygen Bleach Recipe

You can make your own ultra-powerful oxygen bleach.

Many oxygen bleach products sold in stores, online, and in TV commercials can contain vast amounts of filler. The filler reduces the amount of active ingredient in the product.

So Powerful it Requires the Oxidizer Label

I developed my own special recipe in 2024. I used information from past conversations with a chemist. This man is, perhaps, the top expert in the USA.

I mix just two safe ingredients to produce my own super-concentrated cleaner. You can get these ingredients from chemical supply companies.

If you were to try to ship my amazing concoction via UPS or FedEx, they'd require you to use that spooky yellow label!

Yet, my oxygen bleach is safe enough to use around my house. I clean and sanitize all of my granddaughter's toys with it!

CLICK HERE to get your copy of my oxygen bleach recipe.

Oxygen Bleach Best All-Purpose Cleaner

dirty slate flooring next to clean slate using oxygen bleach

This side-by-side slate floor comparison should convince you that the tiny pile of powdered oxygen bleach is your best all-purpose cleaner. The three filthy pieces of slate are surrounded by clean slate. Copyright 2025 Tim Carter ALL RIGHTS RESERVED

Oxygen Bleach is the Best All-Purpose Cleaner

Do you struggle and work too hard to get things clean around your home? A plethora of cleaning products assaults you at the grocery store and in TV commercials. I’ve tried many of them, but thirty years ago I was lucky enough to discover the best all-purpose cleaner while doing research for a deck sealer column. I happened to ask this question while meeting with a chemist, “Does it clean anything else?” The it I was asking about was oxygen bleach.

It started two weeks earlier when I was interviewing the president of a small deck sealer company, and asked him, “Do you recommend cleaning the treated wood with chlorine bleach before using your sealer?” At the time, chlorine bleach was promoted by most as the way to clean exterior treated lumber. “Oh, no, chlorine bleach is the worst thing to use! You should always use oxygen bleach.”

What is Oxygen Bleach?

I had never heard of oxygen bleach. The president then said, “It’s best you talk directly with the chemist who works for the biggest supplier of certified organic oxygen bleach. Here’s his contact information.” I proceeded to call the chemist, and a week later we were having dinner at the most famous ribs restaurant in Cincinnati, Ohio.

The chemist proceeded to give a master class on the best way to clean treated lumber. As the waitress served up our chocolate cake desert, I blurted out my anything-else question. The floodgates opened, and in the next forty-five minutes I was bestowed an honorary cleaning PhD. I discovered just about anything inside and outside your home can be restored to like-new condition using magic oxygen bleach.

It's a Magic Powder

Oxygen bleach is a powder you mix with water. The water initiates a chemical reaction that lasts about six hours. Countless oxygen ions are released into the water. These ions attack stain and odor molecules. The cleaning happens before your eyes in many cases without you having to rub and scrub. Tough red wine stains disappear from tablecloths and carpets. Skunk and cat urine odors are removed by this magic cleaner. Tough baked-on caramelized grease in pots and pans softens like butter when soaked in an oxygen bleach solution.

The hospitality and medical industries clamored many decades ago for a chlorine bleach substitute. They were tired of destroying countless sheets, pillowcases, scrubs using harsh chlorine bleach. After repeated washings, the linens were faded and fell apart. Hospitals and hotels needed a new color and fabric-safe bleach that also sanitized. Oxygen bleach fulfilled this need.

The chemist sent me a 100-pound bag of this amazing powder a week after our dinner meeting. He sent a pamphlet describing how to use it, and asked me to share the powder with my friends and neighbors. He said, “If you can clean the item using water, then you can almost always clean it safely with oxygen bleach.” Just about everything inside and outside your home can be cleaned using water.

Within a month, my friends were begging me for more. They were having success cleaning things that they thought they’d have to throw away. Set stains in clothing and carpets disappeared with soaking in almost all cases.

Oxygen Bleach Does the Work For You

The true magic of oxygen bleach is it can do most of the work on its own. Other cleaners often have you rubbing and scrubbing. The oxygen ions do this work for you on a microscopic level. All you have to do is get the surface wet with the oxygen bleach solution and let the oxygen get to work.

The longer you wait, in almost all cases, the less you have to scrub. This weekend, I used my secret oxygen bleach solution to get rid of deep grime and dirt on the painted metal surface of the door between my house and garage.

I mixed up my solution, applied it to the dirt and grime using a paper towel. Vertical surfaces are always more challenging because the solution wants to run down to the floor. I applied the saturated paper towel to the stain like you’d apply wallpaper to a wall. I waited just one minute, and then lightly scrubbed with a sponge. The door looked like new.

Oxygen bleach is an excellent degreaser. I use it in a spray bottle to clean my stove vent hood. I spritz the greasy surfaces and let the solution work for about three minutes. I then just use a soapy sponge and the grease comes off with one wipe. It’s amazing.

My wife uses the same oxygen bleach when doing the laundry. It keeps whites sparkling white. It’s color and fabric-safe. Colors retain their brightness. You get the best results by using the soak cycle in your washing machine. Allow things to soak for an hour or so, then proceed with the washing cycle.

Oxygen bleach can discolor natural wool and silk. It can also discolor aluminum or silver. Those two metals turn black when oxygen in the air reacts with them. It’s no wonder a liquid oxygen bleach solution will do the same.

You can search Google or any Artificial Intelligence LLM and come up with the recipe. It's in the public domain. It's not a proprietary recipe or trade secret of any brand. All you have to do is mix 4 parts sodium percarbonate with 1 part dense soda ash. You can CALL ME to discover where to get the BEST ingredients, how to use oxygen bleach on all sorts of surfaces, and storage tips.

Column 1618