Repair Blacktop Driveway Crumbling

blacktop asphalt driveway crumbling repair

Repair Blacktop - This asphalt patch was installed two years ago. It was a product in a bag bought from a home center. It started to fail within one year. The golf ball is for scale. Copyright 2026 Tim Carter

Repair Blacktop Driveway Crumbling - Don't Use Cold Patch

You may have an asphalt or blacktop driveway as I do. Mine was installed twenty-five years ago and is in good condition. The mix ordered at the asphalt plant was key to its longevity. The stones in the mix are larger than normal.

Keep in mind that blacktop is much like concrete. It’s a blend of stones, sand, and liquid asphalt cement. The ingredients are tumbled in a large slanted drum, allowing the hot, sticky asphalt cement to thoroughly coat the stones and sand. Concrete uses Portland cement and water to interlock the stones with the sand.

My blacktop contains stones that range in size from BBs to ones that resemble large cashews. The stones or rocks produce the overall strength of the blacktop. Keep in mind, however, that asphalt roads and driveways derive the vast majority of their strength from the compacted crushed stone base underneath the black velvet paving you drive on.

Soft spots in the base beneath the blacktop can lead to depressions. In my case, the blacktop started to fracture into chunks about the size of a piece of pumpkin pie. Two years ago it was time to seal my driveway. I had to fill cracks and repair the crumbling asphalt in three different places.

I used my battery-powered hammer drill to break up the crumbling asphalt. I inserted a demolition tip, transforming the tool into a miniature jack hammer. This made quick work of removing the failed blacktop. I used the tool to make angled edges where I encountered solid asphalt paving. In other words, I undercut the asphalt so the bottom of the hole was larger than the top. This is what dentists do when they drill out a tooth cavity.

I purchased a high-quality cold-patch asphalt product that comes in bags. The product I purchased had just small rounded stones coated with emulsified asphalt cement. Once exposed to air, the patching material gets as hard as blacktop you get from the asphalt plant.

The lack of sand in the patching asphalt, in my opinion, is a major factor that contributes to its poorer performance. The sand in hot-mix blacktop fills all the voids between the stones in the mix. There’s far better bonding between the stones than in the cold-patch product you get in bags. All that work I put into patching my driveway only lasted one year. After two years, my cold patch is now losing stones faster than one looses money at a casino.

I’ve come up with what I believe is a much better, and long-lasting patch method for the DIY homeowner like you. I feel you should patch the larger holes, say anything bigger than ten square inches, with concrete. Yes, purchase bags of high-strength concrete mix. I know for a fact this product will last far longer than the bagged cold-patch blacktop.

Think about it, after you do the repair, you’re most likely going to seal your blacktop drive, right? The sealer will transform the gray concrete to jet black just as it will your existing blacktop. The only issue you’ll face is trying to get the concrete surface texture to match your existing blacktop. This is not too hard to do.

The following method is for residential driveways that receive light-weight traffic. Should you want to do this in a parking lot or a road, you just have to put in thicker concrete.

The next time I do a blacktop repair, I’ll remove the crumbling blacktop and then some of the gravel base. Once again, it’s important to angle the edges of the solid blacktop, making sure the bottom of the hole is bigger than the top by about 1/2 inch around the entire perimeter of the opening. I’ll install the concrete three inches thick. I’ll be sure to compact the gravel base before I mix and pour the concrete. I’ll also sprinkle the gravel with water just before adding the concrete.

I’ll add reinforcing steel to my concrete. You can purchase 3/8-inch rebar for this purpose. The rebar should have at least 1 inch of concrete under it. I’d space the steel bars about 1 foot on center.

The concrete mix should be the consistency of applesauce. You need to pat it with a trowel and smooth it so you have a sandy texture at the top. If you want to try to match the texture of your existing blacktop, you might save some of the pieces you took out. You can use a large hammer to break up the old blacktop chunks, creating a fine mix of stones and sand. No pieces should be bigger than the largest stone you see on the surface of your blacktop. Do all this work before you mix up your concrete.

You can broadcast this crushed blacktop immediately into the wet sandy concrete. Lightly tap it down into the fresh concrete so it looks as much as possible like your blacktop.

Cover the fresh concrete with plastic to help cure it. You don’t want the water in the concrete to evaporate too fast. Leave it covered with the plastic for at least 48 hours. I’d lift the plastic and wet it with water from a garden hose every morning and evening to ensure the concrete stays damp.

Column 1668
Kitchen Cabinets Installation Guide

kitchen base cabinets and bar refrigerator

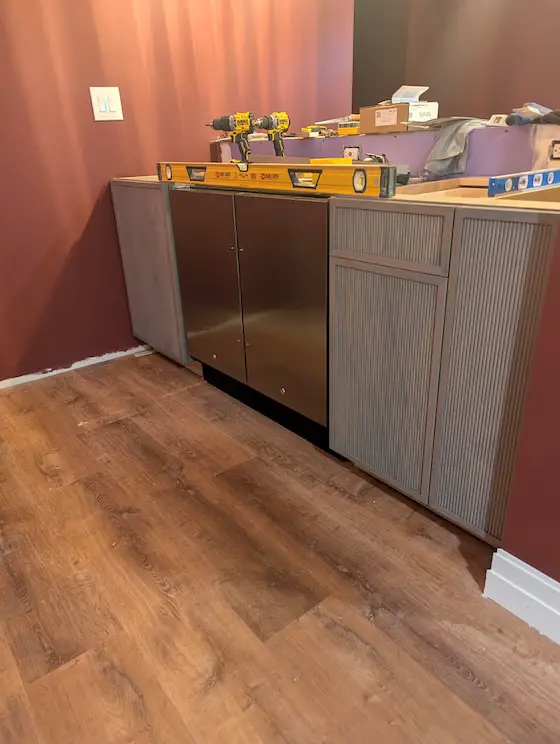
Kitchen Cabinets Installation Guide - There are three cabinets in this photo. A sink base is to the left of the refrigerator/freezer. A trash-can cabinet and small slide-out shelf cabinet are to the right. This is the bar area of a basement speakeasy. Copyright 2026 Tim Carter

Kitchen Cabinets Installation Guide

There are several events in a large building project that I find to be exhilarating. One of them is nailing in place the last rafter in a common-framed roof. Standing at the top of the roof skeleton looking down into the house fills me with a sense of pride and accomplishment. There’s more to do until the house is move-in ready, but reaching this plateau is very satisfying.

common roof framing 17/12 pitch

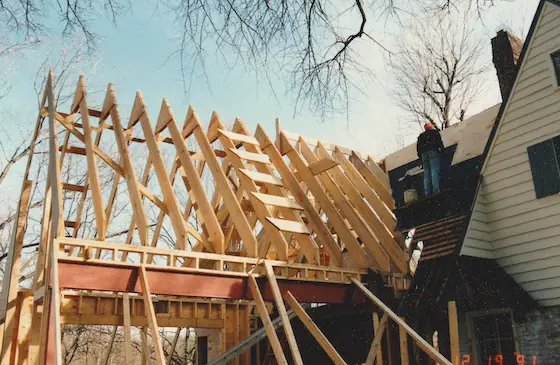
This is a steep 17:12 pitch roof I built in 1991. It has a unique structural component to ensure the roof doesn’t collapse. Copyright 2026 Tim Carter ALL RIGHTS RESERVED

I get the same feeling when I install kitchen cabinets. What seems like a simple job is not in reality. You discover quickly that it pays off in spades to invest extra time in the early stages of construction. Floors, walls, soffits, and ceilings need to be perfect if you don’t want to end up swearing like a sailor. Once the cabinets start to connect with one another with ease, all of the work you invested to make it happen produces a surreal euphoric feeling. At least it does for me!

My son and I were finally able to install the six cabinets in his basement speakeasy this past weekend. He was over the moon, as the end of this project is now just weeks away. We can only work on the job one day a week because of his work schedule and my head ushering responsibilities at my church.

I want to share with you a few tips I’ve discovered over the years that help make kitchen or bath cabinet installation more fun than work. It all starts at the floor level, as you might suspect. There are several things you should do in the early stages of building the floors and walls that will help keep you sane once you start the actual cabinet installation.

You want a line of cabinets to be level both left to right and front to back. You can achieve this with ease if the kitchen or bath floor is level. Precision work is required for concrete slab houses to achieve this. Rough carpenters must install floor joists with minimal or no crown. The joists must all be the exact same height.

The kitchen or bath walls must be square and plumb. Squaring walls is pretty simple using the time-tested 3,4,5 triangle measurements. Plumbing the walls requires a high-quality level and straightedge. The straightedge should just touch the top and bottom wall plate. Never use a level on a wall stud as it might have a slight crown. This hump can produce a false reading.

I’ve maintained for years that the use of steel studs for interior kitchen walls is an easy way to produce plumb and flat walls that make cabinet installation child’s play. You can install wood blocking at the correct heights on the inside of the steel studs to give you the required strength to hang wall cabinets.

If you’re forced to use regular wood studs for the walls, take your time and select ones that are perfectly straight with no crowns in them. A crowned stud has a hump in it when you look down the length of the stud. These humps will have you pulling your hair out, if you have any, as you try to align wall and base cabinets. Look for studs where you can see the center dot of the tree when it was a sapling. These studs cut from the center of a tree are usually very straight and will not warp over time.

Common sense dictates hanging wall cabinets first. You don’t want to lean over base cabinets while holding a wall cabinet up. You don’t want to drop a wall cabinet onto a base cabinet nor scratch the front of a base cabinet as you struggle with a wall cabinet.

You’ll discover flat pieces of 2x4 blocking will prevent you from having to hunt for wall studs. You install this blocking in the framing stage in between the wall studs at the correct height where the top and bottom of the wall cabinets will be. The centerline of the blocking should match up with the centerline of the top and bottom inner horizontal rails of the cabinet. Long screws pass through these rails, holding the cabinet to the wall. Blocking for base cabinets also speeds installation as you don’t have to hunt for the center of a wall stud.

I prefer to remove cabinet doors when I install them. I do the same with interior adjustable shelves. I carefully store them in an adjacent room so they don’t get damaged. Removing the doors and shelves reduces weight. You’ll discover it’s so much easier to install clamps that help you achieve perfect alignment of the face frames of the cabinets.

It goes without saying that I take the time to paint the walls and ceiling before I install cabinets. I also like to have the finished flooring extend under the cabinets. You need to exercise great care when working on finish flooring. I’ll often put down thick cardboard on the flooring. Dropcloths can also be used, but they should be clean and thick. Once again, invoke your common sense to do whatever is necessary to protect a finish floor.

I can’t stress enough how important it is to make sure that base cabinets are level. This is mandatory should solid stone countertops be in your future. The stone must not have any gaps under it, nor should it teeter on a high spot. This can cause a stone top to crack over time.

Column 1667 June 1 2026

Outdoor Room Ideas

outdoor room ideas fire pit, bushes, granite pathway,

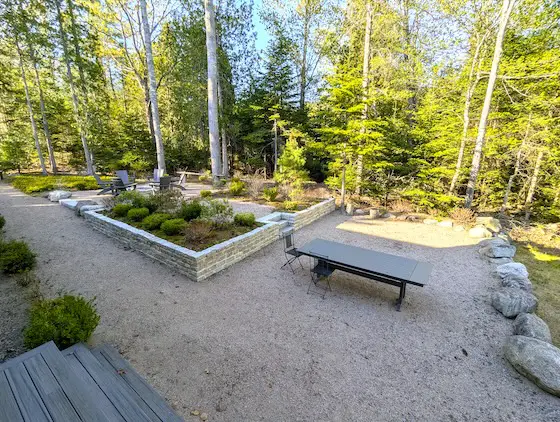
Outdoor Room Ideas - A fire pit room is to the left. An eating area for eight or more is on the right. A pleasant small garden area separates the two outdoor rooms. Copyright 2026 Tim Carter

Outdoor Room Ideas - Use Bushes and Walls

Several days ago, I was on magical Mt. Desert Island in Downeast Maine. I was visiting my daughter and granddaughter. Seven years have passed since I helped build her quaint three-story home with an attached garage. I was the plumber, electrician, and radiant heat installer.

My daughter is very talented when it comes to design. She wrote an in-depth book about things you should consider both inside and outside your home. The book is titled Meghan’s Method. She hand-drew all the illustrations.

Two years ago, she completed the exterior living spaces. You’re about to discover that separate spaces or rooms can be created in a very small outdoor area. She had never shared with me the proposed plan of what she had in mind. I was stunned when I arrived one day with my wife to see the finished product.

Her rear yard has five feet of fall from left to right as you look outdoors to the rear yard through a window. The slope was quite gradual. The overall end-to-end length of the house and attached garage foundation is seventy-two feet. My daughter took advantage of this tilted land, using it to help define separate spaces for individuals or children to gather.

Fire Pit Conversation Area

A circular fire pit area was created at the rear of the garage. This made sense for a host of reasons. First, the fire pit is not used all the time. The split firewood is stacked away from the rear left corner of the garage so it’s not visible.

firepit created using granite blocks

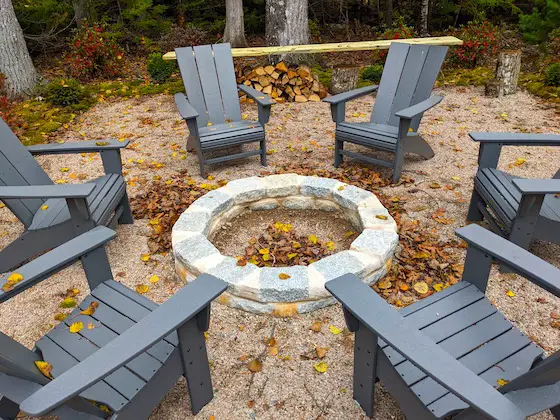
This is my daughter’s brand new never-used firepit. She didn’t ask for my advice and I think her plastic chairs might melt if the fire gets too big. Copyright 2023 Tim Carter

You can sit in the comfortable Adirondack chairs that stand guard over the fire pit created with large blocks of granite. This space can be used with or without a fire. It’s a great place to read a book, relax, chat with someone, and listen to the donkey bray in the neighboring lot.

Waist-High Bushes

Next to the fire pit room is a 14-foot-by-14-foot space with a 4-foot-wide path running parallel to the house. Low bushes dot the ground on either side of the pathway. This minor visual detail acts much like a wall would inside a home. Should these bushes grow up to be 42 inches tall, the fire pit area will transform into a cocoon of privacy!

The pathway and fire pit are all at the same level. A 23-inch-tall granite-block retaining wall separates these two spaces from the next lower level. Walk down three steps, and you find yourself in a large 16-foot by 14-foot crushed-gravel space. A rectangular table is near the house, leaving a large area for a hammock stand near the forest.

Granite Retaining Walls

A 40-inch-tall retaining wall of large, rounded boulders creates the final boundary between a lawn area used as a playground for my granddaughter and the outdoor dining room. Although there are no walls whatsoever, the use of small retaining walls, gravel, and landscape plants creates distinct boundaries between each of the outdoor rooms.

outdoor party table hammock granite chips

This is the outdoor dining room set up for my granddaughter's birthday party. The large table acts as a buffet for this event. Otherwise, eight people can sit comfortably at the table. Copyright 2026 Tim Carter

I’ve seen the same thing done on a much smaller scale while watching home improvement TV shows recorded in the UK. These clever homeowners and designers often have much smaller lots to work with, yet they create distinct spaces in a rear yard as small as 20 feet wide by 30 feet deep.

They achieve the same result as my daughter by blending different building and paving materials, plants, small trees, and water features. These materials and plants create separate zones of privacy and pleasure. It’s not hard at all to do when you stop and think about it.

I’m attracted to the use of the granite blocks for the retaining walls and steps, as well as the tiny pink granite chips used as the paving material. These are easy to maintain, and they require minimal installation skills.

Visualization Tools

You may not be able to visualize the finished design of your new rear yard. Many of my past customers lacked this ability. A simple hack to solve the problem is to stage your spaces using cardboard boxes, lawn chairs, garbage cans, or any other item as a placeholder.

Here’s an example. Let’s say you want to see how big a fire pit area should be. The outer diameter of a fire pit is usually 3 feet. Sprinkle some flour on your grass in a circle. Place the front of a lawn chair about 24 to 30 inches away from the flour. You never want to sit too close to a hot fire.

You’ll soon discover you need a minimum of a 12-foot by 12-foot area for the fire pit area. Do the same exercise for an eating area or a general seating area using lawn furniture.

You can also use the existing rooms in your home as your north star. You know which rooms are spacious and those that might be a little cramped. Don’t make a planning mistake when it takes so little time to determine how to create an ideal outdoor collection of rooms. Good luck!

Column 1666 May 25, 2026

Grease Clogged Drain

sink strainer grease clog preventer

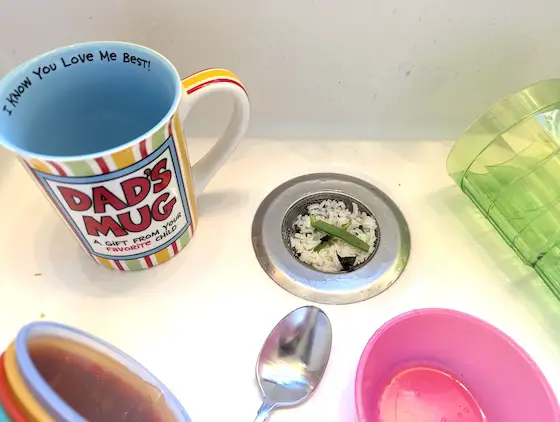
A $5.00 stainless-steel screen strainer can prevent a $500 drain-cleaning service call. You can see how this one captured small grains of rice and other food scraps. Copyright 2026 Tim Carter

Grease-Clogged Drain - Prevent With Sink Strainer

Last week, I shared my broken boiler saga. Even though I did the repair myself, I was still out of pocket almost $540.00. Had I been forced to hire a professional to do the repair, the total bill would have approached $1,000.00. I’m sure he would have marked up the $387 fan at least 30 percent.

This week, a $5.00 stainless-steel sink strainer reminded me twice how it’s guarding the 1.5-inch sink drain pipe buried in the wall behind my kitchen sink base cabinet. The first time it stopped globs of coagulated cheese from entering the pipe. The second time, it filled up with hundreds of pieces of rice someone didn’t put in the garbage can.

I don’t live alone in my house. Even though I’ve shared the gospel about how to prevent clogged drains, other inhabitants seemed determined to worship a false god who claims food scraps and grease cause no harm to drain pipes.

There are hundreds of professional plumbers and drain-cleaning companies who survive and thrive on this home maintenance heresy! I can tell you from first-hand experience that grease and food scraps will clog a drain much like a tortoise crosses a road. It’s a somewhat slow process that eventually reduces the inner diameter of the drain pipe to nothing.

Thanks to technology, you can view quite a few videos on YouTube that show you what the inside of drain pipes looks like. Food deposits, grease, and any other things you send down your drain pipes can accumulate on the inner walls of the pipes.

This same thing happens on a larger scale in city sewer pipes. Look for videos that show the buildup of deposits in these large-diameter pipes. I believe once you watch these videos, you’ll become a disciple of the Tim Carter drain pipe religion.

Since I’m the one who would be conscripted to clean out a clogged drain, I’ve told all in my family I’ll wash the dishes. I take care of it all the time. Here’s what I do to ensure I never have a clogged kitchen sink drain.

First, I have a stainless-steel screen strainer installed above each of the basket strainers in my dual-basin sink. The normal basket strainer has larger holes that allow food scraps to enter the drain pipe. The strainers I have capture any food particles bigger than a tiny undersized peppercorn.

stainless steel sink strainer

CLICK THE IMAGE to order great sink strainers.

The strainers also do double duty with grease. I’m not quite sure how it works, but the screening gets clogged with grease. They’re a must-have in every sink as far as I’m concerned.

I take the time to scrape out all food from plates, bowls, pots, and pans. It all goes in the garbage. My family knows to keep wet paper towels in a bowl on the kitchen counter. I set them out to dry and use them to wipe grease from all dinnerware, pots, and pans. The grease-saturated paper towels are then discarded in the trash.

Baked-on food in pans and pots can be an issue. I fill them with just enough water and soap to cover the hard, dry food scraps. These are put on the counter. I want the hardened food to re-hydrate. After a few hours, I use a small plastic scraper to remove the food from the pot or pan. I dump this outside on the lawn where it magically disappears in a few days.

Last week, I had a reader like you reach out to me about tiny fruit flies that buzz up out of his sink drain when he turns on the water in his sink. He wanted to know if he could put a cap on the vent pipe that projects up out of his roof to stop the infestation.

I shared with him that the flies are not entering from the roof. A cap would stop the much-needed air from entering the plumbing system each time water flows down the drain and waste pipes.

The flies are feasting on the biofilm that coats the inside of the drain pipes extending from the bottom of the sink to the top of the p-trap. This coating is rich in food and moisture which fuels the growth of the flies.

Fortunately, it’s easy in most cases to take apart these pipes and clean them out using the correct-sized bottle brush. The black goo biofilm can be cleaned off with minimal effort.

Column 1665

Wall Hung Toilet Plumbing

wall-hung toilet green subway tile

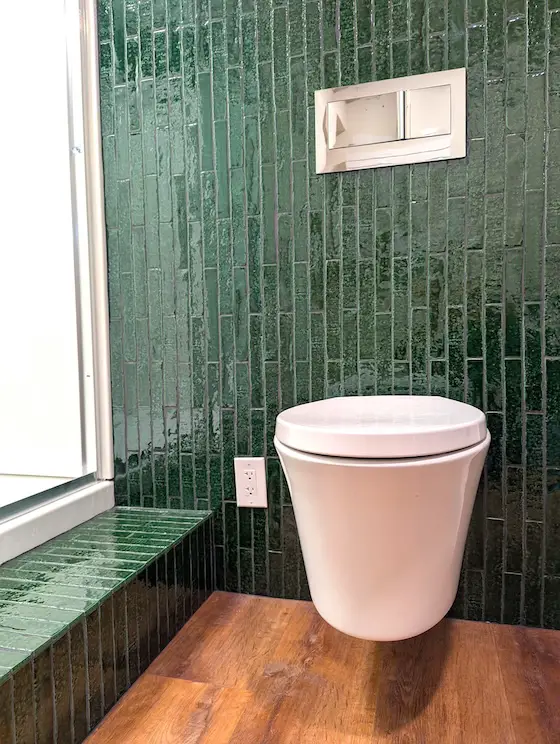
Wall Hung Toilet Plumbing - This sleek wall-hung toilet is in a basement bathroom, not a fancy hotel. Copyright 2026 Tim Carter

Wall-Hung Toilet Plumbing - It's Very Easy

I’ve shared in past columns how I’ve been blessed to help my son complete a massive remodeling project. He purchased a new single-story three-bedroom home four years ago. This house had a massive wide-open, full basement beneath all the upstairs living space.

He decided to carve this space up into a fourth bedroom, a TV room, a workout/storage room, a game room, a speakeasy, and a full bathroom. I was excited to start this project for a host of reasons, not the least of which was to expose him to all of the aspects of building and remodeling.

When you think about it, we built a house sans the foundation, installing windows and siding, and the roof. We did every other aspect of building a home in this basement project. My son never got to see me build anything. I stopped the day-in, day-out aspect of building and remodeling for paying customers when he was a one-year-old lad. He has no memory of me leaving the house with a lunch cooler. His only memories as a child are of me tapping away at a keyboard in the basement, creating Ask the Builder columns and website pages.

I knew early on that the plumbing aspect of this project would be burned into his memory forever. I lost count of all the new basement bathrooms I installed in customers’ homes. These always involved breaking into a concrete slab, locating the main sewer building drain, and then tying in all the new drain pipes into this buried 4-inch pipe.

Some houses have the building drain exiting the house up high on a foundation wall. In those cases, I had to install a sealed sewage-ejection sump in the basement. The new basement bathroom would drain to this sealed sump. The sewage would then be ground up by a pump inside the sump and lifted up eight feet or so to dump into the elevated building drain.

Sewage ejection sumps are future headaches in my opinion. When the pump fails, and they do because they have moving parts, you can visualize what has to happen to get to the pump and install a new one. Yuck!

My son’s building drain was not under his concrete basement floor. It exited the house just an inch above the concrete. The sewer line out in the street was shallow. The plumber had no choice but to bring the pipe into the house at this elevation. I was bound and determined to take advantage of gravity so we could avoid installing a wretched sewage ejection sump pit.

Wall-Hung Toilet to the Rescue

I went online and downloaded the specifications and technical cross sections for a few wall-hung toilets. My guess is you’ve used these in airports, hotels, or other commercial buildings. They have a rich history of flawless performance, and some of the residential ones are very sleek.

Lo and behold, it turns out the centerline of the building drain as it entered my son’s basement was at the perfect height. It would connect to a wall-hung toilet so long as we had the toilet just five or six feet from where the sewer pipe entered the house. It was easy to adjust the floor plan to make this happen. We also put the speakeasy on the other side of the bathroom wall to keep all of the plumbing together.

A wall-hung toilet is connected to a substantial metal support frame that’s bolted to the wall studs. This is why the toilet doesn’t crash to the floor when you sit on it. In our case, the water tank for the toilet flush was built into this metal support frame. It’s very innovative, and I love how the gravity-fed tank is completely hidden from view in the bathroom.

All you see in the bathroom is the actual toilet and above it on the wall, two paddle pads. You press the larger one to get rid of solid waste and the smaller pad for liquid waste.

It doesn’t require any special skill to install a wall-hung toilet. You just have to be very aware of the centerline height above the floor of the metal support frame. Install it too high, and it’s very awkward to use the toilet. Install it too low, and your knees will be in your face when using the commode. The instructions are crystal clear as to exactly where the centerline must be. You then just have to do whatever is necessary to make the drain pipe connections satisfy both gravity and the plumbing code.

I love how easy it is to keep the floor beneath the toilet sparkling clean. The fancy new mops that have a pad are able to get under the toilet with no issues. The toilet flush is vigorous because the water in the hidden tank is about 30 inches above the toilet bowl. Keep in mind you don’t have one of those ugly chrome exposed flushing valves you see in the airports, hotels, and commercial buildings. You just have the two flat pads on the wall.

Talk to your plumber before you get too far into your planning for your project. You can incorporate a wall-hung toilet on any level of your home. I think you’ll be amazed at how sleek the residential models are. I know my son loves his!

Column 1663

Chimney Fire Danger

clinker brick chimney

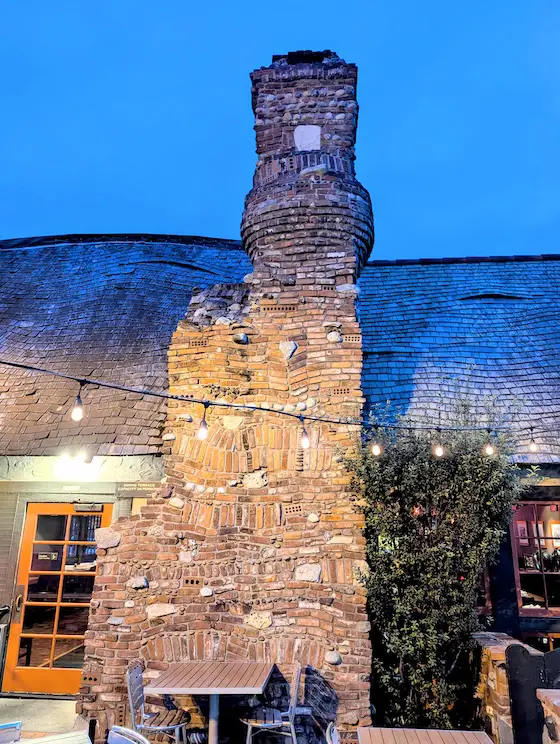
You may think a chimney like this is safe. It could be very dangerous if in an old home. Copyright 2026 Tim Carter

Chimney Fire Danger - No Flue Liner

Each week, I receive quite a few emails from readers of this column. I treasure each one because they provide a window to view the real problems and challenges you face with your home. Some messages are small, some are medium, and others are extra-large. One reader sent me an XXL one. It was a pleasure to read. There are several teaching moments in his email that I’m about to share.

This man lives in an old house in the upper Midwest. It’s a grand home with a tall exterior brick chimney. He’s convinced the fireplace and chimney were afterthoughts and not original to the construction. It’s important to realize that this homeowner told me he builds quite a few blazing wood fires in the fireplace each winter. He’s lived in the house for decades. The embers and hot flue gases from at least 500 fires have traveled up this chimney.

He also mentioned he felt the fireplace was intended for just gas logs. After looking at his photos, I’m in 100-percent agreement with this. It would be somewhat easy to verify this theory by looking for a small black-iron gas pipe in the basement that terminates in or near the underside of the fireplace. That gas pipe may have been for a log lighter for a wood-burning fireplace so you have to look at how the chimney was constructed to make a final determination.

Another clue to support the gas fireplace theory is the actual size of the chimney. The exterior of the chimney measures about 20 inches by 20 inches. He sent a photo taken by a chimney contractor looking down from above. This photo showed the inside dimensions of the chimney to be about 12 inches by 12 inches. This means the chimney walls are just 4 inches thick on all sides.

I could see traces of a stucco finish on the inside of the chimney, but much of it has worn off in the 100 years or so the chimney has been in service. There was no visible clay flue liner when you looked down the chimney from the top.

The homeowner decided to obtain some quotes to repair loose bricks at the top of the chimney and to tuckpoint the mortar above the roofline. He also wanted a new metal chimney cap with mesh sides to stop birds from nesting in the chimney.

This is where the story gets interesting. All of the contractors told this homeowner that his chimney required a significant amount of work to ensure the hot embers and flue gases would not set the house on fire. The man thinks the contractors were just blowing smoke, pun intended. He felt his chimney was safe because of the number of fires he’s had in it over the fifty years he’s lived in the house.

I agree with the contractors. This man has been extremely fortunate that his local fire department hasn’t pulled up on a frosty winter’s night to extinguish a fire inside his exterior wall or attic. His current chimney is an extreme fire hazard, in my opinion.

For starters, the chimney lacks a flue liner. These vitrified clay products are designed to withstand the hot temperatures from wood-burning fires. These liners are thick and are designed to have minimal joints between the smoke chamber above the fireplace, extending to the top of the chimney. It’s best to use fire clay to seal the joints where one liner rests on top of another. Regular mortar used to bond bricks together is not rated for the hot flue temperatures and will fail in short order.

The photo I saw taken by the contractor looking down inside this man’s chimney, shows lots of missing brick mortar between the bricks. Keep in mind there’s only one brick thickness between the combustible wood framing of the house and the 400F flue gases, just 4 inches from bone-dry wall studs and sheathing.

Years ago, I was tasked with moving an interior fireplace to an exterior wall. The chimney above the fireplace did have a proper code-approved clay flue liner surrounded by solid 4-inch concrete block. What I saw when I removed the drywall shocked me.

There were black tongues of soot extending from tiny cracks in the mortar between the solid concrete blocks. This soot and the hot flue gas had escaped from the flue liners. Wood furring strips nailed to the concrete block were next to the hot gases! I then discovered the flue liners had been set using regular brick mortar, not fire clay.

Let’s get back to the chimney, that’s the core of this column. There could be brick joints where 3 inches of mortar has worn away over the years. Now, just 1/2 inch of normal mortar may be the only thing between the dry wood and glowing tiny embers that are floating up the chimney. There’s no doubt in my mind that any insurance company would cancel a fire policy if it were aware of an unsafe chimney.

I told this homeowner to rush to the Brick Industry Association (BIA) website. I suggested he download and read all of their free technical notes about fireplace and chimney construction. You should do the same. Pay close attention to the one technical note publication about chimney crowns. I’d venture to say 99.9999 percent of all chimney crowns on residential homes are not built correctly.

Your takeaways should be the following:

If you doubt what a chimney contractor is telling you, call your local fire department. Most have a fire-prevention officer. Allow him to share true stories about chimney fires. Ask him about the minimum construction standards that one should follow to prevent a fire from a wood-burning fireplace.

Rely on the technical notes from the BIA. They show you how to build fireplaces and chimneys that exceed the minimum building code requirements.

Chimneys servicing wood-burning fireplaces should, in my opinion, have a minimum of eight inches of solid masonry surrounding the properly sized clay flue liner.

A suitable stainless-steel heavy-gauge pipe inside an existing brick chimney might prevent a fire. I’d pass this by the fire department. The challenge is how to make a safe connection between the pipe and the smoke chamber above his damper. This is not easy and must be done to ensure no flue gases or embers travel up the chimney on the outside of the stainless-steel pipe.

Column 1662

Clinker Brick Wall

clinker brick wall crooked brick and rock

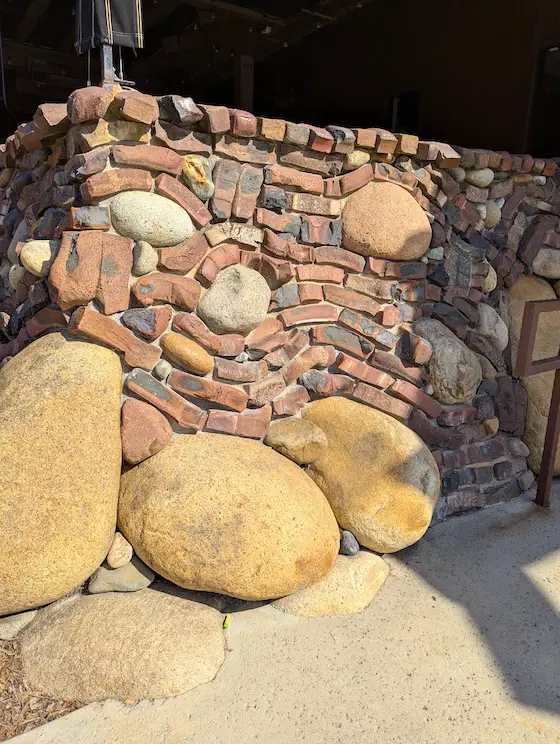
Clinker Brick Wall - This is a small brick and stone retaining wall. The mason used some factory-reject bricks to create it. It’s also possible these curved and twisted brick were made on purpose. Copyright 2026 Tim Carter

Clinker Brick Wall - Stunning and Unique

My guess is that most of the bricks you’ve seen in your lifetime have been very uniform in shape. Each brick is rectangular. This is by design in almost all cases. The length of a brick plus one mortar joint in the USA is supposed to equal 8 inches. The depth of a standard brick plus a mortar joint is intended to measure 4 inches. The height of three bricks plus three mortar joints equals 8 inches. This is why many common bricks are referred to as modular.

That said, funny things can happen at a brick factory that might have an older kiln or one that’s not designed to heat the contents evenly. A brick might develop a nasty blister and swell up once it’s fired in the kiln. Some can twist and deform. Some develop severe discoloration. This deformation and discoloration are attributed to the excessive heat some bricks experience in the firing process. Brick manufacturers call these clinker bricks, as they make a distinctive sound when they tumble against one another.

Visit the historic Gamble House in Pasadena, CA, and you’ll see how the architect made use of thousands of clinker bricks that might have ended up as construction fill. This magnificent house was constructed in 1908 as a winter home for David Gamble and his wife. David was the son of one of the founders of the enormously prosperous Procter & Gamble company.

The exterior gardens of this National Landmark feature walls made with thousands of these unique twisted, burnt, and deformed bricks. They add a distinctive flair to the curved walls in the gardens.

Modern brick kilns are designed to minimize or eliminate clinkers. That said, there is a demand for them, and some manufacturers make deformed bricks on purpose. I urge you to seek these out should you want to create something unique, be it a retaining wall, a fire pit enclosure, or even use them in a chimney.

The best part about clay is it can be formed into any shape. Potters do this all the time. But imagine getting creative with clay as it relates to building a home or using it in any sort of architectural sense. Some brick manufacturers specialize in twisted, burnt, deformed, and misshapen clinker brick. I just want you to open your mind to the possibilities of using them in certain situations.

You can create bricks that have different radii. These can be used to create a border around medium or large, rounded river rocks or boulders.

Imagine twisting a brick to make it look a bit like a piece of licorice. These twisted brick can be used as a decorative cap to garden wall.

The shapes don’t have to be uniform. Think about stone retaining walls made with rock ranging in shape and size. Miles of stone walls in New England are made this way. You can do the same thing with hunks of clay that have an irregular shape and look more like colored blobs instead of the normal rectangular bricks you see on most buildings.

You can take this design to the next level by colorizing the mortar used to set the clinkers. Tinted mortar is a tool in the architect’s workshop. The church I attend each Sunday has reddish mortar. It’s by no means the standard gray you see in almost all other brick walls.

The colors are created by adding dry pigments to the mortar mix. There is a wide range of colors of dry pigments. Nothing is stopping you from mixing two or three pigments to arrive at your own mortar color. Nothing is stopping you from having the mortar change color throughout the brick structure. Think of the mortar as an artist would consider the different tubes of acrylic paint or watercolors they might use in a painting.

Many clinkers, or fake ones, have extreme durability. Keep in mind that bricks can be made that are intended for use on a roadway. I have a salvaged brick from the historic Dixie Highway brick road constructed in Florida decades ago. You can visit Athens, Ohio, and see bricks in its streets that still have cars and trucks drive on them daily.

I urge you to do an online search for inspiration as to how to use clinkers in a fun project at your home. Google Images and Pinterest are great places to start. You can vary your search terms. Search for clinkers, bent brick, twisted brick, burnt brick, blistered brick, etc.

While doing this, also look for photographs of tinted mortar. Look to see how creative people have incorporated it into their projects.

Don’t underestimate the sand in the mortar! Realize you can get sand that contains a wide variety of tiny pieces of rock, many of them different colors. Most sand is just rock. Rocks come in a wide variety of colors, so it makes sense that some sand and gravel pits have multi-colored sand. I’m lucky to have an abundance of it here in central New Hampshire.

Column 1661

Spice Cabinet Ideas

spice cabinet ideas - built-in closet

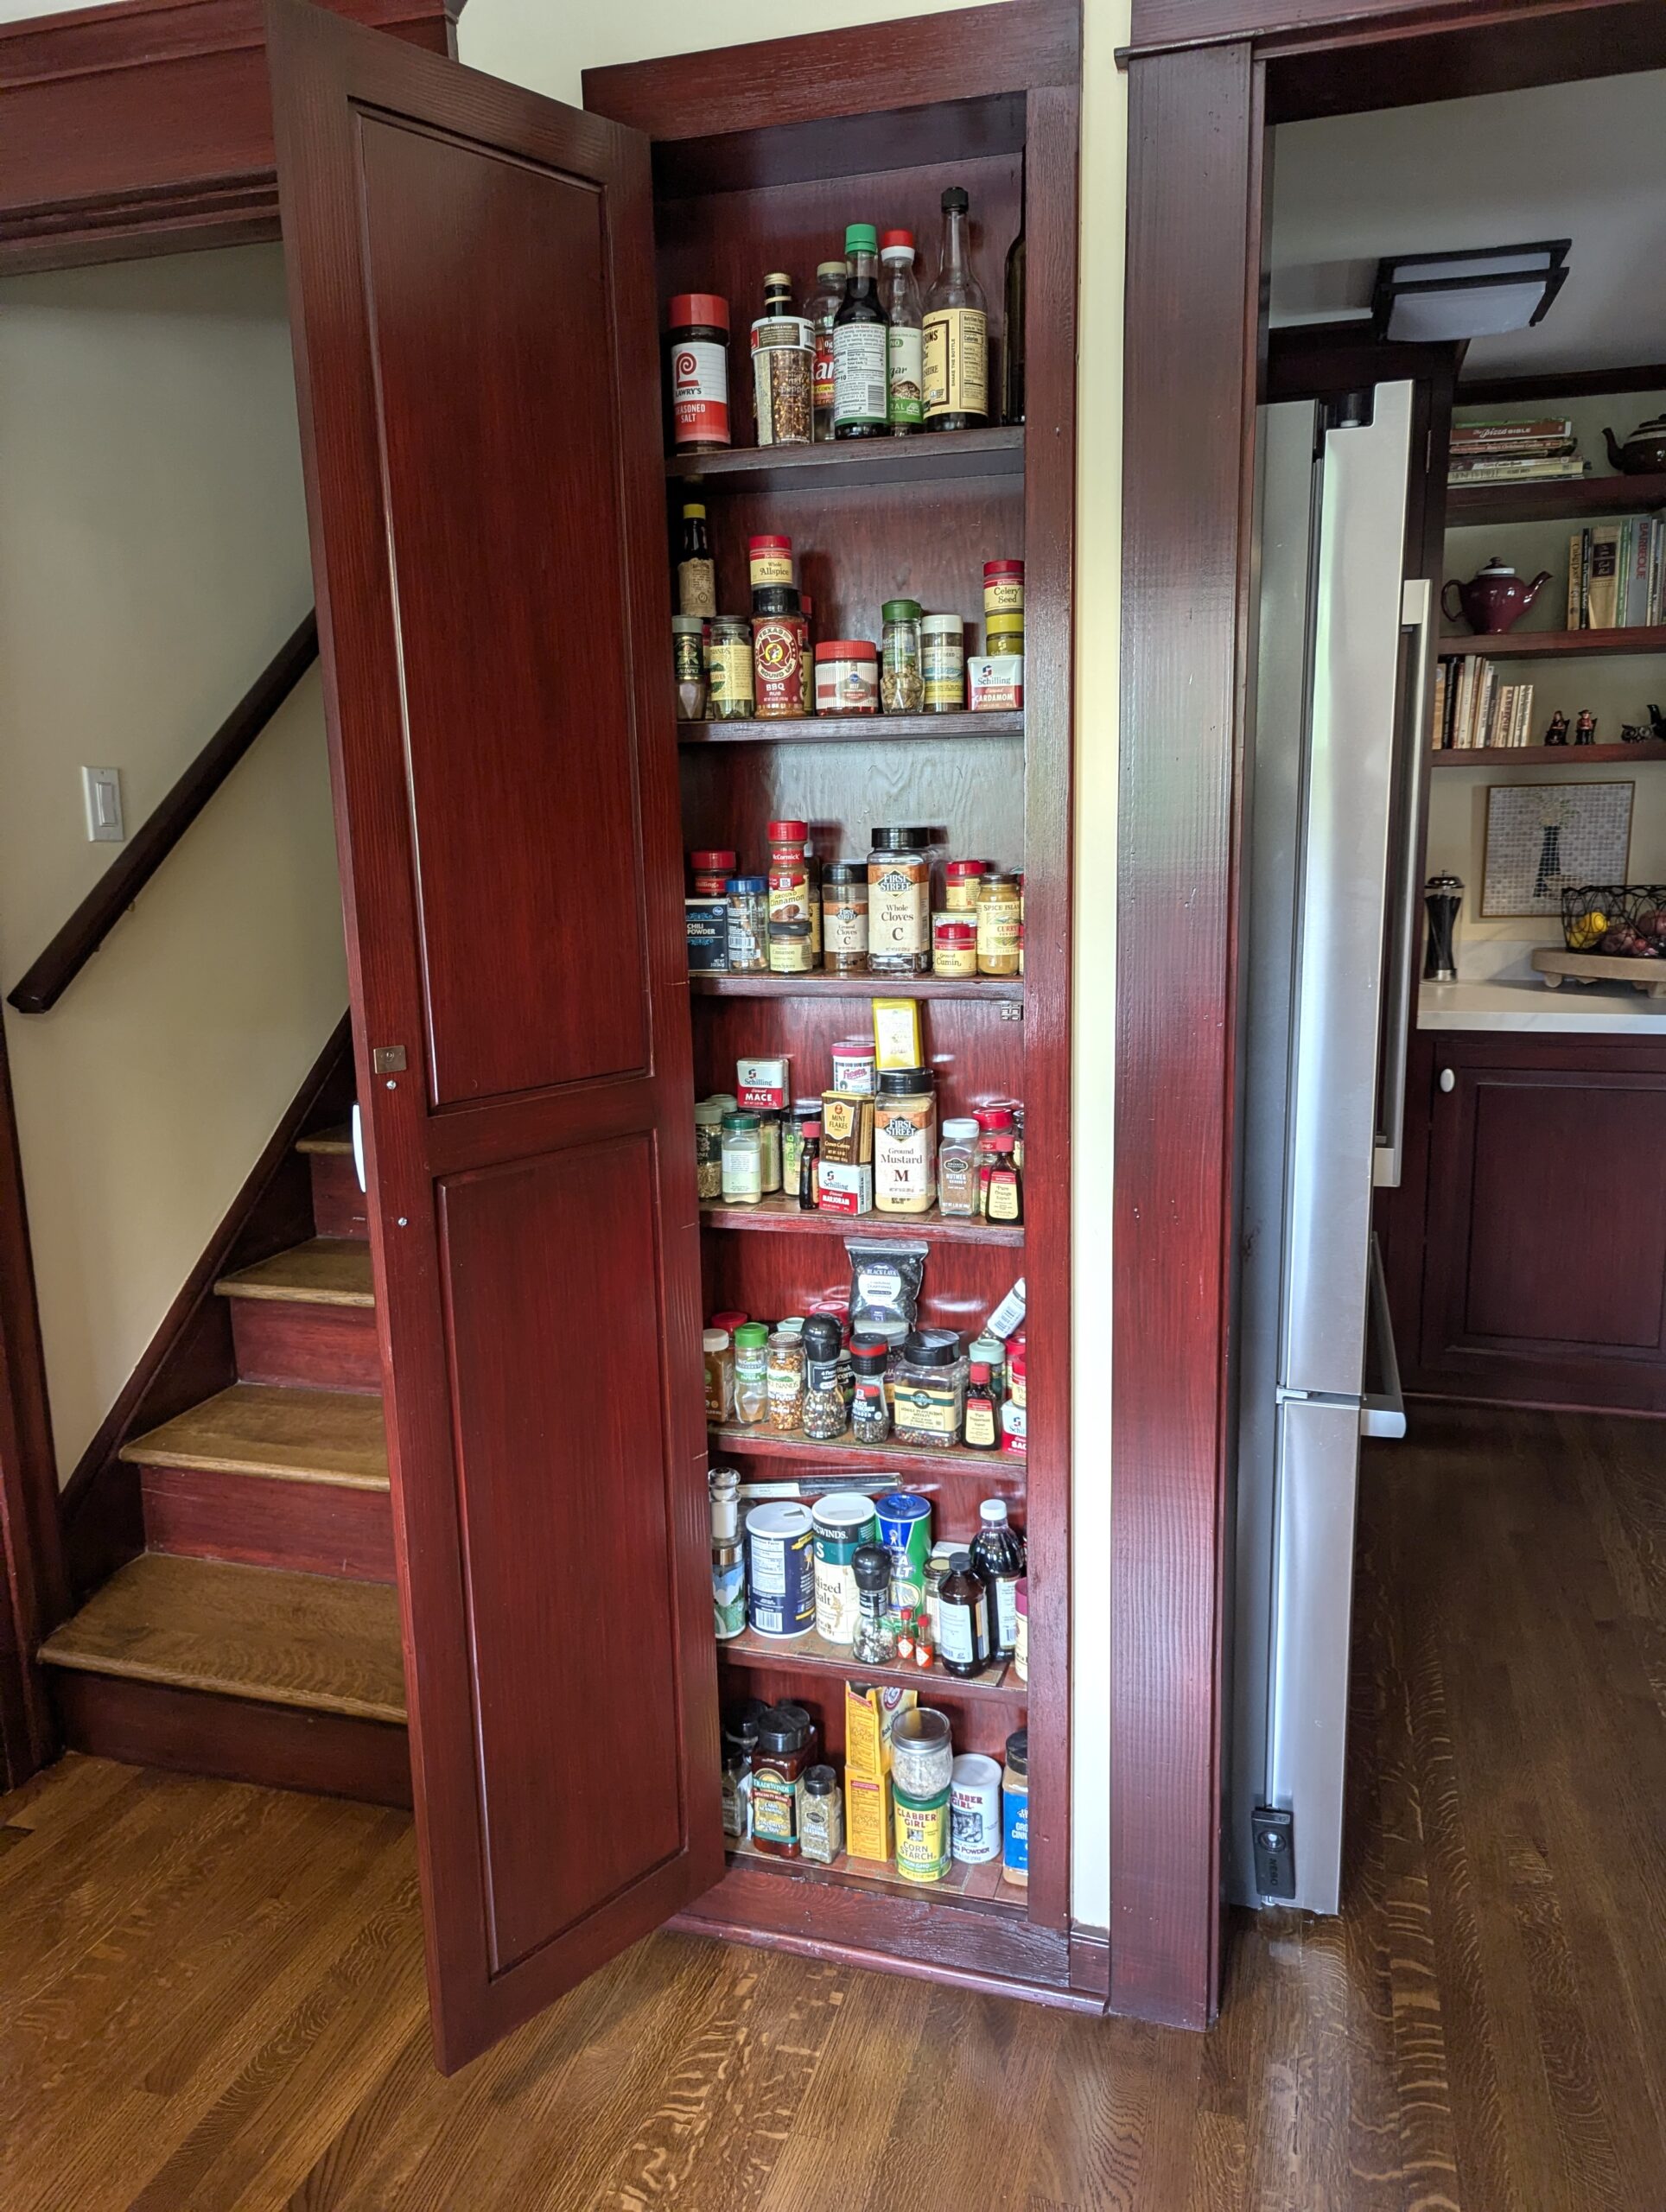
Spice Cabinet Ideas - This spice storage concept is only 115 years old! The architect or custom builder made use of otherwise wasted space. Copyright 2026 Tim Carter

Spice Cabinet Ideas - Create a Spice Closet in a Wall!

My 52nd wedding anniversary is less than five months away. I was so lucky to find my beautiful and loving wife. In all those many years, I think we’ve had fewer than four serious arguments. I discovered years ago that it doesn’t pay to cross swords with a woman with Irish blood.

More often than not, my dear sweet wife grumbles when trying to find a particular spice bottle. She frequently laments about the random placement of the glass cylinders filled with all sorts of tasty powders, leaves, or who knows what.

I discovered long ago not to open my mouth to suggest she organize them the way she’d like to have them, so what she needs is exactly in its spot. I made that mistake and didn’t like the look of flared nostrils and wide eyes.

Fast forward to a month ago. She Who Must Be Obeyed was complaining once again about how she couldn’t find a particular jar. I knew early the following morning my 16-month-old granddaughter and I would have the kitchen to ourselves. I decided to try to organize the spices alphabetically while my soulmate was still slumbering.

Our spice cabinet is a normal 12-inch-deep wall cabinet. There are four small, shallow shelves on the back of each door. Each of these shelves holds 4 typical spice jars. There are 9 inches of shelf space in the cabinet once the doors are closed.

This is where the trouble starts. You can fit four rows of spice jars on each of the interior cabinet shelves. It’s impossible to see 75 percent of the labels.

I did my best to organize them, but my efforts were rewarded with a big bowl of grumble soup. I know my lovely wife appreciated my thoughtfulness, but truth be told, I hadn’t solved the problem.

I’ve seen slide-out spice racks and suggested those. She didn’t seem impressed. I know what she wants, and that’s the magic-wand solution. She’d prefer a genie in a bottle blink her eyes, and the labels to all the spices be visible when you open the door.

Just days ago, I saw this exact solution while visiting a friend in Southern California. He lives in his childhood home, which was built in 1911. This grand Craftsman-style home has a modest 12-foot by 12-foot kitchen. Windows, a staircase, and three doorways consume valuable wall space.

The architect or builder came up with an ingenious solution for spice storage. The void space normally hidden by plaster or drywall between two vertical wall studs was used to store spices. The finish carpenter placed 1x3 smooth trim around the opening. A face-frame door that matched the base cabinets was used to cover this enormous, shallow cavern.

There were seven shelves inside the space, but it could have been nine or eleven with little effort. I measured my spice jars, and the tallest one is less than five inches tall. The diameter of the spice jars is two inches. This means you can fit seven jars on each shelf if you want to place just one row per shelf.

A 6-foot-tall opening would allow you to have almost enough space for 80 spice jars. Two taller shelf spaces could be allocated for bottles or boxes that need more space.

This unused space in a normal 2x4 wall would give you 4 inches of storage depth from the back side of the drywall on the other side of the wall to the face of the drywall in your kitchen. The typical spice jar is 2 inches in diameter. You could have two rows of spices per shelf, but the back row labels would be invisible. I recommend just putting one row of jars per shelf.

You can just paint the back of the drywall and the sides of the studs if you want to go the economy route. The better solution, in my opinion, is to glue pieces of 1/4-inch-thick luan plywood to create a finished wood look inside the space. You have the room to do this.

If you’re building a custom home or remodeling your current kitchen, you can enlarge the width of this spice storage space. You can make it as wide as you want, assuming you’ll purchase a standard-sized tall cabinet door to hide the jars. A 24-inch cabinet door could cover a 23-inch-wide interior space with no problem. Imagine how many spice jars you could fit in a space 23 inches wide, 72 inches tall, and 4 inches deep!

Column 1660

Outdoor Kitchen Ideas

outdoor kitchen under timber frame roof

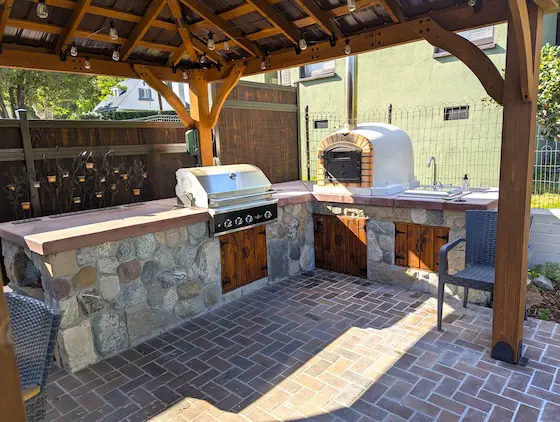
Outdoor Kitchen Ideas - This outdoor kitchen will work well. There’s plenty of countertop space. Copyright 2026 Tim Carter

Outdoor Kitchen Ideas - Plan for Weather

You may be dazzled by the outdoor kitchens you see on home improvement TV shows. Designers work hard each year to create trends of every type. You see it in clothing, paint colors, new cars and trucks, etc. This is done to pry dollars from your savings account. New products of every type fuel the economy.

I’ve been in the industry long enough to remember when interlocking concrete bricks were the cat’s meow. People used their driveways to share how cool they were. Many of these are the same folks you see on social media showing off what they just did, what they just bought, or any other news that puts them at the forefront of what’s cool.

The family that lives next to my son invested many tens of thousands of dollars in creating an outdoor patio oasis that has an outdoor kitchen. It also has a large human soup bowl. They call it a hot tub. A fire pit surrounded by four chairs is on a lower level of the patio. The large outdoor kitchen dominates the upper patio area.

Their stainless-steel barbecue is almost six feet wide. Fire up all the burners, and you could cook for a party of 20 or 30 people. The only thing missing in this setup is an outdoor sink. It would be quite easy to install one, although you’d have to use a point-of-use heater to get hot water.

I spent a few days a week ago with good friends who live in Southern California. They had just finished a full remodel of their in-ground swimming pool area. The entire pool was repiped and coated with a delightful granular coating. They also added a new human-soup bowl in one corner of the shallow end of the pool.

The centerpiece of the pool project was a magnificent outdoor kitchen. An open timber-frame structure keeps part of this outdoor kitchen dry from rain showers. A wind-driven rain will get everything wet for sure. Rain in Southern California is not a nuisance like in many other parts of the USA.

This kitchen had a great design. It was L-shaped with a domed pizza oven in the corner. The heat required to bake a pizza was supplied by a wood fire or an electric heating element. The firewood was stored in an arched nook at the far end of the kitchen counter. It was a clever use of space.

The gas-fired stainless-steel barbecue was placed three feet away from the pizza oven. There was just enough space for a person to be flipping burgers and bratwursts and not bump into a person checking on how brown the cheese was on the pizza. You must think about these conflicts when developing your plan.

A large stainless steel kitchen sink was next to the pizza oven. There were sixteen inches of counterspace next to the right side of the sink. I’m willing to bet my friends will discover they could have made this leg of the kitchen counter at least three feet longer.

The base of the entire kitchen was made from native rocks. The mason did an extraordinary job of picking an assortment of small granite and other metamorphic rocks. The colors and textures blended together creating a striking rustic appearance.

Storage cabinets were built into the stone base under the barbecue, pizza oven, and sink. The wood doors with rustic hinges and handles matched the stone base to a tee.

Countertop construction is critical. You need everything to be waterproof. My friends went with a 4-inch-thick colored concrete top. It was troweled smooth as silk. All of the edges were rounded, creating a very smart appearance. The top had a 2-inch overhang past the front surface of the stone walls.

Planning an outdoor kitchen requires more thought than one inside a home, in my opinion. Weather extremes should be at the top of your list. Ice and snow can cause severe damage to the kitchen components when the kitchen is out of service in the deep winter. Water will cause any unprotected steel or iron to rust. All metal should be stainless steel or brass to prevent issues.

What about the blazing sun? You may already suffer when using your stand-alone barbecue grill when out on your driveway. I’m thinking you don’t want to be drenched in sweat while grilling in your new outdoor kitchen. How will you shade yourself?

Utility connections are very important. All electrical work must meet the latest requirements of the National Electrical Code. Shock hazards are real in these outdoor kitchens.

Sink plumbing is also critical. How will you dispose of the gray water from the sink? How will you drain your water pipes should you live in a cold climate? You need to make it easy to winterize the supply and drain piping.

You may be able to extend natural gas to your new barbecue grill. I did that many years ago in my last home. I never again had to worry about running out of propane halfway through a meal. Remember, you can’t bury an iron gas pipe. All gas lines must meet the National Fuel Gas Code.

It’s wise to look at lots of photos of outdoor kitchens before you start to plan. Look at each kitchen with a critical eye. Think about counter space. Consider how multiple people may bump into one another when cooking is in full gear. What about refrigeration?

Ask vendors for photographs or videos of kitchens they’ve installed. Once again, think about the spacing of appliances, the ease of cleaning things, and how you’ll stay comfortable while using the kitchen.

Column 1659

Prevent Mold in Bathroom

tile shower with a ventilation fan slot at the floor

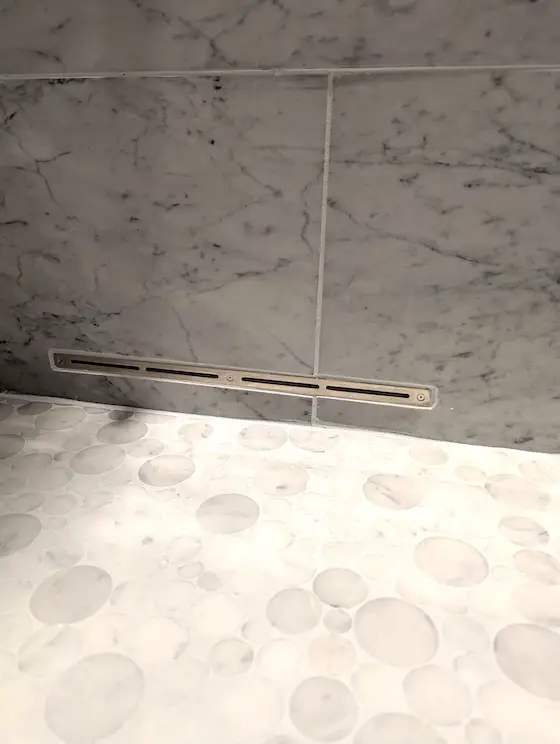
Prevent Mold in Bathroom - This narrow slot is connected to a high-speed fan that blows air into a shower. The air removes the water, stopping the growth of mold and mildew. Copyright 2026 Tim Carter

Prevent Mold in Bathroom

You may be plagued with mold and mildew in your tub and shower area. It’s a very common problem. The good news is that if you’re willing to spend just 30 extra seconds once you’ve rinsed off all the body wash and shampoo from your hair, I can just about guarantee you’ll never have mold and mildew again.

Mold and mildew are much like fire. You need just three things to have a fire: fuel, heat, and oxygen. Remove any one of the three ingredients, and you’ll not have flames and smoke.

Mold and mildew spores, food, and water are the three things you need to fuel mold and mildew growth. The spores are everywhere in your home. You’d need an expensive whole-house filtration system to prevent them from being on all the surfaces in your home.

The food for mold and mildew is plentiful in your tub and shower area. Body oil, dust, soap deposits, dirt, and grime from your body that don’t make it down the drain can accumulate in tubs and showers that aren’t cleaned on a very regular basis. At the very least, you’d have to clean the tub and shower every three days.

Water is the easiest of the three ingredients to control and minimize. You need to get rid of all of the water in your tub and shower area as rapidly as possible to inhibit the growth of the nasty black organisms.

There are many ways to achieve this water control. I use a squeegee in my shower to get all the water off the tempered glass walls and acrylic surfaces. I also squeegee the floor, directing all the liquid water to the drain.

You may have a shower curtain. My son has one in the shower I use when I work overnight at his house. After I turn off the shower, I shake the curtain to get off as much water as possible. I’m careful not to stress the grommets at the top to prevent tears in the plastic curtain.

The last step is to use an old towel to dry off all the surfaces in the tub and shower. Yes, I know this is not easy, but it’s exactly how you ensure there’s no mold or mildew growth.

Let’s say you choose not to do this last step. You should do several things to get the water to evaporate quickly. Leave the shower door open when you exit the bathroom. You need air to get into the tub and shower area. Don’t close the shower curtain to hide the tub and shower. Once again, you need to leave it open to encourage dry air to get into the space.

Leave the door to the bathroom open if possible. You want less humid air from the house to get into the bathroom. Consider installing a timer or humidistat control on your bathroom exhaust fan. You’re trying to get the humid air out and create air currents in the room to foster rapid evaporation of the water.

You can also use a free-standing vertical fan in the bathroom. My son has one. It takes up very little floor space, yet it produces a vigorous stream of air. His fan rotates to distribute the air in the room.

Fancy remote air blowers are also available, should you be remodeling your shower or building a new home. My daughter installed one of these systems in a bathroom in her home.

airmada shower fan in closet

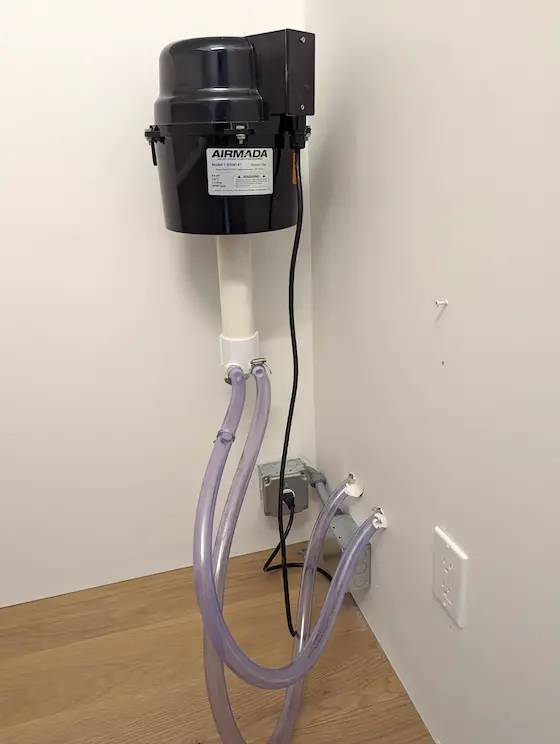
This is a fancy remote fan that sends hundreds of cubic feet of air into a shower or bathroom in minutes. You MUST remove water fast to prevent mold. Copyright 2026 Tim Carter

These systems resemble the air dryers you might have seen at a car wash. Once you exit the shower, you flip a switch, and the blower turns on. Dry air comes out of any number of strategically placed round non-directional nozzles, directional nozzle outlets, or sleek, narrow linear trim vents. The air is piped to these outlets using flexible, clear plastic hoses.

The fan can be up to 50 feet away from the shower stall if necessary. You’ll get peak performance if you place the fan in a closet that shares a wall with the shower. The 2 hp blower can deliver 115 cubic feet of dry air per minute. This will dry out a shower in minutes, especially if you invest 15 seconds using a squeegee to get most of the water into the drain.

I can assure you that you’ll feel much better about your bathroom, plus you’re creating a healthier environment for you and your family, if you take those extra seconds to dry out your shower.

Yes, I can hear you now. You may be willing to do this, but you’ll have a very hard time convincing the others in your family to change their habits. If this is the case, then you must forget about the water and clean the shower every few days. I know, I know, this is a pain too!

I wish you the best of luck in your mold/mildew battle. You now know what you’re up against. You just have to decide what strategy works best for you.

Column 1658