Downspout Drainage and Diverter

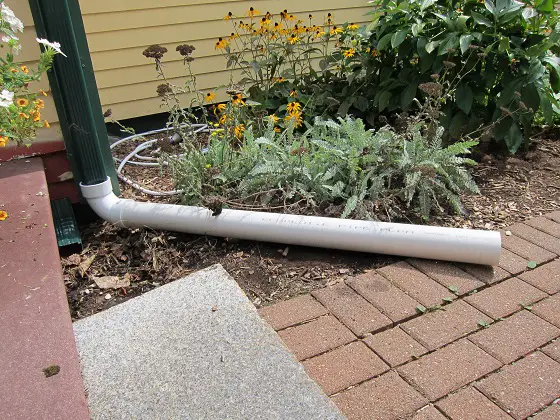
This downspout diverter was hastily placed to get the roof water onto the sidewalk where it will drain away from the house. It will later be replaced and piped underground. © 2017 Tim Carter

"Storms produce vast quantities of water on roofs. An average-sized ranch home that has a roof area close to 2,400 square feet will generate nearly 200 cubic feet of water, or 1,500 gallons, during a storm that dumps 1-inch of rain. That's a tremendous amount of water to concentrate around the foundation of your home."

DEAR TIM: The downspouts from my roof empty out right next to my home. I feel this contributes to my wet basement. I know it keeps my grass soggy. Friends tell me to just install the simple plastic downspout diverters or splash blocks and all will be well. I'm convinced those are pretty much useless. What about downspout extensions or pipes that will get the water at least 10 feet from my home? Is that sufficient? What's a really great long-term solution to dealing with lots of roof water? Irene H., Nags Head, NC

DEAR IRENE: You've got good reason to be concerned with rainwater that cascades down roof slopes. Houses equipped with gutters and downspouts concentrate this water in just a few locations where the downspouts terminate near the ground.

You're correct that the downspout splash blocks, or diverters as some people call them, are of little benefit. The only thing they do is absorb some of the downward energy of the water as it rushed down the downspout. Without the splash blocks, you'd have a large hole next to your home where soil used to be.

Storms produce vast quantities of water on roofs. An average-sized ranch home that has a roof area close to 2,400 square feet will generate nearly 200 cubic feet of water, or 1,500 gallons, during a storm that dumps 1-inch of rain. That's a tremendous amount of water to concentrate around the foundation of your home.

This water can absolutely cause significant leakage in basements and crawlspaces. It's always been my feeling that you should pipe roof water to the lowest spot on your property, into municipal stormwater systems, or if you can afford it, into a cistern or other collection vessel so the water can be reused for gardening or other household uses.

Note that some parts of the nation do not allow you to store this water because of water rights that were sold or leased many years ago. Someone downstream of you may have negotiated the rights to get the water that falls naturally out of the sky.

I've had nothing but success piping roof water underground in rigid PVC pipes. I tend to use a pipe that's made for sewer line work. It comes with slip joints that don't have to be glued. This pipe does not have the wall thickness of Schedule 40 PVC, but it's not the flimsy ABS plastic piping that you'll commonly see at the home centers. You can find this SDR-35 PVC pipe at quality plumbing supply houses or businesses that sell pipe to sewer contractors.

These buried downspout lines don't have to be too deep in the soil. Usually, they are no deeper than 16 inches, unless you have a flat lot. It's best to make sure they fall 1/4 inch per foot of run. This provides plenty of pitch so the water readily flows.

You'll want to use a 4-inch diameter pipe for your system. Be sure that any change of direction of the pipes while underground is done with 45-degree bends. The only place I would use a 90-degree bend is at the end of the pipe where it turns up to capture the end of the metal downspout.

To make other 90 degree bends in the piping system, use two 45-degree bends and put a 1-foot piece of straight pipe between them. This spacing will really help you or a drain-cleaning company if they ever have to put a drain-cleaning snake down the pipe to unclog it.

If you're in a bind and can't immediately bury the pipes, you can run them on top of the soil. These pipes look ugly, but they work. The trick is to get the water as far as possible from the house always making sure it's aimed at the lowest part of your land where it would naturally drain if your house was not there. It's never a good idea to pipe water to part of your land where the water would not naturally go.

If you're installing downspout drain lines in the soil, don't ever bury them immediately adjacent to your home if it was built within the past five to ten years. The soil that's put in around the foundation is almost never compacted. It can take years for it to completely self-compact.

If you install the lines in un-compacted soil, the pipes can bend, kink, or develop reverse drainage where the water doesn't flow. If you use the slip joints, in worst cases, the pipes can come apart at the joints.

In new construction, always put the buried pipes in undisturbed soil. When you cross over the soil around the house, keep it to a minimum. Give this section of pipe extra slope, up to an inch per foot of run, to compensate for future soil settlement.

Column 898

Grand Cayman Beach Suites Video Review

Let me share a true story about tolerance, patience, manners and karma. If you're thinking of coming to the Cayman Islands and are considering staying at the Grand Cayman Beach Suites hotel, then this is a must read.

Two days ago, my youngest daughter and I flew here from the Northeast on a dad/daughter vacation. Because of a number of reasons, family vacations simply couldn't happen as my kids were growing up. I wanted to take them to all sorts of nice places, but money, timing and the opportunity just didn't present themselves.

Kelly and I arrived here in the Cayman Islands after flying on two airplanes and getting up at 5 am. We were tired and hungry. Fortunately the cab ride from the airport to the hotel was short. I'm still not used to seeing cars on the wrong side of the road. We were anxious to get to our one-bedroom suite that had a view of the Caribbean Sea.

When I got to the front desk to check in, the first person to greet me was Ms. Taneisna Campbell. She was very pleasant and looked up my reservation. The expression on her face changed slightly and she told me I had to speak with Ms. Tricia Miller, the manager, who was on the phone helping someone else.

After just a few minutes, Tricia hung up the phone and greeted me. "Mr. Carter, I'm afraid that I have to put you in a hotel down the street for just tonight. We're overbooked and the fine print on the online site you purchased from says this is a possibility," she explained.

Now stop and think about this for a moment. Overbooked? We are talking about the lowest spot on the graph of the Low Season here in the Cayman Islands. It's like a ghost town here now. Why would this hotel be overbooked? I'll give you a clue - this property used to be a former Hyatt hotel. You'll discover additional reasons as you read on.

Now, back to the lobby where I was just given some bad news. I've been standing back in the check-in line watching when a person in front of me receiving this bad news explodes. You'd think the world ended. The person goes ballistic.

I don't know about you, but I've discovered that screaming, yelling and threats are pretty much not going to get the desired result. Plus, in my case, I was in no mood to argue. I just wanted to get Kelly onto the warm beach sand. Think about it, the patience that hospitality workers must possess is enormous.

It was futile to complain. Tricia was being truthful and just doing her job. Besides, she was kind enough to offer a generous food and beverage allowance free of charge once we came back the next day. Kelly and I left the hotel in their private shuttle, and moments later were in the other hotel. It was a very pleasant property, and we survived.

Before leaving the lobby of the Cayman Island Beach Suites, Tricia handed me her business card and said, "Mr. Carter, please call me in the morning and we'll have our shuttle pick you up to bring you back." "Thanks, I'll do that," I said as I walked out the door.

The next morning we called and talked with Tricia. We decided to come back around Noon as there was plenty to do where we were. The crystal-clear sea water was just the same as it would be down the beach at the Grand Cayman Beach Suites. Kelly and I enjoyed an outdoor breakfast next to the beach and then relaxed.

During the phone conversation, Tricia mentioned that she upgraded us to a two-bedroom oceanfront suite for the rest of our stay apologizing for our trouble. I thanked her on the phone not fully realizing what she had done.

When we arrived at the Grand Cayman Beach Suites, checked in and got to our room, I was speechless. Never before in all my life had I stayed in such a nice room. It was magnificent and the view from the lattice-shaded balcony was beyond words. Watch the videos at the end of this article, and you'll see why you'll want to come here.

I can't say enough nice words about Tricia and the rest of the staff at this superb property. I'll never know why we were treated the way we were, but I highly suspect it was the absence of me groaning, moaning and complaining when we discovered that we couldn't stay here the first night.

In a way, I'm really glad we didn't. I thought the room we were in the first night was not bad, but now it doesn't even compare to what we have now.

If you're planning a trip to the Cayman Islands, there is only one place to stay in my opinion - right here at the Grand Cayman Beach Suites. Don't waste your time looking for another place. And if you can afford it, be sure to book room 8415. You'll not believe it when you see it.

UPDATE:

Kelly and I have now been here for three days and I want to share some other great news about this marvelous hotel.

First, they have a delightful tiki bar next to the swimming pool that has seats where you can dangle your feet in the water. Some pools have the seats lower so the top of the seat is in the water, but these are fine.
I highly recommend the mango raspberry smoothie. If you can have it made by Dileep, do it. He's an employee that's been here for over a decade. Dileep hails from Sri Lanka and bleeds the Cayman Islands Beach Suites.

In fact, I suspect there's enormous competition each month for the Employee of the Month Award. I'll bet Dileep has a wall full of these plaques at his house. The general manager, Bill Powers, must have a hand-wringing fit each month when he has to pick the winner. Why? Because every team member I've run into here has been friendly, helpful and goes out of their way to assist.

Kelly and I also discovered that part of this property is the magnificent 18-hole golf course Britannia just a few minutes away. We ate lunch there yesterday and Dileep was kind enough to grab a couple of golf carts and drive us around several holes of the course.

We made it to the two signature holes down by the water. Oh my gosh I wish I had time to play a round, but that's not fair to Kelly. I decided I'll just have to come back and play another time. The course topography is so interesting. It's a target-golf course for sure. You'll love the colorful iguanas that make this course their home. They'll not bother you one bit.

August 23, 2011 AsktheBuilder Tips And Newsletter

What's in This Newsletter?

Latest News
Atlas Roofing Giveaway
Patching a Hole in a Concrete Foundation
Preventing Blacktop Defects
Facebook Fun

This is my third day back from vacation. I had a splendid time with my youngest daughter. It's a long story, but it's nearly impossible to do family vacations with everyone, so I end up going with one or two of my kids to different places. Kelly and I went to the Cayman Islands and had a marvelous time. It's been on my bucket list for over 40 years. I never thought I was going to make it to the Caribbean. We got a room upgrade that exceeded my expectations.

I urge you to read about our stay at the Grand Cayman Beach Suites. I hope you had a great vacation this year.

The Atlas Roofing Grime Pays $15,000 Free Roof Giveaway

Atlas Roofing Grime PaysTimes are tough right now and every penny counts. How would you like to win a NEW asphalt shingle roof installation worth $15,000? That's a lot of sweet moola, and right now it could make a difference in your life, that of a neighbor, friend, relative or co-worker.

Entering is easy. You have to take a photo of your dirty roof. I think the concept is cool. It's the Anti-Beauty Contest. You know how regular beauty contests work, right? Usually the most beautiful and talented woman wins. Well, Atlas Roofing is looking for the GRIMIEST, algae-stained roof. It could be yours! You never know. You absolutely want to enter. It's free and you just may win!

Atlas Roofing is sponsoring this very cool contest that runs from August 19, 2011 to October 15, 2011. But this contest is pretty unique. The winner is not who gets the most votes overall, but who gets the most votes on any given day. So it's sort of like voting in a regular election in some parts of the country where one gets to vote early and often! Any roof on a detached single-family home is eligible to enter - regardless of the condition of the roof.

This means you need to ENTER NOW and then start getting the word out to everyone you know using your email list, your Facebook account, your Twitter feed, etc. Your friends can vote each day, so as the contest runs and you gather more to vote for you, your totals for each day should climb. Or, you could be stealthy and assemble all your votes for one day right at the end of the contest and come in from nowhere to WIN the new roof. Tell me that wouldn't be cool. I wish I could enter, but I'm disqualified because I'm not eligible.

If you want to help your friends, relatives and co-workers to enter as well, just FORWARD this email to them. Tell them to read all you're reading here and to click the link below to read all the rules for the contest and to see how easy it is to win this great roof.

Remember, here's what you may win:

Atlas Signature Select Roof System Featuring the new line of Pristine Shingles with Scotchgard Protector and Lifetime Limited Warranty against Algae Streaks and Stains

Okay, get out your camera, be sure you take the best photo when the sun highlights how dirty and grimy your roof is.

Go here to enter the contest:

www.AtlasRoofing.com/Vote (This contest has ended.)

Remember, if you want others to Enter FORWARD this email. Don't copy and paste the link above.

P.S. Atlas Roofing paid a small fee to have me tell you about this great contest. I wish you the best of luck!

Patching a Hole in a Concrete Foundation

Ben from Cedar Rapids, IA wrote to me:

"I have a hole through my concrete foundation below grade and it needs to be filled in so it doesn't leak. The concrete guys left the void in the wrong spot. It should've been about 10 feet further to stay above grade. I have an 8-inch diameter hole that needs to be filled in. Any suggestions?"

Ben, this is pretty easy, but it's going to have to happen in stages. The first thing to do is to clean out the hole and remove all dust. Use water and some rags to do this.

Then I would get some concrete brick and put two in the hole lengthwise laying them with sanded hydraulic cement. Slightly dampen the hole first and spritz the concrete brick with water before laying them. Try to keep the brick recessed in from the face of the foundation about one-quarter inch on both sides.

Hydraulic cement is a special cement that expands as it cures. You MUST use this.

Fill any voids with the hydraulic cement mortar. You may have to chip some brick up to fill any large voids. Be sure to surround all the brick with the hydraulic cement mortar.

The next day, I would then mix up more of the hydraulic cement and use it to plaster over the brick making sure the mixture is flush with the foundation. Be sure to spritz the area slightly with water before applying the cement.

Use a damp sponge to blend the patching material in with the foundation. Tape a sheet of plastic over both sides immediately to help slowly cure the patch. Let the plastic set for at least two days. You want the patch to remain moist for a few days.

Remove the plastic and let the patch dry for a few days. I would then get a piece of Grace Ice and Water Shield roofing underlayment. You want a piece that's 2 feet square. This will go on the exterior of the foundation over the patch. Be sure the concrete is dry and dust free before applying it. Carefully backfill against it so the membrane is not damaged.

Preventing Blacktop Defects

Kelly was part of another saga before we left. She hit a large pothole at the edge of the pavement and blew two tires and bent both rims. I was able to document and prove that our town had neglected the road, so they paid for the lion's share of the repair bill.

I'm telling you about this for two reasons. First, it may save you personal injury and damage to your cars. Second, it can help you make sure you don't have pavement issues with your driveway. You'll see how when you view the photos I took. See below for that link.

Many don't know there are laws in almost every state that make the government responsible for the repairs to cars and people AFTER they've been notified. It's up to us to report defects. That's sad but true. I understand how some potholes appear in bad weather overnight. But some defects are there for months with no repairs happening.

My town didn't have to pay, because there was no official notification given that the road was a danger.

The lesson here is that you need to notify your local town or city if you see a road defect. Don't assume they know about it. Use the Contact Form on their website or call the police department so a recording of your voice is made telling them of the problem.

You can also take photos and load them to the Internet. Then contact the town or city giving them the URL of the photos. Doing this got me a check for $800. That was well worth the 15 minutes it took to upload the photos to Picasa!

Facebook Fun

AsktheBuilder on FacebookIf you're not a fan of AsktheBuilder on Facebook, you're missing out on some fun. At least twice a week, I try to stump you with photos that I upload.

What's more, you may be a fan with a question about your home. I try to answer EVERY question submitted on the fan page. I can't always do that promptly at my AsktheBuilder.com site. That's a benefit of being a FAN!

Become an AsktheBuilder Facebook Fan!

What is Green Building?

DEAR TIM: I'm really confused about the whole green building movement. There seems to be conflicting messaging, especially when it comes to products that advertise they are green. They seem to me to be the same products I saw ten years ago. If it's so important to be environmentally friendly, why didn't companies push this agenda decades ago? After all, we've been concerned about the Earth since the 1970's, right? I want to be a responsible person, but don't want to get hoodwinked. Sally P., Lawrenceburg, IN

DEAR SALLY: First let me say that it's absolutely impossible to discuss this green building movement in this tiny column. The subject is too broad and deep. As much as I hate to say it, thousands of trees have given their lives to publish hundreds of books on the topic. I've always thought that was very ironic. One would think that every book or magazine that covers the topic would use 100 percent recycled paper.

This decking can probably be considered green because it contains 100 percent recycled materials. But is it really green? PHOTO CREDIT:  Tim Carter

This decking can probably be considered green because it contains 100 percent recycled materials. But is it really green? PHOTO CREDIT: Tim Carter

Many who I see that attach themselves to the green building initiative try to cast their participation in an emerald shade of green. Many should use packaging that's more a murky color of olive green. I can see why you could be confused, as some products say they are green when, in fact, they may be impostors.

I'm all for being a great steward of the planet. It's our job to try to minimize our impact on the planet. But greed and personal gain are swirling in the vortex of this popular movement. I can see why consumers like you are struggling to make wise investments. That, by the way, is one of the real challenges when trying to make green choices.

One of the biggest things I see happening in the rush to purchase green products is the lack of doing one's homework. When you're comparing two products, the product that may not seem too green is actually the winner.

Let's examine a product that's been on the market for well over a decade, the tankless water heater. I've written extensively about these products, and have received lots of feedback from consumers who have purchased them. One of the selling points of these devices is the manufacturers saying you have an endless quantity of hot water when you install one.

Many of these heaters are touted as being very green and earth friendly. But what happens when you get one and you become part of the group whose fuel bill goes up because you, or members of your family, end up using MORE hot water than you did with your traditional tank storage heater? How green is that? Some would argue that you're causing more pollution and you're hogging more of the finite energy that powers the heater.

You may be tempted to purchase products that contain lots of recycled materials. Some of these could absolutely be a headache down the road. Just ask the hundreds and thousands of homeowners whose homes contain recycled fly ash from Chinese power plants. This fly ash was used as a filler in drywall.

The trouble is, the fly ash is a byproduct of burning high-sulfur Chinese coal. The fly ash inside the drywall is producing an invisible off gas that's corroding wiring, plumbing and causing health issues for some of the occupants of the homes that used this drywall. It's a green nightmare, if there is such a thing.

Trying to use earth-friendly materials can backfire in other ways. Who would ever think that using limestone dust would cause problems? After all, limestone is a very common rock and it's been around for millions of years. But when you mix limestone dust and asphalt together to help add weight to roofing shingles, you create an environment that the algae Gloeocapsa magma loves. Perhaps you have an ugly black-stained roof that has some of this earth-friendly limestone on it.

As you can see, there can be some unintended consequences when you try to be green. One other aspect is the financial angle. It could cost you more money to be green, lots more.

If you're independently wealthy, you may be one who can afford to subsidize the green building movement. But the average person, in these trying economic times, may not be able to afford the green product or the extra cost that may be involved to install it.

Add to this the return on investment (ROI) factor. It's really important for you to calculate the real ROI for the green products you purchase if you're on a tight budget. You may discover that it takes a decade or more to break even. What happens if you decide to sell your home in just five years? The potential buyer of your home may not care that it contains earth-friendly products.

I'm sorry to add to your confusion, but just be aware that there's lots of dangerous water out there as you navigate through the Sea of Green. Just make sure that you don't waste any of the green in your wallet as you try to be a good steward of our planet.

Column 897

Concrete Pier Construction Tips

DEAR TIM: My upcoming deck project requires concrete support piers. I've never done this before and have many questions. Do I have several options? How do I make sure the piers are in the correct locations? What type of concrete pier foundation would you install if you were me? Can you share some best practices so I don't have a failure down the road? Nancy W., Greenville, SC

DEAR NANCY: I can see why you've got questions if you've never worked with concrete piers before. You do have options galore, and what you end up doing is primarily a function of the tools at your disposal and the amount of cash you have.

concrete pier

This concrete pier is supporting several tons of weight. PHOTO CREDIT: Tim Carter

You can discover the frost depth in your area by contacting your local building department. You'll be going there anyway to get a permit for this project as decks need to be inspected so they are safe. The local building inspector will probably want to check the soil to ensure it's strong enough. This means that you have to dig the hole for the pier to the required depth, and then have the inspector come out and look at it before you proceed with any more work.

As for your options, you can use any number of plastic or dense cardboard forms or tubes that will allow you to pour your own concrete pier. You can also purchase precast concrete deck piers that would be delivered to your home. The only trouble with these piers is that you need a backhoe to move them and lift them into place. The precast piers are very competitively priced when you consider how much it will cost you to buy the forms and possibly bring in a truck with all the concrete you'll need for all the piers.

You can also use concrete block to build your own piers, but this requires you to pour a concrete footing at the bottom of the hole for the block to rest on. You then have to fill the cores of the concrete block with steel rods and a concrete mix to make them solid. It's a lot of work, but it is a viable option. You also need to be somewhat skilled to lay concrete block level and plumb.

EB015 Cleaning & Sealing Deck eBoo Cover

If the deck you're building is a simple square or rectangle and it's not too far off the ground, I've found that it's best to construct the actual outline of the deck. I would then use simple wood posts to temporarily support this box in the air.

Once you ensure it's the right size, it's level, and it's square, you install temporary diagonal braces at the corners to keep the box square. You can now drop plumb bobs or use a laser tool that project to the ground the exact position of where your deck posts will be. This allows you to precisely position each pier so the deck posts are centered on the exposed pier.

I would probably install concrete piers that I pour myself. I've used the traditional round dense cardboard tube forms with great success. There are new plastic forms that also work well, and I especially like the ones that have the funnel-shaped base that creates its own footer when you pour the wet concrete into the form. This special base has the shape of a bell.

As for best practices, I feel you need to make sure the bottom of the pier is wider than the top. This shape really helps prevent any frost heave from lifting the pier. If you use the traditional round tube that has the same shape top and bottom, it's possible for the frozen ground to grab onto the pier at the top and actually lift it from the ground as the frozen soil moves up. This is not common, but it can happen.

To prevent lift, I'll typically pour a concrete footer that's at least a foot wider in diameter than the pier. I place bent concrete steel rods in this footer that extend up into the tube. This way, once the pier is poured, it's connected to the large disc of concrete that makes up the footer. If the frost tries to lift the pier, it has to bring the footer with it. Because of its large shape, it provides lots of resistance.

Be sure you install steel reinforcing in all poured concrete piers. The steel vastly increases the tensile strength of the concrete. Place the vertical steel bars so they will not be in the way should you have to drill into the concrete pier to install anchors for a metal post base.

I would caution you to not put in anchor bolts in the concrete pier unless you have a foolproof method to ensure they are in the exact spot and the height of the pier is perfect. You typically don't have much wiggle room with anchor bolts once the concrete is hard.

Be sure the forms you use for concrete piers are braced well. The last thing you want to happen is for them to move as you shovel concrete into them. Triple check all your locations and the height to which you'll pour to make sure all is right. Once the concrete hardens, you can't move it easily.

Column 896

Wood Rot Prevention and Repair

DEAR TIM: I was getting ready to paint my home and noticed several pieces of wood trim that is rotting. What can I do to prevent this from happening in the future and what can I do to repair the wood that is now defective? Are there safe chemicals to use to prevent wood rot? What have you done in the past to combat this problem? Marty B., Redlands, CA

DEAR MARTY: Wood rot has been on the rise for quite some time when it comes to wood trim on homes. There are several reasons for this, some of them poor building practices, but another one, in my opinion, has to do with the wood itself.

Rot is attacking this piece of wood. Keeping wood dry is the number one way to prevent rot. PHOTO CREDIT:  Tim Carter

Rot is attacking this piece of wood. Keeping wood dry is the number one way to prevent rot. PHOTO CREDIT: Tim Carter

First, much of the wood used today for trim on homes comes from hybridized trees that grow fast. The wood that’s added to a tree in the spring has a much less dense structure than the wood added in late summer as growth slows. This spring wood is the light band of color you see at the cut end of a long board or a log. The dark band is called summer wood. The two bands add up to a year’s worth of growth.

Cut into a piece of trim wood on an older home that’s not succumbed to rot and look at the end grain. I’m pretty sure you’ll often see that the dark grain accounts for nearly 50 percent of the wood mass. In today's lumber, it can be less that 25 percent. The fungi that eat wood feast on the easier-to-eat light-colored spring wood. That means the hybridized trees simply can be consumed faster and easier by rot. That's why many owners of newer homes are seeing an explosion of wood rot.

Keeping wood dry is the number one way to prevent rot. PHOTO CREDIT:  Tim Carter

Keeping wood dry is the number one way to prevent rot. PHOTO CREDIT: Tim Carter

The easiest way to prevent wood rot is to keep wood dry. Wood rot is like mold growth and fire. It's a triangle. With fire, you need fuel, oxygen and heat. With mold, you need mold spores, food and water. Wood rot is the same, all you need is wood, water and fungi spores. Fungus and fungi spores are just about everywhere. Build a house in the Atacama Desert and you'll not have to worry about rot. It rarely rains there.

But rain is a problem in most areas of the USA. Since you can't stop the rain, you have to resort to making the wood think it's dry. One way, and this is where poor building practices come in, is to paint the wood on all surfaces and edges. This effectively puts a defense shield up so that water can't touch the wood. It takes more time and effort to paint wood in this way, and most builders and carpenters will scoff at you, but it does help.

You can also pretreat raw wood that's dry with water-soluble borate chemicals. Boron is a very effective wood-rot prevention chemical. It's safe for humans and mammals, but the fungi that cause wood rot find it distasteful and poisonous.

These borate powders readily dissolve in water. You can spray the solution onto lumber, but it's best to soak each piece in a trough of heated solution for a minute or so allowing the borate chemicals to soak into the end grain like a milk shake going up a straw.

Once the lumber is treated with the borates, allow it to dry. It's best to do this in the shade and be sure to separate the pieces of lumber with thin strips of wood so air gets to all the surfaces.

After it's dry, then you can prime it on all surfaces and edges. Then you paint all surfaces with the finish paint. If you cut the lumber to fit, the cut edge needs to be painted before it's installed. You can see this is very time consuming, but it absolutely works.

If the wood rot has not progressed too far, it can often be repaired with long-lasting epoxies. There are some wood repair products that act something like the borate chemicals. Rotted wood that you might cut away can sometimes be saved with a stabilizer that's brushed or poured onto the wood. These chemicals soak into the wood giving it new life.

Great building practices also can help prevent wood rot. There are many things that could be on the following list. Here are some that are time tested:

  • Generous roof overhangs
  • Keeping at least 12 inches of separation between wood and the soil at grade
  • Use of gutters and downspouts to prevent splashing of water onto the sides of a house
  • Use felt paper or an approved equivalent to make sure water never touches wood framing or sheathing
  • Don't allow masonry to come into direct contact with wood. Leave a separation of at least a half inch to allow for air to dry the wood
  • Use flashings to direct water away from wood and to get water outside where it belongs

Column 895

August 4, 2011 AsktheBuilder Tips And Newsletter

What's in This Newsletter?

Latest News
Meghan in California
New Milwaukee Flush Cut Saw Blade
Painting Floors
Mixers for Sale

Summer is here in all its glory. I know certain parts of the nation are simmering. Two weeks ago, I was at the Milwaukee Tools Conference in Milwaukee and it was blistering hot.

I also had the opportunity to get a new homeowner's insurance policy over the past two weeks. It's very possible you've been overcharged for years like I was and deserve a refund check. Wait till you read that story.

I finally checked off one item on my bucket list. I visited the summit of Mt. Washington last Friday. Three weeks ago, I got really close, just 250 feet or so below the summit when I was working my ham radio helping in a bicycle race. But that day the conditions were so bad and there were so many people up there tending to the bicyclists, I decided to go back to the base instead of grope through the fog bumping into people.


Meghan in California

Do you live in or near these California cities? :

  • La Mesa
  • Bakersfield
  • Redlands
  • Chatsworth
  • Huntington Beach

If so, starting today, you can go see my daughter Meghan as she talks about her new The Meghan Method book. She'll gladly sign your copy.

At each location, Meghan gives a presentation on the secrets of how you extract from yourself what your true style is. You don't have to hire an expensive interior decorator. Seriously, you can do it yourself and get perfect results.

Here are the times and locations for the events. If you go and have a question about your home, be sure to bring photos of the spots you're having trouble with. Please tell her I said Hello and hope all is going well.


New Milwaukee Flush Cut Saw Blade

Milwaukee Flush Cut Saw Blade

While at the Milwaukee Tool Conference two weeks ago, they demonstrated a fancy new saw blade made for reciprocating saws. It's called the Flush Cut blade.

This blade is unique because it has a large truss design that helps keep the blade cutting in the same plane. That's handy when cutting out a bottom plate at a door opening.

It also has a new fang tip that allows for quicker plunge cutting.

Better yet, it has new blade geometry that prevents the cutting teeth of the blade from coming into contact with a floor surface as the blade finishes a cut.

You'll love this blade for sure.

The link above is an affiliate link to Amazon. If you purchase the saw blade from that link, I will receive a tiny commission.


Painting Floors

Becky from El Paso, TX wrote to me:

"We just bought our 1st house. It is a mess! The previous owners left us with cigarettes burns all over the master bath old ugly laminate floor. We also had to pull out all the carpeting in all the other rooms, so we are limited on funds. My question is: Can I paint laminate flooring?"

Becky, you can absolutely paint laminate floors, or many other floors for that matter. I've got a boatload of tips about the entire process at my website.

Some of my past advice talks about oil-based primers and paints. Laws regarding volatile organic compounds (VOCs) have made it pretty tough to find these paints. But if you still can locate them, they're the ones to use.

Here's a past column on Painting Floors.

Here's a column that's full of Secret Ninja Floor-Painting Tips.


Mixers FOR SALE

Do you live in greater Cincinnati or Chicago? I have two electric-powered drum-type concrete or mortar mixers for sale.

The one in Cincinnati is only three years old and NEVER been in the daylight. It's always been in a warehouse and only used once or twice a week to mix powder, not gross concrete or mortar. It looks brand new and has a 4 cubic-foot capacity.

The one in Chicago has NEVER been used. It's brand new and has a bigger capacity.

Contact me if you're interested in either machine.
Mixer for Sale

Remember, if you're on Facebook, PLEASE leave a comment at the bottom of the column telling others what you discovered when reading my column. You'll see the Facebook comment widget at the bottom of the column. Thanks in advance!

Brick Paver Repair Tips

DEAR TIM: I have a 15-year-old colored brick paver sidewalk that’s in need of repair. I’ve got several cracked brick, and a few that are humped up and collapsed. Luckily I saved some of the original brick and have them stored in my garage. It doesn’t seem like it would be too hard to make these repairs, but I’m stumped at how to get the cracked brick out of the sidewalk without chipping adjacent brick. What’s the secret? What other tips do you have when you have to replace several and want the final surface to be perfectly smooth? Anna K., Memphis, TN

DEAR ANNA: You’re correct. The repairs to this brick sidewalk are pretty simple. The best part is that you don't need too many tools to get professional results. If you don't have the exact tools, you can rent them affordably.

This corner of a brick paver sidewalk has collapsed. The repair is not as hard as you might think. PHOTO CREDIT:  Tim Carter

This corner of a brick paver sidewalk has collapsed. The repair is not as hard as you might think. PHOTO CREDIT: Tim Carter

Let's start with the crack paver brick as they are the easiest ones to deal with. It's important to note that there's more than one right way to deal with all of these repairs. I'll just describe the methods I'd use.

I want you to first be aware of one unintended consequence before you get started. You may think you're being a good steward by making your sidewalk look like the day it was installed, but you could create a secondary problem that may leave you distressed.

Your paver sidewalk is middle aged. You may not believe this, but it probably looks much different today than it did the day it was installed. To prove this, take one of those original brick that's been in the cozy confines of your garage the past 15 years. You'll see that the color of the paver brick is undoubtedly much deeper and richer than the others that have been out in the weather.

When the brick pavers are made, pigments are added to the cement paste. This fine paste coats all the aggregate and sand used to make the brick. The top surface is usually monochromatic as everything has a fine coating of the colored cement paste.

Over time, Mother Nature wears away this paste and you start to see the actual color of the small sand and rock particles. If you had left outdoors all your extra brick so they would also weather, you'd not have a problem. But now, if you replace the cracked brick with a brand-new brick, the difference in color may be so striking as to look worse than the tiny crack. Just keep this in mind.

If you do have brick that will match, then you're good to go. To replace one brick that's in the center of many others, one method is to use a hammer drill with a 3/8-inch bit. You start at the center of the brick and drill many holes next to one another until you can take a chisel and hammer to remove the brick material working your way to the edges.

Never angle the chisel towards the edges. Try to always chip the brick towards the center of the brick. This directs all pressure towards the brick you're trying to remove.

Once all of the brick is removed, smooth the sand under the brick. Tamp it with a small piece of 2x4 wood so that the sand is compacted and is at the same level as the bottom of the adjacent brick.

Place the new brick in position and start to tap it in place with a rubber mallet. You only get one chance to do this correctly. If you have too much sand in the space, the brick will sit high. If you have too little, the new brick may sit lower or will crack again if there is a hollow spot.

The areas of the sidewalk that are high need to have sand removed to make them flush again with the rest of the sidewalk. Once the high bricks are lifted out of place, the trick is to use a flat board that smooths the sand so that it's in the same plane as the rest of the sidewalk. But the uncompacted sand needs to be about 1/4 or 3/8 inch higher than the bottom of the adjacent brick that are at the right height.

You can test to see if you can tap the brick down to the correct height with the rubber mallet. Be careful so you don't beat the brick and cause it to crack. Use a straight piece of wood or a level to constantly check to make sure the brick are not too high or low by sliding it across the existing brick that are perfect and then onto the brick on which you're working.

For the areas of the sidewalk that are low, you just have to carefully salvage the brick and then add more sand. Usually the sand is a medium grade. You have to make sure the sand is smooth, and you carefully set the brick back into position.

After they are set, you can tap them with the rubber mallet. Test this to make sure you can get the brick into position so they are flush with surrounding brick. The original installer used a heavy machine plate compacter to drive the brick into the uncompacted sand. If you don't use this machine, you must experiment with the amount of sand needed to be able to get the brick flush with those next to it.

It's not hard to do, it just takes time and some trial and error.

Column 894

Local Results

How to Repair Drywall Like a Pro

DEAR TIM: I’ve got several drywall defects in my home that must be repaired. A doorknob punched a hole in one spot, rough housing children created another hole, and my husband stepped through the ceiling while in the attic. What are some tips you can share about repairing these holes. Is this really a do-it-yourself task or should I call in a pro? Surely you have some secrets. Susie P., Orlando, FL

DEAR SUSIE: You and tens of thousands of others have drywall defects. Drywall is a great building material, but it’s not a durable substitute for plaster as plaster is basically a thin coating of rock on your walls. This is why drywall was affectionately given the name sheetrock years ago. Too bad it’s an impostor as drywall is more like stiff clay in hardness.

This hole had to be cut to repair a water leak. It’s easy to patch the hole since the piece of cut drywall was saved. PHOTO CREDIT:  Tim Carter

This hole had to be cut to repair a water leak. It’s easy to patch the hole since the piece of cut drywall was saved. PHOTO CREDIT: Tim Carter

There are countless right ways to make these repairs to your walls and ceilings. I’ve seen many inventions over the years at trade shows. All were created to aid in the repair of drywall. Some are ingenious, like the thin piece of aluminum that had holes in it and self-adhesive on one side. This would work perfectly for your doorknob hole.

You simply put the metal patch on the wall and then coat it with premixed drywall compound out of a bucket. The patching compound passes through the small holes and locks the repair material to the metal.

One method that’s worked great for me over the years is to just take a few minutes and cut a square or rectangular hole using a plunge saw removing the jagged drywall at the hole locations. Be sure you look behind and around the hole for any wires, pipes or cables. You don’t want to cut these with your saw causing more problems.

Once you have the square hole cut, cut a slightly smaller piece of drywall. I suggest you make the repair piece one-quarter inch less in width and height. This will give you a manageable gap of just an eighth inch between the repair piece and the existing wallboard.

The trick is to fasten this repair piece as there is rarely a wall stud where the hole was created. I like to take a piece of wood no thicker than 3/4-inch to use for the next step. I cut the piece of wood so it’s 1 inch less in width of the hole and 6 inches longer than the height of the hole. Let’s say the hole to be repaired is 3 inches square. This means I'd cut a piece of wood 2 inches wide by 9 inches long. Plywood works great for this job as it's not prone to splitting.

You'll need a screw gun or a drill with a Phillips bit in it. You'll also need about ten 1 and 1/4-inch coarse-thread drywall screws assuming the drywall is 1/2-inch thick. The first thing is to screw one screw into the exact center of the piece of wood so that about 7/8-inch of the screw is still sticking out. You'll use this as a finger hold.

The trick is to slide the piece of wood into the wall cavity through the hole making sure you don't drop it in the cavity. You can tie a string to the screw as a safety device in case you do drop it. Step on the string until such time as you have the wood secured.

Once the wood is in the cavity, center it in the hole using the screw as your guide. Pull on the screw so the wood it tight against the back of the drywall at the hole. Use the screw gun or drill to drive drywall screws through the drywall and into the strip of wood as if it were a wall stud. Pull tight against the screw as you do this so the wood pulls tight against the drywall. Use at least two screws top and bottom of the hole to secure the wood strip.

Remove the center screw you were using to hold the wood in place and then screw the small repair piece to the wood. For a small piece of drywall similar to our example of 3 x 3 inches, you'll only need two screws.

Now all you have to do is tape and finish the patch. The best way to get proficient at this is to practice on a piece of drywall out in your garage. Once you get the hang of it, move indoors.

The biggest mistakes rookies make when taping and finishing drywall is putting on too much or too little of the joint compound. They also tend to use it straight from the container without adding a slight amount of water to make it creamy like warm cake icing.

You want about one sixteenth of an inch of joint compound under and over the tape to make a lasting repair. If you drag too much mud from under the tape, there will be no compound to bond the tape to the drywall.

Too much mud makes a giant hump. The key is to practice taping on a scrap piece of drywall. When the mud is the right consistency, it's easy to draw the taping knife across the tape and pull out the correct amount of mud.

Column 893