Roof Dormer Tips

roof dormer

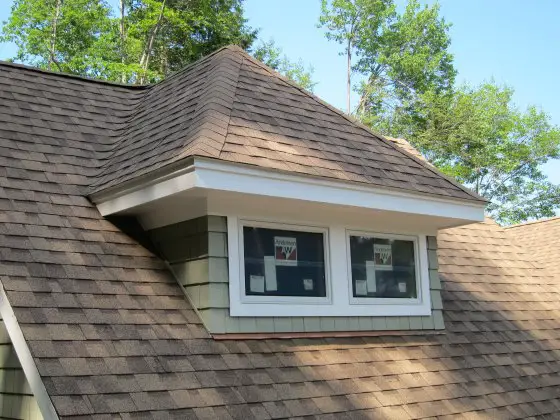
This roof dormer was built in a couple of days. It takes some serious carpentry skills to do this. PHOTO CREDIT: Tim Carter

DEAR TIM: The roof on my house is just a big flat area. I’ve seen similar style houses that have a dormer on the roof. This structure makes the house far more interesting. What’s it take to add a dormer after a house is already built? Can you add one if the roof is constructed with modern trusses? Is this a job an average homeowner can do? What are the most important aspects of the job? Cindy W., Greenville, SC

DEAR CINDY: You’re so right. These miniature houses that you find on a roof are called by many names. I’ve heard in my career, doghouse dormers, attic dormers and even roof dormers. The point is they’re a very eye-catching architectural feature, and they absolutely can make the roof of a house look far more interesting.

The good news is you can add a dormer to an existing roof. The bad news is that it’s not a do-it-yourself job. I say this assuming you have limited carpentry and roofing experience. The dormer requires you, or the person building it, to have a complete understanding of roof flashings of just about every type. If you don’t have this skill set, you’ll have leaks for sure in your roof.

If your home has traditional roof rafters and an open attic, you can add a functioning dormer that you can walk into, install a window seat and have a real window that opens. If your home was built with trusses, you can install a make-believe dormer that looks good from the street, but you don’t see it when you pop your head up into the attic space above your home.

In the case of trusses, the dormer will probably be just decorative and is connected to the top of the roof surface. You can cut into trusses and modify them to make a real dormer, but it’s very complex and it requires a consultation and plan from a licensed structural engineer that’s familiar with trusses. Since you can’t effectively use an attic space that is filled with trusses, you might as well just create the decorative dormer and play fool-the-neighbors-and-passers-by.

Let me briefly describe what’s involved in adding a dormer to an existing home, and you’ll start to understand why it’s a job for a pro.

The first thing I would do is make sure I’ve drawn up a great plan that’s to scale. You want to make sure the dormer is not too small or too large. You can get a feel for this by looking at houses that have dormers that appeal to you. Nothing looks worse than a tiny dormer on a massive roof.

Once I have a plan, then I obtain any necessary permits. This might be more of a challenge than you think.

With a permit in hand, now it’s time to get to work. I start by stripping off the roofing material in the area where the dormer is going to be placed on the roof. This one task would terrify the average homeowner, as all they can think of is what happens if it rains.

This is why you have Plan B. That’s a large waterproof tarp and lumber that allows you to completely cover the entire part of the roof in case a storm does roam your way. Years of experience have taught me never to start a project like this unless I’m guaranteed three days of exceptional weather with no rain in the forecast. But it’s good to be prepared.

If you’re creating a dormer on a roof framed with common rafters, you’ll need to double or triple up the rafters on either side of where the dormer will be. Since you’ll be cutting into two or more rafters to create the hole for the dormer, the load from those cut rafters has to be transferred to the rafters on either side. I told you this wasn’t going to be easy.

Once you have the hole created for the dormer, now you have to start to build it. The three walls that make up the front and sides of the dormer will all have angles that compliment the slope of your roof. You also have to build a tiny roof on your dormer. Now it becomes painfully obvious why you should have paid attention during your high school geometry class.

I believe you’re starting to get the picture of how much is involved in working on a sloped surface and all the different things you need to know to complete a job like this. And to think that I’ve just scratched the surface. There are many other detailed parts of this job that would take hours to convey.

In my opinion, the most critical aspects of building a roof dormer are the structural and roof flashing components. The loads on a roof are significant, and you need to make sure that when you cut into a roof, you know what you’re doing. Add to this the added weight of the actual dormer. The materials used in the dormer could easily approach one thousand pounds.

To make the roof connections in a dormer waterproof, you need to know about step flashings, counter flashings, valley flashings and base, head and sill flashings. You better know how to solder flashings too, as you’ll have to solder the lower corners of the base flashing where the front wall corners of the dormer contact the existing roof. It’s all very complex.

Column 890

Air Duct Cleaning and Sealing

DEAR TIM: I just discovered that the air ducts in my concrete slab have problems. There was an odor that alerted me to the issue that there was standing water, debris and even a dead animal in the ducts below my floor. It was disgusting. I have galvanized air ducts installed when the house was built. I got a bid to have these abandoned and rerouted through soffits or the attic of my home. Are there other options? Can I get my air ducts cleaned and possibly sealed so there is no future problem? Mandy S., Laguna Beach, CA

DEAR MANDY: Oh, I’m so sorry to hear about this. There are tens of thousands of people who have galvanized thin metal ducting buried under the concrete slabs of their homes just like you. The piping can corrode in very short order. What’s more, rarely were the joints between two pieces of pipe or fittings ever sealed to prevent the infiltration of ground water. What a mess!

The good news is that an alternative method to clean and seal air ducts exists. Yes, it’s possible to abandon the under-slab ducts, but putting them in soffits or an attic might be problematic for certain homes. It can sometimes be so expensive that it would take your breath away. There are several different ducting systems that may work and not be horribly expensive, but there will be dust and disruption in your home.

But before you make a decision, be sure you get a quote from a company that can use your existing ducts and not have workers creating clouds of dust. I know of a modern system where you can begin to use your furnace or air conditioner as the workers leave the driveway. You can’t always do that if you’re going to install new ducting in an attic, and most definitely not if you decide to hide new ductwork in soffits in each room.

Perhaps the least disruptive, and often the most affordable, method to solve your problem is to have the interior of the existing buried ducts cleaned and sealed with a non-toxic latex plastic.


Here is the first of two photos. In this before image, you can clearly see that it pays to have ducts cleaned and sealed if you have problems with air flow, odors or water in the ducts.<br /><p class=PHOTO CREDIT: Enviro Duct Seal Technologies" src="http://media.askbuild.com/legacy/889-01.jpg" width="350" height="263" /> Here is the first of two photos. In this before image, you can clearly see that it pays to have ducts cleaned and sealed if you have problems with air flow, odors or water in the ducts.
PHOTO CREDIT: Enviro Duct Seal Technologies

The first step these innovative companies take is to film a video of your buried ducts. That way they can show you the exact issues. There is always a charge for this service, but if you decide to use the company to solve the problem, you get the fee credited to the final price of the job.

Taping this video allows the contractor to see all of the problems and give a professional assessment of the situation. You get to watch the video yourself, and if you’re home while it’s being taped, can watch it live on a monitor!

Once it’s determined the process will be successful in your home, the ducts must be professionally cleaned. This is also easy to do, and it often requires that your furnace or air handler be temporarily removed so the workers have complete access to the main trunk lines and all the branch runs of the ducting system.

After the ducts are cleaned, the duct sealing company comes back. They have a special airless spray system equipped with a live camera that navigates through the labyrinth of ducts beneath your slab. This allows the workers to see that the duct is being coated properly with the proprietary latex compound. This sprayer makes its way through each duct and seals as it moves.

In this after photo, you can clearly see how the ducts have been cleaned and sealed.<br /><p class=PHOTO CREDIT: Enviro Duct Seal Technologies" src="http://media.askbuild.com/legacy/889-02.jpg" width="350" height="262" /> In this after photo, you can clearly see how the ducts have been cleaned and sealed.
PHOTO CREDIT: Enviro Duct Seal Technologies

This spray compound is similar in nature to a very thick latex paint and starts to dry immediately. You can use your air conditioner or furnace within hours after the ducts are sealed. A second coat is applied after the first coat is dried and cured.

If I had buried ducts like you, I’d definitely consider this method. I’m attracted to it because of it’s technology and the fact that there is no disruption inside the home. I also like the fact that it comes with a strong 15-year warranty in most situations.

What’s also attractive is the plastic liner, along with a special hydraulic water-stop material used at the metal register boxes and the plenum, help make the ducts highly water resistant. Realize that the inside of the ducts, once the system is cured, is lined with a continuous uninterrupted layer of thick plastic. After the latex compound cures, water has a very tough time entering the ducts. If water does enter, the lining system makes it easy to vacuum out.

As with all jobs like this, it really pays to get multiple opinions. You want to be sure that the process works, and will work flawlessly for years.

One of the things I would absolutely do before signing a contract would be to call past customers who had this magical compound sprayed on their ducts. You want to talk to customers who’ve had it done from three different time periods: the past 60 days, a year ago, and possibly back as far as three years ago.

Perhaps the most important question to ask the homeowner who’s had his ducts cleaned and sealed three years ago is: Has the process delivered on all it’s promises and would you hire this company again?

The homeowner that’s had it in for just a year would be able to tell you how their after-the-sale service is. Sometimes there are minor issues. What you want to ask them is: Did the company come back and take care of the warranty issue with no problems?

Finally, the most recent homeowner would know how professional the current employees are. Ask them if they would invite the workers that cleaned and sealed the ducts to a picnic in their backyard. If they say Yes, then you probably have a great company at your disposal!

Column 889

June 21, 2011 AsktheBuilder Tips And Newsletter

What's in This Newsletter?

Latest News
Bosch Laser Measurer
High-Quality Windows
Pressure Washing a Deck
Advertising in This Newsletter
AsktheBuilder on Facebook

Happy Summer Solstice! Today is the longest day of the year. We've had a string of absolutely unbelievable weather here in New Hampshire. Yesterday was a diamond day. The air was crystal clear and a mild breeze had the water on the lake dancing. When the sun hits it about 9 am, it sparkles of each wave top. It looks like the lake is filled with diamonds. I'll get a video of it next time it happens and share it with you.

I'm going to have a thrill of a lifetime this weekend. On Friday, Saturday and Sunday, I'll be glued to the side of the Mt. Washington Auto Road at the location in the photo below with my handheld ham radio in hand. I'll be at Station 23 out of 28, with 28 being at the top. I'm part of a team of radio operators that will be communicating race car locations and alerts in case there is a breakdown or accident at the epic Climb to the Clouds race.

Mt. Washington - Google Earth
See the arrow? I'll be on the edge of the roadway somewhere very close to this point. I'll take real photos for you as well as videos.


Bosch GLM 80 Laser Distance Measurer

Bosch GLM 80 Laser MeasurerTwo weeks ago, I attended the Bosch Editors Tool Conference. It was a fantastic event where we got to test all sorts of new cordless drills, reciprocating saws, multi-tools, jobsite table saws, etc. We even got to see a cordless drill dropped 500 feet into a grass field. It still worked after that fall!

But one of the sweetheart tools I saw was the GLM 80 Laser Measurer. Oh my goodness was this a fantastic tool. It's accurate to 1/16th inch in 33 feet! That's really close. It has so many functions it's impossible here to list them all.

But here is a cool one. It can calculate the height of a wall with you just pointing the tool at the top of the wall. It does this if you're standing AWAY from the wall. You don't have to be at the base of the wall and point the tool to the ceiling. It does the trigonometry for you. No need for you to remember all those sine, cosine and formulas!

This is indeed a pro tool or one for the serious DIYr. But if you want to indulge yourself with a very cool tech tool, this has to be it. It will be available in a couple of weeks.


High-Quality Windows in a New Home

Bob Fitch of Leland, NC emailed me:

"We will be building a home in Leland NC.  Our builder has recommended MGM windows. Their website is excellent. Do you know anything about the MGM window?"

Bob, I'll tell you what I have told people for years. Read my past columns at my website about the independent testing and certification that's done on windows.

The bottom line is that you want a window that comes with the AAMA label and the secondary label from the NFRC.

A snazzy website can easily throw up some smoke and mirrors that can make you think a sub-par window is a great one. So don't be fooled by that. You want proof that the windows are certified by AAMA. It's non-negotiable.


Pressure Washing a Deck

There are several schools of thought about pressure washing wood decks. I happen to be in the camp that it's a bad idea. The destructive power of the water stream absolutely, over time, will erode the light bands of spring wood leaving your deck feeling and looking like a weathered fishing pier.

My friend Tim just chatted with me about cleaning his *painted* deck with a pressure washer. I first told him that painted decks, especially here in the moist Northeast, are a very bad idea. Paint will peel from horizontal surfaces faster than those race cars that are going to screech up Mt. Washington this weekend.

But, I did tell Tim that a pressure washer wand, held at a low or nearly parallel angle to the deck's surface is a great way to peel off the loose paint to get it ready to seal. I suggested to Tim to abandon the paint program if possible and go to a penetrating pigmented water repellent.

If you use a 40-degree tip and want to rinse off your deck after cleaning it with my Stain Solver, that's an approved use of a pressure washer on wood in my opinion.


Advertising in This Newsletter

In a few weeks, you're going to be able to buy simple flat rate ads in the right column of this newsletter. Does that interest you? The clicks I'm getting on the ads you see over there on the right are very respectable.

If you have a product or service you want to advertise, you better contact me soon as there is a very limited amount of space in each issue. The rates will be very affordable. You'll be able to buy an ad for one issue, a month or a longer period. Obviously, the more time you buy the cheaper the rate.


AsktheBuilder Facebook Fan Page Update

Wow, the fan page has been BUSY the past two weeks!

  • Let's see, there was a huge discussion about my new Canon S95 camera.
  • Then I helped Jeri paint the outside of her foundation with the right paint.
  • Roger didn't know how to properly install flagstone on concrete, but now he does!
  • Laurie needed a hand with a door knob. Ta Da, I was able to help.

AsktheBuilder on FacebookGet the picture? There's LOT's happening at the Fan page. It's FREE to become part of Facebook. Many of your friends from school and past lives are there. Once you become a fan by just LIKING my page, each time someone adds something to the page, you get a simple notification.

You're going to discover many new things!

http://www.facebook.com/askthebuilder


Alternative to Stud Finders

DEAR TIM: I need to hang some cabinets, but I don’t own an expensive stud finder tool. I borrowed one from a neighbor in the past and had limited success with it. Can you share any secrets on how you find wall studs or ceiling joists hidden behind drywall or plaster when you can’t afford an expensive wall stud finder? What are the biggest mistakes a rookie like me can make? How do I prevent making the walls look like a woodpecker was here? How do I repair any collateral damage? Ed R., Warwick, RI

DEAR ED: I hear your lamentations about the electronic stud finders. They are great tools in certain situations, but sometimes they can be really frustrating.

These symbols are not from a Mayan or Egyptian tomb. They are telling me where the center of the stud should be, it’s edges and the real center point. PHOTO CREDIT:  Tim Carter

These symbols are not from a Mayan or Egyptian tomb. They are telling me where the center of the stud should be, it’s edges and the real center point. PHOTO CREDIT: Tim Carter

Two years ago, I was using a stud finder tool with a helper and it was giving all sorts of false positive signals. It would indicate where a ceiling joist was behind drywall, and when you drove a nail, it wasn’t there. We even had the house plans and knew the direction of the floor joists.

It turned out that the device was finding them, but that they were recessed from the surface of the backside of the drywall by 3/4 of an inch. The builder’s rough carpenters had installed 1x3 furring strips across the entire ceiling at 90 degree angles to the floor joists. You can see why using these tools requires a knowledge of building habits in certain parts of the nation.

Just this past weekend, I had to find some wall studs to hang wall cabinets. I reverted back to my old-fashioned method of a hammer and a nail. It works well, and because I strategically drove the nail into the wall in certain spots, the cabinets covered the exploratory holes after they were hung.

The first thing I do when I have to find a stud is look for clues as to where they would be. If the house is middle-age or newer, say built after 1950, I look for electrical wall outlets. In almost all situations, the boxes that house the outlets are nailed to the side of a wall stud. In rare instances, a particular wall outlet may have been added at a later date. In these situations a special remodeling box is used that doesn’t need to be nailed to a wall stud.

I’ll also look for poorly patched nail holes in baseboard. This is less accurate because in some places, rough carpenters install a double bottom wall plate. This allows them to randomly nail baseboard trim into the bottom plates instead of a vertical wall stud.

You can also look on a wall for a return air duct if the house has central air conditioning or forced-air heat. Wall registers are commonly put between two wall studs. Remove a return-air grill covering and you’ll almost always see two wall studs.

The general spacing for wall studs is 16 inches on center, but they can be 24 inches. At my current home, the exterior wall studs are spaced at 24-inch centers, but the interior walls are 16 inches on center.

However, just because you find one wall stud’s center location, that doesn’t mean you can say that every other stud on the wall is 16 inches on center from that one. Rough lumber can bow and twist. It’s possible for the spacing to be off by as much as one inch or more either direction, especially half way between the floor and ceiling where studs tend to bow the most.

I use a 10d finish nail when I can to find wall studs. These create tiny holes that are easily patched with spackling compound.

My technique is to find at least one part of the wall stud and then drive nearby holes that tell me where the edges of the stud are. Once I find the edges, and most studs are 1.5 inches wide, I then know where the center of it is.

Old houses that have plaster are a little harder to work in. It requires more effort to drive the nails, and you can get fooled in houses that are old enough to have wood lath that supports the plaster.

If you’re working in a plastered house with horizontal wood lath strips between the studs, you need to find a void space between two pieces of lath. The wood lath strips were often 1 and 1/4 inches wide and the lathers installed them with a 3/8 space between each one.

Drive the nail up the wall until you just go through plaster and hit no wood. When you find this void, start going left and right till you locate a wall stud.

Houses that were built between the 1930’s and the 1950’s had plaster lath boards that were the early forms of drywall. Using this allowed the lathers to be far more productive instead of nailing up thousands of wood lath strips.

These gypsum panels were 3/8-inch thick, 16 inches wide and 48 inches long. In certain situations these would sag and you can see the outline of the seams on the walls and ceilings. Use the staggered 16-inch lines to help you locate the wall studs and ceiling joists. The ends of these panels almost always break on the center of a wall stud or ceiling joist.

Column 888

SS Before & After

Stain Solver Before & After Pictures

Here are the captions: The first one is algae and mold in cat water dish that was found after being outdoors for 3 months. The second one is a customer showing before/after on dirty cedar siding. Remarkable! The third is a grape jelly stain on an office chair. When you read the woman's testimonial, you can't believe it. She just dabbed some of the Stain Solver solution on and 20 or so minutes later it was gone. The picture doesn't lie. The fourth is a cedar deck. Can you believe that difference? The fifth is a iced-tea maker container soaked in Stain Solver. The after looks brand new. The sixth is dirty floor tile grout that now looks new. Look at the pink cheese cloth stained by wine. After soaking in Stain Solver, they look new. Below that is a before/after on a deck. You can see the photo was taken at the same spot. See the chair behind the glass doors? Then look at the custom jacket. See the gross red bleed stains on the left. Stain Solver SAVED the day!!!!! Each image (almost all) has been reduced to 300px wide in this view. The images are linked to the full size image, stored on the ATB Site.

Click on any image to view the larger image. Then it can be saved.

Or FTP to askthebuilder.com/httpdocs/artman212/uploads/1/SS_Before_After to get all the pictures.

Dish Before Dish After
Cedar Siding Siding Clean
Chair 01 Chair 2
Clean Deck Deck
Coffee Before Coffee After
Tile Before Tile after
Deck
Rags Before Rags After
Ron's Deck Before Ron's Deck After
Ron's Deck Combo Fowler's Deck
Riding Jacket Before Riding Jacket After

Bosch Orbital Sander Side by Side Test Video

Hi, I'm Tim Carter. We are going to do a side-by-side comparison of orbital sanders. Watch this. We are checking vibration!! This one is so smooth ... like a baby's bottom.

Here is a link to the Bosch 3727DEVS 3.3 Amp 6-Inch Hook and Loop Random Orbit Variable Speed Sander/Polisher with Dust CanisterDisc Sanders) on Amazon.com. This is an affiliate link. I get a tiny commission if you purchase this item from Amazon.

Bosch Hammer Drill Driver Video

Hi, I'm Tim Carter. We are going to try out this Bosch HDH181 01 Cordless Hammer Drill. Watch it in action on this concrete block. Lots of power and high RPMs for handle the concrete.

Here is a link for the Bosch HDH181-01 18V Brute Tough Hammer Drill Driver with (2) 3.0ah Batteries on Amazon.com. This is an affiliate link. I get a tiny commission if you purchase this item from Amazon.

Bosch Multi Tool Video

Hi, I'm Tim Carter. You are not going to believe this multi tool and what it can do. I'm not making this stuff up. Watch this. Look how fast it removed that tile grout. You can image that it is a great tool if you have to make tile grout repair.

Here is a link to the Bosch MX25EC-21 2.5-Amp Multi-X Oscillating Tool Kit on Amazon.com. This is an affiliate link. I get a tiny commission if you purchase this item from Amazon.

Bosch Daredevil Spade Bit Video

Hi, I'm Tim Carter. I want to show you the Bosch Daredevil Spade Bit and what it can do. This spade bit can really drill some holes fast. It is a great bit from Bosch.

Here is a link to the Bosch DSB5013P DareDevil 13-Piece Spade Bit SetSpade Drill Bits) on Amazon.com where you can purchase this drill driver. This is an affiliate link. I get a tiny commission if you buy the tool.

DeWALT Compact Drill Driver Video

Hi, I'm Tim Carter. I've got the new DeWALT 20V Max Cordless Drill. Watch how fast this drills. It's pretty amazing. I'm telling you, it's just like I have a corded drill.

It's really cool. You're going to love it.

Here is a link to the DeWALT DCD780C2 20-Volt MAX Li-Ion Compact Drill/Driver Kit, 1.5 Ah on Amazon.com where you can purchase this drill driver. This is an affiliate link. I get a tiny commission if you buy the tool.