What's in This Issue?
Home for Thanksgiving
Frog Tape
Foam Insulation
Ceramic Tile Saw
Basement Waterproofing eBook
Latest Columns and Videos
The Fire Pit
Friendly Question Reminder!
If you have a question for me, don't hit the Reply button just yet. Go immediately to my web site and type in the keywords about your problem into my Search engine. The search box is at the top of every page of my web site. You could have your answer in seconds if you do this! Please pay attention to all links you see at my web site. The exact products and services you often need are right in front of you, and you might be ignoring them.
I'm back in Cincinnati for Thanksgiving with Kathy and the family. It will be my last Thanksgiving in Cincinnati, as next year everyone will be in New Hampshire. What's more, this week I'll also put the For Sale sign up in the front yard of the house here. Wait till you see how I'm selling the house. I'll share the website for that next issue. In fact, you may be able to help me. I'm looking to connect with the Transfer Department at either Procter and Gamble or the Kroger company. I know that each company has a division where they assist employees transferring from city to city. Do you have connections there at either of these two companies? Both are headquartered here in Cincinnati, and my house in Amberley Village is a perfect candidate for someone being transferred here for a work stint. My place is literally just minutes from downtown. Could you please email me if you have a contact?
I finally got to see the house here with the roof complete. WOW!!! The GAF Slateline shingles really helped the appearance of the house. From the street, there's a good chance you'll feel my authentic Queen Anne Victorian home has a real slate roof. I'll have a sweet photo for you to compare it against a video I shot back at the beginning of the summer. The video shows the old brown 3-tab shingles. If you're thinking of a new roof, and your home might look better if it had slate, then consider these great asphalt shingles. When you see the photo next issue, I think you'll agree the roof is a show stopper.
Frog Tape
One of the problems with moving, and if you've moved you know what I'm talking about, is the issue of parcels coming to the old address. I'm on the press lists of any number of Public Relations firms, and some still send things to my Cincinnati address. Two weeks ago I received an email from a PR person about how I liked the sample of a painting tape called Frog Tape. I replied, "What sample?" Turns out it was sent here to my house in Cincinnati. I saw the box on Friday night when I dragged myself through the door after a grueling 15-hour drive, three hours of it through heavy rain in NH and the Mass Turnpike. Oh, did I say it's my desire NEVER to pay a toll on the Mass Turnpike again?
I opened the Frog Tape sample box and there inside is a roll of this tape, a small bottle of water, a plastic cup and a small bag of white powder. Hmmmmmm???? Reading the note on the white powder the instructions say to pour it in the plastic cup and fill the cup with water. WOW!! The water in the cup INSTANTLY transformed to a gelatin. I mean instantly.
This powder is on the edges of the tape. You use the tape when you want to paint two colors on a surface and you don't want that horrible pesky bleed under that happens with many of the other masking tapes. The powder on the tape instantly reacts with the water in the paint creating a barrier. When you pull off the tape a few hours later, you have a crisp line with no ragged paint edges. Pretty clever invention. This is just one example you can give to your kids if they ever ask what a chemist does for a living.
Foam Insulation in an Attic
Chris Johnson wrote to me asking:
"I am getting ready to build a new home and spoke with a foam insulation installer. He said he could spray the underside of the roof in the attic and side boards to R40, and I would have an unvented attic. Honestly I was shocked saying I thought attic ventilation was critical due to cooling and moisture control. He said the insulation location will prevent any condensation, and the attic will be a conditioned space, especially good for any HVAC ducts in the attic. Any thoughts on this?"
Chris, I'm faced with the same dilemma in the new home I'll be building in New Hampshire. I'm absolutely going to use foam insulation in the new house and am researching this exact topic right now. I don't have the exact answer for you at this time, but here are some of the things I'm thinking about and the questions I'll be asking the foam insulation manufacturers. Understand that I'm VERY concerned as there are references in the residential trade literature about rot issues with Structural Insulated Panels (SIPs) used in cathedral roof designs. A SIP is just like an Oreo cookie - a thick piece of foam sandwiched in between two pieces of oriented strand board (OSB). Some past stories I've read talk about water vapor from the house traveling up to the attic, and eventually condensed on the cold side of the foam. This liquid water then rotted out the OSB just under the shingles.
With this in mind, think about the following:
- What happens to the water vapor in the attic, especially in the winter?
- How do you ventilate the attic? Doesn't that defeat the *conditioned space* aspect of the process?
- What is the real difference in open and closed-cell foam in these situations?
- What about the costs to *heat* this new conditioned space? If you insulate the traditional way, the heat is stopped or slowed at the ceiling level of the top story. Now the heat is allowed into the attic.
- What about cooling costs? This conditioned space will get hot when the blazing sun is beating on your roof. Will you have to get a larger AC unit to compensate for this possible added heat gain? This might offset any savings you gain from the super-insulation system the foam will provide.
This technology is not new by any means. Foam has been used as a commercial insulation for years. But I'm always skeptical of experiments where commercial products enter into the residential marketplace. A great example is EIFS. Read this past column of mine about the EIFS nightmare written written in 1996 that's still valid today!
Go slow and do tons of research.
Ceramic Tile Saw
The New Year is just around the corner. I can't wait! I have a monster To-Do list of projects, and perhaps you do too. If you're planning a ceramic-tile job, you very likely will need a wet saw to make difficult cuts. My friends at ConstructionComplete.com have a great ceramic-tile saw on sale, and it's not too late to put it on your Christmas list. This saw will make a 14-inch long rip cut with one continuous motion. It will make a continuous diagonal cut through a 10-inch by 10-inch tile. You even get a diamond wet-saw blade, the pan, etc. You can set it up on saw horses, but I'd recommend getting the stand to make the saw more stable and to save your back. You'll not believe the price for this tool when you see it. I doubt you'll find a better deal for this useful tool anywhere. I use my diamond wet saw on just about every tile job I do. Ask Santa for one now! If you don't believe in Santa, then break out your credit card and order one before the price goes up.
Basement Waterproofing eBook
I've been putting this project off for years, but now I'm just about finished with it. It's my intention to produce possibly one of the best books that tells the truth about basement waterproofing. I plan to discuss what your options are, what works and what might not, and talk about a little-used secret weapon to stop basement water leaks forever. Did you know my college degree is in Geology, and I was fascinated with the topic of hydrogeology - the study of ground water? That gives me a distinct advantage when it comes to understanding the dynamics of basement and crawlspace water leaks.
But I need your help. If you could wave a magic wand and POOF!, there in your hands was the best book about basement waterproofing, what would it contain? What do you REALLY want to know about basement waterproofing? Are you confused about sump pumps? Do you wonder about the different systems? Do you want a must-have checklist to help you select a pro to solve you water problem? Make a list of questions, all of them, and send them to me using a special page at my website.
No question is silly. Tell me exactly what you want to know.
If you help me, you'll get one of two things:
- a FREE copy of the eBook once complete
- a 75% price reduction when the eBook first becomes available
You must go here and fill out this simple form so I can get in touch with you once I've completed the eBook.
Latest Columns and Videos
It's that time of year to warm yourself by the fire. Do you have all the Fireplace Accessories you need?
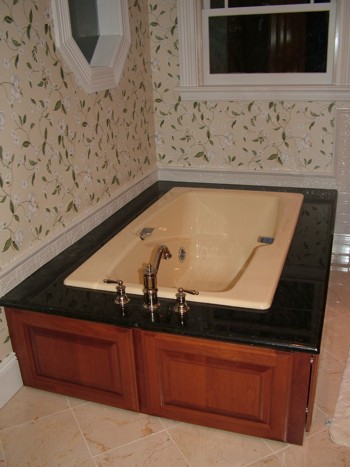
Tub faucets can be frustrating to select. Think about what you need before you pull out your credit card.
Are you going to Grout a Tile Floor soon? This is part one of a series of videos showing you grouting tile!
The Fire Pit
Last week the headline to this newsletter, as well as the Fire Pit article, possibly put your head on a swivel. I received so many positive remarks (hundreds and hundreds), perhaps one from you, that it changed the course of what I'm doing. Add to that some input from some very dear friends of mine, and I've now decided that the Fire Pit deserves it's own special place where it can flourish outside the shadow of this home-improvement newsletter. I wish to thank you from deep within my heart for the kind words you sent me last week. It was impossible to respond to each email, there were just too many.
For the record, last issue's approval rating - based on your response and those from other subscribers email responses - was over 73 percent. What touched me the most and prompted me to make the change that I did, were the emails that said I actually made a difference. That's what the Fire Pit is all about - getting you to think about what's happening, and then nudging you into action.
From now on, if you want to read what I have to say about our great nation, where I feel it's headed, and who's got some explaining to do, you *must* subscribe to a second newsletter that's solely the Fire Pit. It's easy to do, and I encourage you to do it. Look just to the right of the roaring fire for the sign up form. I thank you in advance for doing this.
What I will continue to do in this section of the AsktheBuilder.com newsletter is give you a brief summary of what's happening over at the Fire Pit and provide you with a handy link to where you can sign up for that newsletter.
I'm proud to announce: http://www.TimCartersFirePit.com
A special thanks to Brent Walter for taking the stunning photo you'll see. Those embers are real, not photoshopped. Nothing like a slower shutter speed. Brent also created the website within a matter of days, and my assistant Roger transferred all past Fire Pit articles into this website. From the spark of the idea until the website was glowing took just 48 hours. Great job fellows!
If you have your own website, or are affiliated with a group that has a political website, I'd sure appreciate a link from your site to my fledgling Fire Pit website.
AsktheBuilder.com